Let’s play with images and experiment with CSS masks. The idea is fairly simple: take a single <img>
tag and harness the power of CSS to accomplish complex hover
transitions. Through different demos, you will see how CSS masks
combined with gradients allow us to create fancy effects — with
efficient, reusable code.
In a previous article,
we explored fancy hover effects for images that involve shines,
rotations, and 3D perspectives. We are going to continue playing with
images, but this time, we are making animations that reveal images on
hover. Specifically, we will learn about CSS masks and how they can be
used to cover portions of an image that are revealed when the cursor
hovers over the image.
Here is the HTML we will use for our work:
<imgsrc=""alt="">
Yes, that’s right, only one image tag. The challenge I like to take on with each new CSS project is: Let CSS do all of the work without extra markup.
As
we go, you may notice minor differences between the code I share in the
article and what is used inside the demos. The code throughout the
article reflects the CSS specification. But since browser support is
inconsistent with some of the features we’re using, I include prefixed
properties for broader support.
The
first step for us is to create the image container and the gradient
border around it. The container is actually a repeating linear gradient background set on the <img> tag. If we add a little amount of padding on the image, that allows the gradient background to show through.
Two square images with striped gradient borders. (Large preview)
So, we have two images, each with a gradient background that is revealed with a touch of padding. We could have added a <div> — or perhaps even a <figure> — to the markup to create a true container, but that goes against the challenge of letting CSS do all of the work.
While we were able to work around the need for extra markup, we now have to ask ourselves: How do we hide the image without affecting the gradient background? What we need is to hide the image but continue to show the padded area around it. Enter CSS masks.
It’s
not terribly complicated to apply a mask to an element, but it’s a
little trickier in this context. The “trick” is to chain two mask layers
together and be more explicit about where the masks are applied:
img{/* etc. */mask:linear-gradient(#000 0 0) padding-box,linear-gradient(#000 0 0) content-box;}
Now we have two masks “sources”:
content-box: one that is restricted to the image’s content,
padding-box: one that covers the whole image area, including the padded area.
We need two layers because then we can combine them with the CSS mask-composite property. We have different ways to combine mask layers with mask-composite, one of which is to “exclude” the area where the two masks overlap each other.
img{/* etc. */mask:linear-gradient(#000 0 0) padding-box,linear-gradient(#000 0 0) content-box;mask-composite: exclude;}
This will make only the gradient visible (the padded area), as you can see below.
Notice that we can remove the padding-box from the code since, by default, a gradient covers the whole area, and this is what we need.
Are there other ways we could do this without mask-composite? There are many ways to hide the content box while showing only the padded area. Here is one approach using a conic-gradient as the mask:
mask:conic-gradient(from 90deg at 10px 10px, #0000 25%, #000 0)
0 0 / calc(100% - 10px)calc(100% - 10px);/* 10px is the value of padding */
There
are others, of course, but I think you get the idea. The approach you
choose is totally up to you. I personally think that using mask-composite
is best since it doesn’t require us to know the padding value in
advance or change it in more than one place. Plus, it’s a good chance to
practice using mask-composite.
Now, let’s replace the second gradient (the one covering only the content area) with a radial-gradient. We want a circle swipe for the hover transition, after all.
See that? The exclude
mask composite creates a hole in the image. Let’s play with the size
and position of that cutout and see what is happening. Specifically, I’m
going to cut the size in half and position the circle in the center of
the image:
I bet you can already see where this is going. We adjust the size of the radial-gradient
to either hide the image (increase) or reveal the image (decrease). To
fully hide the image, we need to scale the mask up to such an extent
that the circle covers up the image. That means we need something greater than 100%. I did some boring math and found that 141% is the precise amount, but you could wing it with a round number if you’d like.
That gives us our final CSS for the effect:
img{padding: 10px;/* control the thickness of the gradient "border" */background:repeating-linear-gradient(45deg, #FF6B6B 0 10px, #4ECDC4 0 20px);mask:linear-gradient(#000 0 0),radial-gradient(#000 70%, #0000 71%) content-box
50% / var(--_s, 150% 150%) no-repeat;mask-composite: exclude;transition: .5s;}img:hover{--_s: 0% 0%;}
A few minor details:
We start with a size equal to 150% 150% to initially hide the image. I am taking the additional step of applying the size as a CSS variable (--_s) with the full size (150% 150%) as a fallback value. This way, all we need to do is update the variable on hover.
Add a hover state that decreases the size to zero so that the image is fully revealed.
Apply a slight transition of .5s to smooth out the hover effect.
We
just created a nice reveal animation with only a few lines of CSS — and
no additional markup! We didn’t even need to resort to pseudo-elements.
And this is merely one way to configure things. For example, we could
play with the mask’s position to create a slick variation of the effect:
I’m
a big fan of putting an idea out there and pushing it forward with more
experiments. Fork the demo and let me know what interesting things you
can make out of it!
Don’t
look at the code just yet. Let’s try to create it step-by-step,
starting with a simpler effect that follows the same pattern we created
in the first example. The difference is that we’re swapping the radial-gradient with a linear-gradient:
img{padding: 10px;/* control the thickness of the gradient "border" */background:repeating-linear-gradient(45deg, #FF6B6B 0 10px, #4ECDC4 0 20px);mask:linear-gradient(#000 0 0),linear-gradient(135deg, #000 50%, #0000 0) content-box
0% 0% / 200% 200% no-repeat;mask-composite: exclude;transition: .5s;}img:hover{mask-position: 100% 100%;}
You’ll notice that the other minor difference between this CSS and the first example is that the size of the mask is equal to 200% 200%. Also, this time, the mask’s position is updated on hover instead of its size, going from 0% 0% (top-left) to 100% 100% (bottom-right) to create a swiping effect.
We can change the swipe direction merely by reversing the linear gradient angle from 135deg to -45deg, then updating the position to 0% 0% on hover instead of 100% 100%:
img{padding: 10px;/* control the thickness of the gradient "border" */background:repeating-linear-gradient(45deg, #FF6B6B 0 10px, #4ECDC4 0 20px);mask:linear-gradient(#000 0 0),linear-gradient(-45deg, #000 50%, #0000 0) content-box
100% 100% / 200% 200% no-repeat;mask-composite: exclude;transition: .5s;}img:hover{mask-position: 0% 0%;}
One more thing: I defined only onemask-position value on hover, but we have two
gradients. If you’re wondering how that works, the mask’s position
applies to the first gradient, but since a gradient occupies the full
area it is applied to, it cannot be moved with percentage values. That
means we can safely define only one value for both gradients, and it
will affect only the second gradient. I explain this idea much more
thoroughly in this Stack Overflow answer. The answer discusses background-position, but the same logic applies to mask-position.
Next,
I’d like to try to combine the last two effects we created. Check the
demo below to understand how I want the combination to work:
This time, both gradients start at the center (50% 50%).
The first gradient hides the top-left part of the image, while the
second gradient hides the bottom-right part of it. On hover, both
gradients slide in the opposite direction to reveal the full image.
If you’re like me, you’re probably thinking: Add all the gradients together, and we’re done. Yes, that is the most intuitive solution, and it would look like this:
This approach kind of
works, but we have a small visual glitch. Notice how a strange diagonal
line is visible due to the nature of gradients and issues with
anti-aliasing. We can try to fix this by increasing the percentage
slightly to 50.5% instead of 50%:
Yikes,
that makes it even worse. You are probably wondering if I should
decrease the percentage instead of increasing it. Try it, and the same
thing happens.
The fix is to update the mask-composite property. If you recall, we are already using the exclude value. Instead of declaring exclude alone, we need to also apply the add value to make sure the bottom layers (the swiping gradients) aren’t excluded from each other but are instead added together:
Now, the second and third layers will use the add
composition to create an intermediate layer that will be excluded from
the first one. In other words, we must exclude all the layers from the
first one.
I know mask-composite is a convoluted concept. I highly recommend you read Ana Tudor’s crash course on mask composition for a deeper and more thorough explanation of how the mask-composite property works with multiple layers.
One more small detail you may have spotted: we have defined three gradients in the code but only twomask-position values on the hover state:
img:hover{mask-position: 0% 0%, 100% 100%;}
The first value (0% 0%) is applied to the first gradient layer; it won’t move as it did before. The second value (100% 100%)
is applied to the second gradient layer. Meanwhile, the third gradient
layer uses the first value! When fewer values are declared on mask-position than the number of mask layers, the series of comma-separated values repeats until all of the mask layers are accounted for.
In this case, the series repeats circles back to the first value (0% 0%) to ensure the third mask layer takes a value. So, really, the code above is a more succinct equivalent to writing this:
While
this may look like a more complex hover effect than the last two we
covered, it still uses the same underlying CSS pattern we’ve used all
along. In fact, I’m not even going to dive into the code as I want you
to reverse-engineer it using what you now know about using CSS gradients
as masks and combining mask layers with mask-composite.
I
hope you enjoyed this little experiment with CSS masks and gradients!
Gradients can be confusing, but mixing them with masks is nothing short
of complicated. But after spending the time it takes to look at three
examples in pieces, we can clearly see how gradients can be used as
masks as well as how we can combine them to “draw” visible areas.
Once
we have an idea of how that works, it’s amazing that all we need to do
to get the effect is update either the mask’s position or size on the
element’s hover state. And the fact that we can accomplish all of this
with a single HTML element shows just how powerful CSS is.
We saw
how the same general CSS pattern can be tweaked to generate countless
variations of the same effect. I thought I’d end this article with a few
more examples for you to play with.
Running
a workshop can be an effective alternative to traditional,
long-standing meetings. However, if workshops aren’t designed with
inclusivity in mind, participants may feel apprehensive about
contributing, fearing criticism from others. To help ensure the success
of a workshop, Ben Shih introduces the concept of an inclusive workshop.
In Part 1 of the series, you discover the fundamentals of inclusivity
and get some solid guidance on how to plan an inclusive remote workshop.
Have you ever found yourself trapped in an hour-long meeting, listening to someone’s endless talk without
understanding their main point? Or sat through a discussion where
everyone speaks, but no actions are decided upon in the end? Or perhaps
felt like the meeting you’re participating in is simply a waste of time?
If you have, you’re not alone.
According to a survey conducted by Clarizen and Harris Poll
(2017), three in five employed adults reported that preparing for a
meeting “takes longer than the meeting itself,” and 35% of those who
attend status meetings called them a waste of time. In fact, 46% of
employed Americans would rather engage in any unpleasant activity than sit in a meeting.
Meetings,
when organized well, can serve as an effective way to share information
and make decisions. The harsh reality, however, is that many meetings
are poorly structured, ending up as a drain of resources.
One of the possible ways to replace meetings with something better and more effective is the implementation of workshops.
But while workshops can be a highly effective way to foster
collaboration and generate innovative solutions, they often require
active participation from everyone involved. Yet, not everyone feels
comfortable voicing their thoughts or taking the lead in a group
setting, even though these quieter voices can be just as valuable and
insightful. This is what led to the concept of an “inclusive” workshop —
a workshop that ensures everyone feels heard, connected, and comfortable expressing their ideas.
Before we dive into the concept of an inclusive workshop, let’s first talk about the foundation. At its core, inclusivity means recognizing, appreciating, and respecting the diverse tapestry of human individuality.
It’s about valuing the uniqueness everyone brings to the table, from
attributes like ethnicity, gender, age, and religion to less apparent
characteristics such as cognitive style or socioeconomic background.
Inclusivity is deeply rooted in the social identity theory, introduced by Tajfel & Turner
in 1979. This theory suggests that our identities — who we think we are
— are partly defined by the social groups we feel part of. It’s human
nature to seek acceptance and to want to belong to a group that
appreciates us for who we are. This need for social acceptance
influences how we view ourselves and how we interact with others.
An
inclusive environment embraces this diversity and uses this as an
advantage to create a collaborative environment. Think of an orchestra,
for example. Every instrument, whether it’s a violin, a trumpet, a
cello, or a drum, brings with it its unique sound. Some may play a
melody, others a harmony, and some keep the rhythm. Each of these sounds
is different, but when combined, they create a harmonious symphony. In
an inclusive setting, each person, with their distinct qualities, comes
together with others to form a symphony of collaboration and understanding.
The
only thing we can do is acknowledge the fact that not everyone will be
comfortable speaking up, particularly in group settings. There could be
various reasons for this, including individual personality traits,
cultural backgrounds, past experiences, or simply the fear of judgment.
As a facilitator, it is your responsibility to ensure that every
individual in the room feels comfortable expressing their opinions and
ideas. In the remainder of this article, I will be introducing some
practical principles and techniques that could guide you in facilitating
an inclusive workshop.
If
you are familiar with design thinking and design in general, you’ll
find similarities between the design process and structuring an
inclusive workshop. In design, we start by trying to understand our
users, identifying their goals, and then crafting an effective user
experience to guide them from start to finish. The same principles apply
to designing an inclusive workshop:
Understand the participants,
Recognize their goals,
Plan an engaging experience to achieve these goals.
Here are some “pre-works” you can do to better prepare for your workshop.
The most important thing in any meeting or workshop is including the right participants. Failing to do so could prevent you from guiding the team in order to reach the goals of the workshop.
If
you are facilitating a workshop for your own team (or within your
company, which you know well), ask yourself the following questions so
as to decide if a person should be included:
Is the meeting relevant to this person’s work and core responsibilities?
Can this person provide critical information, aid in the decision-making, or contribute meaningfully to the conversation?
Is this person’s presence necessary to achieve the meeting’s goals?
On
the other hand, if you’re facilitating a workshop with an external
team, provide a list of criteria that outlines what the ideal
participant looks like and ask your client to include all the relevant
individuals.
At this stage, bear in mind that adding a new
participant not only means that you are bringing in a new viewpoint but
you’re also increasing the number of necessary agreements among the
members of the group. This could potentially lead to more disagreements
and conflicts among different parties. Have a look at the points of
agreement graph (below) to better understand how this mechanism works.
Once
your participant wish list is set, it’s important to invite all the
participants to the workshop in a manner that is welcoming and inclusive
— for example, not just sending a calendar invite and expecting them to
show up. If it’s feasible, try to arrange a pre-workshop call or
meeting with each participant to gain a better understanding of them.
Building these personal connections before the workshop is important in
ensuring your workshop activities are inclusive and productive.
Instead
of a generic invite, personalize your invitations. Clearly outline the
workshop’s purpose and activities and why you think they would be a
valuable addition. Be open to participant’s opinions and concerns about
attendance. If there’s uncertainty about their availability or relevance
to the workshop, offer them an option to contribute asynchronously if
they can’t participate in real-time.
An example message could be crafted along these lines:
“Hey
Lewis, I am reaching out as I am planning to run a workshop with Max to
brainstorm around how we can build the AI dashboard (which is the next
initiative on our roadmap), and I would love to invite you to the
workshop as I believe your front-end knowledge will help us a lot to
understand the tech limitations. How does that sound to you? The
workshop will be approximately two hours long and is scheduled for next
week. Here’s the high-level agenda...”
A message like this — where you can explain what the workshop will be about, who will be involved, and how they can contribute to the workshop — will help the participant decide whether their involvement will be useful or not.
If
possible, have a brief, informal chat with the participants, especially
if you’re unfamiliar with them. This could be as simple as a quick
coffee chat where you just talk about your hobbies and favorite movies.
Such interactions can help build rapport before the workshop and provide
insights into the participant’s goals and expectations.
The
personality traits of your workshop participants can be grouped along
two main axes: their preference for group work (individualistic vs.
collaborative) and their communication style (introverted vs.
extroverted). By understanding and accommodating these preferences, you
can create a workshop environment that truly values and harnesses the
benefits of diversity.
Individualistic participants They
may prefer tasks they can work on independently and discussions in
smaller groups. Designing certain portions of the workshop that allow
for individual thinking and ideation can help engage these participants.
Collaborative participants They
enjoy large group discussions and team activities. Incorporating
collaborative tasks where everyone can contribute can keep these
participants involved and motivated.
Introverted participants They
might feel more comfortable with structured turn-taking or with written
contributions. They might not voice their thoughts as readily in a
group setting, but that doesn’t make their ideas any less valuable.
Establishing clear turn-taking rules or offering opportunities for
written input can help ensure their voices are heard, too.
Extroverted participants They
might be more engaged in free-flowing discussions or roles that involve
presenting to the group. Ensuring that the workshop format has room for
open discussions can cater to their preference.
A matrix to help you map the personalities of the participants in your workshop. (Download the FigJam template: Personality Matrix) (Large preview)
Once
you have defined your participant list and understand the participants
well, the next step is to plan the workshop accordingly to meet their
needs.
In the next section, I will share some high-level tips relevant in particular to inclusivity.
The
specifics of planning an entire workshop is another topic altogether — I
recommend reading a few books on this topic, such as Gamestorming by Dave Gray, Sunni Brown, and James Macanufo and Facilitator’s Guide to Participatory Decision-Making by Sam Kaner, as well as Smashing Magazine articles that will help you dive deeper into the specifics of crafting a workshop. You might also want to look at the 4C framework developed by AJ & Smart, which can guide you in structuring your workshop logically.
Numerous
studies indicate that people can generally focus effectively for about
45 to 50 minutes at a time. Hence, consider scheduling a 5–10 minute
break every hour. These intervals offer participants time to relax,
regroup, and reset their mental focus, thereby maintaining engagement
and productivity throughout the session.
“Excessive focus
exhausts the focus circuits in your brain. It can drain your energy and
make you lose self-control. This energy drain can also make you more
impulsive and less helpful. As a result, decisions are poorly thought
out, and you become less collaborative. So what do we do then? Focus or
unfocus? In keeping with recent research, both focus and unfocus are
vital. The brain operates optimally when it toggles between focus and
unfocus, allowing you to develop resilience, enhance creativity, and
make better decisions too.”
The
selection of tools in a remote environment can substantially influence
participants’ experience. Complex or unfamiliar tools can affect the
effectiveness of even the most well-planned workshop. Thus, it’s
important to select tools that can help with collaboration, address
diverse participants’ needs, and are accessible and straightforward to
use.
Below, you’ll find a list of some popular tools for
facilitating workshops, including their advantages, disadvantages, and
best-suited participant types.
Miro Miro
is a popular and user-friendly digital whiteboard tool known for its
intuitive interface and collaborative features. It’s great for visual
learners and those who thrive on a free-form canvas. Additionally, for
facilitators, a wide range of workshop templates is provided so that you
don’t need to start from scratch. However, this tool can be
overwhelming for those who prefer more structured interfaces. In
addition, in Miroverse, there are more than 1000+ templates for you to get inspired by and to better plan your workshop.
Mural Another
alternative digital whiteboard platform, Mural, is known for its
ability to onboard new users easily. People can join and edit your Mural
board without the need to create an account, which reduces friction.
However, for facilitators who wish to have more powerful features such
as AI, tables, charts, and integrations, Mural might not completely
satisfy their needs.
FigJam FigJam is a top choice for designers and those familiar with Figma.
It combines the flexibility of a digital whiteboard and design-focused
features. This tool suits visually oriented and design-minded
participants alike but may feel less intuitive to those unfamiliar with
design software in general.
Miro is a popular tool for online collaboration, including remote workshops; and in Miroverse there are more than 1000+ templates available. (Large preview)
Microsoft Teams, Zoom, and Google Meet These
are the “traditional” tools that almost everyone knows how to use.
While their interfaces may lack extensive interactive features (which
leads to a somewhat basic look and feel), their key strength lies in
their consistent performance and accessibility. Their familiarity among
users ensures a low learning curve, contributing to smooth and efficient
workshop sessions.
Butter This
tool is purpose-built for running interactive workshops, offering
creative features specifically focused on workshops and collaborative
meetings. Butter can cater to a broad range of personality types. For
extroverted participants, it enables easy active engagement in
discussions, while it also allows more introverted participants to
express themselves using reactions, emojis, or GIFs in a less
confrontational manner.
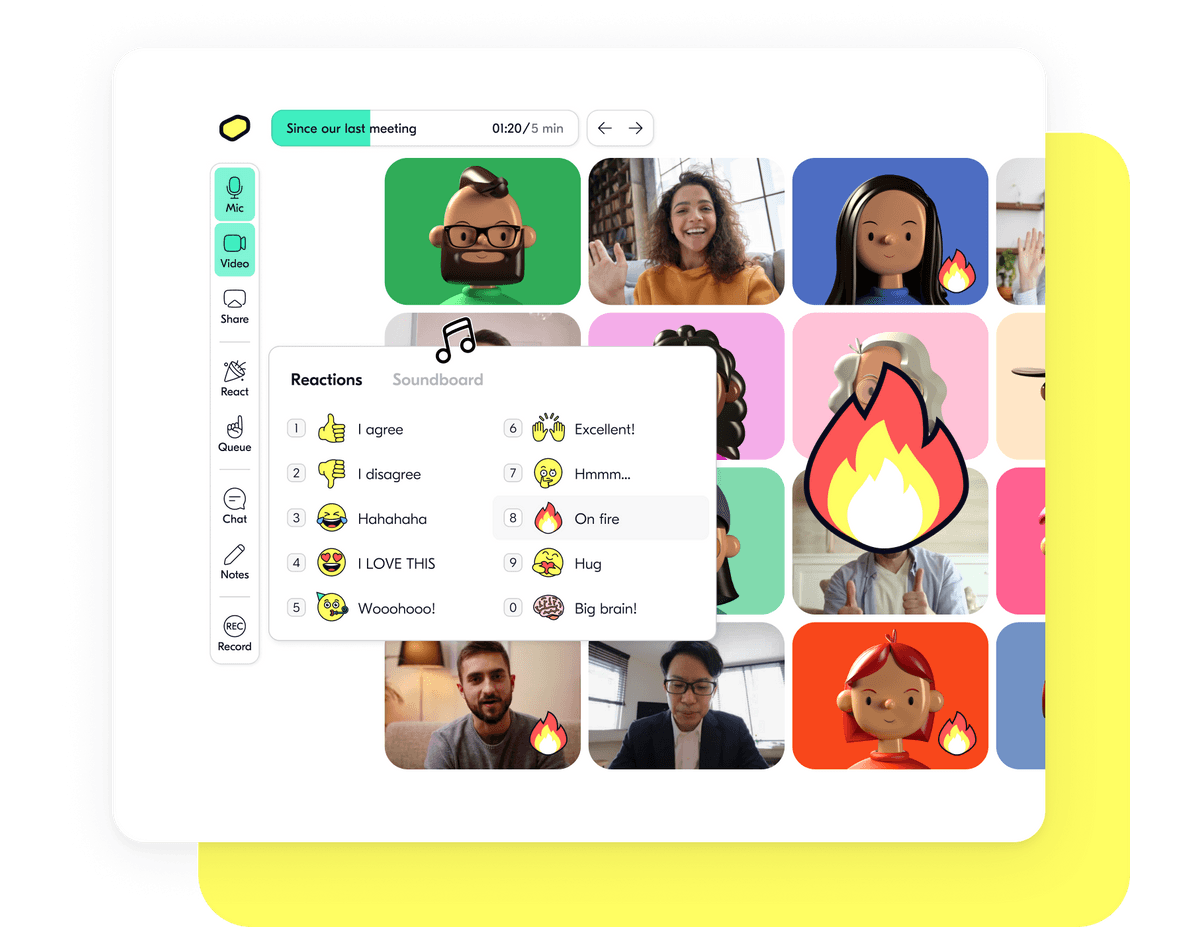
Butter
offers many features that make it easy for participants to react and
interact with facilitators and other people, including reactions,
soundboard, comments, and more. (Large preview)
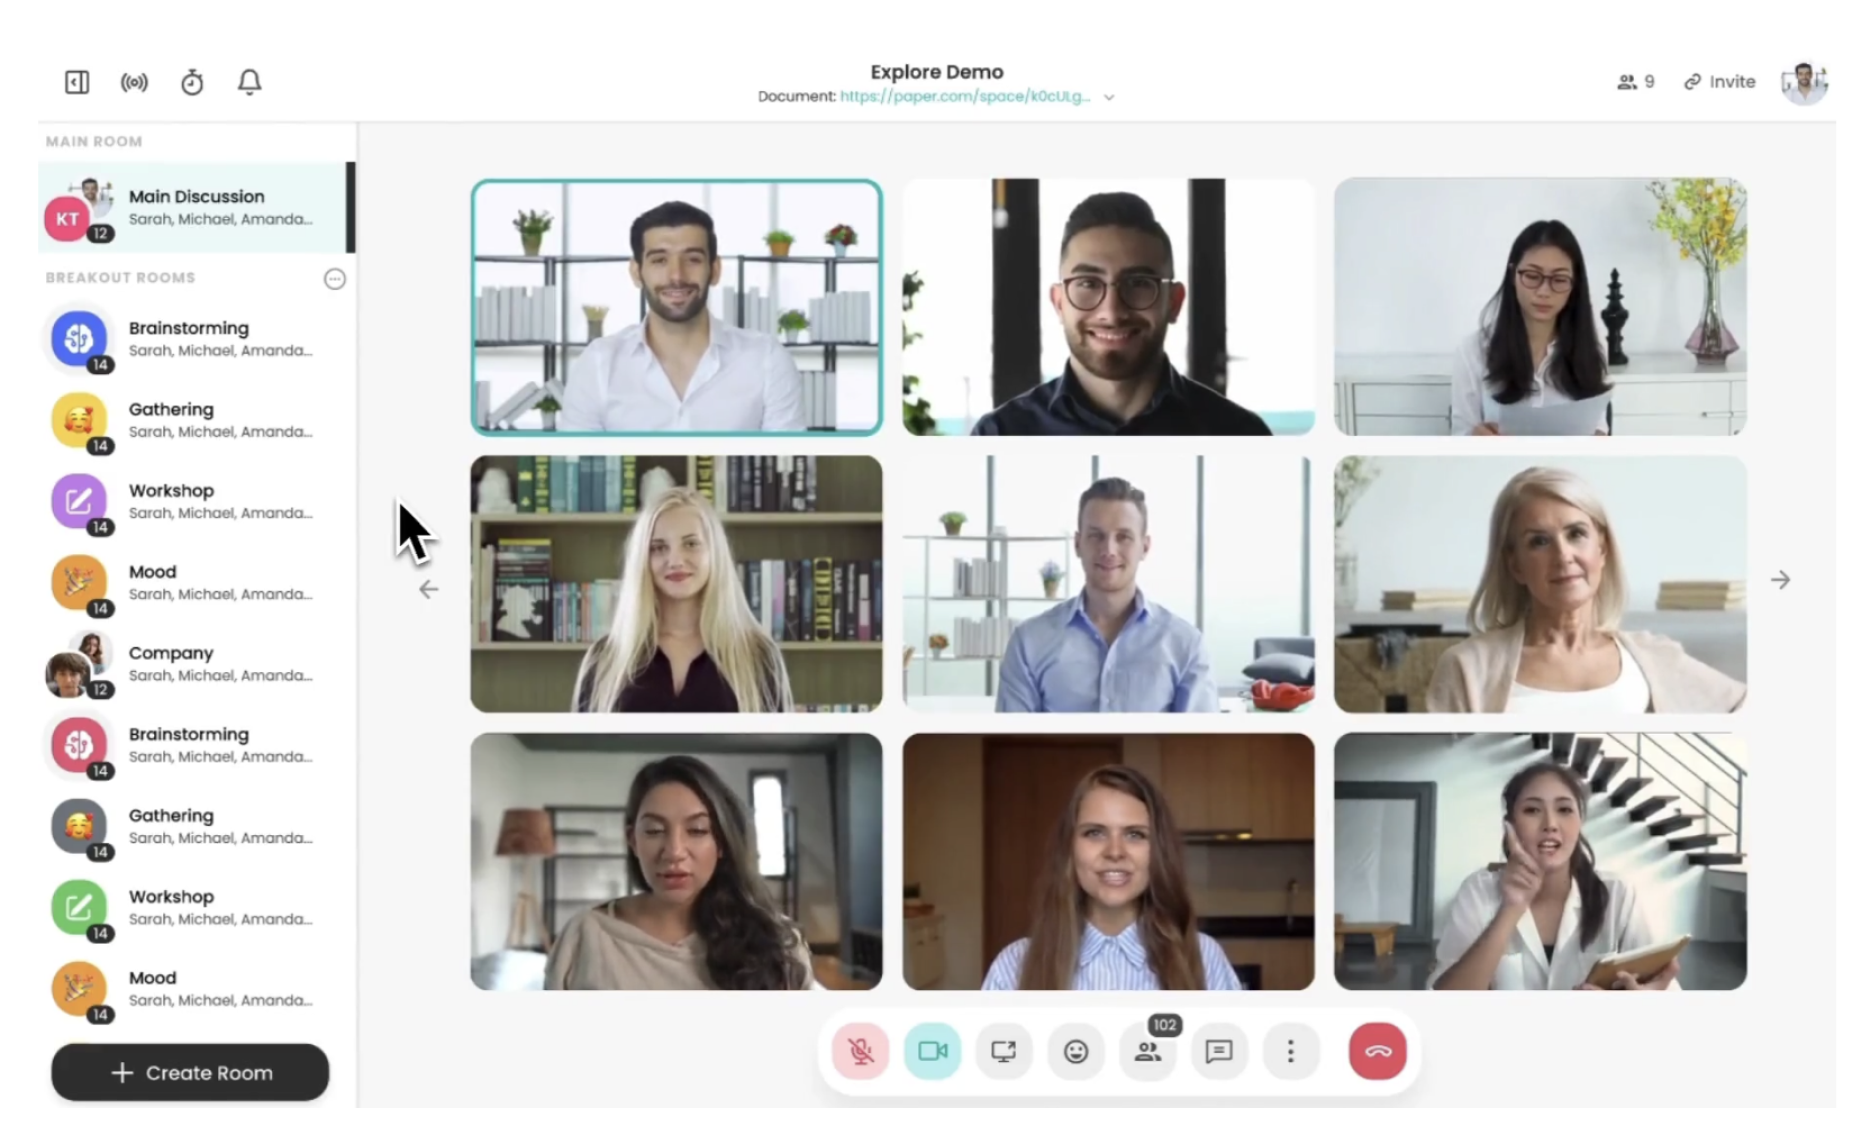
Mixerchat This
platform facilitates interactive group discussions. Participants can
freely navigate different breakout rooms, engaging in breakout sessions
or world café-style activities.
Mixerchat makes it easy for participants to switch between different breakout rooms. (Large preview)
The
next and perhaps most critical step is to carefully choose activities
that cater to the diversity of your participants. Use the personality
types and goals you identified in Step 2 to guide your decisions. Here
are some suggestions to help you get started.
If most of your participants are Introverted & Individualistic. These
participants prefer to think through ideas independently before sharing
them, and they may be more comfortable in a quieter setting. A few
activities for this group of people could be:
Silent Brainstorming:
Each participant works individually to generate ideas and write them
down. After a set period, everyone shares their ideas one by one. This
approach gives introverted participants time to think and formulate
their ideas before sharing them.
Silent Dot-Voting:
These tools allow participants to share their views or vote on ideas
anonymously, which can be less intimidating than speaking up in a group.
If most of your participants are Introverted & Collaborative. These
participants may enjoy working in groups, but they prefer quieter, more
thoughtful discussions. A few activities for this group of people could
be:
Small Group Discussions:
Divide participants into smaller groups of 3-4 people to discuss a
topic or question. This setup can feel less overwhelming than large
group discussions.
Think-Pair-Share:
In this activity, participants first consider a question or problem
individually, then they pair up to discuss their thoughts, and finally,
they share their ideas with the larger group.
Fishbowl Conversation:
A small group sits in a circle (the fishbowl) to discuss a topic while
the rest of the participants observe. After a while, allow participants
to switch places, ensuring everyone gets a chance to contribute.
If most of your participants are Extroverted & Individualistic. These
participants enjoy expressing their ideas and might prefer to work
independently. A few activities for this group of people could be:
Lightning Talks:
Each participant prepares a short presentation on a topic related to
the workshop’s theme. This activity allows participants to express their
ideas and share their expertise.
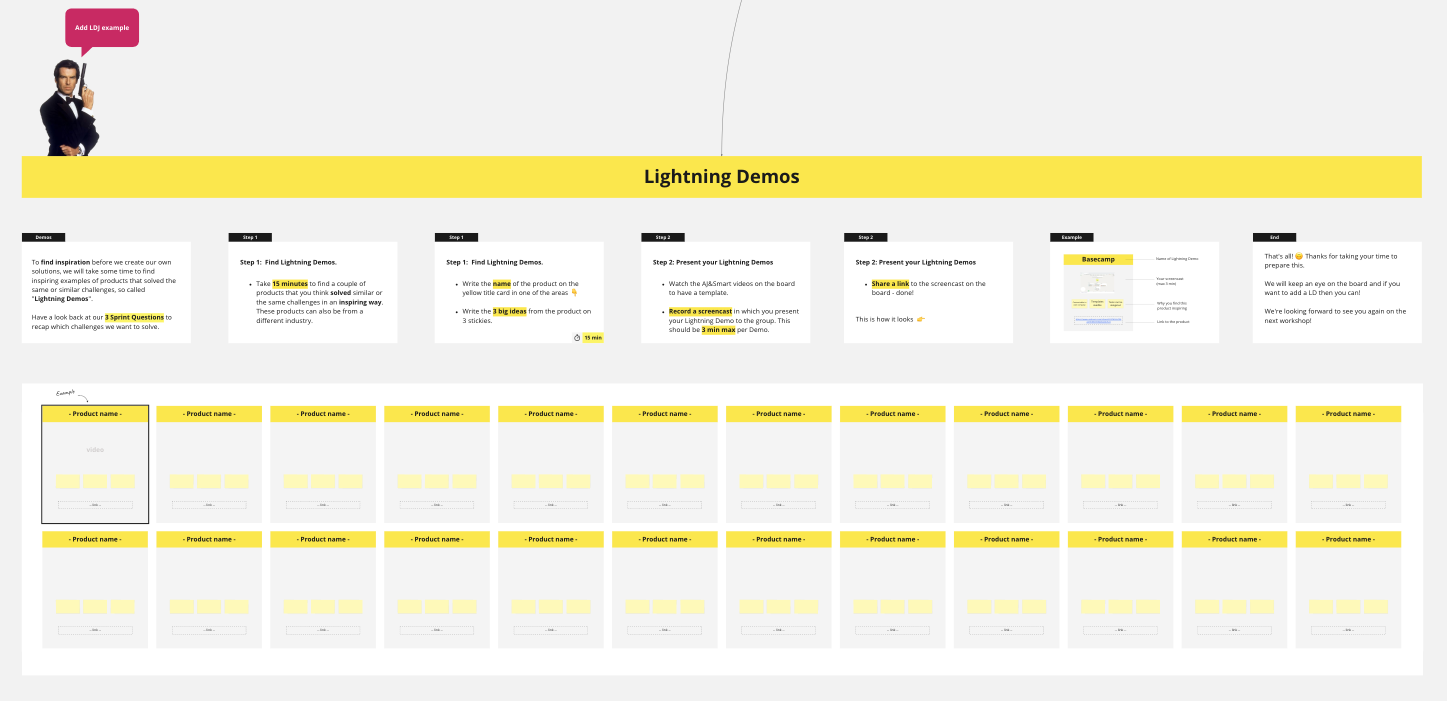
Idea Gallery/Lightning Demo:
Participants work individually to create a visual or written
representation of their ideas (like a poster), then everyone walks
around to view the “gallery” and discuss the ideas. Note:The idea is not new and is also known as a “Poster Session.”
The goal of a poster session is to create a set of compelling images
that summarize a challenge or topic for further discussion. Creating
this set might be an “opening act,” which then sets the stage for
choosing an idea to pursue, or it might be a way to get indexed on a
large topic. The act of creating a poster forces experts and otherwise
passionate people to stop and think about the best way to communicate
the core concepts of their material.
The
lightning demo activity from Design Sprint is a perfect example of an
“Idea Gallery” type of activity. Find out more about this example: AJ&Smart’s Remote Design Sprint. (Large preview)
Jigsaw Activity:
In this exercise, each participant becomes an “expert” in a specific
aspect of a larger topic. They then share their knowledge with the
group, allowing for individual exploration and public speaking.
If most of your participants are Extroverted & Collaborative. These
participants enjoy the energy of group discussions and collaborative
work. A few activities suitable for this group of people could be:
Open Discussions:
Provide a topic or question and allow the conversation to flow
naturally. Extroverted participants typically thrive in this open
format.
Group Projects:
Split participants into teams and assign a project related to the
workshop’s theme. This could be anything from creating a mock-up for a
new product to brainstorming strategies for overcoming a business
challenge.
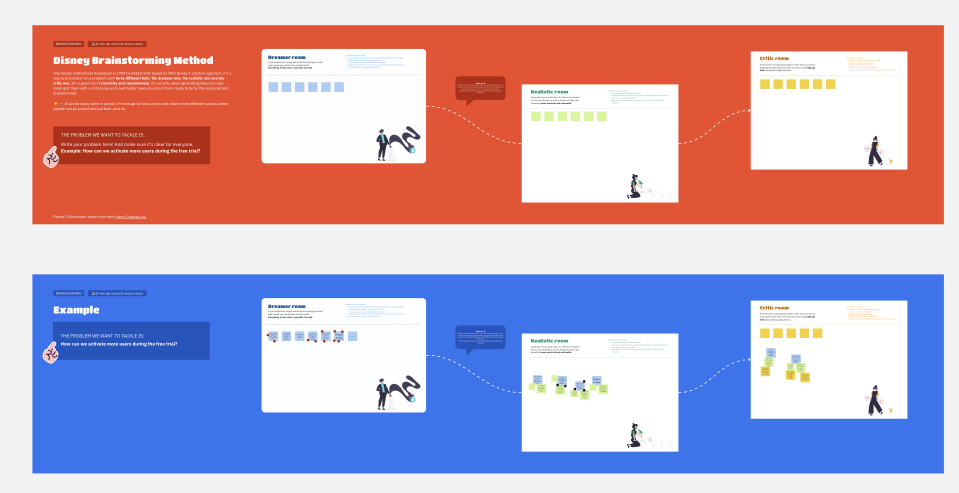
Role-play:
This group activity allows participants to act out different scenarios
or perspectives related to the workshop theme, encouraging dynamic
discussion and cooperative problem-solving.
Disney’s Brainstorming Method is a good example of what a fun role-play activity looks like. (Download the template: Disney Brainstorming Method) (Large preview)
Step 4. Estimate The Right Time And Allocate An Extra “Buffer” #
Once
you have completed planning the workshop activities, if possible, try
to conduct a pilot run so that you can decide the appropriate duration
for each activity.
Time management is critical for inclusivity
since participants may have other engagements, and if time management
is out of control, both the facilitator and the participants may feel
uncomfortable as they may need to shift focus to other commitments.
Therefore, it is crucial to estimate the appropriate time and allocate
extra “buffer” time to avoid rushing participants during engaging
discussions.
I usually like to add a 20% buffer to each activity
to ensure there is always some time to spare in case some people are
slower. For instance, if you have set a 10-minute brainstorming session,
schedule it to be 12 minutes so that you can have some extra buffer.
Inclusion
often starts before the workshop even begins. A pre-workshop note can
make a significant difference in setting the stage for inclusivity. It
allows all participants, regardless of their background or understanding
of the key topic, to start from a common ground.
For example, if
you’re conducting a workshop on project management, your pre-note could
include an outline of the topics to be covered, such as agile
methodology, risk management, or team leadership. You could also include
a brief case study for participants to review before the workshop.
The
pre-note can also include logistical details such as the workshop date,
time, location (or virtual meeting link), any software they need to
install (like Zoom or Microsoft Teams), and what they should bring with
them (like a laptop or a notebook). By sending a pre-note, you ensure
that all participants come prepared and are aligned with the workshop’s
objectives right from the start.
A template that you can use to create your own workshop pre-note. (Get the template from Figma Community) (Large preview)
Once
you’ve established the framework of your workshop, it’s time to season
it with some personal flair. This “secret sauce” could be a unique
icebreaker or an element of surprise that sparks laughter and lightens
up the atmosphere.
For instance, I’ve often incorporated the pets
of my colleagues into the Miro board during my workshops. The sight of
familiar furry friends not only brings a smile but also fosters a sense
of community and connection within the team.
Instead
of having a standard dot-voting session, replace the “dots” with cats
or dogs (of your colleagues, if possible) to create some fun during the
workshop session! (Image credits: Official Remote 5-day Design Sprint, a Miro template by Steph Cruchon) (Large preview)
This
was the first half of our journey exploring inclusive remote workshops
where we’ve “peeled back” the layers of their essence and highlighted
some critical techniques and approaches to lay out the groundwork.
Remember, the key to running a successful inclusive workshop is to know your participants well and to create a space where they feel at ease.
Take the time to understand them and shape the workshop activities in
such a way that they match participant’s personal preferences. The most
important bit, perhaps, is that every attendee should feel valued and
heard.
In the second part of this two-part series, I will dive
deeper into what you can do during and after the workshop in order to
better tailor the experience to the workshop attendees, and I will also
introduce you to the P.A.R.T.S. principle, which stands for Promote,
Acknowledge, Respect, Transparency, and Share.