Hire a web Developer and Designer to upgrade and boost your online presence with cutting edge Technologies

Friday, July 31, 2015

Powerful PERL Script for Large codes


Count lines of code in a C,C++,Java,perl,shell,html,VHDL,Verilog or Python file

   
#!/usr/bin/perl -0777
my @lines = ();
my $numofifs = 1;
my $commentstarted = 0;
my $notacfile = 0;

if($ARGV[0] !~ /\.[cCh]$/) {
  $notacfile = 1;
}

while(<>) {
     s/\/\*(.*?)\*\//cOmMeNt/gms;
     s/<!--(.*?)-->/cOmMeNt/gms;
     @tmp = split(/\n/);
     for(@tmp) {

     if (/cOmMeNt/) {
                unless(/cOmMeNt/ ) {
$_ = $_ . "\n";
                        push(@lines, $_);
next;
                 }
                 else {
                    if((/[\S]+[\s]*cOmMeNt/) || (/cOmMeNt[\s]*[\S]+/)) {
                       $_ = $_ . "\n";
                       push(@lines, $_);
                    }
           
                 }
         }
          else {
#slurp #if 0 comments
            if( (/^[\s]*#[\s]*if[\s]+0/) || ($commentstarted == 1) ) {
                if ( $commentstarted == 0) {
                  $commentstarted = 1;
                  next;
                }
                if(/^[\s]*#[\s]*if/) {
                 $numofifs = $numofifs + 1;
                 next;
                }
                unless(/^[\s]*#[\s]*endif/) {
              next; # slurp the comments
                }
                 else { # we found an endif, but we don't know if it is the right one...
                  $numofifs = $numofifs - 1;
                  if($numofifs == 0) {
                    $commentstarted = 0;
                    $numofifs = 1;
                  }
                  next;
                 }
            }

#leave out // comments
if(/^[\s]*\/\//) {
        next;
}
# leaave out # style comments if it is not a C/C++ file taking care to count #! line
               if($notacfile == 1) {
                unless(/^#!/) {
                  if  (/^[\s]*#/) {
   next;
                  }
                }
               }
#leave out blank lines ,vhdl  and assembly type comments
if( (/^[\s]*$/) || (/^[\s]*--/) || (/^[\s]*;/) ){
        next;
}

# Now leave out =head and =pod section till =cut in perl scripts
if( (/^=pod/) || (/^=head/) || ($commentstarted == 1) ) {
                if ( $commentstarted == 0) {
                  $commentstarted = 1;
                  next;
                }
               unless(/^=cut/) {
              next; # slurp the comments
                }
            # Now found cut, just fall thro'
            }
$_ = $_ . "\n";
                push(@lines, $_);
my @lines = ();
          }

      }
}
print "The number of lines of code in file is [1m " . @lines . " [0m\n";
exit @lines;

Friday, July 24, 2015

Process Larger Log files Simple using Perl Script [ TimesTen In-Memory Database ]

 Using PERL script how can we process large log files easily. In this example i will explain you how we can process Oracle times ten in memory log files.We can make simple modification for that script and we can use to parse large files like size 5 GB. We can use this script for process Mysql, Sql, Psql  and all other database also.


Before starting writing script i will explain you what is Times Ten DB. 

TimesTen In-Memory Database

        Oracle TimesTen In-Memory Database (TimesTen) is a full-featured, memory-optimized, relational database with persistence and recoverability. It provides applications with the instant responsiveness and very high throughput required by database-intensive applications. Deployed in the application tier, TimesTen operates on databases that fit entirely in physical memory (RAM). Applications access the TimesTen database using standard SQL interfaces. For customers with existing application data residing on the Oracle Database, TimesTen is deployed as an in-memory cache database with automatic data synchronization between TimesTen and the Oracle Database.

      It increase speed of data access and performance for accessing data from db. 

      We can use the following places to boost the speed, performance and delay latency in application. How is TimesTen used by real-life customers? TimesTen is deployed by thousands of customers spanning industries in communications, financial services, web applications, travel logistics, gaming, and more.

Script Code for process
  
  By default times ten db create a log file with the names of
Keyagent.log 

We can use this script to ptocess other db [mysql , oracle , psql .. etc]. 
 
 
package AgentParser;

use 5.22.1;
use strict;
use warnings;
use Errstate::Return;
require Exporter;
our @ISA = qw(Exporter);
our %EXPORT_TAGS = ( 'all' => [ qw() ] );
our @EXPORT_OK = ( @{ $EXPORT_TAGS{'all'} } );
our @EXPORT = qw(Agentlog);
our $VERSION = '0.01';

BEGIN
{
   if(! -d "/var/lib/perl_lib/" )
   {
       print "\nDependent directory /var/lib/perl_lib/ not found!!!\n\n";
       exit 1;
   }
   unshift(@INC,"/var/lib/perl_lib");

}

my ($LogFile,$outfile,@stringgrep);
my $loglevel = "DEBUG";
my $logger = Return->new();
$logger->setlogfile($LogFile,'a');
$logger->disable_console();

sub _shiftlog($)
{
        $LogFile = shift || "Keyagent.log";
        return $LogFile;
}

sub _shiftout($)
{
        $outfile = shift || "Agentlog_Count.txt";
        return $outfile;
}

sub CleanUP($)
{
    my $Flag = shift || '1';
    $logger->closelog();
    exit($Flag);
}

sub untaring($)
{
    $logger->info("untaring() started...");
    my $file = shift || 'agent.log.1';
    if($file !~ m/gz/)
    {
        print "$file - $!\n";
        $logger->error("GUNZIP:file $file not available");
        CleanUP(1);
    }
 system("gunzip $file"); 
    $file=~s/\.gz//;
    if($? ne 0)
 {
        $logger->error("GUNZIP: not working");
     CleanUP(1);   
    }
    $logger->info("untaring() Completed...");
 parsing($file);
}

sub parsing($)
{
    my $c = 0;
    $logger->info("parsing() started...");
    my $parsefile = shift || 'agent.log.1';
    if(! -e $parsefile)
    {
        print "$parsefile - $!\n";
        CleanUP(1);
    }
    open(OUTFILE,">>$outfile") or die("FILE:not able to open file $!\n");
 my @array = `grep -oiP '(\\d{4}\-\\d{2}\-\\d{2})' $parsefile | head -n1  && grep -oiP '\\d{2}\:\\d{2}\:\\d{2}' $parsefile | head -n1`;
    my @end=`grep -oiP '(\\d{4}\-\\d{2}\-\\d{2})' $parsefile | head -n1  && grep -oiP '\\d{2}\:\\d{2}\:\\d{2}' $parsefile | tail -n1`;
    chomp(@end,@array,$parsefile);
    print OUTFILE "\n---------FILE: $parsefile---------------\n";
    print  OUTFILE "LOG START TIME: $array[0] $array[1]\nLOG END TIME: $end[0] $end[1]\n";
 foreach my $key (@stringgrep)
 {
        my $count = `grep -o "$key" $parsefile |wc -l`;
        if($count > 0)
        {
            print OUTFILE "\nKEYWORD: \"$key\"\nNO.Of.Counts:$count";
      my @pattern=`grep "$key" $parsefile`;
            LP:if(!@pattern)
            {
                $logger->error("KEYWORD: \"$key\"  not exist in file: \[$parsefile\]");
                next;
            }
         print OUTFILE @pattern;
        }
        else
        {
            $c++;
            goto LP;
        }
    }
            print OUTFILE "$c LINES NOT MATCHED CHECK LOG FILE 'Keyagent.log' \n" if($c);
    
    $logger->info("Parsing() Completed...");
    $logger->info("----------------------\n");

    print "INFO: Parsing Completed check logfile: Keyagent.log and output file Agentlog_Count.txt\n";
}

sub Agentlog
{
 _shiftlog(@_);
 _shiftout(@_); 
 opendir(DIR, ".") || die "can't opendir $!";
 my @dirmatch = grep { /agent(\d+)*(\.)*(log)*(\d+)*(\.)*(gz)*|agent(\.)*(log)*(\.)*(\d+)*(\.)*(gz)*/ && -f "/home/kodiak/$_" }   readdir(DIR);
 closedir DIR;

 @stringgrep=("Starting NuoDB agent","Running as Broker", "Setting up Raft server","Raft server started","Converting to Leader","Peer joined","Node joined","Peer left","Node left","Node state changed to ACTIVE","Node state changed to RUNNING","has become active", "was previously inactive for","agent is shutting down","ShutdownHook called","has become inactive");

 foreach my $filename (@dirmatch)
 {
      chomp($filename)||$filename=~s/\n//;
      $filename = $filename =~ m/\.gz/ ? untaring($filename) : parsing($filename);
 }
}


1;

__END__

=head1 NAME

AgentParser - To Parse the Timesten Default Agentlog files under Linux/Unix system.

=head1 SYNOPSIS

  use Timten::AgentParser;
  $array=AgentParser->Agentlog("Logfile","outputfile");

=head1 DESCRIPTION

To Parse the Timesten Default Agentlog files under Linux/Unix system.

=head2 EXPORT

use Timten::AgentParser;
  $array=AgentParser->Agentlog("Logfile","outputfile");

=head1 SEE ALSO

=head1 AUTHOR

Name :Kaavannan, K<br>
E-Mail: kaavannaniisc@gmail.com

=head1 COPYRIGHT AND LICENSE

Copyright (C) 2016 by Kaavannan K

This library is free software; you can redistribute it and/or modify
it under the same terms as Perl itself, either Perl version 5.22.1 or,
at your option, any later version of Perl 5 you may have available.


=cut

For further more details please visit the link http://search.cpan.org/~kaavannan/Timten-AgentParser/.

I felt it is very useful to process easily.

Tuesday, July 7, 2015

Role based Spring security


If you need Spring jsp page authorization means follow the below steps,
Step 1: Need to activate web authorization in web security file
use-expressions="true" in http tag in security xml file
ex: <http .... use-expressions="true">
then you configure pom.xml for download spring
<dependency>
    <groupId>org.springframework.security</groupId>
    <artifactId>spring-security-taglibs</artifactId>
    <version>3.2.5.RELEASE</version>
</dependency>
Step2. Then add the tag lib in your need jsp page
Ex:
<%@ taglib prefix="security" uri="http://www.springframework.org/security/tags" %>
Step3: Then check the hasRole in jsp page
Ex:
<security:authorize access="hasRole('ROLE_USER')">
    This text is only visible to a user
    <br/>
</security:authorize>
<security:authorize access="hasRole('ROLE_ADMIN')">
    This text is only visible to an admin
    <br/>
</security:authorize>
In that place userRole is case sensitive
You can also provide the full page access based on role.. use follow sample code
<intercept-url pattern="/user/**" access="hasRole('ROLE_USER')" />
This intercept allow role user in that page.
Based on in you question you should verify web security file must have use-expression="true"
If it is correct please make sure the role name.Because it is case sensitive

Wednesday, July 1, 2015

Servlet Tutorial


What is Servlet ?

      Servlet  is a java  programming language class used request  response programming model.
Used to create server side web application and generate dynamic web page.
Servlet language is Robust and scalable because of java language.Before Servlet we used CGI (Comman Gateway Interface) for server side programming. 
The javax.servlet and javax.servlet.http packages provide the servlet interfaces and classes to implement the servlet.
     All servlet must implement the servlet interface.

Advantage of Servlet :


 The servlet contain the many advantages over the CGI. The web container creates threads for handling the multiple requests to the servlet. Threads have a lot of benefits over the processes such as they share a common memory area, lightweight, cost of communication between the treads are low.The following benefits for Servlets are ,

1. Better Performance --> Because it create threads for every client requests.
2. Portability --> It use java so its portability
3. Robust --> Servlet use the JVM so no need to take care about memory leak and GC(garbage collection)
4. Secure --> It use Java language.

Servlet Interface :

        This provide the common behavior to all the servlets. Need to implemented this servlet for all creating any servlet.
     Methods of Servlet Interface:
           1.  init() --> This used to initialize the servlet. This is one of the servlet life cycle method.
           2.  service() --> This is used to processing the incoming request and send response to that request.
           3. destroy() --> It is used to destroy the servlet. this can be invoked only once.
           4. getServletConfig() --> This method return the object for servlet configuration
           5. getServletInfo() --> It return the information about the servlet.
Exmaple:

 1
 2
 3
 4
 5
 6
 7
 8
 9
10
11
12
13
14
15
16
17
18
19
20
21
22
23
24
25
26
27
28
29
30
31
32
33
34
35
36
37
38
39
40
41
42
43
44
45
46
47
48
49
50
51
52
53
54
55
56
57
58
59
60
61
62
63
64
65
66
67
68
package com.shinnedhawks;

/**

 * @author Ramachandran

 */

import java.io.*;

import javax.servlet.*;


public class ServletExample implements Servlet {

 ServletConfig config = null;


 public void init(ServletConfig config) {

  this.config = config;

  System.out.println("servlet is initialized");

 }

 public void service(ServletRequest req, ServletResponse res)

 throws IOException, ServletException {


  res.setContentType("text/html");


  PrintWriter out = res.getWriter();

  out.print("

   out.print("hello simple servlet");

   out.print("

    ");  

   }

   public void destroy() {

    System.out.println("servlet is destroyed");

   }

   public ServletConfig getServletConfig() {

    return config;

   }

   public String getServletInfo() {

    return "copyright @Ramakavanan 2015";

   }
  }

Servlet LifeCycle:

1. Web container loads the Servlet classes
2. Web container creates an instance of the servlet classes
3. Initialize the servlet using init() method
4. Invoke the service() method
5. Invoke the destroy() method


Steps for creating Servlet Example:

The servlet example can be created by three ways:
  1. By implementing Servlet interface,
  2. By inheriting GenericServlet class, (or)
  3. By inheriting HttpServlet class
The mostly used approach is by extending HttpServlet because it provides http request specific method such as doGet(), doPost(), doHead() etc.
Here, we are going to use apache tomcat server in this example. The steps are as follows:
  1. Create a directory structure
  2. Create a Servlet
  3. Compile the Servlet
  4. Create a deployment descriptor
  5. Start the server and deploy the project
  6. Access the servlet

1)Create a directory structures

The directory structure defines that where to put the different types of files so that web container may get the information and respond to the client.
The Sun Microsystem defines a unique standard to be followed by all the server vendors. Let's see the directory structure that must be followed to create the servlet.
directory structure of servlet
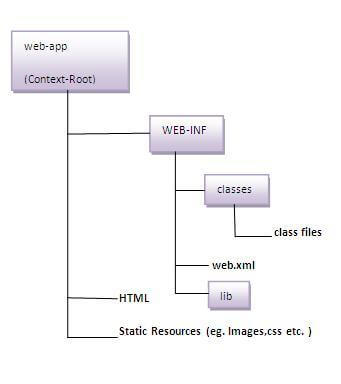
As you can see that the servlet class file must be in the classes folder. The web.xml file must be under the WEB-INF folder.


2)Create a Servlet

There are three ways to create the servlet.
  1. By implementing the Servlet interface
  2. By inheriting the GenericServlet class
  3. By inheriting the HttpServlet class
The HttpServlet class is widely used to create the servlet because it provides methods to handle http requests such as doGet(), doPost, doHead() etc.
In this example we are going to create a servlet that extends the HttpServlet class. In this example, we are inheriting the HttpServlet class and providing the implementation of the doGet() method. Notice that get request is the default request.

 1
 2
 3
 4
 5
 6
 7
 8
 9
10
11
12
13
14
15
16
17
18
19
20
21
22
23
24
25
26
27
28
29
30
31
32
33
34
35
package com.shinnedhawks;

/**

 * @author Ramachandran

 */

import java.io.*;
import javax.servlet.http.*;
import javax.servlet.*;

public class DemoServlet extends HttpServlet {

 public void doGet(HttpServletRequest req, HttpServletResponse res) throws ServletException, IOException {

   res.setContentType("text/html"); //setting the content type  

   PrintWriter pw = res.getWriter(); //get the stream to write the data  

   //writing html in the stream  
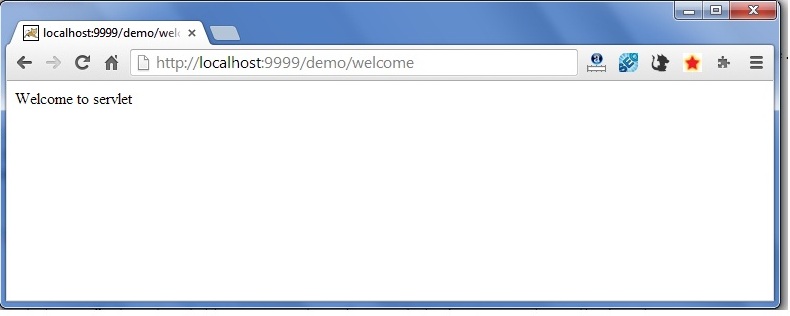
   pw.println("

    pw.println("Welcome to servlet");

    pw.println("

     ");

     pw.close(); //closing the stream  

    }

   }

3)Compile the servlet

For compiling the Servlet, jar file is required to be loaded. 

Two ways to load the jar file

1.set classpath
2.paste the jar file in JRE/lib/ext folder

Put the java file in any folder. After compiling the java file, paste the class file of servlet in WEB-INF/classes directory.

4)Create the deployment descriptor (web.xml file)

The deployment descriptor is an xml file, from which Web Container gets the information about the servet to be invoked.
The web container uses the Parser to get the information from the web.xml file. There are many xml parsers such as SAX, DOM and Pull.
There are many elements in the web.xml file. Here is given some necessary elements to run the simple servlet program.

web.xml file

 1
 2
 3
 4
 5
 6
 7
 8
 9
10
11
12
13
14
15
16
17
18
19
<web-app>   

<servlet>  

<servlet-name>ramakavanan</servlet-name>  

<servlet-class>DemoServlet</servlet-class>  

</servlet>    

<servlet-mapping>  

<servlet-name>ramakavanan</servlet-name>  

<url-pattern>/welcome</url-pattern>  

</servlet-mapping>  

</web-app>  

Description of the elements of web.xml file
There are too many elements in the web.xml file. Here is the illustration of some elements that is used in the above web.xml file. The elements are as follows:

 represents the whole application.
 is sub element of and represents the servlet.
 is sub element of represents the name of the servlet.
 is sub element of represents the class of the servlet.
 is sub element of . It is used to map the servlet.
 is sub element of . This pattern is used at client side to invoke the servlet.

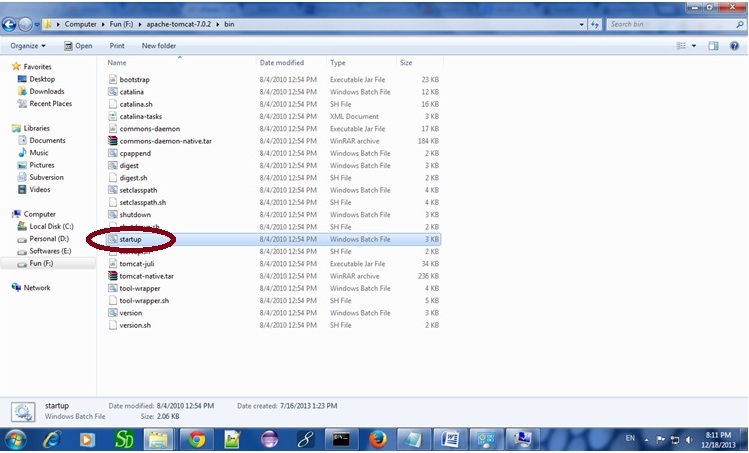
5)Start the Server and deploy the project
To start Apache Tomcat server, double click on the startup.bat file under apache-tomcat/bin directory.

One Time Configuration for Apache Tomcat Server

You need to perform 2 tasks:
  1. set JAVA_HOME or JRE_HOME in environment variable (It is required to start server).
  2. Change the port number of tomcat (optional). It is required if another server is running on same port (8080).

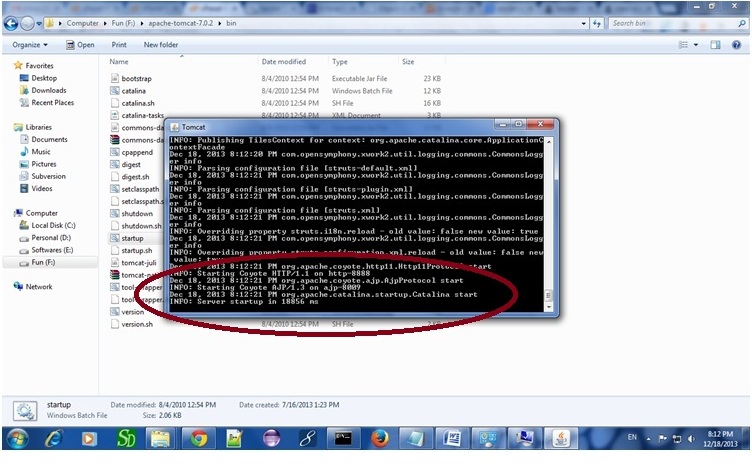
After setting the JAVA_HOME double click on the startup.bat file in apache tomcat/bin.
Note: There are two types of tomcat available:
  1. Apache tomcat that needs to extract only (no need to install)
  2. Apache tomcat that needs to install
It is the example of apache tomcat that needs to extract only.
how to start tomcat server for servlet program
Now server is started successfully.

2) How to change port number of apache tomcat

Changing the port number is required if there is another server running on the same system with same port number.Suppose you have installed oracle, you need to change the port number of apache tomcat because both have the default port number 8080.
Open server.xml file in notepad. It is located inside the apache-tomcat/conf directory . Change the Connector port = 8080 and replace 8080 by any four digit number instead of 8080. Let us replace it by 9999 and save this file.

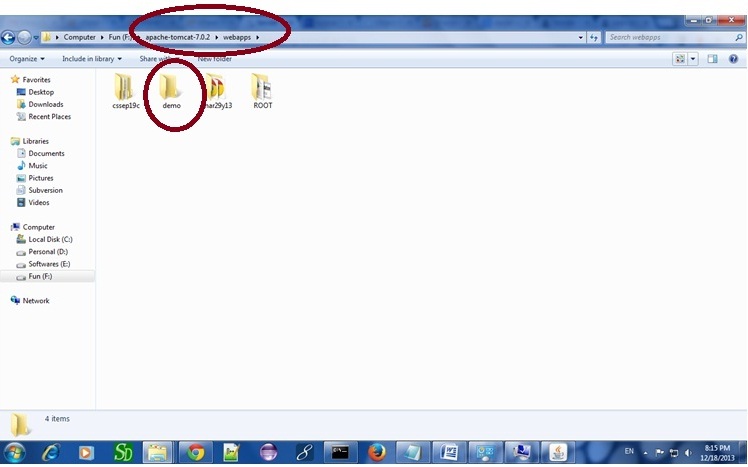
5) How to deploy the servlet project

Copy the project and paste it in the webapps folder under apache tomcat.
how to deploy servlet in apache tomcat server
But there are several ways to deploy the project. They are as follows:
  • By copying the context(project) folder into the webapps directory
  • By copying the war folder into the webapps directory
  • By selecting the folder path from the server
  • By selecting the war file from the server
Here, we are using the first approach.
You can also create war file, and paste it inside the webapps directory. To do so, you need to use jar tool to create the war file. Go inside the project directory (before the WEB-INF), then write:
projectfolder> jar cvf myproject.war *  
Creating war file has an advantage that moving the project from one location to another takes less time.

6) How to access the servlet

Open broser and write https://hostname:portno/contextroot/urlpatternofservlet. For example:
  1. http://localhost:9999/demo/welcome  
output of servlet example


How Servlet Works

It is important to learn how servlet works for understanding the servlet well. Here, we are going to get the internal detail about the first servlet program.
The server checks if the servlet is requested for the first time.
If yes, web container does the following tasks:
  • loads the servlet class.
  • instantiates the servlet class.
  • calls the init method passing the ServletConfig object
else
  • calls the service method passing request and response objects
The web container calls the destroy method when it needs to remove the servlet such as at time of stopping server or undeploying the project.

How web container handles the servlet request?

The web container is responsible to handle the request. Let's see how it handles the request.
  • maps the request with the servlet in the web.xml file.
  • creates request and response objects for this request
  • calls the service method on the thread
  • The public service method internally calls the protected service method
  • The protected service method calls the doGet method depending on the type of request.
  • The doGet method generates the response and it is passed to the client.
  • After sending the response, the web container deletes the request and response objects. The thread is contained in the thread pool or deleted depends on the server implementation.