Hire a web Developer and Designer to upgrade and boost your online presence with cutting edge Technologies

Thursday, October 12, 2023

Gatsby Headaches: Working With Media (Part 1)

 Gatsby is an exceptionally flexible static site generator with a robust community and ecosystem to extend a Gatsby site with additional features. Did you know that there are more than a dozen image-related plugins alone? Working with media can become a real headache when you have to research plugins and choose the right one, particularly when we’re talking about lots of different image formats and different plugins for handling different formats. Discover how to incorporate a variety of media formats — images, videos, GIFs, SVGs, and so on — in a Gatsby website. Juan Rodriguez shares what he’s learned about optimizing files for improved performance after working with different plugins and techniques.

Working with media files in Gatsby might not be as straightforward as expected. I remember starting my first Gatsby project. After consulting Gatsby’s documentation, I discovered I needed to use the gatsby-source-filesystem plugin to make queries for local files. Easy enough!

That’s where things started getting complicated. Need to use images? Check the docs and install one — or more! — of the many, many plugins available for handling images. How about working with SVG files? There is another plugin for that. Video files? You get the idea.

It’s all great until any of those plugins or packages become outdated and go unmaintained. That’s where the headaches start.

If you are unfamiliar with Gatsby, it’s a React-based static site generator that uses GraphQL to pull structured data from various sources and uses webpack to bundle a project so it can then be deployed and served as static files. It’s essentially a static site generator with reactivity that can pull data from a vast array of sources.

Like many static site frameworks in the Jamstack, Gatsby has traditionally enjoyed a great reputation as a performant framework, although it has taken a hit in recent years. Based on what I’ve seen, however, it’s not so much that the framework is fast or slow but how the framework is configured to handle many of the sorts of things that impact performance, including media files.

So, let’s solve the headaches you might encounter when working with media files in a Gatsby project. This article is the first of a brief two-part series where we will look specifically at the media you are most likely to use: images, video, and audio. After that, the second part of this series will get into different types of files, including Markdown, PDFs, and even 3D models.

Solving Image Headaches In Gatsby #

I think that the process of optimizing images can fall into four different buckets:

  1. Optimize image files.
    Minimizing an image’s file size without losing quality directly leads to shorter fetching times. This can be done manually or during a build process. It’s also possible to use a service, like Cloudinary, to handle the work on demand.
  2. Prioritize images that are part of the First Contentful Paint (FCP).
    FCP is a metric that measures the time between the point when a page starts loading to when the first bytes of content are rendered. The idea is that fetching assets that are part of that initial render earlier results in faster loading rather than waiting for other assets lower on the chain.
  3. Lazy loading other images.
    We can prevent the rest of the images from render-blocking other assets using the loading="lazy" attribute on images.
  4. Load the right image file for the right context.
    With responsive images, we can serve one version of an image file at one screen size and serve another image at a different screen size with the srcset and sizes attributes or with the <picture> element.

These are great principles for any website, not only those built with Gatsby. But how we build them into a Gatsby-powered site can be confusing, which is why I’m writing this article and perhaps why you’re reading it.

Lazy Loading Images In Gatsby #

We can apply an image to a React component in a Gatsby site like this:

import * as React from "react";

import forest from "./assets/images/forest.jpg";

const ImageHTML = () => {
  return <img src={ forest } alt="Forest trail" />;
};

It’s important to import the image as a JavaScript module. This lets webpack know to bundle the image and generate a path to its location in the public folder.

This works fine, but when are we ever working with only one image? What if we want to make an image gallery that contains 100 images? If we try to load that many <img> tags at once, they will certainly slow things down and could affect the FCP. That’s where the third principle that uses the loading="lazy" attribute can come into play.

import * as React from "react";

import forest from "./assets/images/forest.jpg";

const LazyImageHTML = () => {
  return <img src={ forest } loading="lazy" alt="Forest trail" />;
};

We can do the opposite with loading="eager". It instructs the browser to load the image as soon as possible, regardless of whether it is onscreen or not.

import * as React from "react";

import forest from "./assets/images/forest.jpg";

const EagerImageHTML = () => {
  return <img src={ forest } loading="eager" alt="Forest trail" />;
};

Implementing Responsive Images In Gatsby #

This is a basic example of the HTML for responsive images:

<img
  srcset="./assets/images/forest-400.jpg 400w, ./assets/images/forest-800.jpg 800w"
  sizes="(max-width: 500px) 400px, 800px"
  alt="Forest trail"
/>

In Gatsby, we must import the images first and pass them to the srcset attribute as template literals so webpack can bundle them:

import * as React from "react";

import forest800 from "./assets/images/forest-800.jpg";

import forest400 from "./assets/images/forest-400.jpg";

const ResponsiveImageHTML = () => {
  return (
    <img
      srcSet={`

        ${ forest400 } 400w,

        ${ forest800 } 800w

      `}
      sizes="(max-width: 500px) 400px, 800px"
      alt="Forest trail"
    />
  );
};

That should take care of any responsive image headaches in the future.

Loading Background Images In Gatsby #

What about pulling in the URL for an image file to use on the CSS background-url property? That looks something like this:

import * as React from "react";

import "./style.css";

const ImageBackground = () => {
  return <div className="banner"></div>;
};
/* style.css */

.banner {
    aspect-ratio: 16/9;
      background-size: cover;

    background-image: url("./assets/images/forest-800.jpg");

  /* etc. */
}

This is straightforward, but there is still room for optimization! For example, we can do the CSS version of responsive images, which loads the version we want at specific breakpoints.

/* style.css */

@media (max-width: 500px) {
  .banner {
    background-image: url("./assets/images/forest-400.jpg");
  }
}

Using The gatsby-source-filesystem Plugin #

Before going any further, I think it is worth installing the gatsby-source-filesystem plugin. It’s an essential part of any Gatsby project because it allows us to query data from various directories in the local filesystem, making it simpler to fetch assets, like a folder of optimized images.

npm i gatsby-source-filesystem

We can add it to our gatsby-config.js file and specify the directory from which we will query our media assets:

// gatsby-config.js

module.exports = {
  plugins: [
    {
      resolve: `gatsby-source-filesystem`,

      options: {
        name: `assets`,

        path: `${ __dirname }/src/assets`,
      },
    },
  ],
};

Remember to restart your development server to see changes from the gatsby-config.js file.

Now that we have gatsby-source-filesystem installed, we can continue solving a few other image-related headaches. For example, the next plugin we look at is capable of simplifying the cures we used for lazy loading and responsive images.

Using The gatsby-plugin-image Plugin #

The gatsby-plugin-image plugin (not to be confused with the outdated gatsby-image plugin) uses techniques that automatically handle various aspects of image optimization, such as lazy loading, responsive sizing, and even generating optimized image formats for modern browsers.

Once installed, we can replace standard <img> tags with either the <GatsbyImage> or <StaticImage> components, depending on the use case. These components take advantage of the plugin’s features and use the <picture> HTML element to ensure the most appropriate image is served to each user based on their device and network conditions.

We can start by installing gatsby-plugin-image and the other plugins it depends on:

npm install gatsby-plugin-image gatsby-plugin-sharp gatsby-transformer-sharp

Let’s add them to the gatsby-config.js file:

// gatsby-config.js

module.exports = {
plugins: [

// other plugins
`gatsby-plugin-image`,
`gatsby-plugin-sharp`,
`gatsby-transformer-sharp`],

};

This provides us with some features we will put to use a bit later.

Using The StaticImage Component #

The StaticImage component serves images that don’t require dynamic sourcing or complex transformations. It’s particularly useful for scenarios where you have a fixed image source that doesn’t change based on user interactions or content updates, like logos, icons, or other static images that remain consistent.

The main attributes we will take into consideration are:

  • src: This attribute is required and should be set to the path of the image you want to display.
  • alt: Provides alternative text for the image.
  • placeholder: This attribute can be set to either blurred or dominantColor to define the type of placeholder to display while the image is loading.
  • layout: This defines how the image should be displayed. It can be set to fixed for, as you might imagine, images with a fixed size, fullWidth for images that span the entire container, and constrained for images scaled down to fit their container.
  • loading: This determines when the image should start loading while also supporting the eager and lazy options.

Using StaticImage is similar to using a regular HTML <img> tag. However, StaticImage requires passing the string directly to the src attribute so it can be bundled by webpack.

import * as React from "react";

import { StaticImage } from "gatsby-plugin-image";

const ImageStaticGatsby = () => {
  return (
    <StaticImage
      src="./assets/images/forest.jpg"
      placeholder="blurred"
      layout="constrained"
      alt="Forest trail"
      loading="lazy"
    />
  );
  };

The StaticImage component is great, but you have to take its constraints into account:

  • No Dynamically Loading URLs
    One of the most significant limitations is that the StaticImage component doesn’t support dynamically loading images based on URLs fetched from data sources or APIs.
  • Compile-Time Image Handling
    The StaticImage component’s image handling occurs at compile time. This means that the images you specify are processed and optimized when the Gatsby site is built. Consequently, if you have images that need to change frequently based on user interactions or updates, the static nature of this component might not fit your needs.
  • Limited Transformation Options
    Unlike the more versatile GatsbyImage component, the StaticImage component provides fewer transformation options, e.g., there is no way to apply complex transformations like cropping, resizing, or adjusting image quality directly within the component. You may want to consider alternative solutions if you require advanced transformations.

Using The GatsbyImage Component #

The GatsbyImage component is a more versatile solution that addresses the limitations of the StaticImage component. It’s particularly useful for scenarios involving dynamic image loading, complex transformations, and advanced customization.

Some ideal use cases where GatsbyImage is particularly useful include:

  • Dynamic Image Loading
    If you need to load images dynamically based on data from APIs, content management systems, or other sources, the GatsbyImage component is the go-to choice. It can fetch images and optimize their loading behavior.
  • Complex transformations
    The GatsbyImage component is well-suited for advanced transformations, using GraphQL queries to apply them.
  • Responsive images
    For responsive design, the GatsbyImage component excels by automatically generating multiple sizes and formats of an image, ensuring that users receive an appropriate image based on their device and network conditions.

Unlike the StaticImage component, which uses a src attribute, GatsbyImage has an image attribute that takes a gatsbyImageData object. gatsbyImageData contains the image information and can be queried from GraphQL using the following query.

query {
  file(name: { eq: "forest" }) {
    childImageSharp {
      gatsbyImageData(width: 800, placeholder: BLURRED, layout: CONSTRAINED)
    }

    name
  }
}

If you’re following along, you can look around your Gatsby data layer at http://localhost:8000/___graphql.

From here, we can use the useStaticQuery hook and the graphql tag to fetch data from the data layer:

import * as React from "react";

import { useStaticQuery, graphql } from "gatsby";

import { GatsbyImage, getImage } from "gatsby-plugin-image";

const ImageGatsby = () => {
  // Query data here:

  const data = useStaticQue(graphql``);

  return <div></div>;
};

Next, we can write the GraphQL query inside of the graphql tag:

import * as React from "react";

import { useStaticQuery, graphql } from "gatsby";

const ImageGatsby = () => {
  const data = useStaticQuery(graphql`
    query {
      file(name: { eq: "forest" }) {
        childImageSharp {
          gatsbyImageData(width: 800, placeholder: BLURRED, layout: CONSTRAINED)
        }

        name
      }
    }
  `);

  return <div></div>;
};

Next, we import the GatsbyImage component from gatsby-plugin-image and assign the image’s gatsbyImageData property to the image attribute:

import * as React from "react";

import { useStaticQuery, graphql } from "gatsby";

import { GatsbyImage } from "gatsby-plugin-image";

const ImageGatsby = () => {
  const data = useStaticQuery(graphql`
    query {
      file(name: { eq: "forest" }) {
        childImageSharp {
          gatsbyImageData(width: 800, placeholder: BLURRED, layout: CONSTRAINED)
        }

        name
      }
    }
  `);

  return <GatsbyImage image={ data.file.childImageSharp.gatsbyImageData } alt={ data.file.name } />;
};

Now, we can use the getImage helper function to make the code easier to read. When given a File object, the function returns the file.childImageSharp.gatsbyImageData property, which can be passed directly to the GatsbyImage component.

import * as React from "react";

import { useStaticQuery, graphql } from "gatsby";

import { GatsbyImage, getImage } from "gatsby-plugin-image";

const ImageGatsby = () => {
  const data = useStaticQuery(graphql`
    query {
      file(name: { eq: "forest" }) {
        childImageSharp {
          gatsbyImageData(width: 800, placeholder: BLURRED, layout: CONSTRAINED)
        }

        name
      }
    }
  `);

  const image = getImage(data.file);

  return <GatsbyImage image={ image } alt={ data.file.name } />;
};

Using The gatsby-background-image Plugin #

Another plugin we could use to take advantage of Gatsby’s image optimization capabilities is the gatsby-background-image plugin. However, I do not recommend using this plugin since it is outdated and prone to compatibility issues. Instead, Gatsby suggests using gatsby-plugin-image when working with the latest Gatsby version 3 and above.

If this compatibility doesn’t represent a significant problem for your project, you can refer to the plugin’s documentation for specific instructions and use it in place of the CSS background-url usage I described earlier.

Solving Video And Audio Headaches In Gatsby #

Working with videos and audio can be a bit of a mess in Gatsby since it lacks plugins for sourcing and optimizing these types of files. In fact, Gatsby’s documentation doesn’t name or recommend any official plugins we can turn to.

That means we will have to use vanilla methods for videos and audio in Gatsby.

Using The HTML video Element #

The HTML video element is capable of serving different versions of the same video using the <source> tag, much like the img element uses the srset attribute to do the same for responsive images.

That allows us to not only serve a more performant video format but also to provide a fallback video for older browsers that may not support the bleeding edge:

import * as React from "react";

import natureMP4 from "./assets/videos/nature.mp4";

import natureWEBM from "./assets/videos/nature.webm";

const VideoHTML = () => {
  return (
    <video controls>
      <source src={ natureMP4 } type="video/mp4" />

      <source src={ natureWEBM } type="video/webm" />
    </video>
  );
};

P;

We can also apply lazy loading to videos like we do for images. While videos do not support the loading="lazy" attribute, there is a preload attribute that is similar in nature. When set to none, the attribute instructs the browser to load a video and its metadata only when the user interacts with it. In other words, it’s lazy-loaded until the user taps or clicks the video.

We can also set the attribute to metadata if we want the video’s details, such as its duration and file size, fetched right away.

<video controls preload="none">
  <source src={ natureMP4 } type="video/mp4" />

  <source src={ natureWEBM } type="video/webm" />
</video>

Note: I personally do not recommend using the autoplay attribute since it is disruptive and disregards the preload attribute, causing the video to load right away.

And, like images, display a placeholder image for a video while it is loading with the poster attribute pointing to an image file.

<video controls preload="none" poster={ forest }>
  <source src={ natureMP4 } type="video/mp4" />

  <source src={ natureWEBM } type="video/webm" />
</video>

Using The HTML audio Element #

The audio and video elements behave similarly, so adding an audio element in Gatsby looks nearly identical, aside from the element:

import * as React from "react";

import audioSampleMP3 from "./assets/audio/sample.mp3";

import audioSampleWAV from "./assets/audio/sample.wav";

const AudioHTML = () => {
  return (
    <audio controls>
      <source src={ audioSampleMP3 } type="audio/mp3" />

      <source src={ audioSampleWAV } type="audio/wav" />
    </audio>
  );
};

As you might expect, the audio element also supports the preload attribute:

<audio controls preload="none">
  <source src={ audioSampleMP3 } type="audio/mp3" />

  <source src={a udioSampleWAV } type="audio/wav" />
</audio>

This is probably as good as we can do to use videos and images in Gatsby with performance in mind, aside from saving and compressing the files as best we can before serving them.

Solving iFrame Headaches In Gatsby #

Speaking of video, what about ones embedded in an <iframe> like we might do with a video from YouTube, Vimeo, or some other third party? Those can certainly lead to performance headaches, but it’s not as we have direct control over the video file and where it is served.

Not all is lost because the HTML iframe element supports lazy loading the same way that images do.

import * as React from "react";

const VideoIframe = () => {
  return (
    <iframe
      src="https://www.youtube.com/embed/jNQXAC9IVRw"
      title="Me at the Zoo"
      allow="accelerometer; autoplay; encrypted-media; gyroscope; picture-in-picture"
      allowFullScreen
      loading="lazy"
    />
  );
};

Embedding a third-party video player via iframe can possibly be an easier path than using the HTML video element. iframe elements are cross-platform compatible and could reduce hosting demands if you are working with heavy video files on your own server.

That said, an iframe is essentially a sandbox serving a page from an outside source. They’re not weightless, and we have no control over the code they contain. There are also GDPR considerations when it comes to services (such as YouTube) due to cookies, data privacy, and third-party ads.

Solving SVG Headaches In Gatsby #

SVGs contribute to improved page performance in several ways. Their vector nature results in a much smaller file size compared to raster images, and they can be scaled up without compromising quality. And SVGs can be compressed with GZIP, further reducing file sizes.

That said, there are several ways that we can use SVG files. Let’s tackle each one in the contact of Gatsby.

Using Inline SVG #

SVGs are essentially lines of code that describe shapes and paths, making them lightweight and highly customizable. Due to their XML-based structure, SVG images can be directly embedded within the HTML <svg> tag.

import * as React from "react";


const SVGInline = () => {

  return (

    <svg viewBox="0 0 24 24" fill="#000000">

      <!-- etc. -->

    </svg>

  );

};

Just remember to change certain SVG attributes, such as xmlns:xlink or xlink:href, to JSX attribute spelling, like xmlnsXlink and xlinkHref, respectively.

Using SVG In img Elements #

An SVG file can be passed into an img element’s src attribute like any other image file.

import * as React from "react";

import picture from "./assets/svg/picture.svg";

const SVGinImg = () => {
  return <img src={ picture } alt="Picture" />;
};

Loading SVGs inline or as HTML images are the de facto approaches, but there are React and Gatsby plugins capable of simplifying the process, so let’s look at those next.

Inlining SVG With The react-svg Plugin #

react-svg provides an efficient way to render SVG images as React components by swapping a ReactSVG component in the DOM with an inline SVG.

Once installing the plugin, import the ReactSVG component and assign the SVG file to the component’s src attribute:

import * as React from "react";

import { ReactSVG } from "react-svg";

import camera from "./assets/svg/camera.svg";

const SVGReact = () => {
  return <ReactSVG src={ camera } />;
};

Using The gatsby-plugin-react-svg Plugin #

The gatsby-plugin-react-svg plugin adds svg-react-loader to your Gatsby project’s webpack configuration. The plugin adds a loader to support using SVG files as React components while bundling them as inline SVG.

Once the plugin is installed, add it to the gatsby-config.js file. From there, add a webpack rule inside the plugin configuration to only load SVG files ending with a certain filename, making it easy to split inline SVGs from other assets:

// gatsby-config.js

module.exports = {
  plugins: [
    {
      resolve: "gatsby-plugin-react-svg",

      options: {
        rule: {
          include: /\.inline\.svg$/,
        },
      },
    },
  ],
};

Now we can import SVG files like any other React component:

import * as React from "react";

import Book from "./assets/svg/book.inline.svg";

const GatsbyPluginReactSVG = () => {
  return <Book />;
};

And just like that, we can use SVGs in our Gatsby pages in several different ways!

Conclusion #

Even though I personally love Gatsby, working with media files has given me more than a few headaches.

As a final tip, when needing common features such as images or querying from your local filesystem, go ahead and install the necessary plugins. But when you need a minor feature, try doing it yourself with the methods that are already available to you!

If you have experienced different headaches when working with media in Gatsby or have circumvented them with different approaches than what I’ve covered, please share them! This is a big space, and it’s always helpful to see how others approach similar challenges.

Again, this article is the first of a brief two-part series on curing headaches when working with media files in a Gatsby project. The following article will be about avoiding headaches when working with different media files, including Markdown, PDFs, and 3D models.
Wednesday, October 11, 2023

A High-Level Overview Of Large Language Model Concepts, Use Cases, And Tools

 While AI remains a collective point of interest — or doom, depending on your outlook — it also remains a bit of a black box. What exactly is inside an AI application that makes it seem as though it can hold a conversation? Discuss the concept of large language models (LLMs) and how they are implemented with a set of data to develop an application. Joas compares a collection of no-code and low-code apps designed to help you get a feel for not only how the concept works but also to get a sense of what types of models are available to train AI on different skill sets.

Even though a simple online search turns up countless tutorials on using Artificial Intelligence (AI) for everything from generative art to making technical documentation easier to use, there’s still plenty of mystery around it. What goes inside an AI-powered tool like ChatGPT? How does Notion’s AI feature know how to summarize an article for me on the fly? Or how are a bunch of sites suddenly popping up that can aggregate news and auto-publish a slew of “new” articles from it?

It all can seem like a black box of mysterious, arcane technology that requires an advanced computer science degree to understand. What I want to show you, though, is how we can peek inside that box and see how everything is wired up.

Specifically, this article is about large language models (LLMs) and how they “imbue” AI-powered tools with intelligence for answering queries in diverse contexts. I have previously written tutorials on how to use an LLM to transcribe and evaluate the expressed sentiment of audio files. But I want to take a step back and look at another way around it that better demonstrates — and visualizes — how data flows through an AI-powered tool.

We will discuss LLM use cases, look at several new tools that abstract the process of modeling AI with LLM with visual workflows, and get our hands on one of them to see how it all works.

Large Language Models Overview #

Forgoing technical terms, LLMs are vast sets of text data. When we integrate an LLM into an AI system, we enable the system to leverage the language knowledge and capabilities developed by the LLM through its own training. You might think of it as dumping a lifetime of knowledge into an empty brain, assigning that brain to a job, and putting it to work.

“Knowledge” is a convoluted term as it can be subjective and qualitative. We sometimes describe people as “book smart” or “street smart,” and they are both types of knowledge that are useful in different contexts. This is what artificial “intelligence” is created upon. AI is fed with data, and that is what it uses to frame its understanding of the world, whether it is text data for “speaking” back to us or visual data for generating “art” on demand.

Use Cases #

As you may imagine (or have already experienced), the use cases of LLMs in AI are many and along a wide spectrum. And we’re only in the early days of figuring out what to make with LLMs and how to use them in our work. A few of the most common use cases include the following.

  • Chatbot
    LLMs play a crucial role in building chatbots for customer support, troubleshooting, and interactions, thereby ensuring smooth communications with users and delivering valuable assistance. Salesforce is a good example of a company offering this sort of service.
  • Sentiment Analysis
    LLMs can analyze text for emotions. Organizations use this to collect data, summarize feedback, and quickly identify areas for improvement. Grammarly’s “tone detector” is one such example, where AI is used to evaluate sentiment conveyed in content.
  • Content Moderation
    Content moderation is an important aspect of social media platforms, and LLMs come in handy. They can spot and remove offensive content, including hate speech, harassment, or inappropriate photos and videos, which is exactly what Hubspot’s AI-powered content moderation feature does.
  • Translation
    Thanks to impressive advancements in language models, translation has become highly accurate. One noteworthy example is Meta AI’s latest model, SeamlessM4T, which represents a big step forward in speech-to-speech and speech-to-text technology.
  • Email Filters
    LLMs can be used to automatically detect and block unwanted spam messages, keeping your inbox clean. When trained on large datasets of known spam emails, the models learn to identify suspicious links, phrases, and sender details. This allows them to distinguish legitimate messages from those trying to scam users or market illegal or fraudulent goods and services. Google has offered AI-based spam protection since 2019.
  • Writing Assistance
    Grammarly is the ultimate example of an AI-powered service that uses LLM to “learn” how you write in order to make writing suggestions. But this extends to other services as well, including Gmail’s “Smart Reply” feature. The same thing is true of Notion’s AI feature, which is capable of summarizing a page of content or meeting notes. Hemmingway’s app recently shipped a beta AI integration that corrects writing on the spot.
  • Code and Development
    This is the one that has many developers worried about AI coming after their jobs. It hit the commercial mainstream with GitHub Copilot, a service that performs automatic code completion. Same with Amazon’s CodeWhisperer. Then again, AI can be used to help sharpen development skills, which is the case of MDN’s AI Help feature.

Again, these are still the early days of LLM. We’re already beginning to see language models integrated into our lives, whether it’s in our writing, email, or customer service, among many other services that seem to pop up every week. This is an evolving space.

Types Of Models #

There are all kinds of AI models tailored for different applications. You can scroll through Sapling’s large list of the most prominent commercial and open-source LLMs to get an idea of all the diverse models that are available and what they are used for. Each model is the context in which AI views the world.

Let’s look at some real-world examples of how LLMs are used for different use cases.

Natural Conversation
Chatbots need to master the art of conversation. Models like Anthropic’s Claude are trained on massive collections of conversational data to chat naturally on any topic. As a developer, you can tap into Claude’s conversational skills through an API to create interactive assistants.

Emotions
Developers can leverage powerful pre-trained models like Falcon for sentiment analysis. By fine-tuning Falcon on datasets with emotional labels, it can learn to accurately detect the sentiment in any text provided.

Translation
Meta AI released SeamlessM4T, an LLM trained on huge translated speech and text datasets. This multilingual model is groundbreaking because it translates speech from one language into another without an intermediary step between input and output. In other words, SeamlessM4T enables real-time voice conversations across languages.

Content Moderation
As a developer, you can integrate powerful moderation capabilities using OpenAI’s API, which includes a LLM trained thoroughly on flagging toxic content for the purpose of community moderation.

Spam Filtering
Some LLMs are used to develop AI programs capable of text classification tasks, such as spotting spam emails. As an email user, the simple act of flagging certain messages as spam further informs AI about what constitutes an unwanted email. After seeing plenty of examples, AI is capable of establishing patterns that allow it to block spam before it hits the inbox.

Not All Language Models Are Large #

While we’re on the topic, it’s worth mentioning that not all language models are “large.” There are plenty of models with smaller sets of data that may not go as deep as ChatGPT 4 or 5 but are well-suited for personal or niche applications.

For example, check out the chat feature that Luke Wrobleski added to his site. He’s using a smaller language model, so the app at least knows how to form sentences, but is primarily trained on Luke’s archive of blog posts. Typing a prompt into the chat returns responses that read very much like Luke’s writings. Better yet, Luke’s virtual persona will admit when a topic is outside of the scope of its knowledge. An LLM would provide the assistant with too much general information and would likely try to answer any question, regardless of scope. Members from the University of Edinburgh and the Allen Institute for AI published a paper in January 2023 (PDF) that advocates the use of specialized language models for the purpose of more narrowly targeted tasks.

Low-Code Tools For LLM Development #

So far, we’ve covered what an LLM is, common examples of how it can be used, and how different models influence the AI tools that integrate them. Let’s discuss that last bit about integration.

Many technologies require a steep learning curve. That’s especially true with emerging tools that might be introducing you to new technical concepts, as I would argue is the case with AI in general. While AI is not a new term and has been studied and developed over decades in various forms, its entrance to the mainstream is certainly new and sparks the recent buzz about it. There’s been plenty of recent buzz in the front-end development community, and many of us are scrambling to wrap our minds around it.

Thankfully, new resources can help abstract all of this for us. They can power an AI project you might be working on, but more importantly, they are useful for learning the concepts of LLM by removing advanced technical barriers. You might think of them as “low” and “no” code tools, like WordPress.com vs. self-hosted WordPress or a visual React editor that is integrated with your IDE.

Low-code platforms make it easier to leverage large language models without needing to handle all the coding and infrastructure yourself. Here are some top options:

Chainlit #

Chainlit is an open-source Python package that is capable of building a ChatGPT-style interface using a visual editor.

Source: GitHub.

Features:

  • Visualize logic: See the step-by-step reasoning behind outputs.
  • Integrations: Chainlit supports other tools like LangChain, LlamaIndex, and Haystack.
  • Cloud deployment: Push your app directly into a production environment.
  • Collaborate with your team: Annotate dataset and run team experiments.

And since it’s open source, Chainlit is freely available at no cost.

LLMStack #

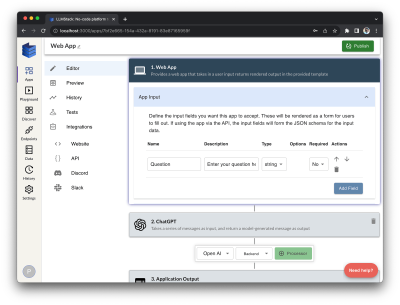
LLMStack visual editing interface
Source: LLMStack. (Large preview)

LLMStack is another low-code platform for building AI apps and chatbots by leveraging large language models. Multiple models can be chained together into “pipelines” for channeling data. LLMStack supports standalone app development but also provides hosting that can be used to integrate an app into sites and products via API or connected to platforms like Slack or Discord.

LLMStack is also what powers Promptly, a cloud version of the app with freemium subscription pricing that includes a free tier.

FlowiseAI #

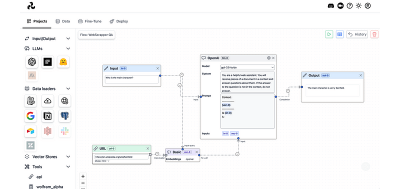
Source: FlowiseAI

What makes FlowiseAI unique is its drag-and-drop interface. It’s a lot like working with a mind-mapping app or a flowchart that stitches apps together with LLM APIs for a truly no-code visual editing experience. Plus, Flowise is freely available as an open-source project. You can grab any of the 330K-plus LLMs in the Hugging Face community.

Cloud hosting is a feature that is on the horizon, but for now, it is possible to self-host FlowiseAI apps or deploy them on other services such as Raleway, Render, and Hugging Face Spaces.

Stack AI #

Stack AI visual editing interface
(Large preview)

Stack AI is another no-code offering for developing AI apps integrated with LLMs. It is much like FlowiseAI, particularly the drag-and-drop interface that visualizes connections between apps and APIs. One thing I particularly like about Stack AI is how it incorporates “data loaders” to fetch data from other platforms, like Slack or a Notion database.

I also like that Stack AI provides a wider range of LLM offerings. That said, it will cost you. While Stack AI offers a free pricing tier, it is restricted to a single project with only 100 runs per month. Bumping up to the first paid tier will set you back $199 per month, which I suppose is used toward the costs of accessing a wider range of LLM sources. For example, Flowise AI works with any LLM in the Hugging Face community. So does Stack AI, but it also gives you access to commercial LLM offerings, like Anthropic’s Claude models and Google’s PaLM, as well as additional open-source offerings from Replicate.

Voiceflow #

Source: Voiceflow

Voiceflow is like Flowise and Stack AI in the sense that it is another no-code visual editor. The difference is that Voiceflow is a niche offering focused solely on developing voice assistant and chat applications. Whereas the other offerings could be used to, say, train your Gmail account for spam filtering, Voiceflow is squarely dedicated to developing voice flows.

There is a free sandbox you can use to test Voiceflow’s features, but using Voiceflow for production-ready app development starts at $50 per month for individual use and $185 per month for collaborative teamwork for up to three users.

“The Rest” #

The truth is that no-code and low-code visual editors for developing AI-powered apps with integrated LLMs are being released all the time, or so it seems. Profiling each and every one is outside the scope of this article, though it would certainly be useful perhaps in another article.

That said, I have compiled a list of seven other tools in the following table. Even though I have not taken the chance to demo each and every one of them, I am providing what information I know about them from their sites and documentation, so you have a wider set of tools to compare and evaluate for your own needs.

NameDescriptionExample UsesPricingDocumentation
Dify“Seamlessly build & manage AI-native apps based on GPT-4.”Chatbots, natural language search, content generation, summarization, sentiment analysis.Free (open source)Documentation
re:tune“Build chatbots for any use case, from customer support to sales and more.” “Connect any data source to your chatbot, from your website to hyper-personalized customer data."Customer service chatbots, sales assistants.$0-$399 per month with lifetime access plans available.Roadmap
Botpress“The first next-generation chatbot builder powered by OpenAI. Build ChatGPT-like bots for your project or business to get things done.”Chatbots, natural language search, content generation, summarization, sentiment analysis.Free for up to 1,000 runs per month with monthly pricing for additional runs in $25 increments.Documentation
Respell“Respell makes it easy to use AI in your work life. Our drag-and-drop workflow builder can automate a tedious process in minutes. Powered by the latest AI models.”Chatbots, natural language search, content generation, summarization, sentiment analysis.A free starter plan is available with more features and integrations starting at $20 per month.Documentation
Superagent"Make your applications smarter and more capable with AI-driven agents. Build unique ChatGPT-like experiences with custom knowledge, brand identity, and external APIs.”Chatbots, legal document analysis, educational content generation, code reviews.Free (open source)Documentation
Shuttle“ShuttleAI is comprised of multiple LLM agents working together to handle your request. Starting from the beginning itself, they expand upon the user’s prompt, reason about the project, and define a plan of action.”Creating a social media or community platform; developing an e-commerce site/store; making a booking/reservation system; constructing a dashboard for data insights.Free with custom pricing options while Shuttle Pro is in a beta trial.Documentation
Passio“Ready to use Mobile AI Modules and SDK for your brand. Our Mobile AI platform supports complete end-to-end development of AI-powered applications, enabling you to rapidly add computer vision and AI-powered experiences to your apps.”Food nutrition analysis, paint color detection, object identification.FreeBlog

Example: AI Career Assistant With FlowiseAI #

Let’s get a feel for developing AI applications with no-code tools. In this section, I will walk you through a demonstration that uses FlowiseAI to train an AI-powered career assistant app trained with LLMs. The idea is less about promoting no-code tools than it is an extremely convenient way to visualize how the components of an AI application are wired together and where LLMs fit in.

Why are we using FlowiseAI instead of any other no-code and low-code tools we discussed? I chose it primarily because I found it to be the easiest one to demo without additional pricing and configurations. FlowiseAI may very well be the right choice for your project, but please carefully evaluate and consider other options that may be more effective for your specific project or pricing constraints.

I also chose FlowiseAI because it leverages LangChain, an open-source framework for building applications using large language models. LangChain provides components like prompt templates, LLMs, and memory that can be chained together to develop use cases like chatbots and question-answering.

To see the possibilities of FlowiseAI first-hand, we’ll use it to develop an AI assistant that offers personalized career advice and guidance by exploring a user’s interests, skills, and career goals. It will take all of these inputs and return a list of cities that not only have a high concentration of jobs that fit the user’s criteria but that provide a good “quality of life” as well.

These are the components we will use to piece together the experience:

  • Retrievers (i.e., interfaces that return documents given an unstructured query);
  • Chains (i.e., the ability to compose components by linking them together visually);
  • Language models (i.e., what “trains” the assistant);
  • Memory (i.e., storing previous sessions);
  • Tools (i.e., functions);
  • Conversational agent (i.e., determine which tools to use based on the user’s input).

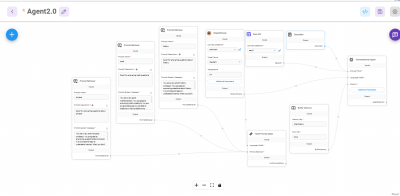
These are the foundational elements that pave the way for creating an intelligent and efficient assistant. Here is a visual of the final configuration in Flowise:

A visual of the final configuration in Flowise, showing how the workflow is organized
(Large preview)

Install FlowiseAI #

First things first, we need to get FlowiseAI up and running. FlowiseAI is an open-source application that can be installed from the command line.

You can install it with the following command:

npm install -g flowise

Once installed, start up Flowise with this command:

npx flowise start

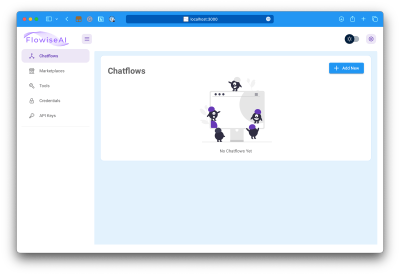
From here, you can access FlowiseAI in your browser at localhost:3000.

FlowiseAI initial screen designed to display chat flows
This is the screen you should see after FlowwiseAI is successfully installed. (Large preview)

It’s possible to serve FlowiseAI so that you can access it online and provide access to others, which is well-covered in the documentation.

Setting Up Retrievers #

Retrievers are templates that the multi-prompt chain will query.

Different retrievers provide different templates that query different things. In this case, we want to select the Prompt Retriever because it is designed to retrieve documents like PDF, TXT, and CSV files. Unlike other types of retrievers, the Prompt Retriever does not actually need to store those documents; it only needs to fetch them.

Let’s take the first step toward creating our career assistant by adding a Prompt Retriever to the FlowiseAI canvas. The “canvas” is the visual editing interface we’re using to cobble the app’s components together and see how everything connects.

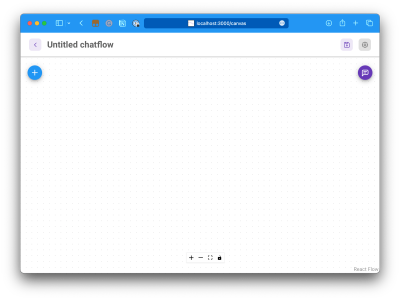
Adding the Prompt Retriever requires us to first navigate to the Chatflow screen, which is actually the initial page when first accessing FlowiseAI following installation. Click the “Add New” button located in the top-right corner of the page. This opens up the canvas, which is initially empty.

Empty canvas
(Large preview)

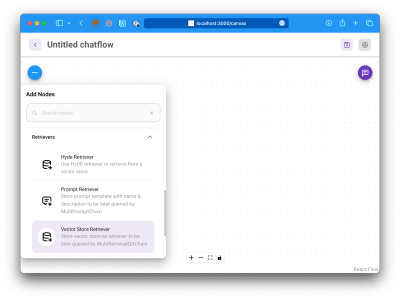
The “Plus” (+) button is what we want to click to open up the library of items we can add to the canvas. Expand the Retrievers tab, then drag and drop the Prompt Retriever to the canvas.

Retrievers tab
(Large preview)

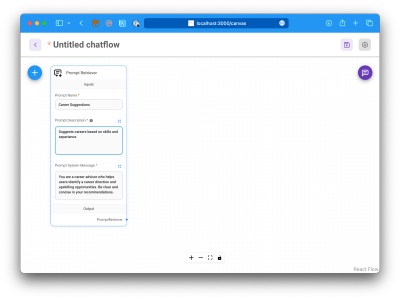
The Prompt Retriever takes three inputs:

  1. Name: The name of the stored prompt;
  2. Description: A brief description of the prompt (i.e., its purpose);
  3. Prompt system message: The initial prompt message that provides context and instructions to the system.

Our career assistant will provide career suggestions, tool recommendations, salary information, and cities with matching jobs. We can start by configuring the Prompt Retriever for career suggestions. Here is placeholder content you can use if you are following along:

  • Name: Career Suggestion;
  • Description: Suggests careers based on skills and experience;
  • Prompt system message: You are a career advisor who helps users identify a career direction and upskilling opportunities. Be clear and concise in your recommendations.
Configuring the Prompt Retriever with inputs
(Large preview)

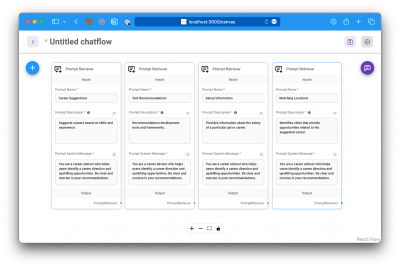
Be sure to repeat this step three more times to create each of the following:

  • Tool recommendations,
  • Salary information,
  • Locations.
Four configured prompt retrievers on the canvas
(Large preview)

Adding A Multi-Prompt Chain #

A Multi-Prompt Chain is a class that consists of two or more prompts that are connected together to establish a conversation-like interaction between the user and the career assistant.

The idea is that we combine the four prompts we’ve already added to the canvas and connect them to the proper tools (i.e., chat models) so that the career assistant can prompt the user for information and collect that information in order to process it and return the generated career advice. It’s sort of like a normal system prompt but with a conversational interaction.

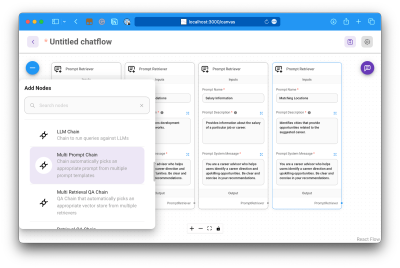
The Multi-Prompt Chain node can be found in the “Chains” section of the same inserter we used to place the Prompt Retriever on the canvas.

Inserting the multi-prompt chain to the canvas
(Large preview)

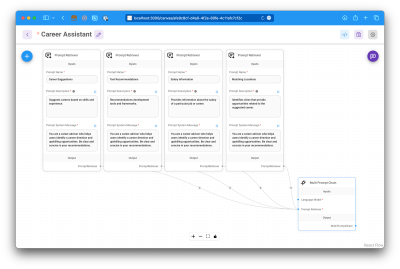
Once the Multi-Prompt Chain node is added to the canvas, connect it to the prompt retrievers. This enables the chain to receive user responses and employ the most appropriate language model to generate responses.

To connect, click the tiny dot next to the “Prompt Retriever” label on the Multi-Prompt Chain and drag it to the “Prompt Retriever” dot on each Prompt Retriever to draw a line between the chain and each prompt retriever.

The chain connected to each prompt retreiver
(Large preview)

Integrating Chat Models #

This is where we start interacting with LLMs. In this case, we will integrate Anthropic’s Claude chat model. Claude is a powerful LLM designed for tasks related to complex reasoning, creativity, thoughtful dialogue, coding, and detailed content creation. You can get a feel for Claude by registering for access to interact with it, similar to how you’ve played around with OpenAI’s ChatGPT.

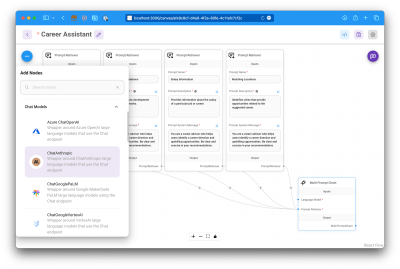
From the inserter, open “Chat Models” and drag the ChatAnthropic option onto the canvas.

Inserting the ChatAnthropic node to the canvas
(Large preview)

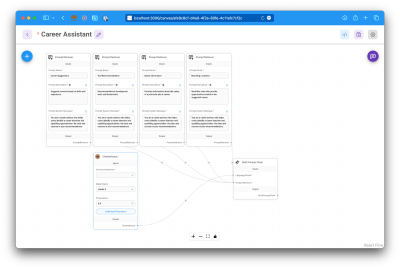
Once the ChatAnthropic chat model has been added to the canvas, connect its node to the Multi-Prompt Chain’s “Language Model” node to establish a connection.

Connecting the language model to the mutlti-chain prompt
(Large preview)

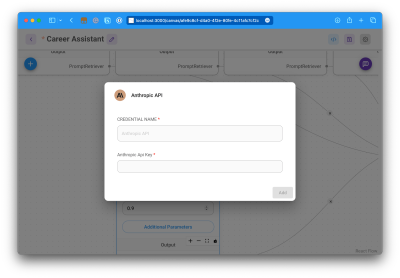
It’s worth noting at this point that Claude requires an API key in order to access it. Sign up for an API key on the Anthropic website to create a new API key. Once you have an API key, provide it to the Mutli-Prompt Chain in the “Connect Credential” field.

Anthropic API field with the credential name and API key
(Large preview)

Adding A Conversational Agent #

The Agent component in FlowiseAI allows our assistant to do more tasks, like accessing the internet and sending emails.

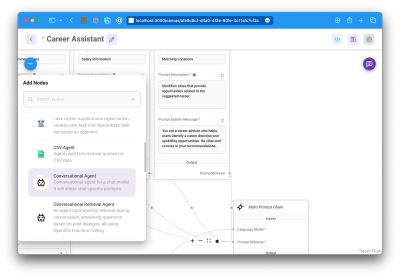
It connects external services and APIs, making the assistant more versatile. For this project, we will use a Conversational Agent, which can be found in the inserter under “Agent” components.

Adding the Conversational Agent to the canvas
(Large preview)

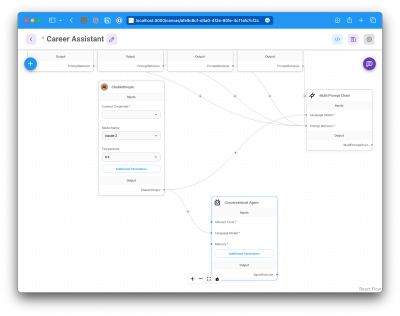
Once the Conversational Agent has been added to the canvas, connect it to the Chat Model to “train” the model on how to respond to user queries.

Conversational Agent connected to the Chat Model
(Large preview)

Integrating Web Search Capabilities #

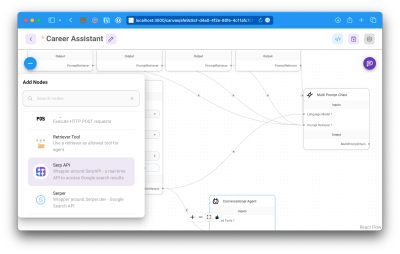
The Conversational Agent requires additional tools and memory. For example, we want to enable the assistant to perform Google searches to obtain information it can use to generate career advice. The Serp API node can do that for us and is located under “Tools” in the inserter.

Adding the Serp API node to the canvas
(Large preview)

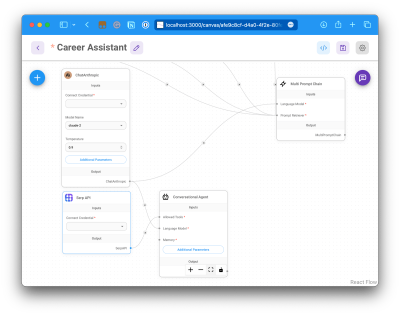
Like Claude, Serp API requires an API key to be added to the node. Register with the Serp API site to create an API key. Once the API is configured, connect Serp API to the Conversational Agent’s “Allowed Tools” node.

Connecting Serp API to the Conversational Agent
(Large preview)

Building In Memory #

The Memory component enables the career assistant to retain conversation information.

This way, the app remembers the conversation and can reference it during the interaction or even to inform future interactions.

There are different types of memory, of course. Several of the options in FlowiseAI require additional configurations, so for the sake of simplicity, we are going to add the Buffer Memory node to the canvas. It is the most general type of memory provided by LangChain, taking the raw input of the past conversation and storing it in a history parameter for reference.

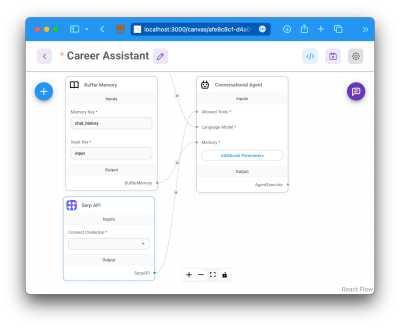
Buffer Memory connects to the Conversational Agent’s “Memory” node.

 Connecting Buffer Memory to the Conversational Agent
(Large preview)

The Final Workflow #

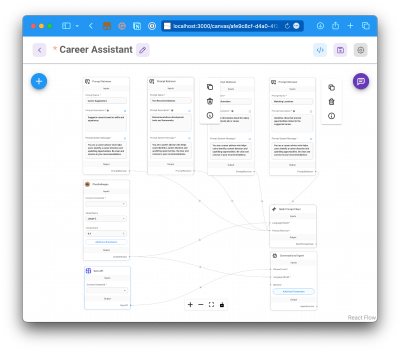
At this point, our workflow looks something like this:

  • Four prompt retrievers that provide the prompt templates for the app to converse with the user.
  • A multi-prompt chain connected to each of the four prompt retrievers that chooses the appropriate tools and language models based on the user interaction.
  • The Claude language model connected to the multi-chain prompt to “train” the app.
  • A conversational agent connected to the Claude language model to allow the app to perform additional tasks, such as Google web searches.
  • Serp API connected to the conversational agent to perform bespoke web searches.
  • Buffer memory connected to the conversational agent to store, i.e., “remember,” conversations.
Showing the entire workfloe on the canvas
(Large preview)

If you haven’t done so already, this is a great time to save the project and give it a name like “Career Assistant.”

Final Demo

Watch the following video for a quick demonstration of the final workflow we created together in FlowiseAI. The prompts lag a little bit, but you should get the idea of how all of the components we connected are working together to provide responses.

Conclusion

As we wrap up this article, I hope that you’re more familiar with the concepts, use cases, and tools of large language models. LLMs are a key component of AI because they are the “brains” of the application, providing the lens through which the app understands how to interact with and respond to human input.

We looked at a wide variety of use cases for LLMs in an AI context, from chatbots and language translations to writing assistance and summarizing large blocks of text. Then, we demonstrated how LLMs fit into an AI application by using FlowiseAI to create a visual workflow. That workflow not only provided a visual of how an LLM, like Claude, informs a conversation but also how it relies on additional tools, such as APIs, for performing tasks as well as memory for storing conversations.

The career assistant tool we developed together in FlowiseAI was a detailed visual look inside the black box of AI, providing us with a map of the components that feed the app and how they all work together.

Now that you know the role that LLMs play in AI, what sort of models would you use? Is there a particular app idea you have where a specific language model would be used to train it?

References #