What
options do we have for integrating GraphQL with WordPress in 2024?
Leonardo Losoviz describes what developments have taken place in this
space during the last three years.
Three years ago, I published “Making GraphQL Work In WordPress,” where I compared the two leading GraphQL servers available for WordPress at the time: WPGraphQL and Gato GraphQL. In the article, I aimed to delineate the scenarios best suited for each.
Full disclosure: I created Gato GraphQL, originally known asGraphQL API for WordPress, as referenced in the article.
A
lot of new developments have happened in this space since my article
was published, and it’s a good time to consider what’s changed and how
it impacts the way we work with GraphQL data in WordPress today.
This time, though, let’s focus less on when
to choose one of the two available servers and more on the developments
that have taken place and how both plugins and headless WordPress, in
general, have been affected.
Headless Is The Future Of WordPress (And Shall Always Be)
There is no going around it: Headless is the future of WordPress!
At least, that is what we have been reading in posts and tutorials for
the last eight or so years. Being Argentinian, this reminds me of an old
joke that goes, “Brazil is the country of the future and shall always
be!” The future is both imminent and far away.
Truth is, WordPress
sites that actually make use of headless capabilities — via GraphQL or
the WP REST API — represent no more than a small sliver of the overall
WordPress market. WPEngine may have the most extensive research into
headless usage in its “The State of Headless” report. Still, it’s
already a few years old and focused more on both the general headless
movement (not just WordPress) and the context of enterprise
organizations. But the future of WordPress, according to the report, is
written in the clouds:
“Headless is emphatically here,
and with the rapid rise in enterprise adoption from 2019 (53%) to 2021
(64%), it’s likely to become the industry standard for large-scale
organizations focused on building and maintaining a powerful, connected
digital footprint. […] Because it’s already the most popular CMS in the
world, used by many of the world’s largest sites, and because it’s
highly compatible as a headless CMS, bringing flexibility,
extensibility, and tons of features that content creators love,
WordPress is a natural fit for headless configurations.”
Just a year ago, a Reddit user informally polled people in r/WordPress, and while it’s far from scientific, the results are about as reliable as the conjecture before it:
Headless
may very well be the future of WordPress, but the proof has yet to make
its way into everyday developer stacks. It could very well be that
general interest and curiosity are driving the future more than tangible
works, as another of WPEngine’s articles from the same year as the
bespoke report suggests when identifying “Headless WordPress” as a hot search term. This could just as well be a lot more smoke than fire.
That’s
why I believe that “headless” is not yet a true alternative to a
traditional WordPress stack that relies on the WordPress front-end
architecture. I see it more as another approach, or flavor, to building
websites in general and a niche one at that.
That was all true merely three years ago and is still true today.
WPEngine “Owns” Headless WordPress
It’s
no coincidence that we’re referencing WPEngine when discussing headless
WordPress because the hosting company is heavily betting on it becoming
the de facto approach to WordPress development.
Take, for instance, WPEngine’s launch of Faust.js,
a headless framework with WPGraphQL as its foundation. Faust.js is an
opinionated framework that allows developers to use WordPress as the
back-end content management system and Next.js to render the front-end
side of things. Among other features, Faust.js replicates the WordPress template system for Next.js, making the configuration to render posts and pages from WordPress data a lot easier out of the box.
WPEngine is well-suited for this task, as it can offer hosting for both Node.js and WordPress as a single solution via its Atlas platform. WPEngine also bought the popular Advanced Custom Fields
(ACF) plugin that helps define relationships among entities in the
WordPress data model. Add to that the fact that WPEngine has taken over
the Headless WordPress
Discord server, with discussions centered around WPGraphQL, Faust,
Atlas, and ACF. It could very well be named the WPEngine-Powered
Headless WordPress server instead.
But WPEngine’s agenda and
dominance in the space is not the point; it’s more that they have a lot
of skin in the game as far as anticipating a headless WordPress future.
Even more so now than three years ago.
GraphQL API for WordPress → Gato GraphQL
I
created a plugin several years ago called GraphQL API for WordPress to
help support headless WordPress development. It converts data pulled
from the WordPress REST API into structured GraphQL data for more
efficient and flexible queries based on the content managed and stored
in WordPress.
More recently, I released a significantly updated version of the plugin, so updated that I chose to rename it to Gato GraphQL, and it is now freely available in the WordPress Plugin Directory.
It’s a freemium offering like many WordPress plugin pricing models. The
free, open-source version in the plugin directory provides the GraphQL
server, maps the WordPress data model into the GraphQL schema, and
provides several useful features, including custom endpoints and
persisted queries. The paid commercial add-on
extends the plugin by supporting multiple query executions, automation,
and an HTTP client to interact with external services, among other
advanced features.
I know this sounds a lot like a product pitch
but stick with me because there’s a point to the decision I made to
revamp my existing GraphQL plugin and introduce a slew of premium
services as features. It fits with my belief that
Gatsby
was perhaps the most popular and leading JavaScript framework for
creating headless WordPress sites at the time my first article was
published in 2021. These days, though, Gatsby is in steep decline and its integration with WordPress is no longer maintained.
Next.js was also a leader back then and is still very popular today. The framework includes several starter templates designed specifically for headless WordPress instances.
Today, in 2024, we continue to see new JavaScript framework entrants in the space, notably Astro.
Despite Gatsby’s recent troubles, the landscape of using JavaScript
frameworks to create front-end experiences from the WordPress back-end
is largely the same as it was a few years ago, if maybe a little easier,
thanks to the availability of new templates that are integrated right
out of the box.
GraphQL Transcends Headless WordPress
The
biggest difference between the WPGraphQL and Gato GraphQL plugins is
that, where WPGraphQL is designed to convert REST API data into GraphQL
data in a single direction, Gato GraphQL uses GraphQL data in both directions
in a way that can be used to manage non-headless WordPress sites as
well. I say this not as a way to get you to use my plugin but to help
describe how GraphQL has evolved to the point where it is useful for
more cases than headless WordPress sites.
Managing a WordPress site via GraphQL is possible because GraphQL is an agnostic tool for interacting with data,
whatever that interaction may be. GraphQL can fetch data from the
server, modify it, store it back on the server, and invoke external
services. These interactions can all be coded within a single query.
GraphQL can then be used to regex search and replace a string in all posts,
which is practical when doing site migrations. We can also import a
post from another WordPress site or even from an RSS feed or CSV source.
And thanks to the likes of WordPress hooks and WP-Cron, executing a GraphQL query can be an automated task. For instance, whenever the publish_post hook is triggered — i.e., a new post on the site is published — we can execute certain actions, like an email notification to the site admin, or generate a featured image with AI if the post lacks one.
In short, GraphQL works both ways and opens up new possibilities for better developer and author experiences!
GraphQL Becomes A “Core” Feature In WordPress 6.5
I have gone on record saying that GraphQL should not be a core part of WordPress.
There’s a lot of reasoning behind my opinion, but what it boils down to
is that the WP REST API is perfectly capable of satisfying our needs
for passing data around, and adding GraphQL to the mix could be a security risk in some conditions.
My concerns aside, GraphQL officially became a first-class citizen of WordPress when it was baked into WordPress 6.5 with the introduction of Plugin Dependencies,
a feature that allows plugins to identify other plugins as
dependencies. We see this in the form of a new “Requires Plugins”
comment in a plugin’s header:
/**
 * Plugin Name: My Ecommerce Payments for Gato GraphQL
 * Requires Plugins: gatographql
 */
WordPress
sees which plugins are needed for the current plugin to function
properly and installs everything together at the same time, assuming
that the dependencies are readily available in the WordPress Plugin
Directory.
So, check this out. Since WPGraphQL and Gato GraphQL are in the plugin directory, we can now create another
plugin that internally uses GraphQL and distributes it via the plugin
directory or, in general, without having to indicate how to install it.
For instance, we can now use GraphQL to fetch data to render the plugin’s blocks.
In
other words, plugins are now capable of more symbiotic relationships
that open even more possibilities! Beyond that, every plugin in the
WordPress Plugin Directory is now technically part of WordPress Core,
including WPGraphQL and Gato GraphQL. So, yes, GraphQL is now
technically a “core” feature that can be leveraged by other developers.
Helping WordPress Lead The CMS Market, Again
While delivering the keynote presentation during WordCamp Asia 2024, Human Made co-founder Noel Tock discussed the future of WordPress. He argues that WordPress growth has stagnated in recent years,
thanks to a plethora of modern web services capable of interacting and
resulting in composable content management systems tailored to certain
developers in a way that WordPress simply isn’t.
Slide taken from Noel Tock's WordCamp Asia 2024 keynote address. (Large preview)
Tock continues to explain how WordPress can once again become a growth engine by cleaning up the WordPress plugin ecosystem and providing first-class integrations with external services.
Slide taken from Noel Tock's WordCamp Asia 2024 keynote address. (Large preview)
Do
you see where I am going with this? GraphQL could play an instrumental
role in WordPress’s future success. It very well could be the link between WordPress and all the different services it interacts with,
positioning WordPress at the center of the web. The recent Plugin
Dependencies feature we noted earlier is a peek at what WordPress could
look like as it adopts more composable approaches to content management
that support its position as a market leader.
Conclusion
“Headless”
WordPress is still “the future” of WordPress. But as we’ve discussed,
there’s very little actual movement towards that future as far as
developers buying into it despite displaying deep interest in headless
architectures, with WordPress purely playing the back-end role.
There
are new and solid frameworks that rely on GraphQL for querying data,
and those won’t go away anytime soon. And those frameworks are the ones
that rely on existing WordPress plugins that consume data from the
WordPress REST API and convert it to structured GraphQL data.
Meanwhile,
WordPress is making strides toward greater innovation as plugin
developers are now able to leverage other plugins as dependencies for
their plugins. Every plugin listed in the WordPress Plugin Directory is
essentially a feature of WordPress Core, including WPGraphQL and Gato
GraphQL. That means GraphQL is readily available for any plugin
developer to tap into as of WordPress 6.5.
GraphQL can be used not
only for headless but also to manage the WordPress site. Whenever data
must be transformed, whether locally or by invoking an external service,
GraphQL can be the tool to do it. That even means that data transforms can be triggered automatically to open up new and interesting ways to manage content, both inside and outside of WordPress. It works both ways!
So,
yes, even though headless is the future of WordPress (and shall always
be), GraphQL could indeed be a key component in making WordPress once
again an innovative force that shapes the future of CMS.
WordPress
Playground began as an experiment to see what a self-hosted WordPress
experience might look like without the requirement of having to actually
install WordPress. A year later, the experiment has evolved into a
full-fledged project that not only abstracts installation but opens up
WordPress to a slew of new opportunities. Ganesh Dahal demonstrates how
WordPress Playground works and gets deep into how it might be used.
Many
things have changed in WordPress over the years, but installation has
largely remained the same: download WordPress, drop it on a server,
create a database, sprinkle in some configuration, and presto,
we have a WordPress site. This process was once lovingly referred to as
the “famous five-minute install,” although that moniker seems to have faded with time, particularly as many hosting providers offer a more streamlined experience.
But
what if WordPress didn’t require any setup at all? As in, you tap a
link, and WordPress spins up a site for you right there, on demand?
That’s probably difficult to imagine, considering WordPress runs on top
of PHP, MySQL databases, and Apache. It’s not the most portable system.
In
that clip, Matt describes WordPress Playground as a “virtual machine,”
and it’s an apt description because all of the standard requirements for
running WordPress — PHP, web server, database, and so on — are created
directly in the browser. It completely abstracts installation to the
extent that there’s absolutely no learning curve or technical knowledge
to get a WordPress instance up and running!
How WordPress Playground Works
There’s a catch to all of this: the instance is temporary.
That’s right. If you even do so much as refresh your browser, the instance is gone.
It’s as though the site evaporates into thin air. It’s not even
captured in the Web Archive’s Wayback Machine. The site effectively
never existed. Matt is right in calling WordPress Playground a virtual
machine because it’s effectively a simulation of WordPress.
I’m not the right person to show you how WordPress Playground works under the hood,
nor is that the scope of what I’m writing about. What I can tell you
about, though, are the primary components that pull it all together:
WebAssembly (Wasm),
SQLite,
Web Service Worker API.
This cocktail of tech is what allows PHP to run in the browser (WebAssembly), data to be saved to a self-contained database engine (SQLite), and the site to run offline without a proper internet connection (Service Worker API).
The
result is what you might call a “disposable WordPress sandbox” more
than a live site you would find in a production environment. Playground
creates instances that are more like isolated testing environments. In
fact, it’s an ideal place to test code, themes, and plugins in different
environments because Playground is capable of running different versions of PHP and WordPress, and all it takes is hitting Playground’s API with a URL. This one, for example, is pointed at the Playground site where Playground is installed and triggers a WordPress instance running WordPress 6.2 in a PHP 8.2 environment:
https://playground.wordpress.net/?php=8.2&wp=6.2
We’ll get to more features in a moment. The important thing to know right now is that WordPress Playground is a virtual
machine that mimics a server environment capable of running WordPress
directly in the browser without actually accessing a real server.
So, it’s a WordPress simulation disconnected from the web but running
in a web browser, not totally unlike a local WordPress installation that
exists only on your machine.
Other WordPress Sandboxes
WordPress
Playground is not the only — or even the first — solution to offer a
disposable WordPress sandbox that can be used for testing. Some of the
more popular options that already exist include:
That
last one, WP Sandbox, formally shut its doors on September 23, 2023. It
was owned by Liquid Web by way of StellarWP, which had acquired the
service when they were part of Modern Tribe. I don’t have any inside
information as far as why they decided to close the shop, but the
introduction of WordPress Playground couldn’t have helped. I’m sure the
other services are mulling over whether Playground will impact them and
their businesses.
It’s not like Playground is exactly the same as
other WordPress sandboxes. We are talking about a different technology
stack. For instance, some services are built on top of a WordPress
multi-site network, where you’re essentially spinning up a site on their
server.
Despite the functional similarities between Playground
and other sandboxes, there’s still plenty of room in the market, at
least at the time of this writing.
For
example, let’s look at the onboarding experience for TasteWP. You can
create a new WordPress site instantly by hitting the following URL: https://tastewp.com/new/.
After a brief series of actions, TasteWP welcomes you to your new site
directly in the WordPress admin. You’re already logged in and
everything.
Notice how the URL is a subdomain of a TasteWP-related top-level domain: hangingpurpose.s1-tastewp.com. It generates an instance on the multi-site network and establishes a URL for it based on a randomized naming system.
There’s
a giant countdown timer on the screen that indicates when the site is
scheduled to expire. That makes sense, right? Allowing anyone and
everyone to create a site on the spot without so much as a login could
become taxing on the server, so allowing sites to self-destruct on a
schedule is likely as much to do with self-preservation as it does
economics.
Speaking of economics, the countdown timer is immediately followed by a call to action to upgrade, which buys you permanence, extra server space, and customer support.
Without
upgrading, though, you are only allowed two free instant sites. But if
you create an account and log into TasteWP, then you can create up to
six test sites on a free pricing tier.
That’s
a look at the “quick” onboarding, but TasteWP does indeed have a more
robust way to spin up a WordPress testing site with a set of advanced
configurations, including which WordPress version to use with which
version of PHP, settings you might normally define in wp-config.php, and options for adding specific themes and plugins.
So,
how does that compare to WordPress Playground? Perhaps the greatest
difference is that a TasteWP site is connected to the internet. It’s not
a WordPress simulation, but an actual instance with a URL you can link
up and share with others… as long as the site hasn’t expired. That could
very well be enough of a differentiation to warrant more players in
this space, even with WordPress Playground hanging around.
I
wanted to give you a sense of what’s already offered before actually
unboxing WordPress Playground. Now that we know what else is out there
let’s turn our attention back to Playground and explore it.
Starting Up WordPress Playground
One of the first interesting things about WordPress Playground is that it is available in not just one but several places.
I wouldn’t liken it completely to a service like TasteWP, where you
create an account to create and manage WordPress instances. It’s more
like a developer tool, one that you can reach for when testing your work
in a WordPress environment.
You can simply hit the playground.wordpress.net URL in your browser to launch a new site on the spot. Or, you can launch an instance from the command line. Perhaps you prefer to use the official Chrome extension instead. Whatever the case, let’s look at those options.
1. Using The WordPress Playground URL
This
is the most straightforward way to get a WordPress Playground instance
up and running. That’s because all you do is visit the playground.wordpress.net address in the browser, and a WordPress site is created immediately.
This
is exactly how the WordPress Playground demo works, prompting you to
click a button to open a new WordPress site. In fact, try clicking the
following button to create one now.
If
you want to use a specific version of WordPress and PHP in your
Playground, all it takes is adding a couple of parameters to the URL.
For example, we can instruct Playground to run WordPress 6.2 on PHP 8.2
with the following URL:
https://playground.wordpress.net/?php=8.2&wp=6.2
You can even try out the developmental versions of WordPress using Playground by using the following parameter:
True to the WordPress ethos, WordPress Playground is very much an open-source project. The repo is available over at GitHub, and we can pull it into a local environment and use WordPress Playground right from a terminal.
First, let’s clone the repository from the command line:
Now that we have the WordPress Playground package in our local environment, we can formally install it:
cd wordpress-playground
npminstallnpm run dev
Once
the local server is running, we should get a URL from the terminal that
we can use to access the new Playground instance, likely pointed to http://localhost:5400/website-server/.
We
are also able to set which versions of WordPress and PHP to use in the
virtual environment by adding a couple of instructions to the command.
For example, this command triggers a new WordPress 5.9 instance running
on PHP 7.4:
wp-now start --wp=5.9 --php=7.4
3. Using wp-now In The Command Line
An even quicker way to get Playground running from the command line is to globally install the wp-now CLI tool:
This way, we can create a new Playground instance anytime you want with a single command:
wp-now start
Be
sure that you’re using Node 18 or higher. Otherwise, you’re likely to
bump into some errors. Once the command executes, however, the browser
will automatically open a new tab pointing to the new instance. You’re
already signed into WordPress and everything!
We can configure the environment just as we could with the npm package:
wp-now start --wp=5.9 --php=7.4
A
neat thing about this method is that there are several different
“modes” you can run this in, and which one you use depends on the
directory you’re in when running the command. For example, if you run
the command from a directory that already contains WordPress, then
Playground will automatically recognize that and run the directory as a
full WordPress installation. Or, it’s possible to execute the command
from a directory that contains nothing but an index.php file, and Playground will start the server and run requests through that file.
There are other options, including modes for theme, plugin, wp-content, and wordpress-develop, that are worth checking out in the documentation.
4. Using The Visual Studio Code Extension
WordPress Playground is also available as a Visual Studio Code extension. It provides a nice one-click process to launch a local WordPress site.
Installing
the extension adds a WordPress icon to the sidebar menu that, when
clicked, opens a panel for launching a new WordPress Playground site.
Open
a project folder, click the “Start WordPress Server,” and the
Playground extension boots up a new site on the spot. The extension also
provides server details, including the local URL, the mode it’s in, and
settings to change which versions of WordPress and PHP are in use.
One thing I noticed while poking at the instance is that it automatically installs and activates the
SQLite Database Integration
plugin. Obviously, that’s a required component for things to work, but I
thought it was worth pointing out that the installation does indeed
include at least one pre-installed plugin right out of the gate.
5. Using A Chrome Extension To Preview Themes & Plugins
Have
you ever found yourself perusing the WordPress Theme Directory and
wanting to take a particular theme out for a test drive? There’s already
a “Preview” button baked right into the directory to do exactly that.
That’s nice, as it opens up the theme in a frame that looks a lot like the classic WordPress Customizer.
But how cool would it be to really
open up the theme and see what it is like to do actual tasks with it in
the WordPress admin, such as creating a post, editing a page, or
exploring its block patterns?
That is what the “Open in WordPress Playground” extension
for Chrome can do. It literally adds a button to “Preview” a theme in a
fresh WordPress Playground instance that, when clicked, allows you to
interact with the theme in a real WordPress environment.
I
tried out the extension, and it worked as described, and not only that,
but it works with the WordPress Plugin Directory as well. In other
words, it’s now possible to try a new plugin on the spot without having
to install, activate, and test it yourself in some sandbox or, worse,
your live or staging WordPress environments.
This
is a potential game-changer as far as lowering the barrier to entry for
using WordPress and for theme and plugin developers offering a
convenient way to provide users with a demo experience. I can easily
imagine a future where paid commercial plugins adopt a similar user
experience to help reduce refunds from customers merely wanting to try a
plugin before formally committing to it.
The extension is available free of charge in the Chrome Web Store, but you can check out the source code in its GitHub repository
as well. While we’re on it, it’s worth noting that this is a
third-party extension rather than an official WordPress or Automattic
release.
The Default Playground Site
No
matter which Playground method you use, the instances that spin up are
nearly identical. For example, all of the methods we covered have the
WordPress Twenty Twenty-Three theme installed and activated by default.
That makes a lot of sense: a standard WordPress installation does the
same.
Similarly, all of the instances we covered make use of the SQLite Database Integration plugin
developed by the WordPress Performance Team. This also makes sense: we
need the plugin to establish a database. It also sounds like from the
plugin description that the intent is to eventually integrate the plugin
into WordPress Core, so perhaps we’ll eventually see zero plugins in a default Playground instance at some point.
There
are a few differences between instances. They’re not massive, but worth
calling out so you know what you are activating or have available when
using a particular method to create a WordPress instance. The following
table breaks down the current components included in each method at the
time of this writing:
Method
WordPress Version
PHP Version
Themes
Plugins
WordPress Playground website
6.3.2
8.0
Twenty Twenty-Three (active)
SQLite Database Integration (active)
GitHub repo
6.3.2
8.0
Twenty Twenty-Three (active)
SQLite Database Integration (active)
wp-now package
6.3.2
8.0.10-dev
Twenty Twenty-Three (active)
Twenty Twenty-Two
Twenty Twenty-One
Akismet
Hello Dolly
SQLite Database Integration (active)
VS Code extension
6.3.2
7.4
Twenty Twenty-Three (active)
Twenty Twenty-Two
Twenty Twenty-One
Akismet
Hello Dolly
SQLite Database Integration (active)
Chrome extension
6.3.2
8.0
Twenty Twenty-Three (active)
SQLite Database Integration (active)
And, of course, any other differences would come from how you configure an instance. For example, if you run the wp-now
package on the command line when you’re in a directory with WordPress
and several themes and plugins installed, then those themes and plugins
will be available to activate and use. Similarly, using the Chrome
Extension on any WordPress Theme Directory page or Plugin Directory page
will install that particular theme or plugin.
Installing Themes, Plugins, and Block Patterns
In a standard WordPress installation, you might log into the WordPress admin, navigate to Appearance → Themes, and install a new theme straight from the WordPress Theme Directory. That’s because your site has a web connection and is able to pull things in from WordPress.org.
Since a WordPress Playground instance from the WordPress Playground
website (which is essentially the same as the Chrome extension) is not
technically connected to the internet, there is no way to install
plugins and themes to it.
If
you want the same sort of point-and-click experience in your Playground
site that you would get in a standard WordPress installation, then go
with the GitHub repo, the wp-now package, or the VS Code
extension. Each of these is indeed connected to the internet and is able
to install themes and plugins directly from the WordPress admin.
You
may notice a note about using the Query API to install a theme or
plugin to a WordPress Playground instance that is disconnected from the
web:
“Playground does not yet support connecting to the themes directory yet. You can still upload a theme or install it using the Query API (e.g. ?theme=pendant).”
That’s
right! We’re still able to load in whatever theme we want by passing
the theme’s slug into the Playground URL used to generate the site. For
example,
https://playground.wordpress.net/?theme=ollie
The same goes for plugins:
https://playground.wordpress.net/?plugin=jetpack
And if we want to bundle multiple plugins, we can pass in each plugin as a separate parameter chain with an ampersand (&) in the URL:
It
does not appear that we can do the same thing with themes. If you’re
testing several themes in a single instance, then it’s probably best to
use the wp-now package or the VS Code extension when pointing at a directory that already includes those themes.
What
about block patterns, you ask? We only get two pre-defined patterns in a
default WordPress Playground instance created on Playground’s site: Posts and Call to Action.
That’s
because block patterns, too, are served to the WordPress admin from an
internet connection. We get a much wider selection of options when
creating an instance using any of the methods that establish a local
host connection.
There
appears to be no way, unfortunately, to import patterns with the Query
API like we can for themes and plugins. The best way to bring in a new
pattern, it seems, is to either bundle them in the theme you are using
(or pointing to) or manually navigate to the Block Pattern Directory and use the “Copy” option to paste a pattern into the page or post you are testing in Playground.
Importing & Exporting Playgrounds
The
transience of a WordPress Playground instance is its appeal. The site
practically evaporates into thin air with the trigger of a page refresh.
But what if you actually want to preserve an instance? Perhaps you need
to come back to your work later. Or maybe you’re working on a visual
tweak and want to demo it for your team. Playground instances can indeed
be exported and even imported into other instances.
Open up a new WordPress site over at the playground.wordpress.net and locate the Upload and Download icons at the top-right corner of the frame.
No
worries, this is not a step-by-step tutorial on how to click buttons.
The only thing you really need to know is that these buttons are only
available in instances created at the WordPress Playground site or when
using the Chrome Extension to preview themes and plugins at WordPress.org.
What’s more interesting is what we get when exporting an instance. We get a ZIP file — wordpress-playground.zip
to be exact — as you might expect. Extract that, and what we have is
the entire website, including the full WordPress installation. It
resembles any other standard WordPress project with a wp-content directory that contains the source files for the installed themes and plugins, as well as media library uploads.
The
only difference I could spot between this WordPress Playground package
and a standard project is that Playground provides the SQLite database
in the export, also conveniently located in the wp-content directory.
This
is a complete WordPress project. Now that we have it and have confirmed
it has everything we would expect a WordPress site to have, we can use
Playground’s importing feature to replicate the exported site in a
brand-new WordPress Playground instance. Click the Upload icon in the
frame of the new instance, then follow the prompts to upload the ZIP
file we downloaded from the original instance.
You
can probably guess what comes next. If we can export a complete
WordPress site with Playground, we can not only import that site into a
new Playground instance but import it to a hosting provider as well.
There
are clear benefits to being able to import and export Playground sites.
WordPress has never been the more portable system. You know that if
you’ve migrated WordPress sites and data. But when WordPress is able to
move around as freely as it does with Playground, it opens up new
possibilities for how we share work.
Sharing With The Query API
We’ve
been using the Query API in many examples. It’s extremely convenient in
that you append parameters on the WordPress Playground site, hit the
URL, and a site spins up with everything specified.
The WordPress
Playground site is hosted, so sharing a specific configuration of a
Playground site only requires you to share a URL with the site’s
configurations appended as parameters. For example. this link shares the
Blue Note theme configured with the Gutenberg plugin:
Again, there are plenty more parameters than what we have explored in this article that are worth checking out in the WordPress Playground documentation.
We already know this is possible because the best example of it is the WordPress Playground developer page.
There’s a Playground instance running and embedded directly on the
page. Even when you spin up a new Playground instance, you’re
effectively running an iframe within an iframe.
Let’s say we want to embed a WordPress site configured with the Pendant theme and the Gutenberg plugin:
So,
really, what we’re doing is using the source URL in a different
context. We can share the URL with someone, and they get to access the
configured site in a browser. In this case, however, we are dropping the
URL into an iframe element in HTML, and the Playground instance renders on the page.
Not
to get too meta, but it’s pretty neat that we can log into a WordPress
production site, create a new page, and embed a Playground instance on
the page with the Custom HTML Block:
What
I like about sharing Playground sites this way is that the instance is
effectively preserved and always accessible. Sure, the data will not
persist on a page refresh, but create the URL once, and you always have a
copy of it previewed on another page that you host.
Speaking of which, WordPress Playground can be self-hosted. You have to imagine that the current Playground API hosted at playground.wordpress.net
will get overburdened with time, assuming that Playground catches on
with the community. If their server is overworked, I expect that the
hosted API will either go away (breaking existing instances) or at least
be locked for creating new instances.
That’s why self-hosting WordPress Playground might be a good idea in the long run.
I can see WordPress developers and agencies reaching for this to
provide customers and clients with demo work. There’s so much potential
and nuance to self-hosting Playground that it might even be worth its
own article.
The documentation provides a list of parameters that can used in the Playground URL.
This
“modern” era of WordPress is all about block-based layouts that lean
more heavily into JaveScript, where PHP has typically been the top boss.
And with this transition, we gained the ability to create entire
WordPress themes without ever opening a template file, thanks to the introduction of theme.json.
Playground can also be configured with structured data. In fact, you can see the Playground website’s JSON configurations via this link.
It’s pretty incredible that we can both configure a Playground site
without writing code and share the file with others to sync
environments.
We
totally can send this file to someone to clone a site we’re working on.
Or, we can use the file in a self-hosted context, and others can pull
it into their own blueprint.
Interestingly, we can even ditch the blueprint file altogether and write the structured data as URL fragments instead:
That
might get untenable really fast, but it is nice that the WordPress
Playground team is thinking about all of the possible ways we might want
to port WordPress.
Advanced Playground Configurations
Up to now, we’ve looked at a variety of ways to configure WordPress Playground using APIs that are provided by or based on playground.wordpress.net. It’s fast, convenient, and pretty darn flexible for something so new and experimental.
But let’s say you need full control
to configure a Playground instance. I mean everything, from which
themes and plugins are preinstalled to prepublished pages and posts,
defining php.ini memory limits, you name it. The JavaScript API
is what you’ll need because it is capable of executing PHP code, make
requests, manage files and directories, and configuring parts of
WordPress that none of the other approaches offer.
<iframe id="wp" style="width: 100%; height: 300px; border: 1px solid #000;"></iframe><script type="module">// Use unpkg for convenienceimport{ startPlaygroundWeb }from'https://unpkg.com/@wp-playground/client/index.js';const client =awaitstartPlaygroundWeb({
iframe: document.getElementById('wp'),
remoteUrl:`https://playground.wordpress.net/remote.html`,});// Let's wait until Playground is fully loadedawait client.isReady();</script>
This is an overly simplistic example that demonstrates how the JavaScript API is embedded in a page in an iframe.
The Playground docs provide a better example of how PHP is used within
JavaScript to do things, like execute a file pointed at a specific path:
Adam Zieliński and Thomas Nattestad offer a nicely commented example with multiple tasks in the article they published over at web.dev:
import{
connectPlayground,
login,
connectPlayground,}from'@wp-playground/client';const client =awaitconnectPlayground(
document.getElementById('wp'),// An iframe{ loadRemote:'https://playground.wordpress.net/remote.html'},);await client.isReady();// Login the user as admin and go to the post editor:awaitlogin(client,'admin','password');await client.goTo('/wp-admin/post-new.php');// Run arbitrary PHP code:await client.run({ code:'<?php echo "Hi!"; ?>'});// Install a plugin:const plugin =awaitfetchZipFile();awaitinstallPlugin(client, plugin);
Once
again, the scope and breadth of using the JavaScript API for advanced
configurations is yet another topic that might warrant its own article.
Wrapping Up
WordPress
Playground is an excellent new platform that’s an ideal testing
environment for WordPress themes, plugins… or even WordPress itself.
Despite the fact that it is still in its early days, Playground is
already capable of some pretty incredible stuff that makes WordPress
more portable than ever.
We looked at lots of ways that Playground accomplishes this. Just want to check out a new theme? Use the playground.wordpress.net
URL configured with parameters supported by the Query API, or grab the
Chrome extension. Need to do a quick test of your theme in a different
PHP environment? Use the wp-now package to spin up a test site locally. Want to let others demo a plugin you made? Embed Playground in an iframe on your site.
WordPress Playground is an evolving space, so keep your eye on it. You can participate in the discussion and request a feature through a pull request or report an issue
that you encounter in your testing. In the meantime, you may want to be
aware of what the WordPress Playground team has identified as known
limitations of the service:
No access to plugins and theme directories in the browser. The theme and plugin directories are not accessible due to the fact that Playgrounds are not connected to the internet, but are virtual environments.
Instances are destroyed on a browser refresh. Because
WordPress Playground uses a browser-based temporary database, all
changes and uploads are lost after a browser refresh. If you want to
preserve your changes, though, use the export feature to download a
zipped archive of the instance. Meanwhile, this is something the team is working on.
iFrame issues with anchor links. Clicking a link in a Playground instance that is embedded on a page in an iframemay trigger the main page to refresh, causing the instance to reset.
How will you use WordPress Playground? WordPress Playground creator Adam Zieliński recently shipped a service that uses Playground to preview pull requests in GitHub.
We all know that WordPress has never put a strong emphasis on developer
experience (DX) the same way other technical stacks do, like static
site generators and headless configurations. But this is exactly the
sort of way that I imagine Playground improving DX to make developing
for WordPress easier and, yes, fun.
In
this article, will take a deep dive into WordPress
Full-Site Editing, examine the tools it provides for theme development,
and provide a tutorial on how to use it to make changes to your site.
Full-Site Editing is one of the main improvements added to the WordPress platform with version 5.9.
It allows users to make sweeping changes to their website design and
layout via a graphic interface, thus moving WordPress closer to the
experience of a page builder. In addition, it offers new ways to create
and customize themes.
These drastic changes have great
consequences not only for the WordPress user experience but also for
large parts of the platform’s ecosphere. For that reason, in this post, I
am planning to take a deep dive into WordPress Full-Site Editing (or FSE for short, there are also discussions about changing the name because it’s a bit of a mouthful).
In
the following, I will first talk about what Full-Site Editing is and
provide a tutorial on how to use it to make changes to your site. I will
also examine the tools it provides for theme development and close with
a discussion of how the arrival of this feature will impact developers,
theme authors, and existing page-builder plugins.
Let’s get started.
Quick note: While FSE was first added to WordPress in version 5.9, it has since been further enhanced by WordPress 6.0. This post includes the latest changes.
What Is WordPress Full-Site Editing?
In
a nutshell, Full-Site Editing means that WordPress now offers the
ability to create and edit page templates and elements like headers and
footers in a block-based graphic user interface.
This
is part of phase two of the Gutenberg project and the preliminary
culmination of a development that saw its beginning with the
introduction of the WordPress block editor
in WordPress 5.0. Since its initial release, the block workflow has
branched out to other parts of the WordPress user interface. For
example, you can now also use it for widget management.
One
of the main goals of Full-Site Editing is to provide users with a
singular workflow for making changes to their WordPress sites. In the
past, you often needed to know several different systems to create a new
menu, compose a page or post content, populate the sidebar, or adjust
the color scheme. Even more complex changes required you to know how to edit page template files
or write CSS. With Full-Site Editing, you can now make changes to
everything in pretty much the same way (even if much of it still happens
in different menus).
For everyday users, the benefit is reduced
dependence on front-end developers. Site owners can now do a lot by
themselves that, in the past, would require technical chops or
professional help, such as making changes to page templates. Plus, those
changes are now visible in the editor right away instead of having to
go back and forth between the front end and back end of your site or
even a code file.
At the same time, Full-Site Editing makes it
easier for theme developers and designers to create markup and allows
for quicker templating.
Main Features
Here are the main building blocks that Full-Site Editing consists of:
Page templates and template parts The
central attractions are two new editor interfaces that allow you to
customize page layouts similar to the normal content editor. You can
move page elements around, change their design (colors, fonts,
alignment, and so on), and add or remove them at will. The same is also
possible for single template parts such as headers and footers. It’s
even possible to edit them separately. Plus, you can export your
templates to use and distribute them as themes.
Global styles and theme.json A
common feature in WordPress page builder plugins, Full-Site Editing
allows you to define global styling for your entire site, such as colors
and typography, in a central place. In the past, you would have to
change the styling in different locations (e.g., the Customizer and
block editor). FSE also introduces the theme.json file, which acts as a nexus for different APIs and contains the majority of styling information in block-based themes.
Template blocks and block patterns Full-Site
Editing adds new block types to WordPress and the WordPress editor.
These include static blocks like the site logo but also dynamic elements
such as blocks for navigation, post titles, and featured images. These
change according to settings in other places. There is even a
full-fledged query block that’s basically the WordPress PHP loop. It
lets you display a list of posts anywhere on the page. Each block also
comes with its own design and configuration options.
Sounds exciting? Then let’s dive into how to use this new WordPress feature practically.
How To Use Full-Site Editing To Customize WordPress
In
the following, I will first go over how to take advantage of Full-Site
Editing as a user. Later, we will also examine what makes this a useful
feature for developers and theme designers.
Prerequisites For Using FSE
In
order to take advantage of Full-Site Editing, the most important thing
is that you have a WordPress site running at least version 5.9. You can
also use a lower version, but then you need to have the Gutenberg plugin installed and up to date.
The
second thing you require is a block theme. That’s a theme that can take
advantage of the new feature. We will go over how these are different
from classic themes later. For now, a good option is Twenty Twenty-Two,
which also came out with WordPress 5.9. I will be using it for this
Full-Site Editing tutorial. Refer to the resources section at the end
for other options.
Finally, if you are giving WordPress Full-Site Editing a spin for the first time, I recommend using a staging site or local development environment for it. That way, you can make all the mistakes you want without anyone knowing.
Overview Of The User Interface
When you are logged into your test site, you can access Full-Site Editing via Appearance > Editor (also notice that the widget and Customizer options are missing).
An alternative way to get there is via the Edit Site link in the WordPress admin taskbar on the front end. Either will land you on the main editor interface.
Let’s walk through all the options available here:
Top left corner:
Let’s start here because it’s easy to overlook. A click on the
WordPress logo opens up a menu to edit templates and template parts. It
also has a link to return to the WordPress dashboard.
Top bar:
This should look familiar to anyone who has used the Gutenberg editor
before. It contains the option to add blocks and block patterns, toggle
between editing and selecting blocks, and undo/redo buttons. You can
also open a list view of the current page, select different template
parts, and jump directly to them.
Top right corner:
Contains the buttons to save changes and preview the design on
different screen sizes. The gear icon opens up settings for templates as
a whole and individual blocks. Besides, that is the option to customize
Global Styles. The three-dot icon contains display options for the
editor, the ability to export templates and template parts, and access
to the welcome guide.
Center: In the middle is
the main editing screen. Here is where you will make changes to page
templates and work with blocks. It is also an accurate representation of
what your design will look like and contains some controls to add
blocks and other elements to the page.
Most of these are togglable, so you can only have those options open that you really need and want.
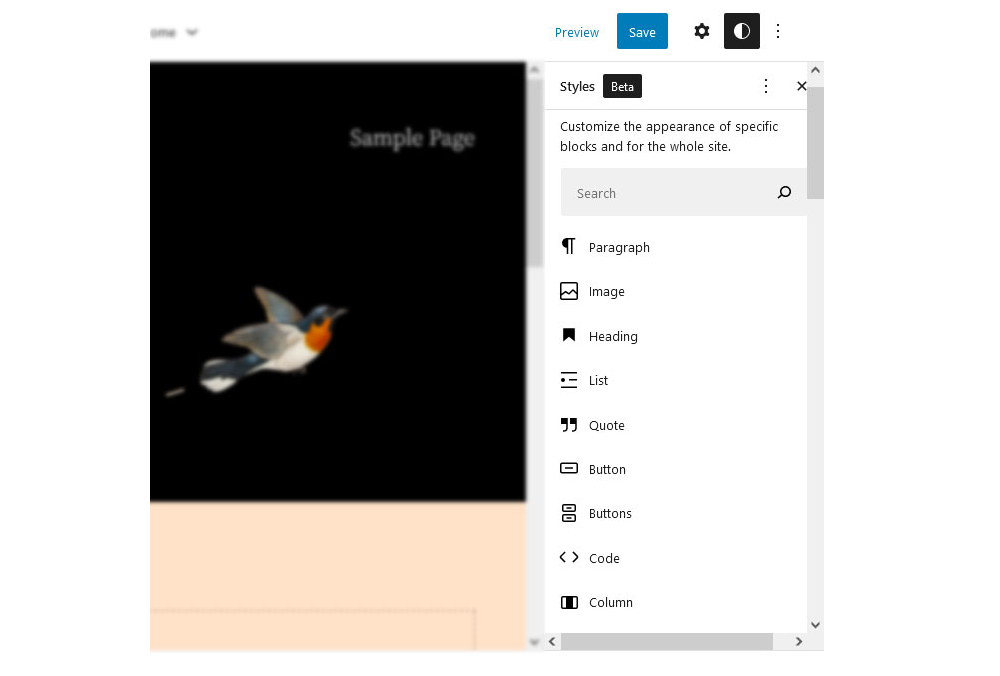
Global Style Presets
As
mentioned above, you can access this menu by clicking the half-black,
half-white circle in the top right corner. It offers two types of
styling options: for the entire website and for individual blocks. What
exactly is available here depends on your theme.
For
Twenty Twenty-Two, you have options for typography, colors, and layout.
We will get to those below. For now, let’s turn to the most exciting
part of the Global Styles menu — the preset color themes. You can find
them when you click on Browse styles.
In
this menu, developers have the possibility to offer styling presets for
the entire theme. Hover over one of the options to see a preview of its
color and font scheme, and then adopt the look for your entire theme
with a single click.
I
really like this feature as it offers users different versions of the
same theme that they can easily use as jump-off points for their own
creations. It’s a bit like themes shipping together with a number of
their own child themes. You can also go back to the previous state by clicking the three dots at the top and choosing Reset to defaults.
Global Styles: Typography
When you click on Typography, you get to a submenu where you can choose whether to customize the styling for general text or links.
Another click gets you to a subsection where you can make the actual changes.
As
you can see, it’s possible to customize the font family, size, line
height, and appearance, meaning font-weight and slant. Options here
depend on the theme as well. For example, under Font family, you can only choose System Font and Source Serif Pro as these are the only options Twenty Twenty-Two ships with.
However,
this is also due to the fact that full support for (local) web fonts
only became available in WordPress 6.0, and this theme came out before
that.
Likewise, the numbers under Size
represent defaults set by the theme authors. You also have the option to
click on the little icon in the upper right corner to set a custom
value.
Line height should be self-explanatory. The Appearance drop-down menu lets you choose font variations from a list.
If you pick any of these options, changes will automatically become visible on the editing screen.
If you don’t like the modifications you have made, you can always reset to defaults, as mentioned above.
Global Colors And Layout
Under Colors, you can change the hue of different elements (duh!).
What’s interesting here is the Palette
option, where the theme can provide its own color palette, including
gradients. This is besides the default options Gutenberg offers and
custom colors that users can create.
Besides
that, just like for typography, the theme provides different options
for elements for which you can change colors. In Twenty Twenty-Two,
that’s Background, Text, and Links.
After
choosing any of these, you get to a screen where you can easily pick a
color or gradient from available options or create your own. When you
do, your pick automatically translates to what you see on the editing
screen.
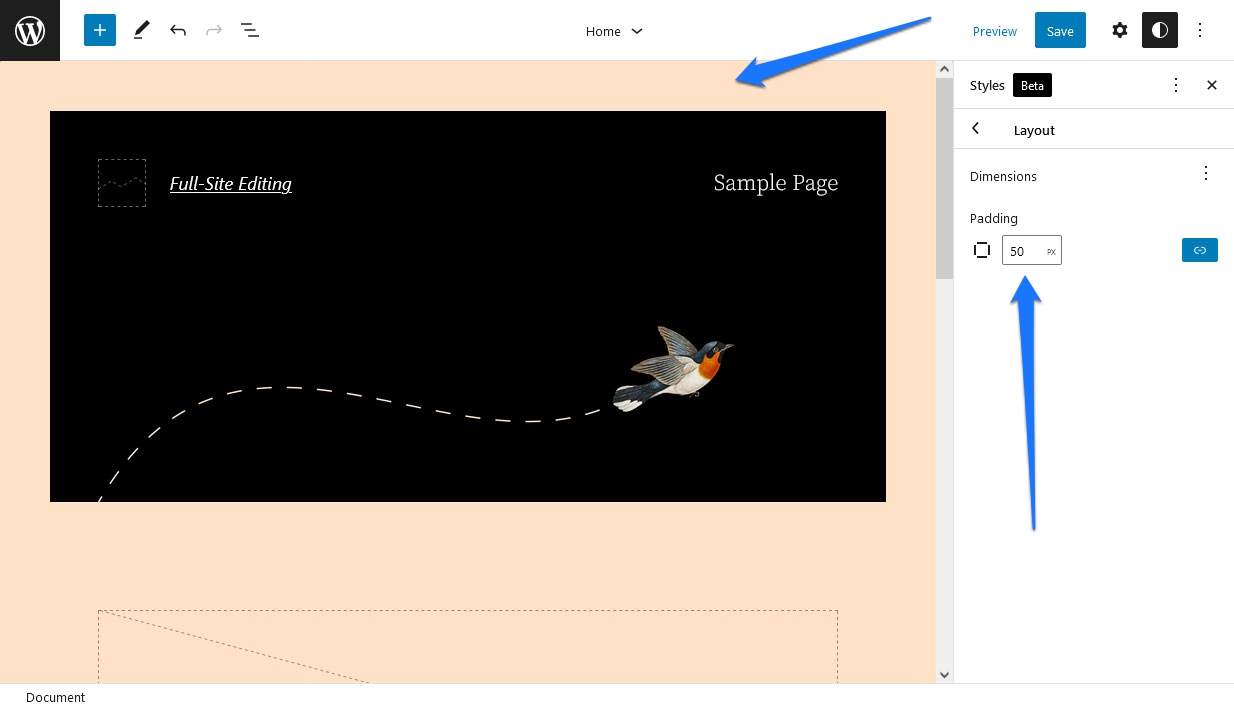
Styling
defaults are not only available for the website as a whole, but you can
also set them for individual blocks. For that, you find an option in
Global Styles at the bottom where it says Blocks.
Click
those in turn to find similar options to customize their design on a
per-block basis. For example, below, I have set the link color globally
to blue but set the color for the Post Title
block (which is also a link) to orange. As a consequence, orange
overwrites the initial value, and the title comes out in that color.
If
you have ever worked with CSS, this principle should be very familiar.
Set some site-wide standards at the top of the style sheet and then
overwrite them with customizations further down in the cascade. It’s the same thing here.
Moving Blocks Around
Making
layout changes works the same way as in the main WordPress block
editor. Everything you see on the screen is made up of blocks. Some may
be combined as groups or block patterns, but they are blocks
nevertheless.
As such, you can move and customize them however you want. For example, the main part of the homepage is the Query Loop block, whose function is to serve up the latest blog posts. However, it, too, is made up of different blocks, namely Post Title, Post Featured Image, Post Excerpt, Post Date, Spacer, and Pagination.
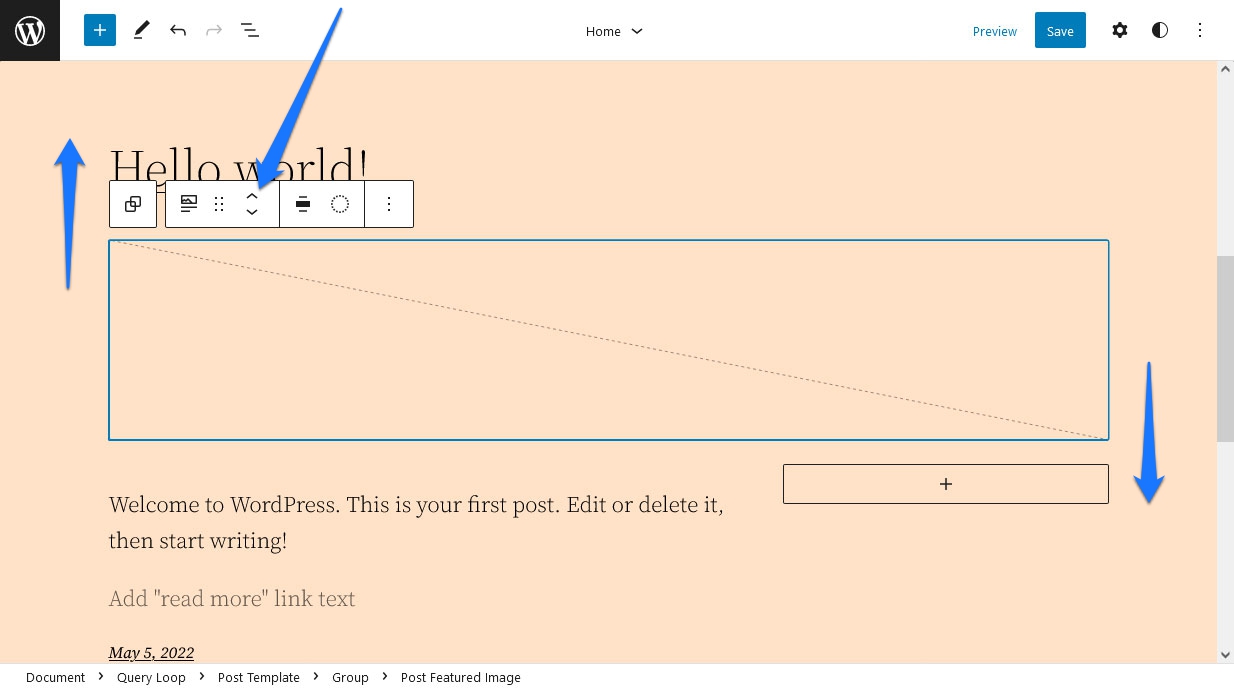
If you want to change something about the way it looks, you can very easily do so. For example, you may click on the Post Featured Image block and then use the arrows in the toolbar to move it below or above the post title.
Alternatively, hover over the block and then use the Drag button (which looks like six dots) to move it to another position. If you hit Save after this, it will translate to the design on your site.
Using Block Options
In
addition to the ability to move them around, every block also comes
with its own settings. Like in the Gutenberg content editor, you can
access those via the gear icon in the upper right corner. When a block
is selected, you will see its customization options there.
What’s available in this place depends on the block you are working with. For example:
Post Featured Image: Has options to add the margin, padding, and configure image dimensions.
Pagination:
Control the justification and orientation of its elements, wrapping,
colors, and whether to show arrows, chevrons, or nothing as indicators.
Post Title: Besides setting colors, you can decide if the title should be a link, open in a new tab, or have a rel= attribute. You can also control colors and typography (including the ability to use Title Case) and add a margin.
You
get the gist. Be aware that there are often more settings hidden that
you can access via a plus or three-dot icon within the sections.
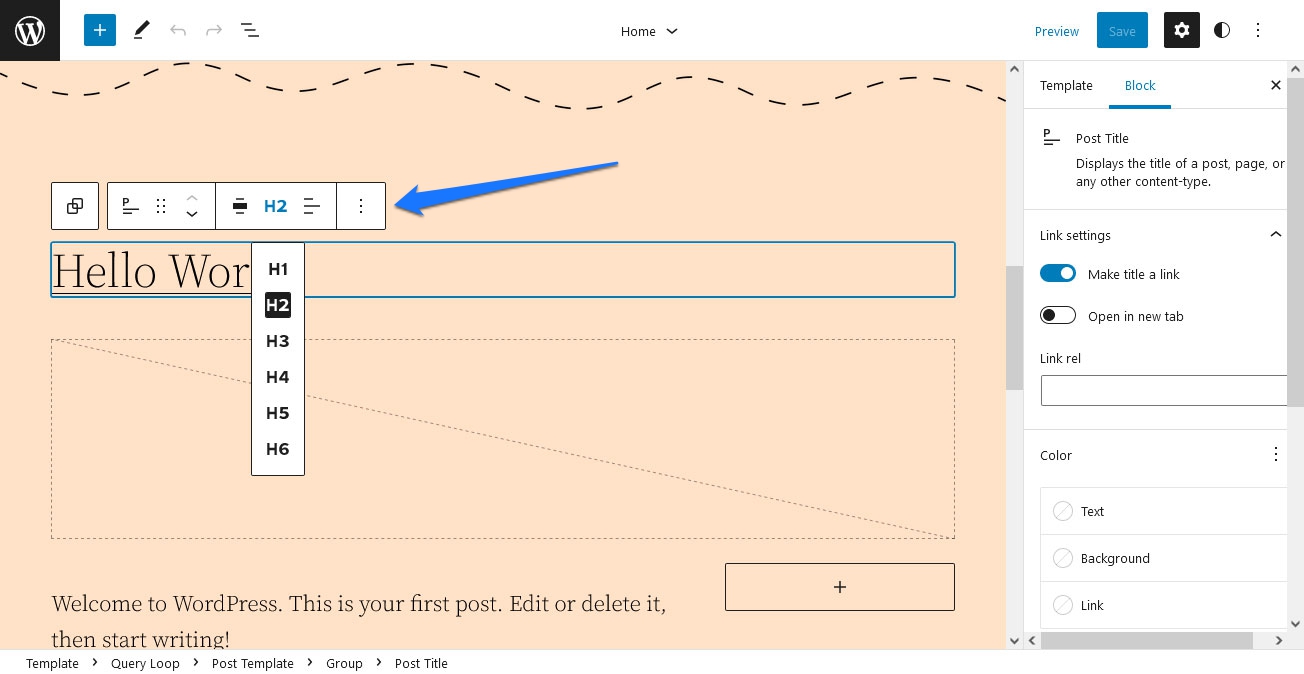
In
addition, there are settings in the toolbar atop blocks when they are
selected. You should not forget those as they can be decisive. For
example, in the case of the Post Title block, it’s where you determine what order of heading (h1-h6) it takes, an important factor for SEO.
Of
course, you can not just customize the available blocks, but you are
also able to add your own. This works the same way as in the content
editor and comes with different options:
Hover over an empty
space in the template until a plus button appears, and click it. Then
search or choose what you want from a list of blocks.
Click existing blocks and use the options button in the top bar to pick Insert before and Insert after.
Use
the plus button in the upper left corner to see and search the full
list of available blocks, then drag and drop them where you want.
In
some places and existing blocks, you will also find icons to add more
blocks. Plus, you have the ability to add block patterns, but we will
talk about this further below.
Leaves the question, how is any of this helpful?
Well,
it means you can easily add both static and dynamic content to the
homepage. An example would be a heading and paragraph above the Query Loop block as an introduction to your blog.
Naturally, you can also remove blocks you don’t want just as easily. Simply select one and hit the Del or backspace button on your keyboard, or remove it via the block options.
You
also have the ability to open a list view at the top (the icon with
three staggered lines) and navigate to blocks from there or choose to
delete them right away.
This option also gives you a great overview of the block structure of whatever part of the site you are currently editing.
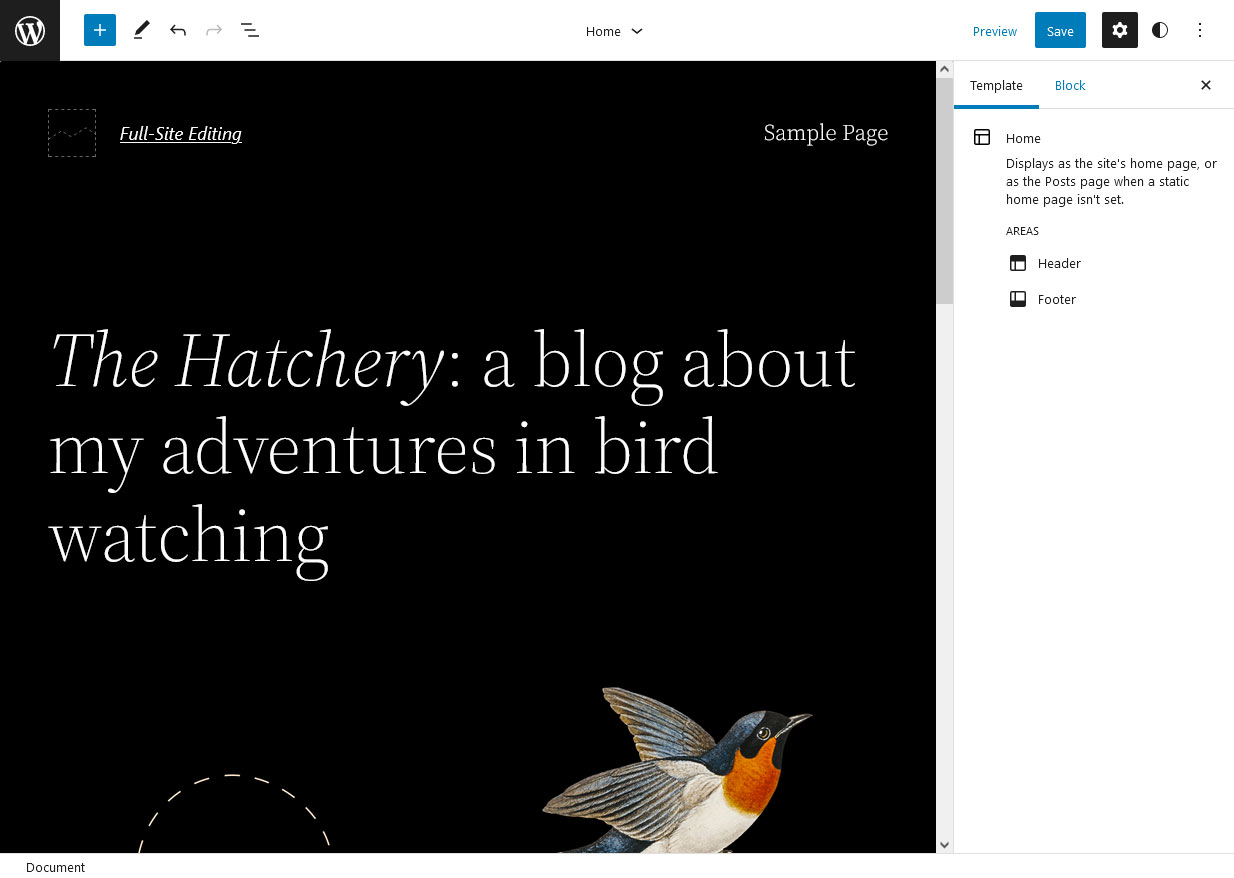
Exchanging And Editing Template Parts
Template
parts are entire sections inside templates that you can exchange as a
whole and modify separately. In the case of Twenty Twenty-Two, that is
the header and footer. You can see this in the template options on the
right or when you click the arrow in the top bar.
Template
parts are just groups of blocks on the page, so you can edit them as
described above. However, what’s special about them is that themes can
offer variations that allow you to change the entire part with one
click.
For example, when you select the header in the example, it will show a Replace option in the settings bar at the bottom.
Twenty
Twenty-Two has several default options to choose from. Click any of
them, and Full-Site Editing will automatically replace the entire header
with the new option.
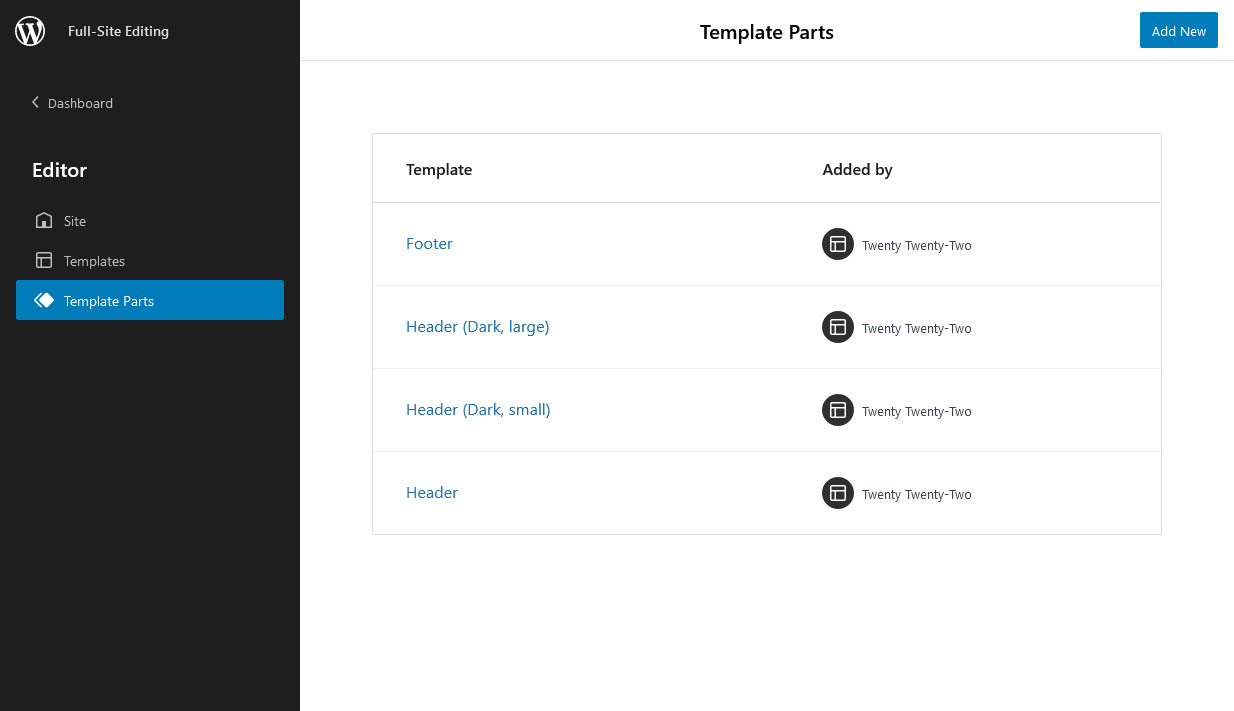
In the Template Parts menu, click Add New
in the upper right corner to create additional ones. This is useful if
you want to make another version of the footer, for example. The cool
thing is when you click it, besides asking for a name, WordPress
automatically gives you templates for both header and footer, so you
don’t have to start from scratch (unless you want to).
Besides
that, you may also just click on existing parts in the list to edit
them. This works the same way as in the main editor. The only thing that
is different for template parts is that you have handles on the left
and right that you can use to shrink and expand the size in order to
check its behavior on smaller screens, i.e., mobile devices.
Just like a template file, anything you change and save here will translate to all pages and templates that use this part.
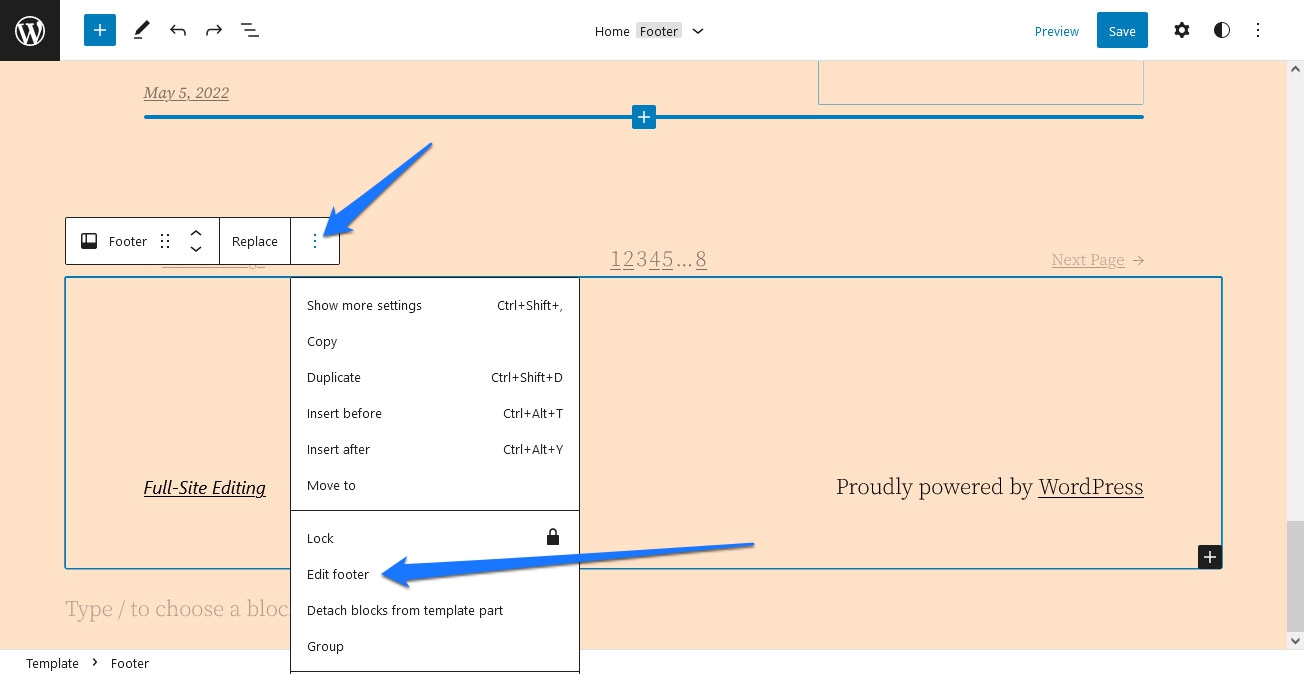
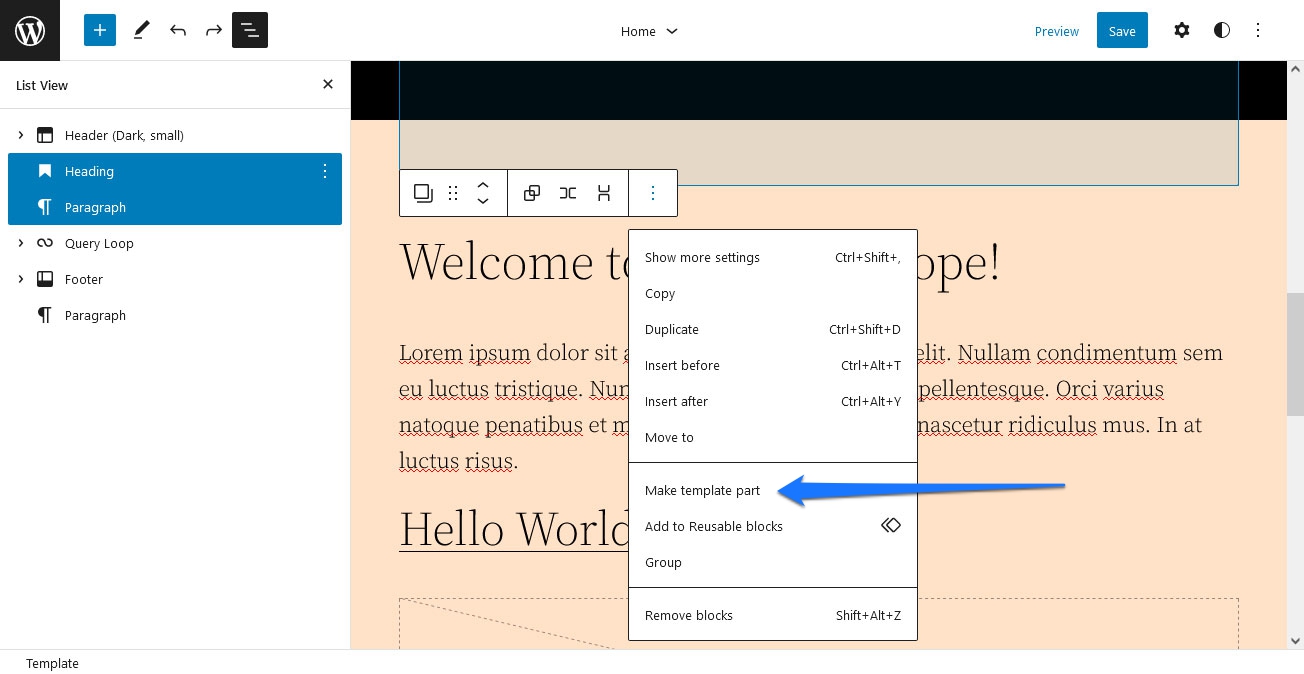
Finally,
if you have set up a group of blocks on the main screen, you can turn
them into a template part as well. Click the options in the main screen
or in the list view and pick Make template part.
You need to give it a name and choose what area it belongs to. When you then save it, it is available as a template part.
Editing Page Templates
In the WordPress logo menu, there is also an item called Templates.
Unsurprisingly, it contains a list of all page templates available on
your site, from the 404-page over archives and single pages to single
posts.
Page
templates are usually files that control the basic layout of different
types of content. If you change the template, all content of that type
changes, too. With Full-Site Editing, you can edit existing templates
and create your own in the user interface instead of a code editor.
Note, however, that FSE only lets you create standard page templates via Add New. More on that soon.
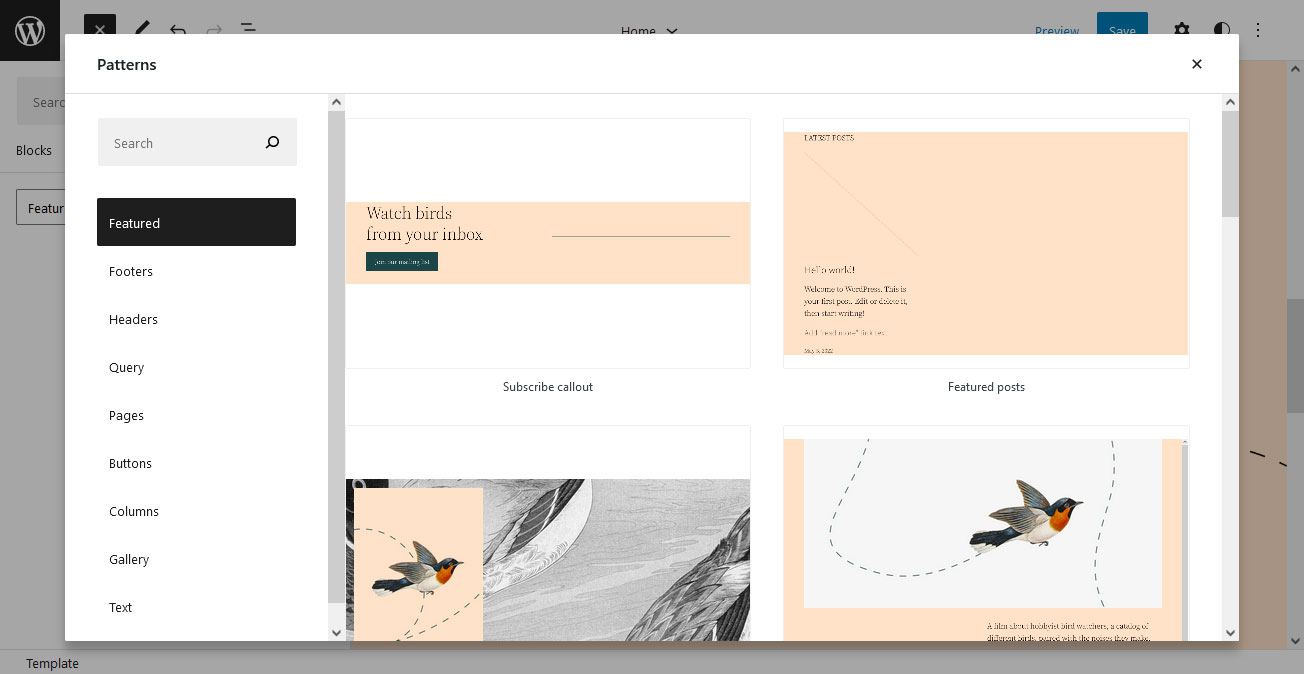
Something
that comes especially handy here (and also for template parts) is block
patterns. These are predesigned layouts consisting of several blocks
you can add to website pages to instantly create entire sections.
Examples include newsletter sign-up forms, pricing tables, and event
lists, but also simple things like a styled divider or an image with a
quote or caption.
Patterns
allow you to put together entire designs quickly. They are easy to use,
too! When editing a template, simply click the plus symbol in the upper
left and go to the Patterns tab.
Filter
the patterns via the drop-down menu at the top, e.g., by featured
patterns, footers, pages, or buttons. If you find something you like,
simply drag and drop it on the page. You can also search for something
specific, like a “header” at the top, which will even show blocks from
the WordPress block directory.
For a better overview, it helps to click on Explore to access the block pattern explorer.
This
shows the block patterns in a larger window with the ability to search
and filter them on the left. A click on a pattern you like automatically
adds it to the template editor, where you can position and customize it
as usual.
By the way, you can clear all customizations you have made for individual templates by clicking the three-dot icon in the Template menu and choosing so.
If you like it and likely want to use it again, click the three dots in the options bar and choose Add to Reusable blocks.
That way, it will, from now on, be available in the block menu under Reusable.
Using The Standalone Templates Editor
There
is a second way to edit and create page templates, which happens in the
normal Gutenberg content editor. It offers less complexity than the
site editor interface (e.g., no access to other templates) but works
similarly.
Simply create a new post or page, then, in the document settings sidebar, locate the Template panel below Status & visibility.
Here,
it lists your current template and makes other options available in the
drop-down menu. You can edit what’s already there via the Edit button or create a new template by selecting New. Each opens the more limited template editing experience.
Edit
and save the template in the same way as in the site editor. Anything
you create this way will also show up in the list of templates in the
Full-Site Editing editor.
Available Blocks For Templating
To
make templating in FSE possible, the developers have added a number of
dynamic blocks that can pull content from the database depending on the
following:
Site title, tagline, and logo;
Post title,
featured image, content, excerpt, author, avatar, author biography,
date, tags, categories, next and previous post, read more;
Post comments, single comment, comments query loop, author, date, content, count, comment form, and link;
Archive title and term description;
Query loop, post list, post template, pagination;
Template part.
These
are also available in the normal WordPress editor. There are more to
come in future versions, and you can get early access to them via the
Gutenberg plugin.
Preview And Save Changes
When you have made all the changes you want, you have the option to preview them in different screen sizes by clicking Preview in the upper right corner.
If you are satisfied, a click on Save will make the modifications permanent. WordPress will also list which templates and template parts your changes will affect.
That
way, if you want to discard them in one place but keep them elsewhere,
you can do so. Simply uncheck those components where you don’t want to
save your changes. Click Save again, and your choices will translate to the front end of your site.
Full-Site Editing For Developers And Designers
Full-Site
Editing is also a useful tool for developers. You can use the interface
to create templates and then export them as files to add to and publish
as themes.
A Quick Primer On Block Theme Architecture
To
take advantage of this, you need to be aware that FSE-ready block
themes have a different architecture than classic WordPress themes. For
one, the template and template-part files for Full-Site Editing no
longer contain PHP but are HTML files with block markup.
Instead of style.css, styling is mostly taken over by theme.json.
Here is where you set up styles for the block editor and individual
blocks, styling presets, as well as CSS defaults (both for the front-end
and backend editor). In fact, theme.json is so powerful that, by modifying it, you can change the style of an entire website.
This also allows you to switch between different sets of global styles (i.e., theme.json files) in the same theme. It’s a feature that only arrived in WordPress 6.0.
Relying mostly on theme.json greatly reduces CSS in other places. For example, Twenty Twenty-Two’s style.css is only 148 lines long. For comparison, its predecessor Twenty Twenty-One has almost 6,000 lines in its style sheet.
In addition, theme.json
uses a whole different kind of markup. Yet, you could write an entire
article just on this one file, so you are better served to start with
the documentation for details.
The minimum requirements for a block theme are to have an index.php, style.css, and an index.html file in a templates folder. The latter is what marks the theme as a block theme to WordPress.
If you want to add template parts, you will place those in a parts folder. Having a functions.php and theme.json files is optional. Finally, you can also include a styles folder for global style presets. For example, this can include different color schemes for the theme.
Besides
the changed structure, you also have different ways of creating
template files when using a block theme. While you can still do it
manually, using the new WordPress interface is also possible.
Using FSE Or The Template Editor To Create Theme Files
If
you want to use the page editors to create templates, the first step is
to simply set up your templates as described in the first part of this
article. One important option here is to know that you can use the Advanced settings for template-part blocks to change their type of HTML element.
When satisfied, you can download all your theme files at once. The option for that is available in the More tools & options menu, which you access by clicking the three dots in the upper right corner of the Full-Site Editing screen.
Here, locate the Export
option. It will automatically download all template and template part
files as a zip. Simply unpack them, and you can use them for your theme.
Manually Creating Block Theme Templates
Of course, it’s also possible to create template files by hand. For that, you just need to be familiar with block markup.
For the most part, these are just HTML comments that contain the name of a block prepended with wp:. Some of them are self-containing. For example, here’s how to add a site-title block to the template:
<!-- wp:site-title /-->
Others, like paragraphs, function like brackets:
<!-- wp:paragraph -->
<p>Lorem ipsum dolor sit amet, consectetur adipiscing elit.</p>
<!-- /wp:paragraph -->
You can also call template parts by stating the file name via slug. Here’s how to call footer.html:
<!-- wp:template-part {"slug":"footer"} /-->
You can even customize the HTML tag (default: div) via the tagName attribute:
Here, too, it’s possible to use one of the editors above
to create blocks and then simply copy the markup over if you are not
sure. Plus, if you save a file and then add it to the respective
location in the theme directory, it will also show up in the FSE editor.
For more details, refer to the resource list below.
Consequences Of Full-Site Editing For The WordPress Ecosphere
Besides
providing a tutorial on how to use Full-Site Editing, I also want to
talk about what its arrival means for the WordPress environment and
those working there.
Job Opportunities For Developers And Designers
As
is to be expected, an important question is whether this kind of
feature will eliminate the need for professional developers and
designers. Are they still needed when users can seemingly do everything
themselves?
The short answer is “yes.”
Neither the emergence
of WordPress itself nor page builders or page builder plugins, or any
other technology that makes it easier for laypeople to build their own
websites have eradicated the need for professional help. And it won’t
happen this time, either.
While these days, users don’t need help
for every little thing (like changing colors or fonts), there are still
lots of tasks that non-technical site owners simply can not do with the
available tools and where they need someone to do it for them. Plus, if
you want a unique design and not rely on a template that hundreds or
thousands of other people might also be using, you still need a designer
and/or developer.
Plus, with great power also comes a great
opportunity to screw things up (to loosely quote Spiderman). Just
because everyone has the tools at their disposal to make a well-designed
website, that doesn’t mean everyone can. Design is more than mere
technical ability.
What’s more, not everyone actually wants to do
the work. They’d rather hire someone with the skills than acquire them
from scratch. Finally, there is so much more to a successful website
than “just” design, such as SEO, performance, security, and maintenance.
So,
even if there are fewer obstacles to building websites, there is no
need to think that designers and developers are a dying breed. In
contrast, the switch to new tools offers plenty of opportunities to
build services and products around them.
What Does FSE Mean For The Theme Market And Theme Designers?
So what about theme creators? Does everyone have to switch to block themes now?
Here,
it’s first important to keep in mind that many themes have not yet
switched to the Gutenberg block editor and that there are still many
users on the Classic Editor. The latter will also continue to work for a
while as the plugin will still be supported until at least the end of 2022.
Also,
all of the features described above are optional, not mandatory.
Therefore, the switch does not have to be immediate. You can even build
hybrid themes that are not complete block themes but are able to use
block templates. This option exists by default unless you specifically switch it off.
Nevertheless,
in the long run, it’s probably a good idea to move your existing themes
over to FSE capabilities. It’s something that WordPress users will
likely grow to expect as it gives them more flexibility and power to
customize themes on their own.
At the same time, as described
above, you can also use Full-Site Editing to create themes with less
coding, which can speed up development time. Plus, it offers new
economic opportunities. Besides themes, theme authors can now offer
extensions like blocks and block patterns, opening up whole new business
models and opportunities.
Full-Site Editing vs. Page Builder Plugins
The
existing page builder plugins are probably one of the biggest question
marks. Will the likes of Divi, Elementor, and Co survive when WordPress
can do a lot of what they were created to provide?
First of all,
it’s unlikely that everyone will immediately switch away from the tools
they are used to working with, so page builder plugins will likely stay
around for a while. Also, many of them are currently more powerful than
what Full-Site Editing is capable of in its present form. Another reason
to stay with what you have.
Overall, these types of plugins have
become very established over the last years, to the point that they
sometimes ship packaged with themes. For that reason, it’s improbable
that they will suddenly lose all their market share. Despite that,
Full-Site Editing will likely eat into it over time, especially with new
users who get to know it as a normal part of WordPress.
Just like
everyone else, page builder plugins will have to evolve so that they
offer things that FSE doesn’t to stay competitive. One way would be to
offer kind of hybrid plugins that extend WordPress’ native page editor.
Similar things already exist for Gutenberg and for the Classic Editor.
Full-Site Editing: Further Resources
If you want to get even deeper into the topic of WordPress Full-Site Editing, I recommend you start with these resources:
Block Editor Handbook The
Block Editor Handbook is generally a good place to start for anything
related to the Gutenberg editor and project. Don’t miss the primer on
block themes, how they work, and how to create them in the Theme Developer Handbook.
WordPress Theme Directory: Block Themes Speaking
of block themes, the official WordPress directory now has a tag for
themes compatible with Full-Site Editing. This way, you can easily find
some to give the feature a spin. More are being added all the time.
Final Thoughts On WordPress Full-Site Editing
Full-Site
Editing is an exciting new chapter in the evolution of WordPress. It
makes the design process easier and more uniform across the entire
platform, offering new opportunities for content creators and users to
customize their pages.
At the same time, FSE comes with
interesting challenges for developers and theme designers. It changes
the architecture of themes as well as introduces new markups and
workflows. However, the feature also offers rewards in terms of new
opportunities and a faster way for prototyping and creating themes that
require less coding.
Above, we have gone over everything FSE has
to offer in detail. My personal impression is that it is a
well-thought-out feature, and I am impressed by how much it can already
do. I’d definitely recommend adding it to your WordPress skill set.
Sure,
there is room for improvement. For example, I could not find an option
to change the hover or active color for links and other elements. Also,
it is not as powerful as existing page builder plugins though I am sure
that new features will close the gap in the future. Yet, I really like
its modularity and the ability to customize different theme parts in
different ways. I’ll surely consider using it more in the future. How
about you?
What are your thoughts on WordPress Full-Site
Editing? How do you think it will impact users, developers, and the
WordPress sphere as a whole? Please share your opinion in the comments!