⭐ If you would like to buy me a coffee, well thank you very much that is mega kind! : https://www.buymeacoffee.com/honeyvig Hire a web Developer and Designer to upgrade and boost your online presence with cutting edge Technologies
Showing posts with label PHP. Show all posts

Thursday, November 6, 2025

How to enable “notify me when back in stock” for Magento 2


If a customer has ever abandoned your online store because the product they want isn’t available or if you’ve ever been forced to sell outdated products for a small percentage of what they originally cost, its a sign of poor stock management!

Magento 2 store owners are always looking out for tools that help them reduce cart abandonment due to stock unavailability. One such tactic is to let customers subscribe to the out of stock products and get notifications when back in stock!

How about implementing this trick without any 3rd party extension

It’s possible now with a default configuration to enable “notify me when back in stock” for Magento 2 stores. The feature is available in Magento 2 OpenSource and Commerce Edtion.

Admin can enable this feature for registered customers. There are two types of notification: price change alert and in-stock alert. Admin is allowed to select the email template for each notification Email and set the alert Email sender.

Steps to enable “Notify me when back in stock” for Magento 2:

1. Enable Out of stock products display in frontend

  • Navigate to Stores > Configuration > Catalog.
  • In Product Alerts, set Allow Alert When Product Comes Back in Stock to YES
1_Stock-Options

2. Enable notification when the product is back in stock

  • Navigate to Stores > Configuration > Catalog.
  • In Product Alerts, set Allow Alert When Product Comes Back in Stock to YES
3_Products-Alerts-Run-Settings

3. Set the frequency to send alert Emails

  • Navigate to Stores > Configuration > Catalog .
  • In Product Alerts Run Settings, select the Frequency from the drop-down menu and set the Start Time to send the notification Emails.
3_Products-Alerts-Run-Settings

However, there are certain limitations with this default Magento 2 features. What if these limitations get overcame?! It would be helpful to admin in understanding the market demand and hence manage the inventory accordingly.

Meetanshi has developed Magento 2 Out of Stock Notification extension that offers additional features that overcome the shortcomings of the default feature and helps to provide better User Experience by efficiently managing product inventory based on customers’ preferences! The additional features provided by Out Of Stock Notification for Magento 2 listed below:

  • All the visitors, guests and customers are allowed to subscribe for out of stock notifications of the out stocked products.
  • Set a custom button label for the out of stock subscription on the product page.
  • Set up and show catchy text to encourage users to subscribe for out stock alerts.
  • Admin can track the list of subscribers for each product from the backend.
  • Admin can allow subscriptions for out of stock alerts based on the customer groups.
  • Customers can easily edit, update and delete subscriptions from their “My Account” section.
  • Store owners can export the list of subscribers for Out of Stock Products.

Out of stock products can be a real headache for store owners as they neither want to remove such products from the store nor miss out the potential future sales. By enabling out of stock alerts for the users, one can not only save the sale but also get the perfect opportunity to engage with the customers and build your subscriber base. You can also leverage the best practices of out of stock email notifications to get the most out of this functionality.

You can also refer to the video tutorial to enable “notify me when back in stock” for Magento 2 from our Magento 2 video tutorial series:

Don’t let your potential future sales leave just because your out of stock products, enable Out of Stock Notification for Magento 2 and take the benefit of more engagement and users’ demand.

Happy Inventory Management ?

UPS Shipping Method Unavailable in Magento 1 or Magento 2 [Solved]


  • y 22, 2025
  • 2 min read
  • Posted in : Magento

United Parcel Service (UPS) offers domestic and international shipping services by land and air to more than 220 countries.

Owing to CGI Rating API, the Magento 1.x and Magento 2.x merchants have witnessed changes and an error like “United Parcel Service – This shipping method is currently unavailable. If you would like to ship using this shipping method, please contact us.

This is due to the change that took place on January 06, 2019 that UPS will now onwards only support the secure connections and not the HTTP connections.

The default Magento tends to connect using an HTTP connection. And that’s why the error due to no official support from UPS.

The solution is to switch to UPS XML API. However, there is a quick fix that does not require switching to XML. Let’s see how:

Solution: UPS Shipping Method Unavailable in Magento 1 or Magento 2

How to fix it in Magento 1.x:

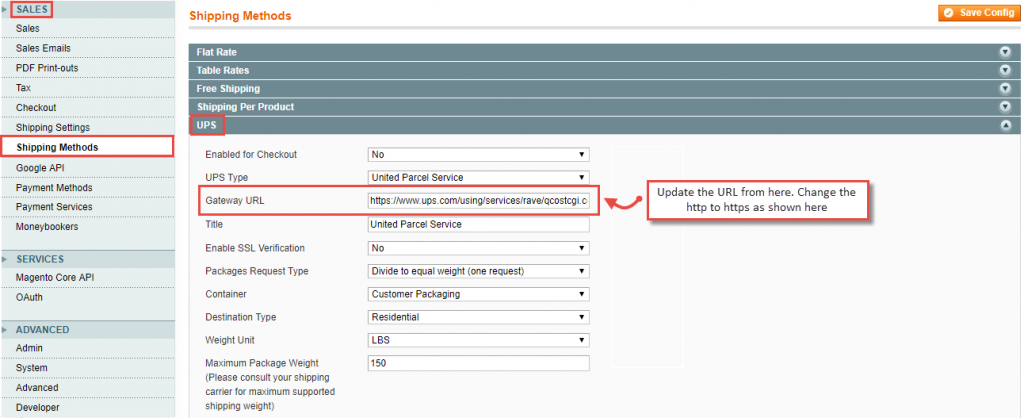
  1. Login to Admin Panel and navigate to System > Configuration.
  2. Under Sales, click Shipping Methods.
  3. Expand the UPS tab.
  4. In the Gateway URL option, change the URL from http://www.ups.com/using/services/rave/qcostcgi.cgi to https://www.ups.com/using/services/rave/qcostcgi.cgi
UPS Magento 1 Issue Solution

Follow the video solution to fix UPS Shipping Method Unavailable issue in Magento1:

How to fix it in Magento 2.x:

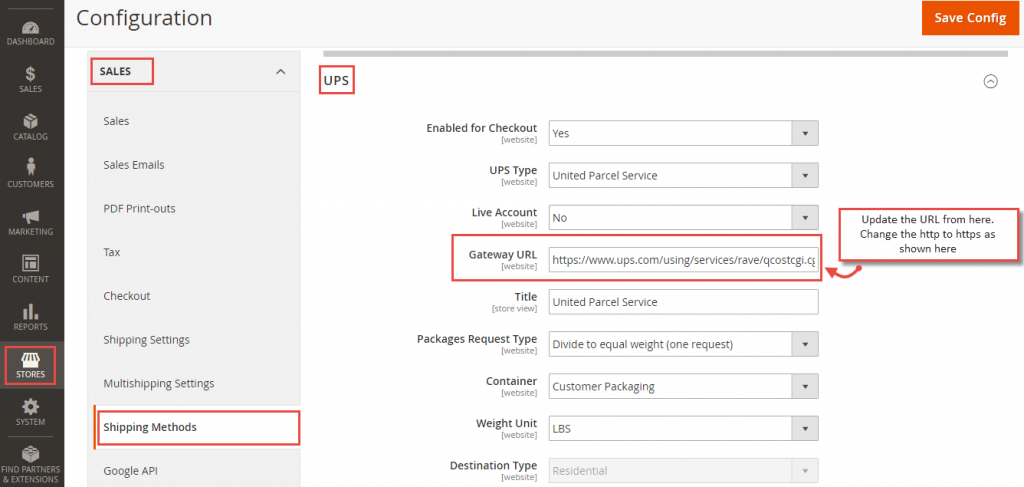
  1. Login to Admin Panel and navigate to Stores > Configuration.
  2. Under Sales, click Shipping Methods.
  3. Expand the UPS tab.
  4. In the Gateway URL option, change the URL from http://www.ups.com/using/services/rave/qcostcgi.cgi to https://www.ups.com/using/services/rave/qcostcgi.cgi
UPS Magento 2 Issue Solution

Follow the video solution to fix UPS Shipping Method Unavailable issue in Magento 2:

That’s it.

In default Magento 1.x or Magento 2.x,  the UPS gateway URL uses the “http” protocol, but now one must use the “https” protocol to avoid any error.

However, the store owners using the UPS XML Rating API are not impacted by this change.

Thank You

Wednesday, November 5, 2025

How to Solve Magento 2 Service Temporarily Unavailable (503)


The error 503 in Magento 2 means that the server is not available at the instant. It may happen because the server is under the maintenance mode or is simply busy.

The Magento 2 store owners may face the Magento 2 Service Temporarily Unavailable error during the installation of a store or server:

“Service Temporarily Unavailable The server is temporarily unable to service your request due to maintenance downtime or capacity problems. Please try again later.”

The store won’t be available at all when there is an error 503 in Magento 2.

Why Magento 2 Service Temporarily Unavailable Error Occurs

During the Magento 2 installation, the maintenance.flag file shows the system message until the operation is finished performing. It hides the screen from the users in case of any errors or issues while the process is going on. Technically, this system message should be removed once the operation gets completed. But sometimes, maintenance.flag file is not deleted automatically after the operation completion and thus, shows the Service Temporary Unavailable error in Magento 2 even after the process is completed.

How to Fix the Magento 2 Service Temporarily Unavailable Error

In order to fix the “503 service temporarily unavailable” error in Magento 2, follow these steps:

php bin/magento cache:flush
php bin/magento setup:upgrade

Note: In Magento 1.x version, the maintenance.flag file is present directly in the root directory.

That’s so easy, right?

Get rid of 503 error and solve the Magento 2 Service Temporarily Unavailable issue easily!

In case you still need any help to fix the 503 error in Magento 2, feel free to comment. I’d be happy to help.

Thank You!

How to Programmatically Attach PDF File in Magento 2 Email


Email Attachments are an easy way to send files without any barriers of geographical locations, security breaches, or cost. PDF files are usually preferred as they are uneditable, password-protected, small-sized, and easily accessible.

For Magento 2 stores, generally, Emails are sent for various purposes such as invoice, billing, coupon codes, etc. that require to attach PDF files. Manually attaching files for these tasks is not feasible. Instead, programmatically attach a PDF file in Magento 2 Email!

Magento 2 uses the lib/internal/Magento/Framework/Mail/Template/TransportBuilder class to send Emails, which doesn’t support file attachments yet.​​​​​​​ However, as the TransportBuilder Class uses Message class inherited from the Zend_Mail, we can add Email attachments programmatically.

Here’s the solution for the same.

Please note that the below solution is compatible till Magento 2.3.5 version only. If your store is running on versions above Magento 2.3.5, you may opt for Magento 2 Email Attachments extension that allows attaching important order documents, terms, and conditions, policy documents, spreadsheets, offer images, pamphlets, etc. in sales emails.

Method to Programmatically Attach PDF File in Magento 2 Email:

1. Create your TransportBuilder class, Vendor/Extension/Model/Mail/TransportBuilder.php

<?php namespace Vendor\Extension\Model\Mail; class TransportBuilder extends \Magento\Framework\Mail\Template\TransportBuilder { public function addAttachment($pdfString) { $this->message->createAttachment( $pdfString, 'application/pdf', \Zend_Mime::DISPOSITION_ATTACHMENT, \Zend_Mime::ENCODING_BASE64, 'attatched.pdf' ); return $this; } }

 2. Here I have created sample Email Sending Helper, Vendor/Extension/Helper/Data.php

<?php namespace Vendor\Extension\Helper; use Magento\Customer\Model\Session; class Data extends \Magento\Framework\App\Helper\AbstractHelper { const XML_PATH_EMAIL_DEMO = 'emaildemo/email/email_demo_template'; protected $_inlineTranslation; protected $_transportBuilder; protected $_template; protected $_storeManager; public function __construct( \Magento\Framework\App\Helper\Context $context, \Magento\Framework\Translate\Inline\StateInterface $inlineTranslation, \Vendor\Extension\Model\Mail\TransportBuilder $transportBuilder, \Magento\Store\Model\StoreManagerInterface $storeManager ) { $this->_objectManager = $objectManager; parent::__construct($context); $this->_inlineTranslation = $inlineTranslation; $this->_transportBuilder = $transportBuilder; $this->_storeManager = $storeManager; } public function generateTemplate() { $pdfFile = 'pdf_file_path/email.pdf'; $emailTemplateVariables['message'] = 'This is a test message by meetanshi.'; //load your email tempate $this->_template = $this->scopeConfig->getValue( self::XML_PATH_EMAIL_DEMO, \Magento\Store\Model\ScopeInterface::SCOPE_STORE, $this->_storeManager->getStore()->getStoreId() ); $this->_inlineTranslation->suspend(); $this->_transportBuilder->setTemplateIdentifier($this->_template) ->setTemplateOptions( [ 'area' => \Magento\Framework\App\Area::AREA_FRONTEND, 'store' => $this->_storeManager->getStore()->getId(), ] ) ->setTemplateVars($emailTemplateVariables) ->setFrom([ 'name' => 'Meetanshi', 'email' => 'meetanshi@meetanshi.com', ]) ->addTo('yourname@gmail.com', 'Your Name') ->addAttachment(file_get_contents($pdfFile)); //Attachment goes here. try { $transport = $this->_transportBuilder->getTransport(); $transport->sendMessage(); $this->_inlineTranslation->resume(); } catch (\Exception $e) { echo $e->getMessage(); die; } }

Implement the above code to programmatically attach a PDF file in Magento 2 Email and save yourself from the tedious repetitive tasks!

Happy Emailing

How to Install a Theme in Magento 2


A theme in Magento 2 provides a consistent look and feel in the store frontend or the admin area, with the help of custom templates, layouts, styles or images. Nowadays, people tend to judge a book by its cover and thus, a beautiful design and theme play an important role in site recognition. The Magento 2 themes are well known to provide better customer experience and interactive platform! Hence they are a must-have in your store infrastructure.

Before diving into the method to install a theme in Magento 2, take a look at the advantages of themes and how to choose the perfect one for your E-commerce business! A banner is displayed in the frontend is not designed keeping in mind any custom theme designs. The solution to this issue is to override extension file in theme in Magento 2.

Advantages of a theme in Magento 2:

  • The responsiveness characteristic makes it possible to offer the same environment to every user, regardless of the operative platform.
  • The responsive themes provide a scalable platform, i.e., adding new features and functions to already built theme is easier.
  • Improved security features with the Magento 2 themes.
  • The responsiveness nature is appreciated by Google and other search engines, giving you the SEO benefit!
  • Improved user experience, of course!
  • Easy installation process (We’ll see here how easy it is to install a theme in Magento 2!)
  • The free Magento themes are compatible with the new versions of Magento and are optimized for all important web browsers.
  • Absolute uniqueness for your Magento 2 store with custom themes.

Points to keep in mind while choosing the Magento 2 Theme:

  • A well-built store with elegant visual effect can work wonders. While an ugly theme can increase the bounce rate. Hence, focussing on the appearance, select a professional looking theme that represents your business.
  • A robust theme with advantages of SASS, Bootstrap 3, HTML5, and CSS3 makes your store responsive.
  • User friendliness themes with easy navigations, useful buttons, and neat arrangements are essential for your theme.
  • It MUST be fast-loading and SEO friendly, for e.g. Hyvä Magento.
  • Select the theme suitable for your business model.
  • Select a theme that is compatible with multiple browsers to reach more audiences.
  • A good color blend with your products and services!
  • With the advanced use of social media, a social media friendly theme is appreciated.

Proceeding to the steps to install a theme in Magento 2, check the below method:

Methods to Install a Theme in Magento 2:

1. Install Manually

When you have a list of files in a zipped folder as a new theme, follow this method.

1. Unzip the theme

Unzip the archive of the theme and spot the two directories: app and pub.

2. Upload the files


  • Navigate to the root directory of your Magento 2 store
  • Upload the folders into the root directory.

3. Run the commands

  • Connect the store via SSH.
  • Navigate to the root directory
  • Upgrade the setup with these commands:
php bin/magento setup:upgrade  php bin/magento setup:static-content:deploy

The success of an E-commerce store is achieved by many things and a theme is one of the prominent element. Hopefully, the above tutorial has helped you enough to install a theme in Magento 2!

Thank You.

4. Login to Admin panel

  • Navigate to Content > Design > Configuration
  • Select Edit the store theme.
1_Design-Configuration
  • Select the desired theme from the dropdown menu and your Save Configuration.
2_Applied-Theme

2. Install via Composer

When you have a theme as a composer package, follow this method.

1. Purchase a theme from Magento Marketplace.

2. Achieve the Composer name of the theme;

3. Navigate to the root directory and enter the below command:


composer require <vendor>/<name>:<version>;

4. Wait till dependencies are updated;

5. Run the below commands:

git add -A && git commit -m "Add theme" git push origin <branch name>

To verify that the theme is registered, follow the below steps:

1. Login to Admin Panel and reload any of the backend pages after the theme is installed.

2. Navigate to Content>Design>Themes

3. Check if the theme is displayed on the right panel in the list of available themes.

The success of an E-commerce store is achieved by many things and a theme is one of the prominent element. Hopefully, the above tutorial has helped you enough to install a theme in Magento 2!

Thank You

Magento 2 Payment Restrictions – Extension Explained

 Magento 2 Payment Restrictions enables creating flexible rules to restrict payment methods. 

A proper payments function offers an enormous opportunity to acquire new customers, increase conversion rate, and ultimately grow revenue.

Starting a Magento 2 store, the main concern must be payment management. The method of accepting online payments must meet the customers’ need and effectively manage the cash flow of your business.

Keeping the above points in mind, Meetanshi has developed the Magento 2 Payment Restrictions extension. It restricts payment methods based on product attributes, cart attributes, shipping address, store views, and customer groups.

The store can offer privileged features to higher customer groups such as COD payment, and disable them for guest users. Moreover, if you want to disable the COD payment method for a distant shipping address, the extension helps to do so!

Improve the payment system of your Magento 2 store by creating flexible payment rules with the help of the Magento 2 Limit Payment Method module.
Configure Magento 2 Payment Restrictions Extension by Meetanshi

Creating rules to restrict the payment methods have never been this easy!

Navigate to Sales > Payment Restrictions. The grid offers the details of payment rules such as rule name, the restricted payment methods, customer group, store view and the status of the rule, i.e., if the rule is active or not in the store. One can edit a rule, create a duplicate one or create a new rule with the “Add Rule” button.

On click of the button, admin is redirected to the configuration of the rule. Enter the name of the new rule. Select the payment methods to be restricted based on the set conditions. Also, select the customer groups and store views to restrict payment method for. Lastly, activate the rule.

Moving on to the conditions, set them based on cart attributes or product attributes. When these conditions are met, the payment method is restricted for the set customer group or store views. Finally, save the settings.

Here, admin can set limitations on payments based on shipping parameters such as address, city, region, zip codes, etc.

When a customer proceeds to check out and if the configured conditions are not satisfied, the restricted payment method is not displayed on the frontend.

How to Override Block, Model, and Controller in Magento 2


Magento 2 CMS offers flexible options to customize the default configurations. The customized features are helpful to offer enhanced customer experience, easy administration, improved SERPs and sales!

However, it is advisable to override block, model, and controller in Magento 2 than editing the core files. This guide walks you through the method to overriding block, model, controller, giving you the flexibility to make changes in the core functionalities.

The Magento 2 Controller is responsible for handling the incoming requests. Blocks are PHP classes used to connect or create a link between layout and templates. The Model represents the data of the application in MVC.

Method to Override Block, Model, and Controller in Magento 2:

  • Magento 2 override Model class using di.xml

Use the following code to override Magento\ConfigurableProduct\Model\ConfigurableAttributeData Create file [Vendor]\[Module]\etc\di.xml

<?xml version="1.0"?> <config xmlns:xsi="http://www.w3.org/2001/XMLSchema-instance" xsi:noNamespaceSchemaLocation="urn:magento:framework:Acl/etc/acl.xsd"> <preference for="Magento\ConfigurableProduct\Model\ConfigurableAttributeData" type="[Vendor]\[Module]\Model\Rewrite\ConfigurableAttributeData" /> </config>

Create class [Vendor]\[Module]\Model\Rewrite\ConfigurableAttributeData to override Magento Model

<?php namespace [Vendor]\[Module]\Model\Rewrite; use Magento\Catalog\Api\ProductRepositoryInterface; use Magento\Framework\Pricing\Helper\Data; class ConfigurableAttributeData extends \Magento\ConfigurableProduct\Model\ConfigurableAttributeData { private $productRepository; private $priceHelper; public function __construct( ProductRepositoryInterface $productRepository, Data $priceHelper ) { $this->productRepository = $productRepository; $this->priceHelper = $priceHelper; } protected function getAttributeOptionsData($attribute, $config) { $attributeOptionsData = []; foreach ($attribute->getOptions() as $attributeOption) { $optionId = $attributeOption['value_index']; $product_details = $config[$attribute->getAttributeId()][$optionId]; $productId = $product_details[0]; $product = $this->productRepository->getById($productId); $attributeOptionsData[] = [ 'id' => $optionId, 'label' => $attributeOption['label'], 'products' => isset($config[$attribute->getAttributeId()][$optionId]) ? $config[$attribute->getAttributeId()][$optionId] : [], 'sku' => $product->getSku(), 'childProductPrice' => $this->priceHelper->currency($product->getFinalPrice(), true, false), ]; } return $attributeOptionsData; } }
  • Magento 2 override block class using di.xmlCreate file : [Vendor]\[Module]\etc\di.xml
<?xml version="1.0"?> <config xmlns:xsi="http://www.w3.org/2001/XMLSchema-instance" xsi:noNamespaceSchemaLocation="urn:magento:framework:Acl/etc/acl.xsd"> <preference for="Magento\Swatches\Block\Product\Renderer\Configurable" type="[Vendor]\[Module]\Block\Rewrite\Product\Renderer\Configurable" /> </config>

Create class [Vendor]\[Module]\Block\Rewrite\Product\Renderer\Configurable to override Magento block

<?php namespace [Vendor]\[Module]\Block\Rewrite\Product\Renderer; class Configurable extends \Magento\Swatches\Block\Product\Renderer\Configurable { protected function getRendererTemplate() { return $this->isProductHasSwatchAttribute() ? self::SWATCH_RENDERER_TEMPLATE : '[Vendor]_[Module]::product/view/type/options/configurable.phtml'; } }

Magento 2 override controller class using di.xml Create file : [Vendor]\[Module]\etc\di.xml

<?xml version="1.0"?> <config xmlns:xsi="http://www.w3.org/2001/XMLSchema-instance" xsi:noNamespaceSchemaLocation="urn:magento:framework:Acl/etc/acl.xsd"> <preference for="Magento\Catalog\Controller\Product\Gallery" type="[Vendor]\[Module]\Controller\Product\Gallery" /> </config>

Create class [Vendor]\[Module]\Controller\Product\Gallery to override Magento block

<?php namespace [Vendor]\[Module]\Controller\Product; class Gallery extends \Magento\Catalog\Controller\Product\Gallery { public function execute() { $result = null; if (!$this->_initProduct()) { $store = $this->getRequest()->getQuery('store'); if (isset($store) && !$this->getResponse()->isRedirect()) { $result = $this->resultRedirectFactory->create(); $result->setPath(''); } elseif (!$this->getResponse()->isRedirect()) { // Apply custom code } } return $result ?: $this->resultPageFactory->create(); } }

That’s all to override block, model, and controller in Magento 2!

Seems pretty much tedious, isn’t?

We’ve got your back. Contact us to do your customization tasks! Flawlessly implement amazing features helpful in your store administration tasks and also enrich customer experience!

Happy Customization

How to Show Recently Viewed Products in Magento 2


E-commerce stores face fierce competition and therefore do not leave any stones unturned to offer the best shopping experience and services.

Magento 2 stores are no exception and hence I’ve come up with a tactic that has proved effective for enhancing the shopping experience. Implement the below method to show recently viewed products in Magento 2 and make it easy for customers to find their interested products.

The feature to display recently viewed products in Magento 2 store help customers find the products they might have viewed and kept the purchase on hold due to some reasons. Also, they might want to compare the previously viewed products with new products to make a purchase decision. Whatever the reasons may be, searching those products from category page or browsing through the store can be irritating. Hence make it easy for them with the feature to display previously viewed products in Magento 2 store!

The widget settings are to be configured in order to show recently viewed products in Magento 2. Check the stepwise method for the same.

Method to Show Recently Viewed Products in Magento 2 Pages:

1. Navigate to Admin Panel > Content > Widgets.

1_Menu

2. Create a new widget instance with the “Add Widget” button.

2_Add New Widget

3. Select the Type and Design Theme from the drop-down in Settings for the widget.

3_Settings

4. Click Continue.

5. Once redirected to StoreFront Properties, name the widget instance title, assign the store views and enter the sort order.

4_Storefront Properties

6. Moving forward to Layout Updates, select the page and container from the drop-down options.

5_Add Layout Update

7. Select the page

6_Layout Update-Page

8. Select the container

7_Layout Update-Container

9. Navigate to Admin Panel > Content > Widgets > Widget Options under widget.

10. Enter the number of products and select its attributes to be shown. Also, choose the buttons to be displayed in the frontend for the widget.

11. Save the configuration and Flush Magento Cache.

8_Widget Options

12. The Recently Viewed Products widget is added as shown here:

9_Widget Grid

Following the above steps, you’d be able to show recently viewed products in Magento 2 store for your customers! Enhance the shopping experience and hence improve sales.

Tuesday, November 4, 2025

Magento 2 Shipping Table Rates Extension [Complete Guide]


Magento 2 Shipping Table Rates enables various shipping options based on Shipping Destination, Product Weight, Price, and Quantity in Magento 2 store.

Customers do care about shipping! That’s where you can beat the competitors with excellent user experience! Offer multiple shipping options that deliver faster and convenience to customers.

Magento 2 store owners are well aware that lack of shipping facilities is a ranking pet peeve for cart abandonment. And obviously, we do not want that! In such cases, Meetanshi’s Magento 2 Shipping Table Rates extension is a rescue! It helps create a number of custom shipping methods based on shipping destinations, product weight, price, and quantity.

The extension enables offering a fast delivery to customers. Moreover, customers can choose a convenient shipping method from among the various custom shipping methods available, owing to the extension.

Define shipping rates via CSV file and improve the shipping process of your Magento 2 store with the flexible table rates system!

Why choose Magento 2 Shipping Table Rates extension by Meetanshi?

Improve the customer experience after the purchase is made with accurate shipping price and multiple options for shipping process. Configure the Magento 2 Multiple Table Rates Shipping as shown here:

Navigate to Sales > Shipping Table Rates and add new method. Configure the general settings for the method and import shipping table rates using CSV.

The imported shipping table rates are listed in the Methods and Rates tab under Shipping Table Rate Methods as shown here:

4_Methods-and-Rates

Configure the shipping method by navigating Configuration > Sales > Shipping Methods.

Configure the custom shipping method, create shipping type attributes and the options for shipping rates.

Assign shipping type to the product as shown here. Navigate to Catalog > Products and select the product to edit the details.

8_Assign-Shipping-Type-to-Product

Once configured, the shipping table rates applied can be seen on the cart page and checkout page.

10_Shipping-Table-Rates-on-Checkout-Page

The customers can check the shipping method from the “My Accounts” section.

11_Shipping-Table-Rates-in-My-Account-Page

Similarly, admin can navigate to Order View backend.

12_Shipping-Table-Rates-in-Order-View-Backend


That’s it, do let us know if you have any queries related the topic.

Solved: Magento 2.2.7 and 2.3 Admin Page Blank Issue


Magento 2 CMS is a suitable platform to run E-commerce business and it can be administered via admin panel. Admin is responsible for the functionalities of the store and any error in the admin panel is not acceptable. However, the clients have been facing the issue of the blank page in the admin panel after upgrade or installation of Magento 2.2.7 and Magento 2.3!

Developers at Meetanshi have been solving this issue and decided to post it as a solution for all the store owners of Magento 2.2.7 and Magento 2.3.

If you have recently upgraded or installed the latest version and face the Magento 2.2.7 and 2.3 admin page blank issue as shown below, follow the solution given in the post.

magento 2.3 and Magento 2.2.7 admin page blank issue

Solution to Magento 2.2.7 and 2.3 Admin Page Blank Issue:

How to solve the Magento 2.2.7 admin page blank issue:

Navigate to: /vendor/magento/framework/View/Element/Template/File/Validator.php:113

You’ll find this code:

protected function isPathInDirectories($path, $directories) { if (!is_array($directories)) { $directories = (array)$directories; } foreach ($directories as $directory) { if (0 === strpos($this->fileDriver->getRealPath($path), $directory)) { return true; } } return false; }

which is to be replaced with the following code:

protected function isPathInDirectories($path, $directories) { $realPath = str_replace('\\', '/', $this->fileDriver->getRealPath($path)); if (!is_array($directories)) { $directories = (array)$directories; } foreach ($directories as $directory) { if (0 === strpos($realPath, $directory)) { return true; } } return false; }

How to solve the Magento 2.3 admin page blank issue:

Navigate to #/vendor/magento/framework/View/Element/Template/File/Validator.php:114

Find the below string:

$realPath = $this->fileDriver->getRealPath($path);

and replace it with:

$realPath = str_replace('\', '/', $this->fileDriver->getRealPath($path));

Is’nt the solution easy to implement? So now you can upgrade to Magento 2 latest version without any issues!

Happy Administrating!

Thursday, October 30, 2025

How to Generate PDF Programmatically in Magento 2


Magento 2 store admin often want to share their store data. Either be it an invoice to be shared with customer or quote to be shared with the potential visitor! PDF is the preferred format to share the data as it can be easily viewed on any device and it’s highly trusted for security and password protection.

The default Magento methods to generate PDF files are rather inflexible. That’s why I’ve come up with the method to generate PDF programmatically in Magento 2. The method allows to generate PDF displaying any type of the store data, be it grid or invoice or customer data, etc.

Method to generate PDF programmatically in Magento 2:

Implement the below code in your controller action file:

<?php namespace Vendor\Extension\Controller\Index;   use Magento\Framework\App\Action\Action; use Magento\Framework\App\Action\Context; use Magento\Framework\App\Response\Http\FileFactory;   class Index extends Action {     protected $fileFactory;       public function __construct(         Context $context,         FileFactory $fileFactory     ) {         $this->fileFactory = $fileFactory;         parent::__construct($context);     }       public function execute()     {         $pdf = new \Zend_Pdf();         $pdf->pages[] = $pdf->newPage(\Zend_Pdf_Page::SIZE_A4);         $page = $pdf->pages[0]; // this will get reference to the first page.         $style = new \Zend_Pdf_Style();         $style->setLineColor(new \Zend_Pdf_Color_Rgb(0,0,0));         $font = \Zend_Pdf_Font::fontWithName(\Zend_Pdf_Font::FONT_TIMES);         $style->setFont($font,13);         $page->setStyle($style);         $width = $page->getWidth();         $hight = $page->getHeight();         $x = 30;         $pageTopalign = 850;          $this->y = 850 - 100;                   $style->setFont($font,14);         $page->setStyle($style);         $page->drawRectangle(30, $this->y + 10, $page->getWidth()-30, $this->y +70, \Zend_Pdf_Page::SHAPE_DRAW_STROKE);                  $style->setFont($font,13);         $page->setStyle($style);         $page->drawText(__("Cutomer Details"), $x + 5, $this->y+50, 'UTF-8');         $style->setFont($font,11);         $page->setStyle($style);         $page->drawText(__("Name : %1", "Test Meetanshi"), $x + 5, $this->y+33, 'UTF-8');         $page->drawText(__("Email : %1","test@meetanshi.com"), $x + 5, $this->y+16, 'UTF-8');           $style->setFont($font,11);         $page->setStyle($style);                  $page->drawText(__("PRODUCT NAME"), $x + 60, $this->y-10, 'UTF-8');         $page->drawText(__("PRODUCT PRICE"), $x + 200, $this->y-10, 'UTF-8');         $page->drawText(__("QTY"), $x + 310, $this->y-10, 'UTF-8');         $page->drawText(__("SUB TOTAL"), $x + 440, $this->y-10, 'UTF-8');           $style->setFont($font,10);         $page->setStyle($style);         $add = 9;                  $page->drawText("$12.00", $x + 210, $this->y-30, 'UTF-8');         $page->drawText(10, $x + 330, $this->y-30, 'UTF-8');         $page->drawText("$120.00", $x + 470, $this->y-30, 'UTF-8');         $pro = "TEST product";         $page->drawText($pro, $x + 65, $this->y-30, 'UTF-8');                  $page->drawRectangle(30, $this->y -62, $page->getWidth()-30, $this->y + 10, \Zend_Pdf_Page::SHAPE_DRAW_STROKE);         $page->drawRectangle(30, $this->y -62, $page->getWidth()-30, $this->y - 100, \Zend_Pdf_Page::SHAPE_DRAW_STROKE);                  $style->setFont($font,15);         $page->setStyle($style);         $page->drawText(__("Total : %1", "$50.00"), $x + 435, $this->y-85, 'UTF-8');                  $style->setFont($font,10);         $page->setStyle($style);         $page->drawText(__("Test Footer example"), ($page->getWidth()/2)-50, $this->y-200);           $fileName = 'meetanshi.pdf';           $this->fileFactory->create(            $fileName,            $pdf->render(),            \Magento\Framework\App\Filesystem\DirectoryList::VAR_DIR, // this pdf will be saved in var directory with the name meetanshi.pdf            'application/pdf'         );     } }

With the above code, generate PDF programmatically in Magento 2 and share the data securely and user-friendly!

You can also Generate attractive PDF catalogs for various product categories by using our Magento 2 PDF Catalog.

Hopefully, the post is helpful to the readers and easy to implement.

Keep Sharing

How to Import Products in Magento 2


Do you own a Magento 2 store with a large number of products? Do you wish to add a large database related to the products in your backend? Do you want to update the products data? And, are you lazy just like me?

Look no more, because this post is for you! Get the time-saving method that helps import products in Magento 2.

Magento 2 Import Products CSV: an easy solution to save you from going through all the troubles of managing a large database of products in the backend!

Follow the stepwise method given below and you’re done

Method to Import Products in Magento 2:

1. Login to Admin Panel

2. Navigate to System > Import.

Magento 2 Admin panel with browsing product import option

3. Select Products in the Entity Type drop-down and click Download Sample File.

2_Import-Settings

4. You’ll get the CSV file like this:

3_CSV File Sample
4_Add_Update

8. Select the Choose file option and type /pub/media/import in the Image File Directory text field. Then choose the Check Data option.

9. After receiving the validation results notification, click Import.

10. When the product import is finished go to Catalog > Products and check the products with the images are displayed on the product grid. Don’t forget to make the products live in-store – Enable Product Toggle:

5_Enable product

11. You can manage all the import and export activities from the Import History tab. For that, navigate to System>Data Transfer>Import History.

6_Import History

If you want to import products with images in bulk, delete all the sample products from the CSV file and insert your own ones with all the attribute details.

With the help of this tutorial, one should be able to import products in Magento 2 easily!

Magento Instagram – Extension Explained


60% of users discover products on Instagram, says Todd Clarke at Hootsuite. And, out of them, 75% of users take action!

Only someone who does not want to grow his business would not bother about Instagram marketing. Meetanshi, who always strives to offer products to help Magento store owners grow their business, have come up with an excellent Instagram marketing tool for Magento stores.

Magento Instagram extension enables integration of Magento with Instagram to create a beautiful Instagram shop in the Magento store. The module fetches Instagram images, edit and displays them in the front-end of the store. It creates an amazing look that attracts users.

The Magento Instagram widget is a marketing tool to boost traffic and sales. The Instagram images create excellent views on the store that prompts visitors to check the products. Also, it helps in increasing the Instagram followers which can be considered as an additional benefit of the extension.

Why choose Magento Instagram extension by Meetanshi?

Now that the usefulness of the extension is clear, let’s see the features and its configuration.

Once the extension is enabled from the backend, one needs to configure a few settings to get the most out of it. Add the Instagram profile name to be displayed in the image popup. The Instagram images can be fetched using the username or hashtags. Add the username, Instagram user access token and the number of Instagram images to be fetched.

Also, configure the settings to show Instagram images on different pages like the home page, category page, product page, and Instagram page. These images help to flaunt your products in an attractive manner on the store pages.

The Magento Instagram extension offers three Instagram image popup views: Default Insta view, Caption with hyperlink and product feed. One can enable the autoplay feature in the popup for the videos.

1. Caption with Hyperlink: Connect image hotspots with a caption to redirect the visitors to a webpage of your store by linking the image captions.

Edit-Image-Information-Title-with-Cption-View-Settings

2. Product Feed: Assign a unique SKU with each hotspot to make a product feed in the popup. On click of each product feed, visitors can be redirected to a particular product page.

Edit-Image-Information-Product-Feed-View-Settings

3. Default Insta View: Create the Instagram desktop view. No settings required, just select the view from the configuration and it will show the exact view of Instagram in Magento.

One of the important features that make the extension more powerful is the UTM tracking settings. All you have to do is enable the UTM tracking and enter the campaign source, name and medium. One can track the traffic that is gained from Instagram and help shape the Instagram marketing strategy!

Admin can approve or delete the images that are fetched, to be displayed. Not only that, but admin can also edit the image details such as captions, hyperlinks, product SKUs, hotspots from Manage Instagram Images section. Do all the customization that you want for the best output!

Want to enable category specific or product specific Instagram images for your store? The module offers the feature to do it! Select the username or hashtag to fetch the images. Check below.

Category Specific Instagram Settings:

Category-Specific-Instagram-Settings

Product Specific Instagram Settings:

Product-Specific-Instagram-Settings

Once the extension is configured, enjoy its features in the frontend. The Instagram images can be seen in the home page as below. When a user hovers on any of the images, the number of likes and comments can be seen which gives an overview of the popularity of the product.

Instagram-Images-on-Home-Page

Similarly, the extension fetches Instagram images on the category page, product page, and Instagram page.

Based on the Instagram Image Popup View, on click of Instagram Images from any of the pages, it shows the popup accordingly.

  • Caption With Hyperlink View: On hover of captions, hot spots are seen. On click of the captions, users get redirected to page set from the backend.
Title-with-Cption-View-in-Frontend
  • Product Feed ViewOn hover of product feeds, hot spots are seen. On click of the feeds, users get redirected to the product page set from the backend.
Product-Feed-View-in-Frontend
  • Default Insta View: Shows the exact view of Instagram.
Default-Insta-View-in-Frontend

Can’t wait to implement these excellent features in your store? Avail the popularity of Instagram for your profits with Magento Instagram extension. Check UserGuide now, to configure the extension in your Magento!