Payment of ₹ requested by HONEY VIG. Click the link to pay securely via Razorpay: Make 5000 payment Payment of ₹ requested by HONEY VIG. Click the link to pay securely via Razorpay: Make 5000 payment ⭐ If you would like to buy me a coffee, well thank you very much that is mega kind! : https://www.buymeacoffee.com/honeyvig
Hire a web Developer and Designer to upgrade and boost your online presence with cutting edge Technologies
Showing posts with label HTML. Show all posts

Thursday, October 1, 2026

Beginners Guide to DHTML


Key Takeaways

  • DHTML, or Dynamic HTML, is not a separate programming language but an enhancement that allows HTML pages to be dynamic, utilizing HTML, JavaScript, and CSS.
  • The primary feature of DHTML is the ability to alter the appearance and content of a webpage dynamically without reloading the page, using built-in browser capabilities in fourth-generation browsers.
  • DHTML implementation varies significantly between browsers; for instance, Netscape Navigator 4 uses the `` tag while Internet Explorer 4 relies on style objects associated with standard HTML tags like `
    ` and ``.
  • For cross-browser compatibility, DHTML requires using different scripting techniques depending on the browser, highlighting the importance of browser detection techniques like object detection for efficient scripting.
  • Despite the emergence of newer technologies like AJAX and jQuery, DHTML remains relevant and is a fundamental skill in creating interactive and dynamic web content.

As a self-proclaimed webmaster, I try my best to keep up with the latest in web technology. My current endeavor is DHTML, or Dynamic HTML. After hearing a lot about this technology and how it will eventually revolutionize the internet, I thought I had to get off the couch and start learning about it, before I lose the right to call myself a “webmaster”. If you’re just as clueless as I am when it comes to DHTML, this tutorial is for you. Enjoy, and please feel free to email me if you have questions.

That’s a great question, one that I admit I had a lot of trouble finding a straight answer to. I remember seeing a posting on a JavaScript newsgroup that attempted to answer this question with the reply:

“DHTML is the combination of HTML and JavaScript”

I said to myself “Isn’t that just a webpage with JavaScript on it then?” I was confused, to say the least. After shuffling through hundreds of search results on search engines for that elusive answer to my question, I still could not find it. So I thought, what the heck, I’ll learn DHTML first, then figure out what it is! Now that I’m somewhat a DHTML programmer, I think I’m ready to present you with a decent one-line definition to the word DHTML:

“DHTML is the combination of several built-in browser features in fourth generation browsers that enable a web page to be more dynamic”

You see, DHTML is NOT a scripting language (like JavaScript), but merely a browser feature- or enhancement- that gives your browser the ability to be dynamic. What you really want to learn is not DHTML itself, but rather, the syntax needed to use DHTML. Before anything else, you may want to quickly visit Dynamic Drive to see what this language is capable of.

Like I said, DHTML is a collection of features that together, enable your web page to be dynamic. I think its important now to define just what the creators of DHTML meant when they say “dynamic”. “Dynamic” is defined as the ability of the browser to alter a web page’s look and style after the document has loaded. I remember when I was learning JavaScript, I was taught that you could use the document.write() method of JavaScript to create webpages on the fly. For example:

<script> document.write(“This is text created on the fly!”) </script>

“Not bad”, I remember saying to myself. But what if I wanted to create content not only on the fly, but on demand? Naive I was then, I tried doing just that, by nesting the above code in a function, and calling it via a form button:

<input type=”button” onClick=”writeconent()” value=”text”>

Pressing the button was nothing short of a big disappointment. My entire web page was erased, and I was left with only the text the function produced.

That was back then. Now, with the introduction of DHTML, I can alter content on a web page on demand, whenever I bloody feel like it, without having the browser erase everything else. That’s what DHTML is all about. The ability of the browser to change look and style even after the document has loaded.

Now that I’ve got you all excited, I think it’s only fair that I put a damper on it. The technology of DHTML is currently at its development stage, with NS 4 and IE 4 differing quite greatly in their implementation of this great technology. Its currently not possible to write one DHTML code and expect it to function in both browsers properly. Furthermore, the two browsers are at different stages in their development of DHTML; from my own knowledge and what I’ve heard, DHTML in IE 4 is far more powerful and versatile than NS 4’s. I don’t want to help spread any propaganda, so I’ll leave it at that.

This could either be a good thing, or a bad one, depending on your view. DHTML in NS 4 is quite simple, and comes down to essentially one word- Layer. I was pretty astonished myself, but its true- NS 4 relies completely on a new tag, called the <layer> tag, to spin up its DHTML magic. This new tag is dynamic in that it can be positioned anywhere on a web page (without relation to other content), moved around, its content inside updated on demand, and more.

Basic syntax

The basic syntax of the <layer> tag can’t be simpler (as if any tag in HTML is complicated!):

<layer>Text inside layer</layer>

The <layer> tag is a content tag, which means you can add into it content (like <table>). Go ahead, try inserting the above code onto your page…you’ll notice that the text inside the layer floats above other text, and overlaps them. Imagine a layer as a sheet of paper that resides on top of the rest of the page, and does not take up space within the flow of the document.

Layer attributes

A layer by itself can’t be more boring, not to mention useless. Fortunately, there’s more to it. Layers support attributes that allow you to position it using the x,y coordinates-system, give it a background, clip it (make only certain area of the layer visible), hide it from view, and so on. I’ve listed the most important layer attributes below:

Layer attributes id The name of the layer, used to identify it in your script left The position of the layer in relationship to the x coordinates top The position of the layer in relationship to the y coordinates width The width of the layer, in px or % height The height of the layer, in px or % bgColor The background color of the layer background The background image of the layer src The external html document contained inside the layer

Mix and match different attributes any way you like.

Click here for a sample layer that uses some of the above attributes

Notice I didn’t specify the left and top attributes. When you don’t, the layer is positioned where you defined it.

Scripting layers

Here’s one of the most important thing to learn about layers- how to script them. After all, its the scripts that make layers come alive. To access a layer, you need to use the following syntax:

document.layername

Accessing the layer is just the first step. Once you’ve accessed a layer, you can then go on and manipulate one of the layer’s attributes to produce dynamic effects.

Click here for an example where a layer’s background color interchanges between red and blue.

All of the layers’ attributes are read/write, so be sure to experiment with each of them!

As I began taking on and learning IE 4’s implementation of DHTML, and realized that there’s a lot more to it than its NS counterpart. DHTML in IE does not rely on any one tag, but rather, new objects and properties that stem out of the usual HTML tags you’re used to working with, such as <div> and <table>. It’s a lot more powerful, but at the same time, and lot more complicated to grasp.

The style object of IE 4

HTML elements in IE 4 now all support a style object, which is essentially the “dynamic” object used to manipulate the look and “feel” of that element. Like the <layer> tag, elements can also be assigned an “id” attribute, which can then be used to identify it during scripting. For example:

<div id=”adiv”></div>

In your script, the syntax required to access the style object of “adiv” would look like this:

adiv.style

The style object contains many properties, and by manipulating these properties, you can alter the look of an element, dynamically. I’ll show some of these properties now:

Important properties of the style object

  1. backgroundColor The backgound color of the element
  2. backgroundImage The background image of the element
  3. color The color of the element
  4. position The position type of the element. Accepted values are “absolute” and relative”
  5. pixelWidth The width of the element
  6. pixelHeight The height of the element
  7. pixelLeft The position of the element in relation to the x coordinates
  8. pixelTop The position of the element in relation to the y coordinates

The properties above only represent a subset of the total supported properties, but are the most commonly used ones. The basic syntax to manipulating any style property is the same, which I’ll show in a minute. By accessing these properties, we can change the look and style of most HTML elements (as opposed to just the <layer> tag in Netscape)!

Click here for a simple demonstration

Notice how I changed the text’s color:

sometext.style.color=’red’

I first used the element’s id to gain access to it, then, through the style object and finally the style’s color property, I was able to easily change the color of the text on demand!

All style properties are read/write, and are accessed in a similar manner: element id->style object->property name.

Click here for another example that expands an image when the mouse is over it, and reverts it back to its original size when the mouse moves out.

Yes, I know its not exactly the most practical example in the world, but it does illustrate DHTML at work quite well. The image changes dimensions on demand, without the need to reload the document. That’s something JavaScript alone can never do.

If you’re not yet scared off by all the differences in syntax and functionality between DHTML in NS 4 and IE 4, you’re ready to learn how to make content on your page dynamic, or change on demand!

Dynamic content in NS 4

Changing content in NS 4 involves -you guessed it- the layer tag. All layers are treated by the NS browser as a separate entity from the rest of the page, with their own document object (which in turn contains other objects supported by document). This is very important to understand, since the fact that layers contains another document object is what makes it possible to create dynamic content in NS. I’ll first construct a basic layer, then show how to change the contents inside of it:

<layer id=”alayer” width=100% height=30></layer>

Ready to access the document object of the above layer? Here’s the required syntax:

document.alayer.document

So, knowing this piece of information, I can write a script that changes the contents of the layer every 3 seconds.

Click here for an example of how it’s done in Netscape.

The text is being dynamically generated and erased, without the need to reload the document!

Dynamic content in IE 4

In IE 4, dynamic content is realized through a special property called innerHTML that exists on the <span> and <div> tag. Just set this property to a new HTML value, and the contents inside that span or div is instantly updated to the new value! I’ll illustrate how it’s done by modifying the above example to create dynamic content for IE 4 users:

Click here for an example that works for IE.

Same results, just a different way to get there!

If you like working with animations, you’ll be glad to know that with DHTML, the entire web page is now your drawing board! You can create content that fly all over the screen freely. In Netscape, this is done by manipulating the left and top attributes of the <layer> tag. In IE 4, the same thing is accomplished by altering the pixelLeft and pixelTop properties of the style object.

Moving elements in NS 4

Recall in lesson 2 that layers support the left and top property, which controls its offset from the document’s upper left corner. Well, by using simple math and a couple of lines of script, we can dynamically update these properties so the layer moves! The following example changes the left property of a layer so it moves horizontally when a button is pressed.

Click here for the example.

See, all I did was continuously add to the left property of “space” to move it, and set the property back to its original value when I want the layer returned back to its initial location.

Moving elements in IE 4

By the way, the day when NS and IE agree upon one implementation of DHTML is the day I can stop writing two versions of everything (just letting out a little frustration). Moving an element in IE 4 involves basically first wrapping that element either inside a positioned span or div, then changing the span or div’s pixelLeft and pixelTop properties. It sounds complicated, but is actually very simple.

Click here for the example.

What I did first was set the outside <div> called “spaceship” to a position of relative, which is necessary to make the element movable (you could also set it to a value of “absolute”). Then, by manipulating the pixelWidth property of it’s style object, the element moves.

Before “true” cross-browser DHTML becomes available (in other words, when NS and IE comes to their senses), cross-browser DHTML basically means using various scripting techniques you picked during those JavaScript years to sniff out which browser the user is using, and execute the code intended for that browser. In this lesson, I’ll first illustrate a way of creating a “cross-browser” layer, then show you a scripting technique I recently learned that allows you to easily sniff out the browser type of the surfer.

Creating a “cross-browser” layer

Ok, so we’ve got NS that understands the <layer> tag, and IE that understands the <span> and <div>. If we wanted to create a simple DHTML effect such as a moving image, we would usually need to use two tags- A layer tag for NS 4, and either a div or span tag for IE 4. Not exactly pretty, uh? Well, I recently learned that there is actually a way to create a “cross-browser” layer that uses only one tag, although its a little buggy on the NS side. Apparently NS 4 treats an absolutely positioned div the same as a layer. So, without any further delay, here’s an example of a cross browser layer:

<div id=”crosslayer” style=”position:absolute”></div>

NS 4 treates the above div exactly the same as it would with a layer. Like any other layer, to access it , we would first go go through the document object, then the layer’s id:

document.crosslayer

In IE 4, we would simply use the div’s id:

crosslayer

I found that in NS, specifying a layer this way, while convenient in terms of cross-browser compatibility, has one major draw back. Such a layer doesn’t always behave the way a normal layer should, and can sometimes actually crash the browser. Just be prepared to expect the unexpected!

Browser sniffing- object detection

Up until recently, whenever I wished to determine the browser type of my surfers, I would use the navigator object, like most JavaScript programmers would. The below illustrates using this object to sniff out both NS 4 and IE 4:

var ns4= (navigator.appName==”Netscape”&&navigator.appVersion>=4) var ns4= (navigator.appName==”Microsoft Internet Explorer”&&navigator.appVersion>=4)

Personally, I hate using the navigator object- its so complicated to use (just look at the above mess!). Well, I have good news to bring to you. There is actually a lot quicker way to sniff out various browsers, and its called object detection.

The idea is based on the way JavaScript works. If the browser does NOT support a particular object, JavaScript returns null when you reference it. Knowing this fact, we can use an object reference in your if statement (in place of the navigator object) to determine the browser of the user.

Let’s do an example. We know that NS 3+ and IE 4+ support the document.images object. If we wanted to sniff out these browsers, we would do this:

if (document.images) alert(“You are using NS 3+ or IE 4+”)

Translating the above into English, it reads: “If the browser supports the images object (which only NS 3+ and IE 4+ do), alert a message.

Think of object detection as an indirect way of determining the browser type of the user. Instead of directly determining the name and version of the user’s browser (through the navigator object), object detection is a more generic, less hassling browser sniffing technique.

So, how can we use object detection to sniff out NS 4 and IE 4? Well, only NS 4 supports the document.layers object, and only IE 4 supports document.all. We can use this knowledge to easily determine whether the user is using NS 4, IE 4, or both:

if (document.layers) alert(“You are using NS 4+”)

if (document.all) alert(“You are using IE 4+”)

if (document.layers||document.all) alert(“You are using either NS 4 or IE 4+”)

Now you never have to return to the messy navigator object to do your browser sniffings!

DHTML resources

Obviously, this tutorial serves only as an introduction to DHTML. Here are a couple of great resources to continue your DHTML endeavor:

Frequently Asked Questions (FAQs) about Dynamic HTML (DHTML)

What is the difference between HTML and DHTML?

HTML, or HyperText Markup Language, is a standard markup language used to create web pages. It is static, meaning it doesn’t change once it’s loaded. On the other hand, DHTML, or Dynamic HTML, is not a separate language but an extension of HTML. It combines HTML, JavaScript, and CSS to create interactive and dynamic web content. This means that DHTML allows web pages to change and interact with the user without needing to reload the page.

How does DHTML enhance user interaction?

DHTML enhances user interaction by allowing web pages to react to user inputs without reloading the page. This is achieved through the use of JavaScript and CSS. For example, DHTML can be used to create drop-down menus, animations, and other interactive features. This makes the user experience more engaging and efficient.

Can I use DHTML with other programming languages?

Yes, DHTML can be used in conjunction with other programming languages. While DHTML itself is a combination of HTML, CSS, and JavaScript, it can also interact with languages like PHP and ASP.NET. This allows for more complex and dynamic web applications.

Is DHTML still relevant today?

While newer technologies like AJAX and jQuery have gained popularity, DHTML is still relevant and widely used. It’s a fundamental part of web development and understanding DHTML can provide a solid foundation for learning more advanced web technologies.

What are some common uses of DHTML?

DHTML is commonly used to create interactive web content. This includes things like drop-down menus, form validation, animations, and image rollovers. It can also be used to create single-page applications, where the entire site or application is loaded in a single HTML page.

How does DHTML improve website performance?

By allowing web pages to react to user inputs without reloading the page, DHTML can significantly improve website performance. This reduces server load and makes the user experience smoother and faster.

What are the components of DHTML?

DHTML is composed of four main components: HTML, CSS, JavaScript, and the Document Object Model (DOM). HTML provides the structure of the page, CSS controls the presentation, JavaScript enables interactivity, and the DOM allows for manipulation of page elements.

How does DHTML work with the Document Object Model (DOM)?

The Document Object Model (DOM) is a crucial part of DHTML. It provides a structured representation of the web page, which can be manipulated using JavaScript. This allows for dynamic changes to the page in response to user inputs.

Is DHTML difficult to learn?

The difficulty of learning DHTML can vary depending on your prior knowledge and experience with web development. If you’re already familiar with HTML, CSS, and JavaScript, learning DHTML will be a natural extension of these skills. However, if you’re new to web development, it may take some time to grasp the concepts.

Where can I learn more about DHTML?

There are many resources available online to learn about DHTML. Websites like GeeksforGeeks, JavaTPoint, and TutorialsPoint offer comprehensive guides and tutorials. Additionally, you can find numerous video tutorials on platforms like YouTube.

Tuesday, March 10, 2026

Getting Started With The Popover API


What happens if you rebuild a single tooltip using the browser’s native model without the aid of a library? The Popover API turns tooltips from something you simulate into something the browser actually understands. Opening and closing, keyboard interaction, Escape handling, and much of the accessibility now come from the platform itself, not from ad-hoc JavaScript.

Tooltips feel like the smallest UI problem you can have. They’re tiny and usually hidden. When someone asks how to build one, the traditional answer almost always comes back using some JavaScript library. And for a long time, that was the sensible advice.

I followed it, too.

On the surface, a tooltip is simple. Hover or focus on an element, show a little box with some text, then hide it when the user moves away. But once you ship one to real users, the edges start to show. Keyboard users Tab into the trigger, but never see the tooltip. Screen readers announce it twice, or not at all. The tooltip flickers when you move the mouse too quickly. It overlaps content on smaller screens. Pressing Esc does not close it. Focus gets lost.

Over time, my tooltip code grew into something I didn’t really want to own anymore. Event listeners piled up. Hover and focus had to be handled separately. Outside clicks needed special cases. ARIA attributes had to be kept in sync by hand. Every small fix added another layer of logic.

Libraries helped, but they were also more like black boxes I worked around instead of fully understanding what was happening behind the scenes.

That was what pushed me to look at the newer Popover API. I wanted to see what would happen if I rebuilt a single tooltip using the browser’s native model without the aid of a library.

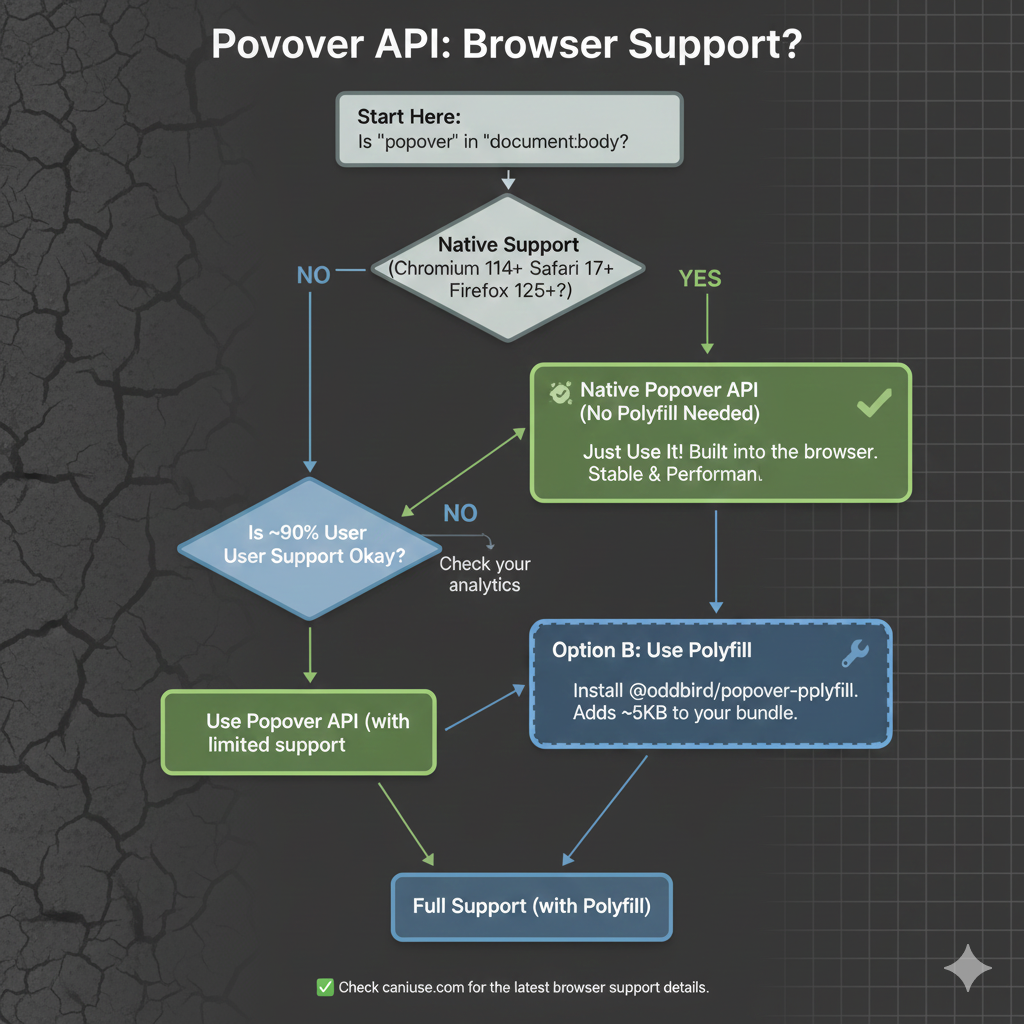
As we start, it’s worth noting that, as with any new feature, there are some things with it that are still being ironed out. That said, it currently enjoys great browser support, although there are several pieces to the overall API that are in flux. It’s worth keeping an eye on Caniuse in the meantime.

The “Old” Tooltip

Before the Popover API, using a tooltip library was not a shortcut. It was the default. Browsers didn’t have a native concept of a tooltip that worked across mouse, keyboard, and assistive technology. If you cared about correctness, your only option was to use a library, and that is exactly what I did.

At a high level, the pattern was always the same: a trigger element, a hidden tooltip element, and JavaScript to coordinate the two.

<button class="info">?</button>
<div class="tooltip" role="tooltip">Helpful text</div>
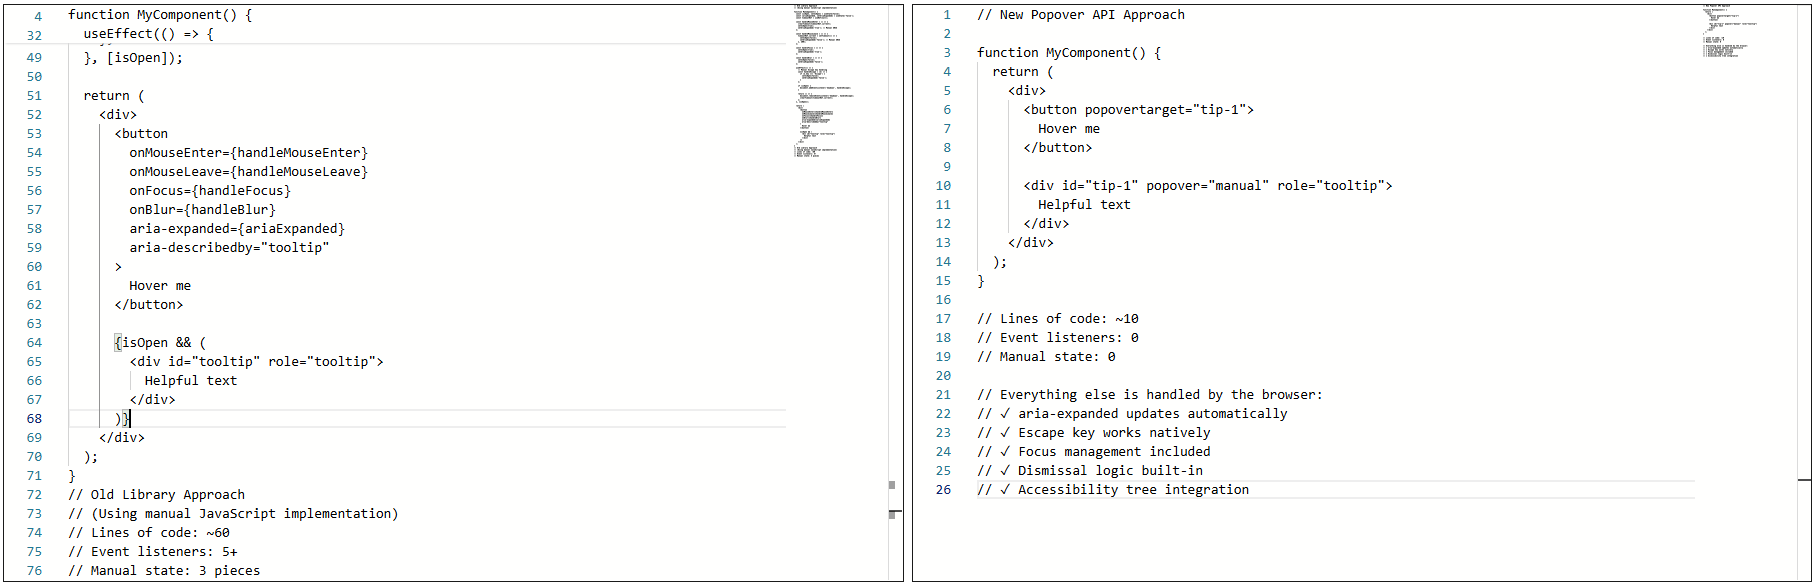
The old approach with ~60 lines of JavaScript with five event listeners vs the new approach is about 10 lines of declarative HTML with zero event listeners.
The old approach required ~60 lines of JavaScript with five event listeners and manual state management. The new approach is about 10 lines of declarative HTML with zero event listeners.

The library handled the wiring that allowed the element to show on hover or focus, hide on blur or mouse leave, and reposition/resize on scroll.

None of it was accidental. It was merely compensating for gaps in web platform features.

Why I Used A Library

The library was doing real work for me: positioning, flipping at viewport edges, event coordination across input types, and scroll awareness inside complex layouts. Positioning alone justified the dependency. Handling scroll containers, transforms, and responsive layouts correctly is not simple.

The real issues showed up in accessibility behavior, not visuals. The tooltip worked, but not all the time. Here’s where things started to fray at the seams:

  • Tooltips sometimes appeared late or not at all.
  • Tabbing quickly could skip them entirely.
  • Escape dismissal was not reliable.
Keyboard navigation with the old implementation: Tabbing quickly causes tooltips to be skipped entirely, and Escape dismissal is unreliable.

I also ran into issues trying to sync hover and focus behavior:

  • Mouse users expect immediacy.
  • Keyboard users expect predictability.
  • Supporting both meant delays and edge cases.
This timing mismatch creates an inconsistent experience across input methods.

Not to mention, there were issues with assistive technologies, particularly screen readers: Sometimes the tooltip was announced, sometimes it wasn’t, and sometimes it was announced twice.

Screen reader behavior with custom tooltips.

Keeping ARIA attributes in sync required manual updates. Miss one state change, and the tooltip became confusing or invisible to the accessibility tree.

This Was Not Bad Code

The implementation was tested, the library was solid, and the behavior was reasonable given the tools available at the time.

The core problem was not the code. It was that the web platform lacked proper affordances.

For example, the browser has no real way of knowing that the element was a tooltip. Everything was built from conventions: generic elements, event listeners, manually-managed ARIA, and custom dismissal logic.

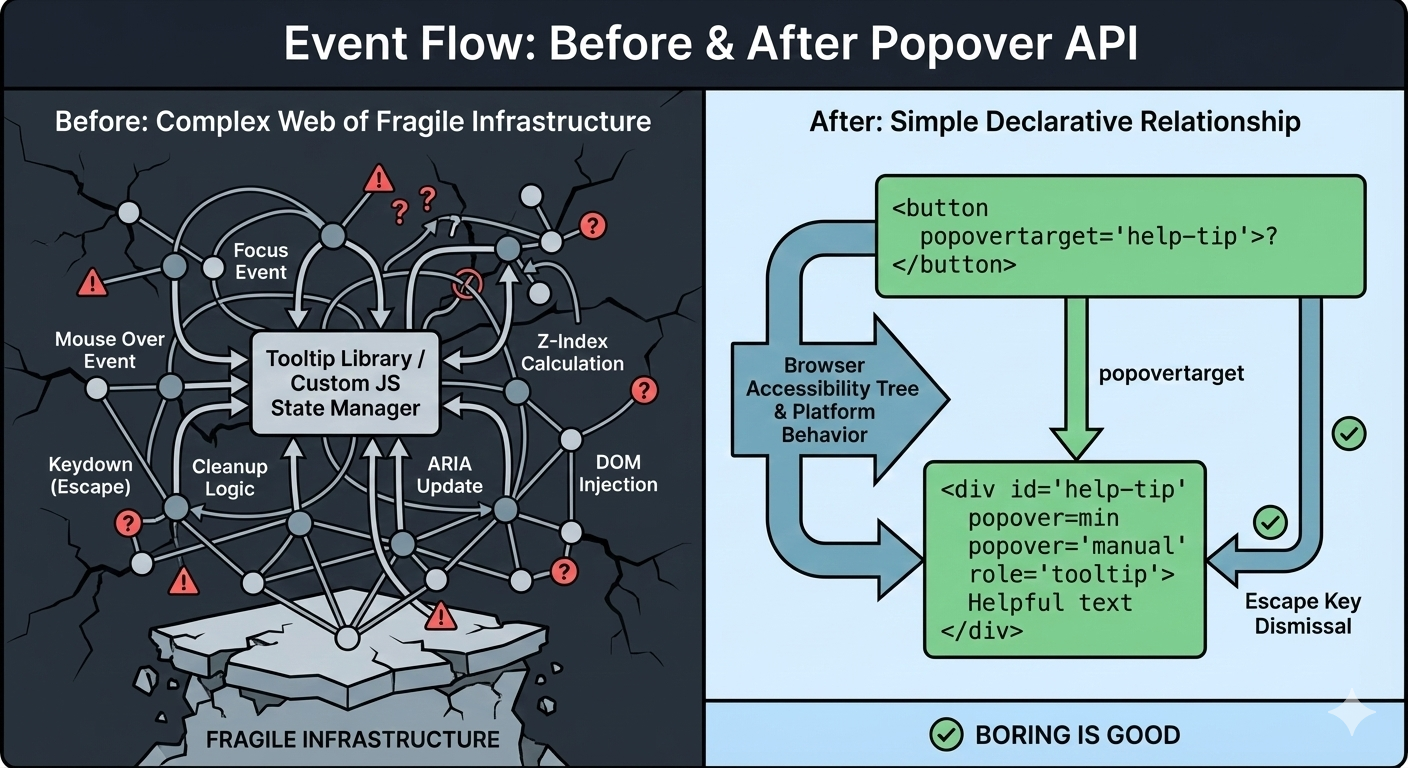
Event flow: before and after Popover API.
Before: A tangled web of event listeners, state management, and manual ARIA updates. After: The browser understands the relationship declaratively.

Over time, the tooltip could become fragile. Small changes carried risk. Minor fixes caused regressions. Worse, adding new tooltips inherited the same complexity. Things technically worked, but never felt settled or complete.

That was the state of things when I decided to rebuild the tooltip using the browser’s native Popover API.

The Moment I Tried The Popover API

I didn’t switch to using the Popover API because I wanted to experiment with something new. I switched because I was tired of maintaining tooltip behavior that I believed the browser should have already understood.

I was skeptical at first. Most new web APIs promise simplicity, but still require glue, edge-case handling, or fallback logic that quietly recreates the same complexity that you were trying to escape.

So, I tried the Popover API in the smallest way possible. Here’s what that looked like:

<!-- popovertarget creates the connection to id="tip-1" -->
<button popovertarget="tip-1">?</button>

<!-- popover="manual": browser manages this as a popover -->
<!-- role="tooltip": tells assistive technology what this is -->
<div id="tip-1" popover="manual" role="tooltip">
  This button triggers a helpful tip.
</div>
The complete tooltip implementation using the Popover API

No event listeners. No state tracking. No ARIA updates handled in JavaScript. I focused the button, and the tooltip appeared. I pressed the Esc key, and it disappeared.

What Immediately Stood Out

A few things became obvious within minutes:

I Didn’t Write Any JavaScript To Open Or Close It 

The browser handled invocation entirely through HTML. The relationship between trigger and tooltip was explicit.

The Esc Key Just Worked #

I didn’t add a key listener. Pressing the Esc key properly closed the tooltip because the browser understands that popovers should be dismissible.

ARIA State Automatically Synced

The aria-expanded attribute updated on its own when the popover opened and closed. There was no need for manual bookkeeping and no risk of stale state.

The browser’s DevTools showing aria-expanded automatically updating from false to true as the popover opens.

This was the moment that the Popover API stopped feeling like a convenience and more like true bona fide platform behavior.

What surprised me most was not the reduced code but the change in responsibility. Before, the tooltip existed because my JavaScript said so. Now, it exists because the browser understands what it is supposed to be and its role in the markup. The tooltip is no longer simply a box positioned near a button anymore, but participating in the browser’s focus model, the accessibility tree, and native dismissal rules.

That’s when my migration to the Popover API started.

Understanding Invoker Commands

The popovertarget and popovertargetaction attributes are part of HTML’s invoker commands, a declarative way to control interactive elements without JavaScript.

  • popovertarget="id": Connects the button to a popover element.
  • popovertargetaction: Specifies what should happen:
    • show: Only opens the popover.
    • hide: Only closes the popover.
    • toggle(default): Opens the popover if closed and closes it if it’s open.

This means you can have multiple triggers for the same tooltip:

<button popovertarget="help-tip" popovertargetaction="show">
  Show Help
</button>

<button popovertarget="help-tip" popovertargetaction="hide">
  Close Help
</button>

<div id="help-tip" popover="manual" role="tooltip">
  Help content
</div>

The browser coordinates everything with no JavaScript needed for the basic interaction.

Free Accessibility Wins

This is the part that made me switch completely. I expected the Popover API to reduce code. I didn’t expect it to remove entire categories of accessibility bugs I had been chasing for years. Before the migration, my tooltip system looked fine at the very least. Keyboard support existed, ARIA attributes were present, and screen readers usually behaved accordingly. But “usually” did a lot of heavy lifting.

Once I swapped in native popovers, three things changed immediately.

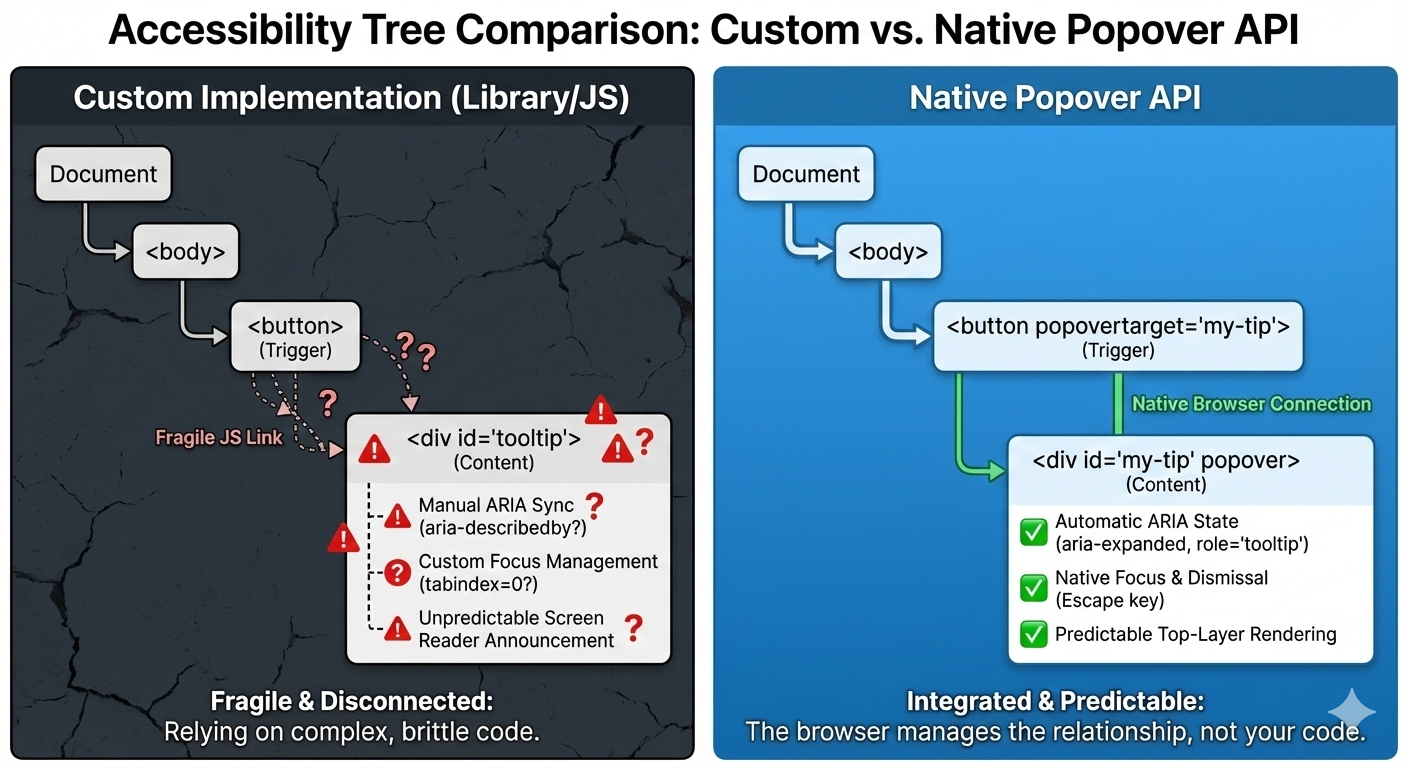
Accessibility tree comparison: Custom vs Native Popover API.
Custom implementations use fragile JavaScript to connect triggers and tooltips. The Popover API creates a native browser connection that assistive technology can trust. 

1. The Keyboard “Just Works”

Keyboard support depended on multiple layers lining up correctly: focus had to trigger the tooltip, blur had to hide it, Esc had to be wired manually, and timing mattered. If you missed one edge case, the tooltip would either stay open too long or disappear before it could be read.

With the popover attribute set to auto or manual, the browser takes over the basics: Tab and Shift+Tab behave normally, Esc closes the tooltip every time, and no extra listeners are required.

<div popover="manual">
  Helpful explanation
</div>

What disappeared from my codebase were global keydown handlers, Esc-specific cleanup logic, and state checks during keyboard navigation. The keyboard experience stopped being something I had to maintain, and it became a browser guarantee.

2. Screenreader Predictability

This was the biggest improvement. Even with careful ARIA work, the behavior varied, as I outlined earlier. Every small change felt risky. Using a popover with a proper role looks and feels a lot more stable and predictable as far as what’s going to happen:

<div popover="manual" role="tooltip">
  Helpful explanation
</div>

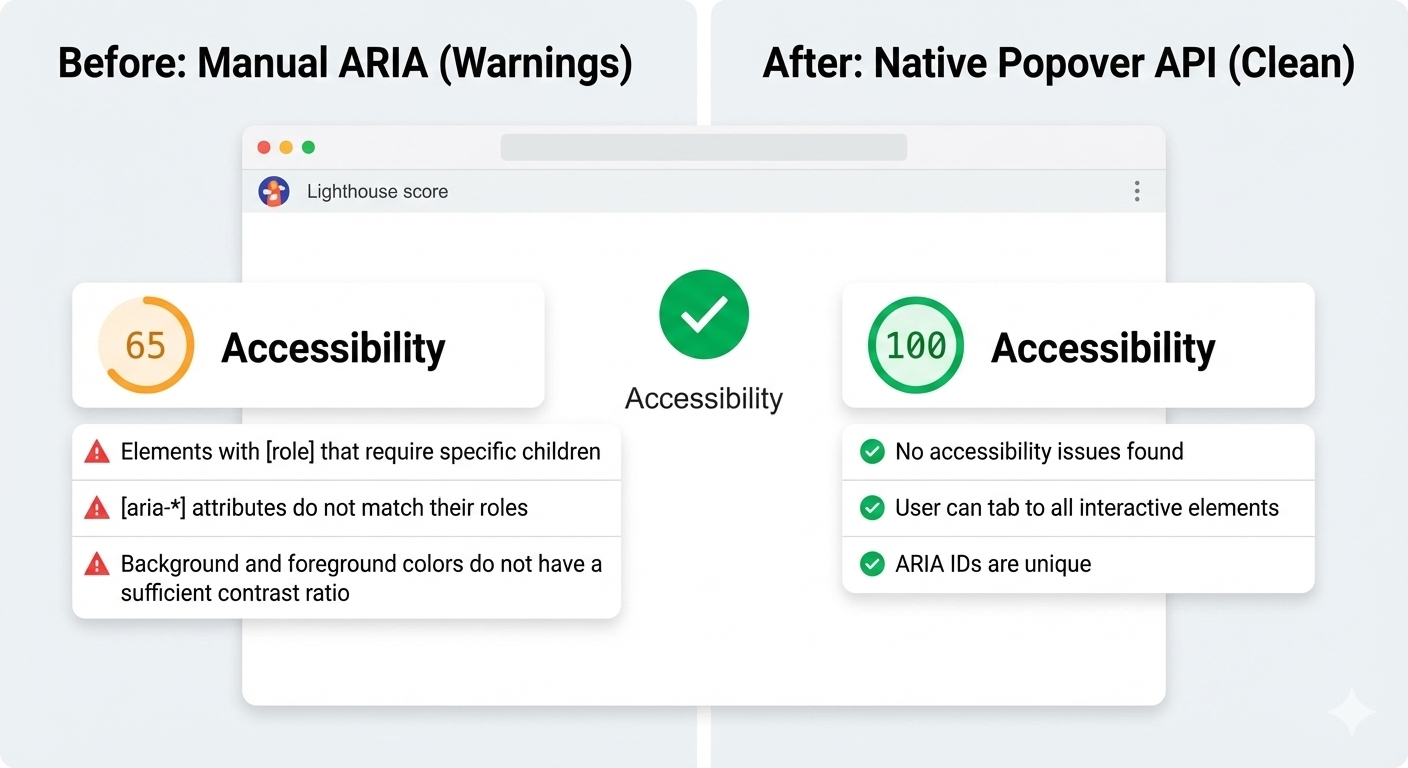
And here’s another win: After the switch, Lighthouse stopped flagging incorrect ARIA state warnings for the interaction, largely because there are no longer custom ARIA states for me to accidentally get wrong.

ARIA state warnings before migration, and 100% audit score after switching to the Popover API.
Before the migration, Lighthouse flagged accessibility warnings about incorrect ARIA state management. After switching to the Popover API, the audit score improved.

3. Focus Management

Focus used to be fragile. Before, I had rules like: let focus trigger show tooltip, move focus into tooltip and don’t close, blur trigger when it’s too close, and close tooltip and restore focus manually. This worked until it didn’t.

With the Popover API, the browser enforces a simpler model where focus can more naturally move into the popover. Closing the popover returns focus to the trigger, and there are no invisible focus traps or lost focus moments. And I didn’t add focus restoration code; I removed it.

Tab to focus the trigger, the tooltip appears, press Escape to dismiss, and focus automatically returns to the trigger.

Where The Popover API Maybe Still Isn’t Enough 

As much as the Popover API has simplified my code and improved semantics, it still has not completely eliminated JavaScript. That’s not totally a bad thing because what’s changed is that JavaScript is no longer a key dependency. I am no longer compensating for missing platform behavior anymore. I am much more focused on intent.

Here are a few places where I could see the API continue to improve.

Tooltip Timing Still Matters 

Native popovers open and close immediately. That is usually the expected behavior, but not always ideal for what we consider to be tooltips. In those cases, instant dismissal can feel unstable when you move your mouse a few pixels too quickly or accidentally brush past the trigger — the tooltip will flash, then disappear, which can be jarring.

I want to be able to control that timing and apply delays between hover or focus and opening the tooltip. So I still add small delays. What changed was how much of the interaction logic I actually needed to own. Before, even basic open and close behavior required JavaScript. With the Popover API, and especially with HTML invoker commands, that responsibility shifts back to the browser.

<button
  popovertarget="help-tip"
  popovertargetaction="show">
  ?
</button>

<div id="help-tip" popover="manual" role="tooltip">
  This button triggers a helpful tip.
</div>

At this point, the browser handles invocation, dismissal, and ARIA state on its own. There’s no JavaScript involved just to make the tooltip appear or disappear.

JavaScript only comes back in when I want intentional behavior. In this case, a short delay before hiding the tooltip, and cancelling if the pointer moves into it. This isn’t about accessibility fixes. It’s about human behavior.

It’s worth noting that CSS is beginning to explore this space as well. The emerging interest/invoker work introduces ways to express entry and exit delays directly in CSS, which could remove this small bit of JavaScript entirely. For now, I still handle it imperatively, but the direction of the platform is clear.

let hideTimeout;

const show = () => {
  clearTimeout(hideTimeout);
  tooltip.showPopover();
};

const hide = () => {
  hideTimeout = setTimeout(() => {
    tooltip.hidePopover();
  }, 200);
};

The difference is that this logic stays small and local. It no longer defines how the tooltip works. It simply refines how it feels.

Hover Intent With Invoker Commands

The browser does not know why someone hovers over an element or focuses on it. Was it intentional, or was the pointer just passing through? That part has always required some judgment.

What changed is where that logic lives. With invoker commands handling the core open and close behavior, JavaScript no longer owns the interaction model. It only adds intent on top of it.

<button
 popovertarget="help-tip"
 popovertargetaction="show">
  ?
</button>

The platform manages invocation, dismissal, and ARIA state. JavaScript is only needed when we want behavior that the browser cannot infer, such as a short delay before hiding or cancelling dismissal if the pointer moves into the tooltip.

let hideTimeout;

const show = () => {
clearTimeout(hideTimeout);
  tooltip.showPopover();
};

const hide = () => {
  hideTimeout = setTimeout(() => {
    tooltip.hidePopover();
  }, 200);
};

And again, CSS is beginning to explore this space with new interaction primitives, which may reduce the need for custom hover intent code even further.

Manual Popovers And Focus 

For popover="manual", the browser does not restore focus automatically the way it can for auto popovers. That responsibility remains explicit. When a tooltip opens on focus and closes on blur, I return focus deliberately to the trigger:

tooltip.hidePopover();
trigger.focus();

This is not a limitation but a clear boundary between platform behavior and person intent.

The Honest Take #

The Popover API does not magically solve tooltips. It stopped forcing me to rebuild fragile infrastructure. I still write JavaScript and think about edge cases, but now I am solving product problems instead of recreating UI primitives the browser should already understand.

When I would Still Reach For A Tooltip Library #

Even after migrating my tooltips to the Popover API, I did not walk away thinking libraries were old and obsolete. They have earned their place, just in more specific situations.

1. Large Or Mature Design Systems

If you are maintaining a large design system used across multiple teams, a tooltip library can still make sense because centralized behavior, documented patterns, and consistent defaults across products. In those environments, changing the underlying interaction model is not just a technical decision; it is an organizational one. A well-maintained library gives teams guardrails, especially when not everyone is deeply familiar with accessibility nuances.

2. Complex Positioning Requirements

For most tooltips, native positioning is enough, but if you need collision detection across nested scroll containers, custom flipping logic, or fine-grained control over offsets and boundaries, libraries like Floating UI still shine. They are optimized for geometry problems that the platform is only beginning to address.

It is also worth mentioning CSS anchor positioning, which is starting to cover many of the problems that tooltip libraries historically solved. Anchors allow a popover to be positioned relative to a trigger using pure CSS, including viewport-aware placement and edge flipping. This moves even more responsibility back to the platform instead of JavaScript.

That said, anchor positioning is still new and there are known issues, although the good news is that they are part of Interop, meaning we can look forward to full and consistent browser support. For teams that need consistent cross-browser behavior today, libraries remain the practical choice. The direction is clear that the platform is steadily absorbing work that once required dedicated positioning engines.

3. Teams Without Accessibility Experience

This one matters. If a team does not have strong accessibility knowledge, a good library can act as a safety net, though it will not guarantee perfect accessibility. It can, however, prevent the many common mistakes. The Popover API gives you better defaults, but it still assumes you know when to add roles, labels, focus management, and testing. Without that understanding, even native tools can be misused.

The Decision Line 

For me, the choice now looks like this:

Use the Popover API for simplicity, clarity, and platform-aligned behavior. Use a library when scale, customization, or constraints demand it. It’s not about purity. It’s about choosing the right level of abstraction for the problem in front of you.

“

And sometimes the right tool is still a library — just no longer by default.


Conc

The Popover API means that tooltips are no longer something you simulate. They’re something the browser understands. Opening, closing, keyboard behavior, Escape handling, and a big chunk of accessibility now come from the platform itself, not from ad-hoc JavaScript.

That does not mean tooltip libraries are obsolete because they still make sense for complex design systems, heavy customization, or legacy constraints, but the default has shifted. For the first time, the simplest tooltip can also be the most correct one. If you are curious, try this experiment: Simply replace just one tooltip in your product with the Popover API, do not rewrite everything, do not migrate a whole system, and just pick one and see what disappears from your code.

When the platform gives you a better primitive, the win is not just fewer lines of JavaScript, but it is fewer things you have to worry about at all.

Check out the full source code in my GitHub repo.

Further Reading

For deeper dives into popovers and related APIs:

MDN also offers comprehensive technical documentation for the Popover API.

Monday, July 15, 2024

In Praise Of The Basics

 What does it mean to learn the “basics”, or fundamentals, of front-end web development? Is starting with HTML and CSS still the best entry point to learn how to make websites and apps when we have a seemingly endless supply of frameworks that abstract those building blocks with their own opinions and syntax flavors? Geoff Graham thinks so and discusses why you might consider going “back to basics” to start or move forward in your career.

Lately, I’ve been thinking about the basics of web development. Actually, I’ve been thinking about them for some time now, at least since I started teaching beginning web development in 2020.

I’m fascinated by the basics. They’re an unsung hero, really, as there is no developer worth their salt who would be where they are without them. Yet, they often go unnoticed.

The basics exist in some sort of tension between the utmost importance and the incredibly banal.

You might even think of them as the vegetable side on your dinner plate — wholesome but perhaps bland without the right seasoning.

Who needs the basics of HTML and CSS, some say, when we have tools that abstract the way they’re written and managed? We now have site builders that require no technical knowledge. We have frameworks with enough syntactic sugar to give your development chops a case of cavities. We have libraries packed with any number of pre-established patterns that can be copy-pasted without breaking a sweat. The need to “learn” the basics of HTML and CSS is effectively null when the number of tools that exist to supplant them is enough to fill a small galaxy of stars.

Rachel Andrew wrote one of my all-time favorite posts back in 2019, equating the rise of abstractions with an increase in complexity and a profound loss of inroads for others to enter the web development field:

“We have already lost many of the entry points that we had. We don’t have the forums of parents teaching each other HTML and CSS, in order to make a family album. Those people now use Facebook or perhaps run a blog on wordpress.com or SquareSpace with a standard template. We don’t have people customising their MySpace profile or learning HTML via Neopets. We don’t have the people, usually women, entering the industry because they needed to learn HTML during that period when an organisation’s website was deemed part of the duties of the administrator.”

— Rachel Andrew, “HTML, CSS and our vanishing industry entry points”

There’s no moment more profound in my web development career than the time I changed the background color of a page from default white to some color value I can’t remember (but know for a fact it would never be dodgerblue). That, and my personal “a-ha!” moment when realizing that everything in CSS is a box. Nothing guided me with the exception of “View Source,” and I’d bet the melting Chapstick in my pocket that you’re the same if you came up around the turn of the 21st century.

Where do you go to learn HTML and CSS these days? Even now, there are few dedicated secondary education programs (or scholarships, for that matter) to consider. We didn’t have bootcamps back in the day, but you don’t have to toss a virtual stone across many pixels to find one today.

There are excellent and/or free tutorials, too. Here, I’ll link a few of ’em up for you:

Let’s not even get into the number of YouTube tutorials. But if you do, no one beats Kevin’s incredible archive of recorded gems.

Anyway, my point is that there are more resources than ever for learning web development, but still painfully few entry points to get there. The resources we have for learning the basics are great, but many are either growing stale, are quick hits without a clear learning path, or assume the learner has at least some technical knowledge. I can tell you, as someone who has hit the Publish button on thousands of front-end tutorials, that the vast majority — if not all — of them are geared toward those who are already on the career path.

It was always a bit painful when someone would email CSS-Tricks asking where to get started learning CSS because, well, you’d imagine CSS-Tricks being the perfect home for something like that, and yet, there’s nothing. It’s just the reality, even if many of us (myself included) cut our chops with sites like CSS-Tricks, Smashing Magazine, and A List Apart. We were all learning together at that time, or so it seemed.

What we need are more pathways for deep learning.

Learning Experience Design (LXD) is a real thing that I’d position somewhere between what we know as UX Design and the practice of accessibility. There’s a focus on creating delightful experiences, sure, but the real aim of LDX is to establish learning paths that universally account for different types of learners (e.g., adults and children) and learning styles (e.g., visual and experiential). According to LDX, learners have a set of needs not totally unlike those that Maslow’s hierarchy of needs identifies for all humans, and there are different models for determining those needs, perhaps none more influential than Bloom’s Taxonomy.

These are things that many front-end tutorials, bootcamps, videos, and programs are not designed for. It’s not that the resources are bad (nay, most are excellent); it’s that they are serving different learners and learning types than what a day-one beginner needs. And let’s please not rely on AI to fill the gaps in human experiences!

Like I said, I’ve been thinking about this a lot. Like, a lot a lot. In fact, I recently published an online course purely dedicated to learning the basics of front-end development, creatively named TheBasics.dev. I’d like to think it’s not just another tutorial because it’s a complete set of lessons that includes reading, demonstrations, videos, lab exercises, and assessments, i.e., a myriad of ways to learn. I’d also like to think that this is more than just another bootcamp because it is curricula designed with the intention to develop new knowledge through reflective practices, peer learning, and feedback.

Anyway, I’m darn proud of The Basics, even if I’m not exactly the self-promoting type, and writing about it is outside of my comfort zone. If you’re reading this, it’s very likely that you, too, work on the front end. The Basics isn’t for you exactly, though I’d argue that brushing up on fundamentals is never a bad thing, regardless of your profession, but especially in front-end development, where standards are well-documented but ever-changing as well.

The Basics is more for your clients who do not know how to update the website they paid you to make. Or the friend who’s learning but still keeps bugging you with questions about the things they’re reading. Or your mom, who still has no idea what it is you do for a living. It’s for those whom the entry points are vanishing. It’s for those who could simply sign up for a Squarespace account but want to actually understand the code it spits out so they have more control to make a site that uniquely reflects them.

If you know a person like that, I would love it if you’d share The Basics with them.

Long live the basics! Long live the “a-ha!” moments that help us all fall in love with the World Wide Web.

Thursday, April 25, 2024

Converting Plain Text To Encoded HTML With Vanilla JavaScript

 What do you do when you need to convert plain text into formatted HTML? Perhaps you reach for Markdown or manually write in the element tags yourself. Or maybe you have one or two of the dozens of online tools that will do it for you. In this tutorial, Alexis Kypridemos picks those tools apart and details the steps for how we can do it ourselves with a little vanilla HTML, CSS, and JavaScript.

When copying text from a website to your device’s clipboard, there’s a good chance that you will get the formatted HTML when pasting it. Some apps and operating systems have a “Paste Special” feature that will strip those tags out for you to maintain the current style, but what do you do if that’s unavailable?

Same goes for converting plain text into formatted HTML. One of the closest ways we can convert plain text into HTML is writing in Markdown as an abstraction. You may have seen examples of this in many comment forms in articles just like this one. Write the comment in Markdown and it is parsed as HTML.

Even better would be no abstraction at all! You may have also seen (and used) a number of online tools that take plainly written text and convert it into formatted HTML. The UI makes the conversion and previews the formatted result in real time.

Providing a way for users to author basic web content — like comments — without knowing even the first thing about HTML, is a novel pursuit as it lowers barriers to communicating and collaborating on the web. Saying it helps “democratize” the web may be heavy-handed, but it doesn’t conflict with that vision!

Smashing Magazine comment form that is displayed at the end of articles. It says to leave a comment, followed by instructions for Markdown formatting and a form text area.
Smashing Magazine’s comment form includes instructions for formatting a comment in Markdown syntax. (Large preview)

We can build a tool like this ourselves. I’m all for using existing resources where possible, but I’m also for demonstrating how these things work and maybe learning something new in the process.

Defining The Scope

There are plenty of assumptions and considerations that could go into a plain-text-to-HTML converter. For example, should we assume that the first line of text entered into the tool is a title that needs corresponding <h1> tags? Is each new line truly a paragraph, and how does linking content fit into this?

Again, the idea is that a user should be able to write without knowing Markdown or HTML syntax. This is a big constraint, and there are far too many HTML elements we might encounter, so it’s worth knowing the context in which the content is being used. For example, if this is a tool for writing blog posts, then we can limit the scope of which elements are supported based on those that are commonly used in long-form content: <h1>, <p>, <a>, and <img>. In other words, it will be possible to include top-level headings, body text, linked text, and images. There will be no support for bulleted or ordered lists, tables, or any other elements for this particular tool.

The front-end implementation will rely on vanilla HTML, CSS, and JavaScript to establish a small form with a simple layout and functionality that converts the text to HTML. There is a server-side aspect to this if you plan on deploying it to a production environment, but our focus is purely on the front end.

Looking At Existing Solutions

There are existing ways to accomplish this. For example, some libraries offer a WYSIWYG editor. Import a library like TinyMCE with a single <script> and you’re good to go. WYSIWYG editors are powerful and support all kinds of formatting, even applying CSS classes to content for styling.

But TinyMCE isn’t the most efficient package at about 500 KB minified. That’s not a criticism as much as an indication of how much functionality it covers. We want something more “barebones” than that for our simple purpose. Searching GitHub surfaces more possibilities. The solutions, however, seem to fall into one of two categories:

  • The input accepts plain text, but the generated HTML only supports the HTML <h1> and <p> tags.
  • The input converts plain text into formatted HTML, but by ”plain text,” the tool seems to mean “Markdown” (or a variety of it) instead. The txt2html Perl module (from 1994!) would fall under this category.

Even if a perfect solution for what we want was already out there, I’d still want to pick apart the concept of converting text to HTML to understand how it works and hopefully learn something new in the process. So, let’s proceed with our own homespun solution.

Setting Up The HTML

We’ll start with the HTML structure for the input and output. For the input element, we’re probably best off using a <textarea>. For the output element and related styling, choices abound. The following is merely one example with some very basic CSS to place the input <textarea> on the left and an output <div> on the right:

See the Pen Base Form Styles [forked] by Geoff Graham.

You can further develop the CSS, but that isn’t the focus of this article. There is no question that the design can be prettier than what I am providing here!

Capture The Plain Text Input

We’ll set an onkeyup event handler on the <textarea> to call a JavaScript function called convert() that does what it says: convert the plain text into HTML. The conversion function should accept one parameter, a string, for the user’s plain text input entered into the <textarea> element:

<textarea onkeyup='convert(this.value);'></textarea>

onkeyup is a better choice than onkeydown in this case, as onkeyup will call the conversion function after the user completes each keystroke, as opposed to before it happens. This way, the output, which is refreshed with each keystroke, always includes the latest typed character. If the conversion is triggered with an onkeydown handler, the output will exclude the most recent character the user typed. This can be frustrating when, for example, the user has finished typing a sentence but cannot yet see the final punctuation mark, say a period (.), in the output until typing another character first. This creates the impression of a typo, glitch, or lag when there is none.

In JavaScript, the convert() function has the following responsibilities:

  1. Encode the input in HTML.
  2. Process the input line-by-line and wrap each individual line in either a <h1> or <p> HTML tag, whichever is most appropriate.
  3. Process the output of the transformations as a single string, wrap URLs in HTML <a> tags, and replace image file names with <img> elements.

And from there, we display the output. We can create separate functions for each responsibility. Let’s name them accordingly:

  1. html_encode()
  2. convert_text_to_HTML()
  3. convert_images_and_links_to_HTML()

Each function accepts one parameter, a string, and returns a string.

Encoding The Input Into HTML

Use the html_encode() function to HTML encode/sanitize the input. HTML encoding refers to the process of escaping or replacing certain characters in a string input to prevent users from inserting their own HTML into the output. At a minimum, we should replace the following characters:

  • < with &lt;
  • > with &gt;
  • & with &amp;
  • ' with &#39;
  • " with &quot;

JavaScript does not provide a built-in way to HTML encode input as other languages do. For example, PHP has htmlspecialchars(), htmlentities(), and strip_tags() functions. That said, it is relatively easy to write our own function that does this, which is what we’ll use the html_encode() function for that we defined earlier:

function html_encode(input) {
  const textArea = document.createElement("textarea");
  textArea.innerText = input;
  return textArea.innerHTML.split("<br>").join("\n");
}

HTML encoding of the input is a critical security consideration. It prevents unwanted scripts or other HTML manipulations from getting injected into our work. Granted, front-end input sanitization and validation are both merely deterrents because bad actors can bypass them. But we may as well make them work a little harder.

As long as we are on the topic of securing our work, make sure to HTML-encode the input on the back end, where the user cannot interfere. At the same time, take care not to encode the input more than once. Encoding text that is already HTML-encoded will break the output functionality. The best approach for back-end storage is for the front end to pass the raw, unencoded input to the back end, then ask the back-end to HTML-encode the input before inserting it into a database.

That said, this only accounts for sanitizing and storing the input on the back end. We still have to display the encoded HTML output on the front end. There are at least two approaches to consider:

  1. Convert the input to HTML after HTML-encoding it and before it is inserted into a database.
    This is efficient, as the input only needs to be converted once. However, this is also an inflexible approach, as updating the HTML becomes difficult if the output requirements happen to change in the future.
  2. Store only the HTML-encoded input text in the database and dynamically convert it to HTML before displaying the output for each content request.
    This is less efficient, as the conversion will occur on each request. However, it is also more flexible since it’s possible to update how the input text is converted to HTML if requirements change.\

Applying Semantic HTML Tags

Let’s use the convert_text_to_HTML() function we defined earlier to wrap each line in their respective HTML tags, which are going to be either <h1> or <p>. To determine which tag to use, we will split the text input on the newline character (\n) so that the text is processed as an array of lines rather than a single string, allowing us to evaluate them individually.

function convert_text_to_HTML(txt) {
  // Output variable
  let out = '';
  // Split text at the newline character into an array
  const txt_array = txt.split("\n");
  // Get the number of lines in the array
  const txt_array_length = txt_array.length;
  // Variable to keep track of the (non-blank) line number
  let non_blank_line_count = 0;
  
  for (let i = 0; i < txt_array_length; i++) {
    // Get the current line
    const line = txt_array[i];
    // Continue if a line contains no text characters
    if (line === ''){
      continue;
    }
    
    non_blank_line_count++;
    // If a line is the first line that contains text
    if (non_blank_line_count === 1){
      // ...wrap the line of text in a Heading 1 tag
      out += `<h1>${line}</h1>`;
      // ...otherwise, wrap the line of text in a Paragraph tag.
    } else {
      out += `<p>${line}</p>`;
    }
  }

  return out;
}

In short, this little snippet loops through the array of split text lines and ignores lines that do not contain any text characters. From there, we can evaluate whether a line is the first one in the series. If it is, we slap a <h1> tag on it; otherwise, we mark it up in a <p> tag.

This logic could be used to account for other types of elements that you may want to include in the output. For example, perhaps the second line is assumed to be a byline that names the author and links up to an archive of all author posts.

Tagging URLs And Images With Regular Expressions #

Next, we’re going to create our convert_images_and_links_to_HTML() function to encode URLs and images as HTML elements. It’s a good chunk of code, so I’ll drop it in and we’ll immediately start picking it apart together to explain how it all works.


function convert_images_and_links_to_HTML(string){
  let urls_unique = [];
  let images_unique = [];
  const urls = string.match(/https*:\/\/[^\s<),]+[^\s<),.]/gmi) ?? [];
  const imgs = string.match(/[^"'>\s]+\.(jpg|jpeg|gif|png|webp)/gmi) ?? [];
                          
  const urls_length = urls.length;
  const images_length = imgs.length;
  
  for (let i = 0; i < urls_length; i++){
    const url = urls[i];
    if (!urls_unique.includes(url)){
      urls_unique.push(url);
    }
  }
  
  for (let i = 0; i < images_length; i++){
    const img = imgs[i];
    if (!images_unique.includes(img)){
      images_unique.push(img);
    }
  }
  
  const urls_unique_length = urls_unique.length;
  const images_unique_length = images_unique.length;
  
  for (let i = 0; i < urls_unique_length; i++){
    const url = urls_unique[i];
    if (images_unique_length === 0 || !images_unique.includes(url)){
      const a_tag = `<a href="${url}" target="_blank">${url}</a>`;
      string = string.replace(url, a_tag);
    }
  }
  
  for (let i = 0; i < images_unique_length; i++){
    const img = images_unique[i];
    const img_tag = `<img src="${img}" alt="">`;
    const img_link = `<a href="${img}">${img_tag}</a>`;
    string = string.replace(img, img_link);
  }
  return string;
}

Unlike the convert_text_to_HTML() function, here we use regular expressions to identify the terms that need to be wrapped and/or replaced with <a> or <img> tags. We do this for a couple of reasons:

  1. The previous convert_text_to_HTML() function handles text that would be transformed to the HTML block-level elements <h1> and <p>, and, if you want, other block-level elements such as <address>. Block-level elements in the HTML output correspond to discrete lines of text in the input, which you can think of as paragraphs, the text entered between presses of the Enter key.
  2. On the other hand, URLs in the text input are often included in the middle of a sentence rather than on a separate line. Images that occur in the input text are often included on a separate line, but not always. While you could identify text that represents URLs and images by processing the input line-by-line — or even word-by-word, if necessary — it is easier to use regular expressions and process the entire input as a single string rather than by individual lines.

Regular expressions, though they are powerful and the appropriate tool to use for this job, come with a performance cost, which is another reason to use each expression only once for the entire text input.

Remember: All the JavaScript in this example runs each time the user types a character, so it is important to keep things as lightweight and efficient as possible.

I also want to make a note about the variable names in our convert_images_and_links_to_HTML() function. images (plural), image (singular), and link are reserved words in JavaScript. Consequently, imgs, img, and a_tag were used for naming. Interestingly, these specific reserved words are not listed on the relevant MDN page, but they are on W3Schools.

We’re using the String.prototype.match() function for each of the two regular expressions, then storing the results for each call in an array. From there, we use the nullish coalescing operator (??) on each call so that, if no matches are found, the result will be an empty array. If we do not do this and no matches are found, the result of each match() call will be null and will cause problems downstream.

const urls = string.match(/https*:\/\/[^\s<),]+[^\s<),.]/gmi) ?? [];
const imgs = string.match(/[^"'>\s]+\.(jpg|jpeg|gif|png|webp)/gmi) ?? [];

Next up, we filter the arrays of results so that each array contains only unique results. This is a critical step. If we don’t filter out duplicate results and the input text contains multiple instances of the same URL or image file name, then we break the HTML tags in the output. JavaScript does not provide a simple, built-in method to get unique items in an array that’s akin to the PHP array_unique() function.

The code snippet works around this limitation using an admittedly ugly but straightforward procedural approach. The same problem is solved using a more functional approach if you prefer. There are many articles on the web describing various ways to filter a JavaScript array in order to keep only the unique items.

We’re also checking if the URL is matched as an image before replacing a URL with an appropriate <a> tag and performing the replacement only if the URL doesn’t match an image. We may be able to avoid having to perform this check by using a more intricate regular expression. The example code deliberately uses regular expressions that are perhaps less precise but hopefully easier to understand in an effort to keep things as simple as possible.

And, finally, we’re replacing image file names in the input text with <img> tags that have the src attribute set to the image file name. For example, my_image.png in the input is transformed into <img src='my_image.png'> in the output. We wrap each <img> tag with an <a> tag that links to the image file and opens it in a new tab when clicked.

There are a couple of benefits to this approach:

  • In a real-world scenario, you will likely use a CSS rule to constrain the size of the rendered image. By making the images clickable, you provide users with a convenient way to view the full-size image.
  • If the image is not a local file but is instead a URL to an image from a third party, this is a way to implicitly provide attribution. Ideally, you should not rely solely on this method but, instead, provide explicit attribution underneath the image in a <figcaption>, <cite>, or similar element. But if, for whatever reason, you are unable to provide explicit attribution, you are at least providing a link to the image source.

It may go without saying, but “hotlinking” images is something to avoid. Use only locally hosted images wherever possible, and provide attribution if you do not hold the copyright for them.

Before we move on to displaying the converted output, let’s talk a bit about accessibility, specifically the image alt attribute. The example code I provided does add an alt attribute in the conversion but does not populate it with a value, as there is no easy way to automatically calculate what that value should be. An empty alt attribute can be acceptable if the image is considered “decorative,” i.e., purely supplementary to the surrounding text. But one may argue that there is no such thing as a purely decorative image.

That said, I consider this to be a limitation of what we’re building.

Displaying the Output HTML

We’re at the point where we can finally work on displaying the HTML-encoded output! We’ve already handled all the work of converting the text, so all we really need to do now is call it:

function convert(input_string) {
  output.innerHTML = convert_images_and_links_to_HTML(convert_text_to_HTML(html_encode(input_string)));
}

If you would rather display the output string as raw HTML markup, use a <pre> tag as the output element instead of a <div>:

<pre id='output'></pre>

The only thing to note about this approach is that you would target the <pre> element’s textContent instead of innerHTML:

function convert(input_string) {
  output.textContent = convert_images_and_links_to_HTML(convert_text_to_HTML(html_encode(input_string)));
}

Conclusion 

We did it! We built one of the same sort of copy-paste tool that converts plain text on the spot. In this case, we’ve configured it so that plain text entered into a <textarea> is parsed line-by-line and encoded into HTML that we format and display inside another element.

See the Pen Convert Plain Text to HTML (PoC) [forked] by Geoff Graham.

We were even able to keep the solution fairly simple, i.e., vanilla HTML, CSS, and JavaScript, without reaching for a third-party library or framework. Does this simple solution do everything a ready-made tool like a framework can do? Absolutely not. But a solution as simple as this is often all you need: nothing more and nothing less.

As far as scaling this further, the code could be modified to POST what’s entered into the <form> using a PHP script or the like. That would be a great exercise, and if you do it, please share your work with me in the comments because I’d love to check it out.

References