⭐ If you would like to buy me a coffee, well thank you very much that is mega kind! : https://www.buymeacoffee.com/honeyvig
Hire a web Developer and Designer to upgrade and boost your online presence with cutting edge Technologies
Showing posts with label Security. Show all posts

Saturday, July 25, 2026

Weaponizing And Defending The React Flight Protocol: Deserialization Sinks In RSCs


While React Server Components rely on the custom Flight protocol to stream interactive UIs, this same mechanism introduces powerful deserialization sinks that attackers can exploit. Durgesh Pawar breaks down the mechanics behind the CVSS 10.0 “React2Shell” vulnerability to show how protocol manipulation can lead to remote code execution. It also covers a practical, ranked set of defenses, from strict schema validation to CSRF hardening, for securing React applications against these structural risks.

React Server Components don’t send HTML to your browser. They don’t send JSON either. When a server component renders, what actually travels over the wire is a custom streaming protocol called Flight. It’s a line-delimited format with its own type system, its own reference resolution, and its own rules for reconstructing executable behavior on the client.

Most React developers have never opened the Network tab and actually looked at a Flight payload. It looks like a mix of JSON fragments, dollar-sign-prefixed references, and module pointers that the React runtime silently reassembles into a live component tree. The framework handles it, so nobody questions it.

I’m not sure most teams have thought carefully about what that trust actually implies.

I started pulling apart the Flight protocol after CVE-2025-55182 dropped in December 2025. The security community called it React2Shell, and for good reason. It was a CVSS 10.0, unauthenticated remote code execution vulnerability sitting in the Flight deserialization layer. One crafted HTTP request to a Server Function endpoint, and an attacker had shell access. No credentials needed.

The federal Cybersecurity & Infrastructure Agency (CISA) added it to the Known Exploited Vulnerabilities catalog. Sysdig tied in-the-wild exploitation to North Korean state-sponsored actors deploying file-less implants through the Ethereum blockchain. That’s the kind of CVE that gets your attention.

After spending time in the source (mostly getOutlinedModel and getChunk, which is where the resolution logic that matters actually lives), I realized React2Shell wasn’t a one-off parsing bug. It was a symptom. Flight reconstructs executable references, lazy-loaded components, server RPC endpoints, and async state from a stream of text. That’s a deserialization system.

The attack surface extends well beyond a single missing hasOwnProperty check. This article covers how Flight works on the wire, where the deserialization sinks are, what attackers have already weaponized, and what’s still exposed.

This leads to a ranked, practical set of defenses for your own Server Components: schema validation on every Server Action, the server-only package, cross-site request forgery (CSRF) hardening beyond framework defaults, and an assessment of what the Taint API and Web Application Firewalls (WAFs) provide.

Flight On The Wire #

Open your browser’s Network tab on any Next.js App Router page and look for requests returning Content-Type: text/x-component. That’s Flight. It’s not a single JSON blob. It’s a streaming, line-delimited format where each line is a self-contained “row” that the client-side React runtime processes as it arrives over the connection.

Here’s what a simple Flight payload looks like in practice:

1:I["./src/components/ClientComponent.js",["chunks/main.js"],"default"]
2:J["$","article",null,{"children":"$1"}]
0:D{"name":"RootLayout","env":"Server"}

Row 1 is an import directive. It tells the client to load ClientComponent.js from the bundler’s chunk map. Row 2 is a JSON tree that constructs an <article> HTML element, and the "$1" inside children is a reference back to chunk 1 (the imported component). Row 0 defines the server execution context, marking this as a RootLayout running in the Server environment. Even in this tiny example, you can see the mix of structural data, module references, and cross-chunk pointers that makes Flight different from plain JSON.

The Row Format #

Every row follows the same syntax: <ROW_ID>:<ROW_TAG><PAYLOAD>\n. The row ID is a numeric identifier that other rows can reference. The tag is a single character (or short string) that tells the parser what kind of data follows. The payload is the actual content.

Here are the row tags I found while reading through the source:

TagNameWhat it does
JJSON TreeSerialized virtual DOM nodes, component props, and HTML elements.
MModuleMetadata for a specific Client Component module or chunk.
IImportTells the client to load a module from the bundler’s chunk map.
HLHint/PreloadInstructs the browser to preload resources such as stylesheets or fonts.
DDataServer-rendered element context and environment info.
EErrorSerialized server-side exceptions and error boundaries.

So far, this might look like a benign structured data format with some custom tags, but the real complexity and attack surface live in the prefix system.

The $ Prefix System #

This is where I started paying closer attention.

When the client-side parser encounters a string value starting with $, it doesn’t treat it as literal text. It intercepts the string, checks the prefix, and routes it through a type-specific resolution path. The parseModelString function in ReactFlightClient.js is where this happens. It’s essentially a big switch statement on the character after $.

PrefixTypeWhat the parser does with it
$Model ReferenceResolves to another chunk in the stream (e.g., $2 points to row 2).
$:Property AccessTraverses into a resolved chunk’s properties (e.g., $1:user:name).
$SSymbolCreates a native JavaScript Symbol.
$FServer ReferenceRepresents a callable Server Action (an RPC endpoint on the server).
$LLazy ComponentDefers component loading until it’s needed in the render tree
$@Promise/Raw ChunkReturns the internal Chunk wrapper object itself (often acting as a Thenable/Promise), not its resolved value.
$BBlob/BinaryTriggers the blob deserialization handler for binary data.

Every other prefix resolves a chunk and gives you the parsed result. $@ hands you the raw internal Chunk object instead, the wrapper React uses to track resolution state, pending callbacks, and internal metadata (which is why it’s used for Promises and why exploits use it to get a mutable handle). Exposing framework plumbing through the protocol looks like a design mistake to me, though I’d be interested to hear the rationale if there is one.

And $: (property access) is the other critical prefix. It lets the protocol specify a path like $1:user:name, which tells the parser to resolve chunk 1, then access .user, then access .name on the result. That’s arbitrary property traversal driven by data in the stream. If you’ve spent any time auditing JavaScript for prototype pollution, that pattern should feel familiar.

This Is Not Just A Data Format #

Flight is not JSON with extra steps. JSON gives you data. Flight gives you behavior. It reconstructs module references that trigger client-side code loading, creates server action endpoints the client can invoke as RPC calls, sets up Promise chains that the React runtime will await, and builds lazy-loaded component boundaries that execute on demand.

Whether React developers think of it that way or not, the mechanics look very similar to deserialization systems that have historically caused problems. The stream doesn’t just describe what the UI looks like. It instructs the client runtime on what code to load, what functions to call, and what to trust.

If you want to read the implementation yourself, fair warning: the chunk resolution path is miserable to follow. State transitions bounce between helper functions, and the naming obscures what the code is actually doing. I gave up on static reading and just set breakpoints. The key files are react-client/src/ReactFlightClient.js for the client-side parser (look for parseModelString, getChunk, reviveModel, and getOutlinedModel) and react-server/src/ReactFlightServer.js for the serialization side. The reply handler for Server Actions lives in react-server/src/ReactFlightReplyServer.js.

Why Flight Is A Deserialization Sink #

The deserialization pattern is familiar: Java’s ObjectInputStream gave us ysoserial, Python’s pickle executes code on load(), PHP’s unserialize chains __wakeup and __destruct methods, and .NET’s BinaryFormatter was deprecated entirely.

The pattern: deserialize attacker-controlled input → invoke behavior during reconstruction → lose control of execution.

So JavaScript should be immune to this, right? JSON.parse() only produces plain data objects. No constructors fire. No magic methods run. You get back exactly what the JSON string describes, nothing more.

That’s true for raw JSON.parse(). But it stops being true the moment a framework wraps custom deserialization logic around it. And that’s exactly what Flight does.

Prototype Pollution #

JavaScript uses prototype-based inheritance. Every object has a __proto__ link to its prototype, and property lookups walk up this chain. If an attacker injects __proto__ or constructor.prototype as a key during reconstruction, they modify the shared base prototypes that all objects inherit from. Downstream code reads attacker-controlled values without knowing.

Flight’s $: prefix performs property traversal on deserialized objects. The getOutlinedModel function walks colon-separated paths like $1:user:name by iterating through each segment and accessing it on the parent object. If those path segments include __proto__ or constructor, the traversal walks straight up the prototype chain. That’s not a theoretical risk. It’s exactly how React2Shell worked.

Duck Typing and Thenables #

The V8 engine (and the JavaScript spec) treats any object with a .then property as a Thenable. When you await something, the runtime checks for .then and calls it if it exists. No class check. No internal slot verification. If .then is callable, it gets invoked.

Flight resolves chunks asynchronously. If an attacker constructs an object with a manipulated .then property and gets it into the chunk resolution pipeline, the runtime calls the attacker’s function during normal await behavior. The language semantics do the work.

I initially focused on $F because forging Server Action references seemed like the obvious attack surface. After tracing the resolution path, $: property traversal looked much more interesting. I also spent a few hours examining chunk status transitions (pending, blocked, resolved, errored) to see if you could force a chunk into an unexpected state, though that approach didn’t yield any results.

The Core Problem #

These two risks converge in Flight because the protocol doesn’t just deserialize data. It deserializes behavior. The $ prefix system dictates which execution path the parser takes: $F creates a callable server endpoint, $L sets up lazy code loading, $B triggers a blob handler, $@ exposes internal framework state. The parser’s control flow is driven entirely by what’s in the stream.

If an attacker can influence the stream’s content, they control which functions the parser calls, which objects it constructs, and which internal state it exposes.

The Mechanics Of React2Shell #

This is the CVE that proved the theory. CVE-2025-55182, nicknamed React2Shell, is a CVSS 10.0 unauthenticated remote code execution vulnerability in the Flight deserialization layer. One HTTP request, no login required, full shell access.

I want to walk through the entire gadget chain because understanding it reveals how much power the Flight protocol hands to an attacker who can control the stream.

The Root Cause #

The vulnerability sits in getOutlinedModel, a function responsible for resolving deep property paths from the $: reference system. The instance used in the exploit chain lives in the server-side reply handling code (ReactFlightReplyServer.js). When the parser encounters a reference like $1:user:name, it splits on the colons and walks the path segment by segment. Here’s the vulnerable loop:

for (key = 1; key < reference.length; key++)
    parentObject = parentObject[reference[key]];

Two lines. No hasOwnProperty check. No validation that the property exists on the object itself rather than somewhere up the prototype chain. Just parentObject[reference[key]] and move on.

So an attacker supplies $1:__proto__:constructor:constructor, and the loop traverses from a plain JSON object up through Object.prototype to the Object constructor to the Function constructor. Function in JavaScript behaves like eval(). Function("arbitrary code")() executes.

No allowlist on property names. No check for __proto__. I searched reviveModel and the chunk initialization path for any filtering. Nothing.

The Gadget Chain #

Getting from “I can reach the Function constructor” to “I have RCE” requires chaining several Flight protocol features together. The Resecurity write-up covers the full chain in detail; here’s the high-level sequence:

  • Step 1: Prototype walk to Function.
    The $: path __proto__:constructor:constructor walks from any plain object to Object.prototype, then to the Object constructor, then to Function — JavaScript’s built-in eval() equivalent.
  • Step 2: Raw chunk self-reference.
    $@0 returns the raw internal Chunk wrapper instead of its resolved value, giving the attacker a mutable handle on React’s internal state machine.
  • Step 3: Thenable hijack.
    The attacker sets the chunk’s .then to Chunk.prototype.then, so React’s resolution pipeline treats the manipulated chunk as a legitimate Promise-like object and awaits it.
  • Step 4: Context confusion.
    During the second deserialization pass, the payload overwrites _response._formData.get to point to the hijacked Function constructor and places the attacker’s shell command into _response._prefix.
  • Step 5: Trigger via blob handler.
    $B0 invokes the blob handler, which internally calls response._formData.get(response._prefix + blobId) — now equivalent to Function("attacker_shell_command")(). That’s arbitrary code execution with whatever privileges the Node.js process has.

Each step uses a legitimate Flight protocol feature in a way the designers didn’t anticipate. There’s no single “broken” feature. The vulnerability emerges from how these features compose when an attacker controls the input.

Impact #

The numbers on this one are stark:

  • CVSS 10.0. The maximum possible score.
  • Unauthenticated and pre-auth. No credentials needed — and the deserialization happens before any application-level auth checks run, so even endpoints behind login walls are exposed.
  • Single HTTP request. One POST to a Server Function endpoint.
  • Affected React 19.0.0, 19.1.0, 19.1.1, and 19.2.0, across react-server-dom-webpack, react-server-dom-parcel, and react-server-dom-turbopack.
  • CISA added it to the Known Exploited Vulnerabilities catalog within days.

What Happened In The Wild #

Exploitation was immediate. Sysdig published research linking EtherRAT deployments to North Korean state-sponsored actors who weaponized the vulnerability within hours of disclosure. EtherRAT is a file-less implant that uses the Ethereum blockchain for command-and-control communication — a technique researchers call “EtherHiding” — making takedown nearly impossible because you can’t seize a blockchain.

Separately, Palo Alto’s Unit 42 documented a backdoor called KSwapDoor that masquerades as [kswapd1] on infected Linux systems, blending into process lists alongside the legitimate kswapd0 kernel swap daemon; their analysis confirms KSwapDoor uses RC4 encryption to protect its internal strings and configuration data, while C2 communications run over AES-256-CFB with Diffie-Hellman key exchange across a P2P mesh network. The speed and sophistication of these campaigns — state-sponsored actors deploying novel implants through a single unauthenticated HTTP request — underscores why a CVSS 10.0 in a deserialization layer demands immediate patching, not triage.

The Fix #

The React team’s patch is clean and targeted. The core change caches the genuine hasOwnProperty method at module load time:

var hasOwnProperty = Object.prototype.hasOwnProperty;

Then every property check in the deserialization path uses .call() to invoke the cached reference:

hasOwnProperty.call(value, i);

Even if an attacker shadows hasOwnProperty on a malicious object, the check uses the original prototype method. The prototype chain traversal that powered the gadget chain is blocked. This fix shipped in React 19.0.1, 19.1.2, and 19.2.1.

The fix is correct. But reading through the patches, I noticed the React team hardened ownership checks while leaving the property traversal model intact. The $: prefix still walks colon-separated paths; it just validates each step now. I think exposing arbitrary property traversal through a network protocol was a design mistake, and the patch treats the symptom. If future bugs emerge, they’ll likely come from this same area.

The framework patch closes the known gadget chain, but it doesn’t change the fundamental dynamic: the Flight protocol still reconstructs behavior — executable references, module imports, RPC endpoints, async state — from a stream of text. That reconstruction happens before your application code runs, before your validation logic fires, before your auth middleware even sees the request. Relying solely on the framework to protect your Server Components means trusting that every edge case in a complex deserialization parser has been found and fixed. The defenses that follow are the practical steps you can take to limit the blast radius on your own.

Defenses, Ranked By Impact #

Some of these close real attack paths. Others mostly make you feel safer than you are. I’ve ranked these from most-to-least impactful based on what I’ve seen in the vulnerability research. If you only have time for one change, start at the top.

1. Input Validation On Server Actions (Zod, Valibot) #

This is the single most impactful thing you can do at the application level. The Flight deserializer processes raw, unvalidated network input before your code takes control. Strict schema validation is your primary defense against whatever the protocol reconstructs.

Put a schema validation call at the very top of every Server Action, before any business logic runs — and I mean before anything, including logging. If you log an argument before validating it, and that argument triggers the stringification bug from CVE-2025-55183, you’ve leaked source code before your validation even had a chance to run.

Zod and Valibot both work well for this. Validate types, shapes, string lengths, numeric bounds, and enumerated values. Reject anything that doesn’t match. Use .safeParse(), not .parse() — the throwing variant can surface internal error details in the response if you’re not careful with your error boundaries.

"use server"
import { z } from "zod"

const UpdateProfileSchema = z.object({
  name: z.string().min(1).max(100),
  email: z.string().email(),
  role: z.enum(["user", "editor"]),
})

export async function updateProfile(formData: FormData) {
  const parsed = UpdateProfileSchema.safeParse({
    name: formData.get("name"),
    email: formData.get("email"),
    role: formData.get("role"),
  })
  if (!parsed.success) return { error: "Invalid input" }
  // proceed with parsed.data, this is now the only shape
  // your business logic ever sees
}

One important nuance: If your Server Action accepts a plain object argument (not FormData), validate the whole argument — don’t destructure first and validate fields individually. Destructuring before validation means you’re already accessing properties on the unvalidated input, which is exactly the kind of operation the Flight deserializer can exploit.

"use server"
import { z } from "zod"

const CommentSchema = z.object({
  postId: z.string().uuid(),
  body: z.string().min(1).max(5000),
})

// Good: validate the raw argument first
export async function addComment(data: unknown) {
  const parsed = CommentSchema.safeParse(data)
  if (!parsed.success) return { error: "Invalid input" }
  await db.comments.create(parsed.data)
}

// Bad: destructuring before validation
export async function addCommentUnsafe(
  { postId, body }: { postId: string; body: string }
) {
  // by the time this runs, you've already accessed properties
  // on the deserialized input
  const parsed = CommentSchema.safeParse({ postId, body })
  // ...
}

If your Server Action doesn’t start with a schema parse, it’s a vulnerability waiting to happen. I’d argue this should be a lint rule — and if you’re running eslint-plugin-react, consider writing a custom rule that flags any "use server" export without a validation call in its first statement.

2. The server-only Package #

The server-only package is straightforward and effective.

Import server-only at the top of any file that contains database credentials, raw API calls, internal business logic, or anything else that should never cross the server-client boundary. If a Client Component tries to import that file (directly or transitively), the build fails with a clear error.

import "server-only"
import { db } from "./database"

export async function getUser(id: string) {
  return db.query("SELECT * FROM users WHERE id = $1", [id])
}

The failure mode to watch for is barrel files. If you re-export a server-only function through an index.ts that also exports client-safe utilities, any Client Component importing from that barrel will pull in the server-only module transitively and break the build — or worse, if the barrel doesn’t include the server-only import itself, it may silently let server code through. Keep server-only modules in separate files with their own import paths.

// Don't do this: barrel re-export mixes boundaries
// src/utils/index.ts
export { getUser } from "./users"     // has "server-only"
export { formatDate } from "./dates"  // client-safe

// Do this: separate import paths
// Client Component imports from "src/utils/dates" directly
// Server Component imports from "src/utils/users" directly

It also won’t protect you from data leaking through return values. If a Server Component calls getUser() and passes the full user object (including passwordHash or internalRole) as props to a Client Component, that data rides the Flight stream to the browser. The server-only guard prevents the code from crossing the boundary, not the data the code returns. You must explicitly filter your return shapes.

3. CSRF Protections #

After CVE-2026-27978, relying solely on Next.js’s built-in Origin vs. Host header check isn’t enough. The Origin: null bypass showed that framework-level CSRF protection has edge cases.

For state-changing Server Actions (anything that writes data, deletes records, or modifies permissions), layer your own protections on top of the framework’s defaults.

Cookie configuration.
Set SameSite=Strict or SameSite=Lax on session cookies. If you’re using next-auth or a custom session library, verify this is set explicitly — don’t rely on browser defaults, which vary.

// next.config.js or your auth configuration
cookies: {
  sessionToken: {
    name: "__session",
    options: {
      httpOnly: true,
      sameSite: "strict",
      secure: process.env.NODE_ENV === "production",
      path: "/",
    },
  },
}

Explicit CSRF tokens.
For high-value operations (password changes, role assignments, payment actions), generate a per-session CSRF token on the server, embed it in a hidden form field or custom header, and validate it in the Server Action before proceeding.

"use server"
import { cookies } from "next/headers"
import { validateCsrfToken } from "@/lib/csrf"

export async function deleteAccount(formData: FormData) {
  const token = formData.get("csrf_token") as string
  const sessionToken = (await cookies()).get("csrf_secret")?.value
  if (!validateCsrfToken(token, sessionToken)) {
    return { error: "Invalid request" }
  }
  // proceed with deletion
}

The allowedOrigins gotcha.
Never, under any circumstances, add 'null' to experimental.serverActions.allowedOrigins in your Next.js config (even if the officially advisory is more nuanced, saying “unless intentionally required and additionally protected”). That string literal matches Origin: null — the exact header that sandboxed iframes send — and it reopens the CVE-2026-27978 bypass. If you’re seeing CSRF failures from legitimate requests, the fix is to configure your reverse proxy to set the correct Origin and Host headers, not to weaken the validation.

// Never do this
module.exports = {
  experimental: {
    serverActions: {
      allowedOrigins: ["null"],  // reopens CSRF bypass
    },
  },
}

4. The hasOwnProperty Patch #

I covered this in detail in the React2Shell section. The fix is correct, and it completely neutralizes the known gadget chain. It shipped fast, which I respect.

The action item here is to verify you’re actually running a patched version. The RCE fix landed in React 19.0.1, 19.1.2, and 19.2.1. Check your lockfile:

# npm
npm ls react react-dom react-server-dom-webpack

# pnpm
pnpm ls react react-dom react-server-dom-webpack

# yarn
yarn why react-server-dom-webpack

If you see 19.0.0, 19.1.0Ć¢€“19.1.1, or 19.2.0, you’re vulnerable to the RCE. Update immediately. And don’t stop there: the DoS fixes (CVE-2025-55184, CVE-2025-67779, CVE-2026-23864) require 19.0.4+, 19.1.5+, or 19.2.4+. If you updated after React2Shell and then stopped paying attention, you may still be running a version vulnerable to the DoS variants.

It’s a reactive patch, not a structural redesign.

Note: More on that in Where This Goes Next.

5. The Taint API #

React’s taintObjectReference and taintUniqueValue functions register objects or strings with the runtime. If tainted data tries to pass through the Flight serializer, it throws an error. The idea is to prevent sensitive data — user records, API keys, tokens — from accidentally leaking into the client.

Here’s how it looks in practice:

import {
  experimental_taintObjectReference as taintObjectReference
} from "react"
import "server-only"

export async function getUserRecord(id: string) {
  const user = await db.users.findUnique({ where: { id } })
  taintObjectReference(
    "Do not pass the full user object to Client Components. " +
    "Select only the fields you need.",
    user
  )
  return user
}

If a Server Component passes the tainted user object as props to a Client Component, React throws it at serialization time with your custom error message. That’s genuinely useful as a development-time guardrail.

The catch — and it’s a significant one — is that taint tracks object references, not data content. Any derivation breaks the tracking:

const user = await getUserRecord(id)

// taint is lost. Spread creates a new object.
<ClientProfile user={{ ...user }} />

// taint is lost. Individual properties aren't tracked.
<ClientProfile token={user.apiToken} />

// taint is lost. Serialization round-trip creates new refs.
<ClientProfile user={JSON.parse(JSON.stringify(user))} />

// taint fires. Same object reference.
<ClientProfile user={user} />

taintUniqueValue works on specific strings (like API keys), but it’s also reference-based. If the same key value appears in a different variable, the taint doesn’t follow.

Think of taint as a development guardrail, not a security boundary. It catches honest mistakes: a developer accidentally passing a full user object to the client. It won’t stop an attacker who can influence what gets serialized, and it won’t survive routine data transformations that your own code performs. It’s a useful defense-in-depth layer, but shouldn’t be your primary boundary.

6. WAFs #

Web Application Firewalls can add a detection layer for known attack patterns. They can inspect POST requests carrying the Next-Action header, block payloads containing constructor:constructor or __proto__ chains, and flag error responses containing E{"digest" patterns that indicate the server is leaking internal error details.

If you’re running a WAF, here are specific patterns worth adding:

# Block prototype pollution attempts in request bodies
Rule: body contains "__proto__" OR "constructor:constructor"
Action: BLOCK
Scope: POST requests with header "Next-Action"

# Flag potential Flight error leakage in responses
Rule: response body matches /E\{"digest":"[^"]+"/
Action: LOG + ALERT
Scope: responses with Content-Type "text/x-component"

# Block excessively large Server Action payloads
Rule: Content-Length > 1MB for POST with "Next-Action" header
Action: BLOCK (mitigates CVE-2026-23864 zipbomb vector)

But attackers know about WAF inspection buffers, and they’re usually around 128KB. Prepend 130KB of padding before the malicious payload, and the WAF inspects the padding, finds nothing, and lets the request through. Chunked Transfer-Encoding tricks accomplish the same thing.

The failure mode is treating WAF coverage as a security boundary rather than a noise-reduction layer. WAFs catch automated scanners and low-effort attacks, and that has real value. But a motivated attacker will bypass them with padding or encoding tricks. The defenses that actually stop sophisticated attacks are the ones earlier in this list: validating input before it reaches your business logic, keeping sensitive code off the wire, and staying on patched versions.

What Came After React2Shell #

React2Shell wasn’t the end of it. The security audits that followed the December 2025 disclosure shook out a series of related vulnerabilities in the same deserialization surface. None of them are as severe as the original RCE, but they’re worth tracking because some of them required multiple rounds of patching.

CVECVSSTypeDescriptionFixed In
CVE-2025-551847.5DoSInfinite recursion of nested Promises in Server Function deserialization. Hangs the Node.js event loop.19.0.2, 19.1.3, 19.2.2
CVE-2025-677797.5DoSIncomplete fix for CVE-2025-55184. Same loop via edge cases the first patch missed.19.0.4, 19.1.5, 19.2.4
CVE-2026-238647.5DoS/OOMUnbounded request body buffering and zipbomb-style decompression. Memory exhaustion. Disclosed Jan 2026.19.0.4+, 19.1.5+, 19.2.4+
CVE-2025-551835.3Info DisclosureCrafted requests reflect Server Function source code when the function stringifies an argument.19.0.1, 19.1.2, 19.2.1
CVE-2026-279785.3CSRF BypassNext.js treated Origin: null (sandboxed iframes) as “missing” instead of “cross-origin.”Next.js 16.1.7

The DoS pair (CVE-2025-55184 and CVE-2025-67779) is a textbook example of why deserialization parsers are hard to patch correctly. The first fix shipped, researchers found edge cases it missed, and a second round was needed. CVE-2026-23864 added a third DoS vector through unbounded memory allocation rather than CPU exhaustion. (See the defenses section above for specific version checks.)

CVE-2025-55183 is the sneaky one. It’s a source code exposure bug that triggers when a Server Function calls JSON.stringify (or any implicit stringification) on one of its arguments. Developers do this constantly for logging, debugging, or error reporting.

The attacker sends a crafted argument that, when stringified, causes the deserialization parser to reflect the function’s own source code back in the response. Business logic, database queries, and any hardcoded secrets sitting in Server Action files become readable by anyone who can send an HTTP request.

CVE-2026-27978 is a different class of bug entirely. It’s a CSRF bypass in Next.js’s Server Action handling. Next.js validates that the Origin header matches the Host header to prevent cross-site request forgery. But when a request comes from a sandboxed <iframe>, the browser sends Origin: null.

The Next.js parser in action-handler.ts treated the string 'null' as a missing origin rather than an explicit cross-origin indicator. So an attacker could embed a form inside a sandboxed iframe, submit it, and invoke Server Actions using the victim’s authenticated session cookies. Fixed in Next.js 16.1.7.


Wednesday, January 17, 2024

Passkeys: A No-Frills Explainer On The Future Of Password-Less Authentication

 Passkeys are beginning to make their way into popular apps, from password managers to multi-factor authenticators, but what exactly are they? As this new technology promises to make passwords a thing of the past, Neal Fennimore explains the concepts behind passkeys, demonstrates how they work, and speculates what we might expect from them in the future.

Passkeys are a new way of authenticating applications and websites. Instead of having to remember a password, a third-party service provider (e.g., Google or Apple) generates and stores a cryptographic key pair that is bound to a website domain. Since you have access to the service provider, you have access to the keys, which you can then use to log in.

This cryptographic key pair contains both private and public keys that are used for authenticating messages. These key pairs are often known as asymmetric or public key cryptography.

Public and private key pair? Asymmetric cryptography? Like most modern technology, passkeys are described by esoteric verbiage and acronyms that make them difficult to discuss. That’s the point of this article. I want to put the complex terms aside and help illustrate how passkeys work, explain what they are effective at, and demonstrate what it looks like to work with them.

How Passkeys Work #

Passkeys are cryptographic keys that rely on generating signatures. A signature is proof that a message is authentic. How so? It happens first by hashing (a fancy term for “obscuring”) the message and then creating a signature from that hash with your private key. The private key in the cryptographic key pair allows the signature to be generated, and the public key, which is shared with others, allows the service to verify that the message did, in fact, come from you.

In short, passkeys consist of two keys: a public and private. One verifies a signature while the other verifies you, and the communication between them is what grants you access to an account.

Here’s a quick way of generating a signing and verification key pair to authenticate a message using the SubtleCrypto API. While this is only part of how passkeys work, it does illustrate how the concept works cryptographically underneath the specification.

const message = new TextEncoder().encode("My message");

const keypair = await crypto.subtle.generateKey(
  { name: "ECDSA", namedCurve: "P-256" },
  true,
  [ 'sign', 'verify' ]
);

const signature = await crypto.subtle.sign(
  { name: "ECDSA", hash: "SHA-256" },
  keypair.privateKey,
  message
);

// Normally, someone else would be doing the verification using your public key
// but it's a bit easier to see it yourself this way
console.log(
  "Did my private key sign this message?",
  await crypto.subtle.verify(
    { name: "ECDSA", hash: "SHA-256" },
    keypair.publicKey,
    signature,
    message
  )
);

Notice the three parts pulling all of this together:

  1. Message: A message is constructed.
  2. Key pair: The public and private keys are generated. One key is used for the signature, and the other is set to do the verification.
  3. Signature: A signature is signed by the private key, verifying the message’s authenticity.

From there, a third party would authenticate the private key with the public key, verifying the correct pair of keys or key pair. We’ll get into the weeds of how the keys are generated and used in just a bit, but for now, this is some context as we continue to understand why passkeys can potentially erase the need for passwords.

Why Passkeys Can Replace Passwords #

Since the responsibility of storing passkeys is removed and transferred to a third-party service provider, you only have to control the “parent” account in order to authenticate and gain access. This is a lot like requiring single sign-on (SSO) for an account via Google, Facebook, or LinkedIn, but instead, we use an account that has control of the passkey stored for each individual website.

For example, I can use my Google account to store passkeys for somerandomwebsite.com. That allows me to prove a challenge by using that passkey’s private key and thus authenticate and log into somerandomwebsite.com.

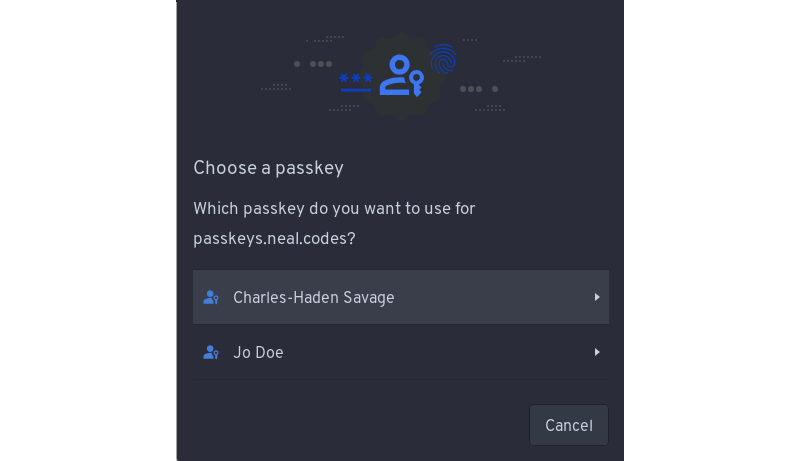
For the non-tech savvy, this typically looks like a prompt that the user can click to log in. Since the credentials (i.e., username and password) are tied to the domain name (somerandomwebsite.com), and passkeys created for a domain name are only accessible to the user at login, the user can select which passkey they wish to use for access. This is usually only one login, but in some cases, you can create multiple logins for a single domain and then select which one you wish to use from there.

Login prompt for choosing a passkey
(Large preview)

So, what’s the downside? Having to store additional cryptographic keys for each login and every site for which you have a passkey often requires more space than storing a password. However, I would argue that the security gains, the user experience from not having to remember a password, and the prevention of common phishing techniques more than offset the increased storage space.

How Passkeys Protect Us #

Passkeys prevent a couple of security issues that are quite common, specifically leaked database credentials and phishing attacks.

Database Leaks #

Have you ever shared a password with a friend or colleague by copying and pasting it for them in an email or text? That could lead to a security leak. So would a hack on a system that stores customer information, like passwords, which is then sold on dark marketplaces or made public. In many cases, it’s a weak set of credentials — like an email and password combination — that can be stolen with a fair amount of ease.

Passkeys technology circumvents this because passkeys only store a public key to an account, and as you may have guessed by the name, this key is expected to be made accessible to anyone who wants to use it. The public key is only used for verification purposes and, for the intended use case of passkeys, is effectively useless without the private key to go with it, as the two are generated as a pair. Therefore, those previous juicy database leaks are no longer useful, as they can no longer be used for cracking the password for your account. Cracking a similar private key would take millions of years at this point in time.

Phishing #

Passwords rely on knowing what the password is for a given login: anyone with that same information has the same level of access to the same account as you do. There are sophisticated phishing sites that look like they’re by Microsoft or Google and will redirect you to the real provider after you attempt to log into their fake site. The damage is already done at that point; your credentials are captured, and hopefully, the same credentials weren’t being used on other sites, as now you’re compromised there as well.

A passkey, by contrast, is tied to a domain. You gain a new element of security: the fact that only you have the private key. Since the private key is not feasible to remember nor computationally easy to guess, we can guarantee that you are who you say we are (at least as long as your passkey provider is not compromised). So, that fake phishing site? It will not even show the passkey prompt because the domain is different, and thus completely mitigates phishing attempts.

There are, of course, theoretical attacks that can make passkeys vulnerable, like someone compromising your DNS server to send you to a domain that now points to their fake site. That said, you probably have deeper issues to concern yourself with if it gets to that point.

Implementing Passkeys #

At a high level, a few items are needed to start using passkeys, at least for the common sign-up and log-in process. You’ll need a temporary cache of some sort, such as redis or memcache, for storing temporary challenges that users can authenticate against, as well as a more permanent data store for storing user accounts and their public key information, which can be used to authenticate the user over the course of their account lifetime. These aren’t hard requirements but rather what’s typical of what would be developed for this kind of authentication process.

To understand passkeys properly, though, we want to work through a couple of concepts. The first concept is what is actually taking place when we generate a passkey. How are passkeys generated, and what are the underlying cryptographic primitives that are being used? The second concept is how passkeys are used to verify information and why that information can be trusted.

Generating Passkeys #

A passkey involves an authenticator to generate the key pair. The authenticator can either be hardware or software. For example, it can be a hardware security key, the operating system’s Trusted Platform Module (TPM), or some other application. In the cases of Android or iOS, we can use the device’s secure enclave.

To connect to an authenticator, we use what’s called the Client to Authenticator Protocol (CTAP). CTAP allows us to connect to hardware over different connections through the browser. For example, we can connect via CTAP using an NFC, Bluetooth, or a USB connection. This is useful in cases where we want to log in on one device while another device contains our passkeys, as is the case on some operating systems that do not support passkeys at the time of writing.

A passkey is built off another web API called WebAuthn. While the APIs are very similar, the WebAuthn API differs in that passkeys allow for cloud syncing of the cryptographic keys and do not require knowledge of whom the user is to log in, as that information is stored in a passkey with its Relying Party (RP) information. The two APIs otherwise share the same flows and cryptographic operations.

Storing Passkeys #

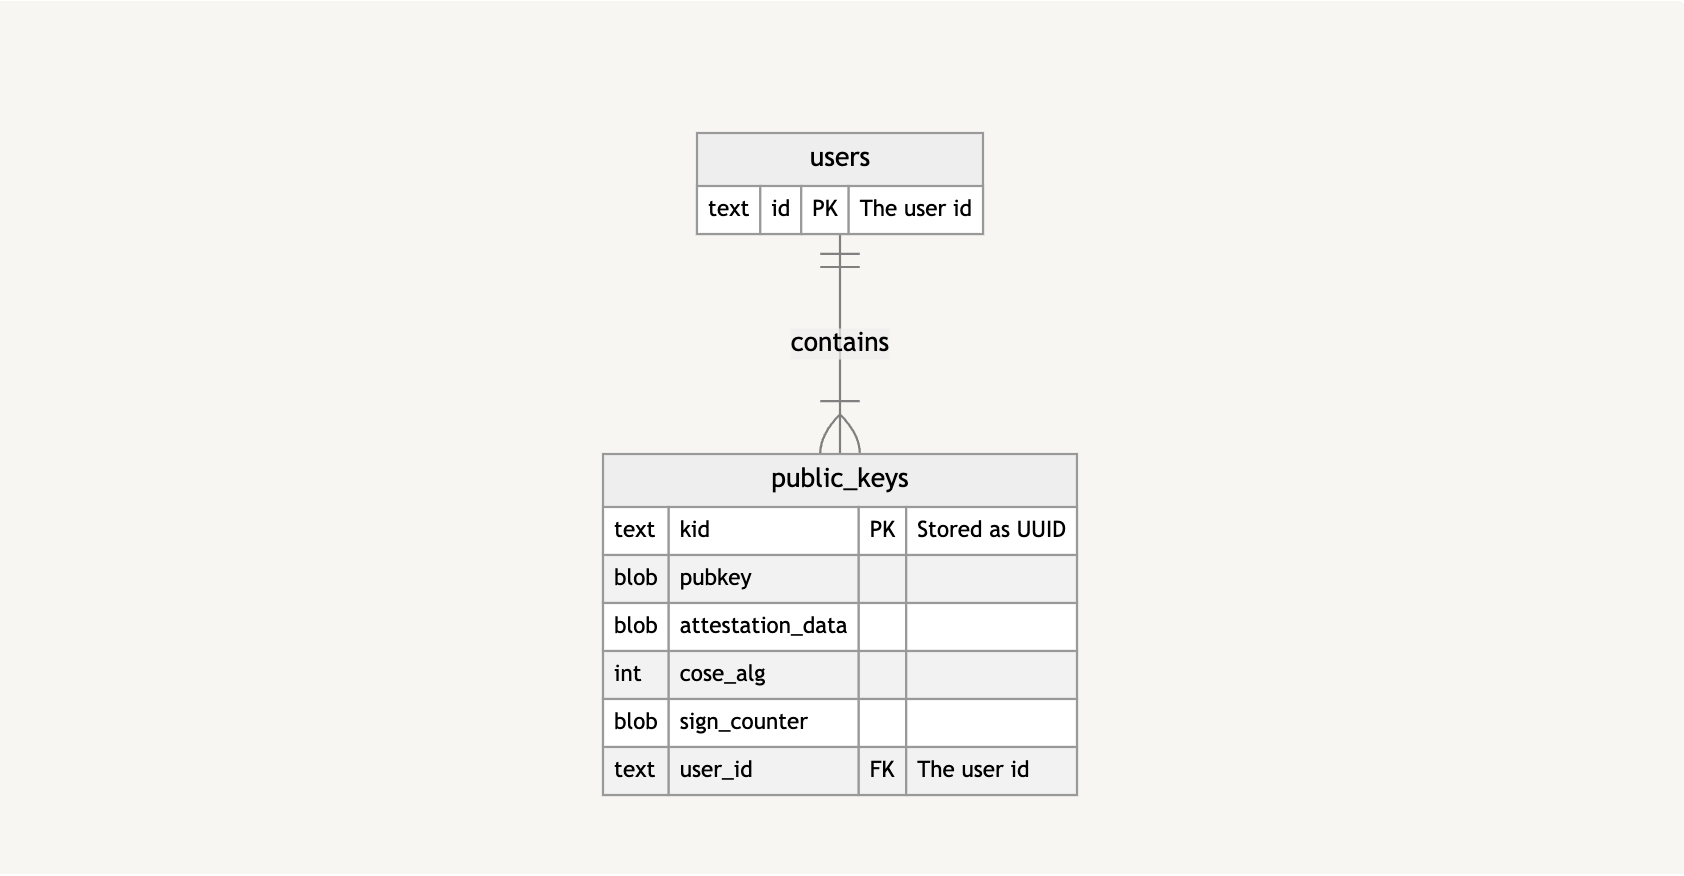
Let’s look at an extremely high-level overview of how I’ve stored and kept track of passkeys in my demo repo. This is how the database is structured.

Diagram connecting a users database table with a public keys table
(Large preview)

Basically, a users table has public_keys, which, in turn, contains information about the public key, as well as the public key itself.

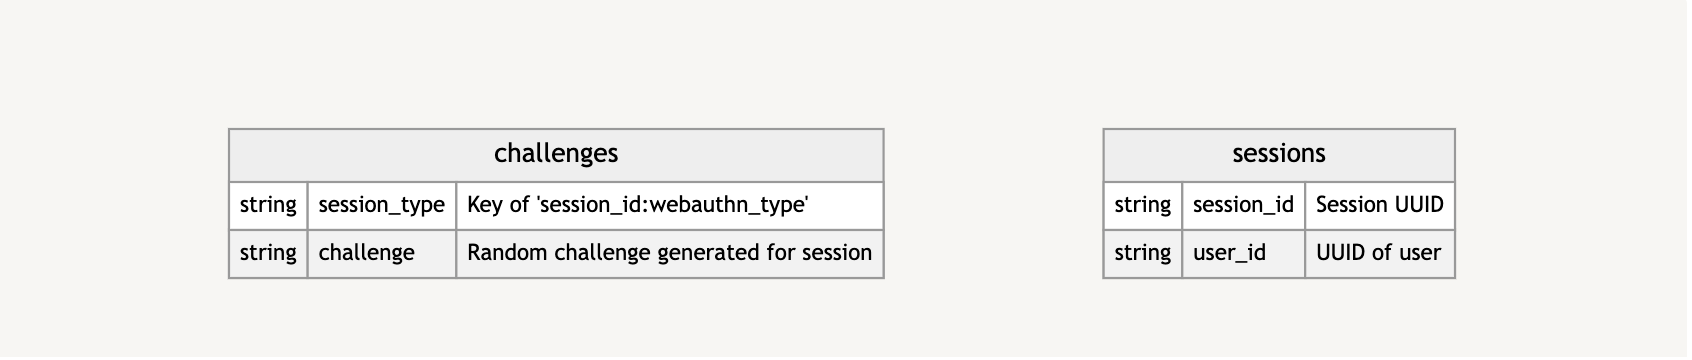
From there, I’m caching certain information, including challenges to verify authenticity and data about the sessions in which the challenges take place.

Diagram showing challenges and sessions tables.
(Large preview)

Again, this is only a high-level look to give you a clearer idea of what information is stored and how it is stored.

Verifying Passkeys #

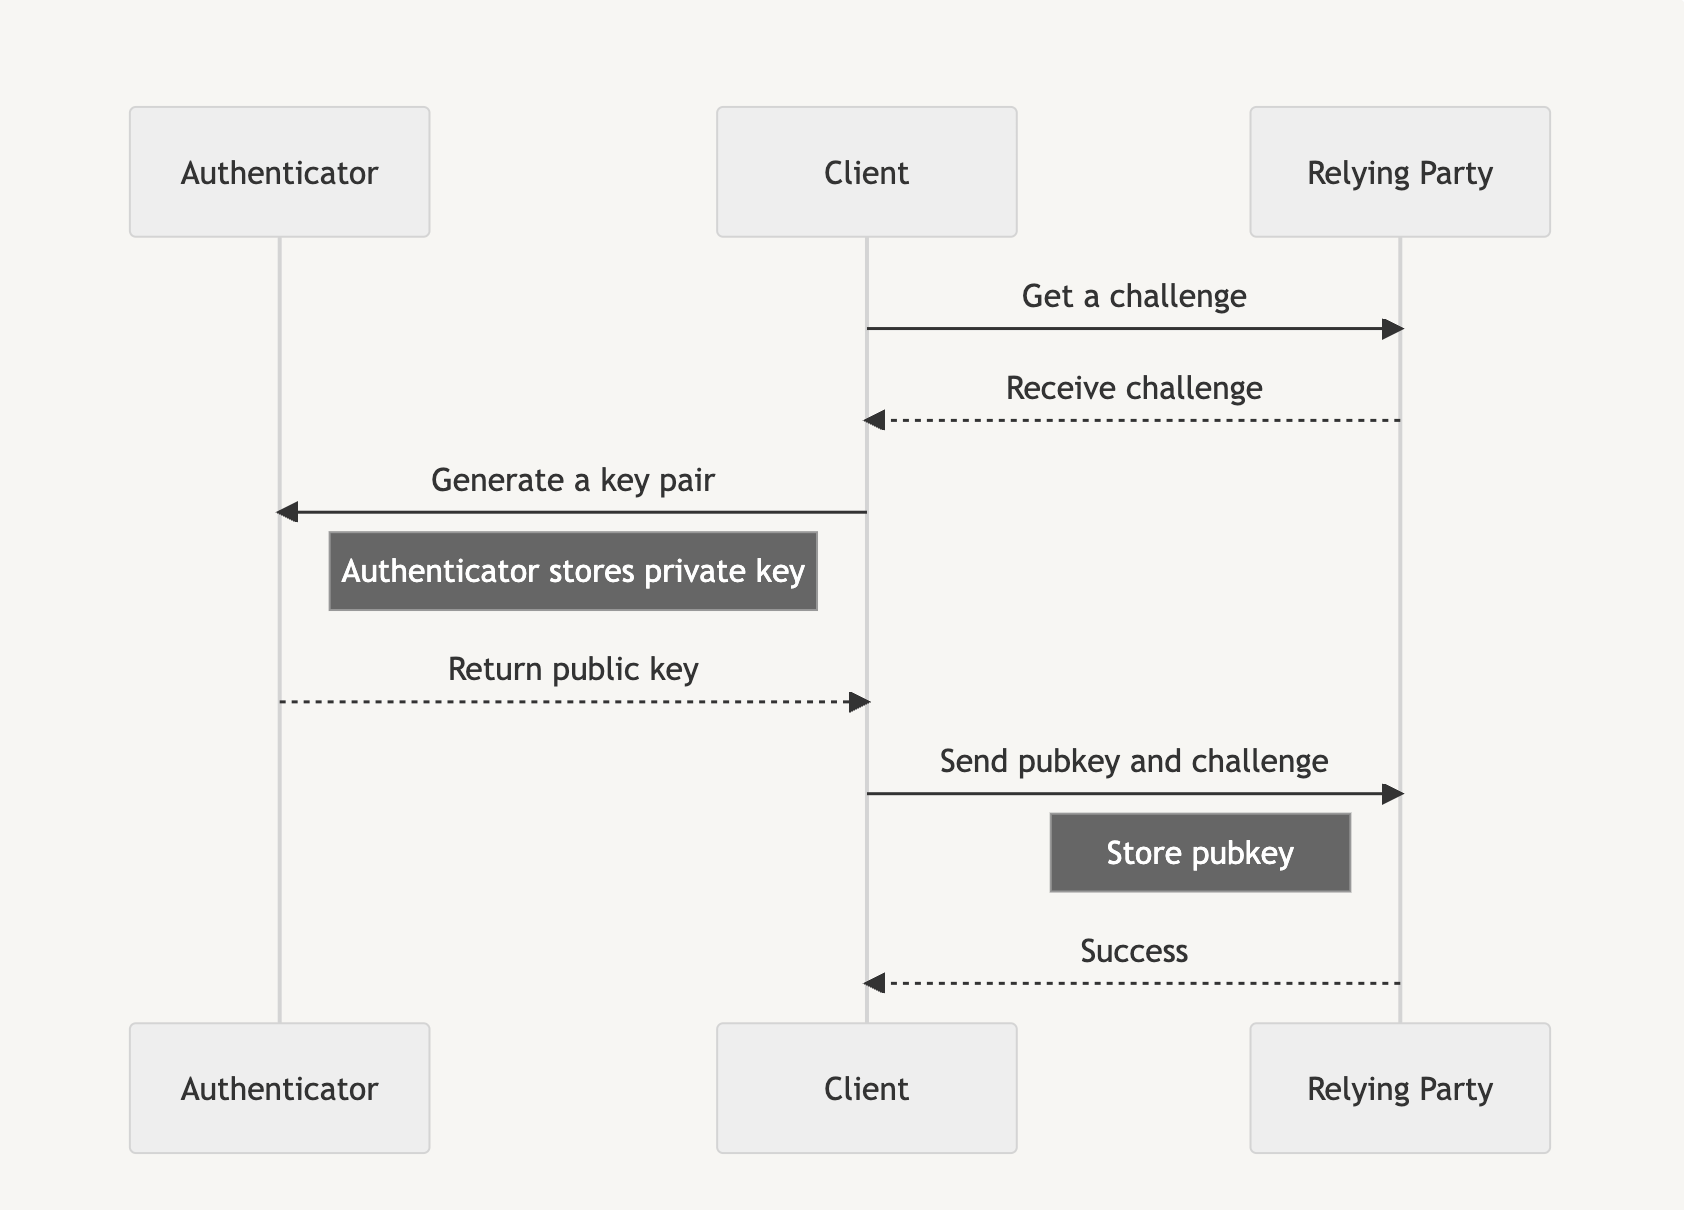
There are several entities involved in passkey:

  1. The authenticator, which we previously mentioned, generates our key material.
  2. The client that triggers the passkey generation process via the navigator.credentials.create call.
  3. The Relying Party takes the resulting public key from that call and stores it to be used for subsequent verification.
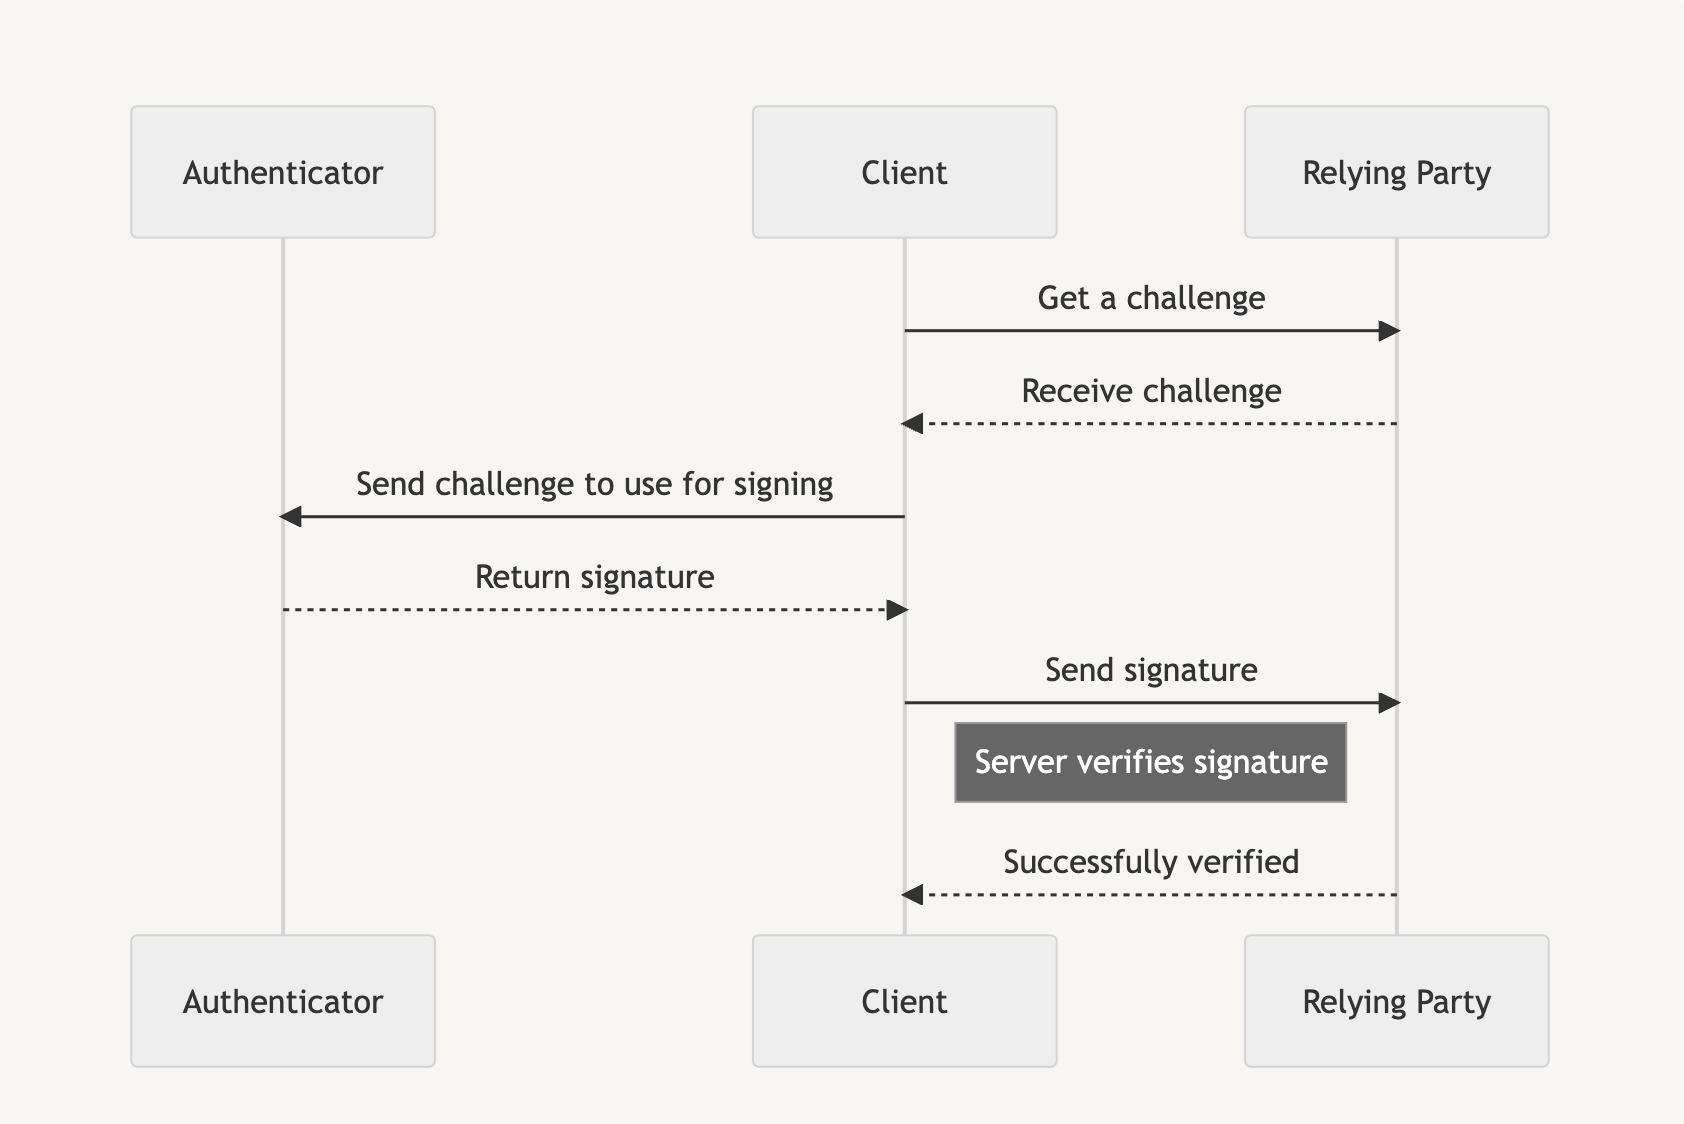
Authenticator to client to Relying Party, and back.
(Large preview)

In our case, you are the client and the Relying Party is the website server you are trying to sign up and log into. The authenticator can either be your mobile phone, a hardware key, or some other device capable of generating your cryptographic keys.

Passkeys are used in two phases: the attestation phase and the assertion phase. The attestation phase is likened to a registration that you perform when first signing up for a service. Instead of an email and password, we generate a passkey.

Decision tree illustrating the workflow.
(Large preview)

Assertion is similar to logging in to a service after we are registered, and instead of verifying with a username and password, we use the generated passkey to access the service.

Decision tree illustrating the workflow.
(Large preview)

Each phase initially requires a random challenge generated by the Relying Party, which is then signed by the authenticator before the client sends the signature back to the Relying Party to prove account ownership.

Browser API Usage #

We’ll be looking at how the browser constructs and supplies information for passkeys so that you can store and utilize it for your login process. First, we’ll start with the attestation phase and then the assertion phase.

Attest To It #

The following shows how to create a new passkey using the navigator.credentials.create API. From it, we receive an AuthenticatorAttestationResponse, and we want to send portions of that response to the Relying Party for storage.

const { challenge } = await (await fetch("/attestation/generate")).json(); // Server call mock to get a random challenge

const options = {
 // Our challenge should be a base64-url encoded string
 challenge: new TextEncoder().encode(challenge),
 rp: {
  id: window.location.host,
  name: document.title,
 },
 user: {
  id: new TextEncoder().encode("my-user-id"),
  name: 'John',
  displayName: 'John Smith',
 },
 pubKeyCredParams: [ // See COSE algorithms for more: 
  {
   type: 'public-key',
   alg: -7, // ES256
  },
  {
   type: 'public-key',
   alg: -256, // RS256
  },
  {
   type: 'public-key',
   alg: -37, // PS256
  },
 ],
 authenticatorSelection: {
  userVerification: 'preferred', // Do you want to use biometrics or a pin?
  residentKey: 'required', // Create a resident key e.g. passkey
 },
 attestation: 'indirect', // indirect, direct, or none
 timeout: 60_000,
};

// Create the credential through the Authenticator
const credential = await navigator.credentials.create({
 publicKey: options
});

// Our main attestation response. See: 
const attestation = credential.response as AuthenticatorAttestationResponse;

// Now send this information off to the Relying Party
// An unencoded example payload with most of the useful information
const payload = {
 kid: credential.id,
 clientDataJSON: attestation.clientDataJSON,
 attestationObject: attestation.attestationObject,
 pubkey: attestation.getPublicKey(),
 coseAlg: attestation.getPublicKeyAlgorithm(),
};

The AuthenticatorAttestationResponse contains the clientDataJSON as well as the attestationObject. We also have a couple of useful methods that save us from trying to retrieve the public key from the attestationObject and retrieving the COSE algorithm of the public key: getPublicKey and getPublicKeyAlgorithm.

Let’s dig into these pieces a little further.

Parsing The Attestation clientDataJSON #

The clientDataJSON object is composed of a few fields we need. We can convert it to a workable object by decoding it and then running it through JSON.parse.

type DecodedClientDataJSON = {
 challenge: string,
 origin: string,
 type: string
};

const decoded: DecodedClientDataJSON = JSON.parse(new TextDecoder().decode(attestation.clientDataJSON));
const {
 challenge,
 origin,
 type
} = decoded;

Now we have a few fields to check against: challenge, origin, type.

Our challenge is the Base64-url encoded string that was passed to the server. The origin is the host (e.g., https://my.passkeys.com) of the server we used to generate the passkey. Meanwhile, the type is webauthn.create. The server should verify that all the values are expected when parsing the clientDataJSON.

Decoding TheattestationObject #

The attestationObject is a CBOR encoded object. We need to use a CBOR decoder to actually see what it contains. We can use a package like cbor-x for that.

import { decode } from 'cbor-x/decode';

enum DecodedAttestationObjectFormat {
  none = 'none',
  packed = 'packed',
}
type DecodedAttestationObjectAttStmt = {
  x5c?: Uint8Array[];
  sig?: Uint8Array;
};

type DecodedAttestationObject = {
  fmt: DecodedAttestationObjectFormat;
  authData: Uint8Array;
  attStmt: DecodedAttestationObjectAttStmt;
};

const decodedAttestationObject: DecodedAttestationObject = decode(
 new Uint8Array(attestation.attestationObject)
);

const {
 fmt,
 authData,
 attStmt,
} = decodedAttestationObject;
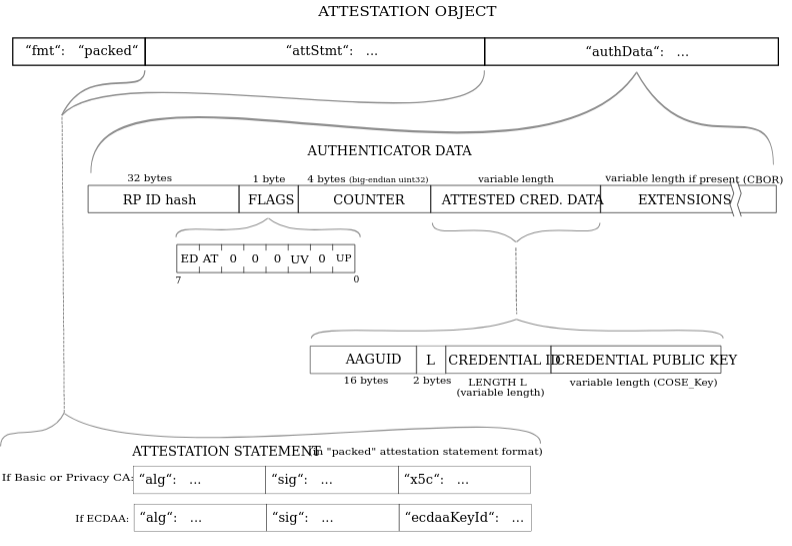
Diagram of the attestation object
Source: Web Authentication: An API for accessing Public Key Credentials Level 2 (W3C). (Large preview)

fmt will often be evaluated to "none" here for passkeys. Other types of fmt are generated through other types of authenticators.

Accessing authData #

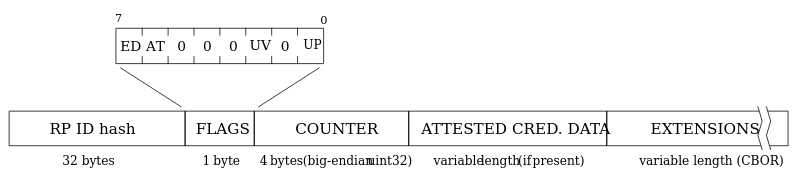
The authData is a buffer of values with the following structure:

Attestation object structure
Source: Web Authentication: An API for accessing Public Key Credentials Level 2 (W3C). (Large preview)
NameLength (bytes)Description
rpIdHash32This is the SHA-256 hash of the origin, e.g., my.passkeys.com.
flags1Flags determine multiple pieces of information (specification).
signCount4This should always be 0000 for passkeys.
attestedCredentialDatavariableThis will contain credential data if it’s available in a COSE key format.
extensionsvariableThese are any optional extensions for authentication.

It is recommended to use the getPublicKey method here instead of manually retrieving the attestedCredentialData.

A Note About The attStmt Object #

This is often an empty object for passkeys. However, in other cases of a packed format, which includes the sig, we will need to perform some authentication to verify the sig. This is out of the scope of this article, as it often requires a hardware key or some other type of device-based login.

Retrieving The Encoded Public Key #

The getPublicKey method can retrieve the Subject Public Key Info (SPKI) encoded version of the public key, which is a different from the COSE key format (more on that next) within the attestedCredentialData that the decodedAttestationObject.attStmt has. The SPKI format has the benefit of being compatible with a Web Crypto importKey function to more easily verify assertion signatures in the next phase.

// Example of importing attestation public key directly into Web Crypto
const pubkey = await crypto.subtle.importKey(
  'spki',
  attestation.getPublicKey(),
  { name: "ECDSA", namedCurve: "P-256" },
  true,
  ['verify']
);

Generating Keys With COSE Algorithms #

The algorithms that can be used to generate cryptographic material for a passkey are specified by their COSE Algorithm. For passkeys generated for the web, we want to be able to generate keys using the following algorithms, as they are supported natively in Web Crypto. Personally, I prefer ECDSA-based algorithms since the key sizes are quite a bit smaller than RSA keys.

The COSE algorithms are declared in the pubKeyCredParams array within the AuthenticatorAttestationResponse. We can retrieve the COSE algorithm from the attestationObject with the getPublicKeyAlgorithm method. For example, if getPublicKeyAlgorithm returned -7, we’d know that the key used the ES256 algorithm.

NameValueDescription
ES512-36ECDSA w/ SHA-512
ES384-35ECDSA w/ SHA-384
ES256-7ECDSA w/ SHA-256
RS512-259RSASSA-PKCS1-v1_5 using SHA-512
RS384-258RSASSA-PKCS1-v1_5 using SHA-384
RS256-257RSASSA-PKCS1-v1_5 using SHA-256
PS512-39RSASSA-PSS w/ SHA-512
PS384-38RSASSA-PSS w/ SHA-384
PS256-37RSASSA-PSS w/ SHA-256

Responding To The Attestation Payload #

I want to show you an example of a response we would send to the server for registration. In short, the safeByteEncode function is used to change the buffers into Base64-url encoded strings.

type AttestationCredentialPayload = {
  kid: string;
  clientDataJSON: string;
  attestationObject: string;
  pubkey: string;
  coseAlg: number;
};

const payload: AttestationCredentialPayload = {
  kid: credential.id,
  clientDataJSON: safeByteEncode(attestation.clientDataJSON),
  attestationObject: safeByteEncode(attestation.attestationObject),
  pubkey: safeByteEncode(attestation.getPublicKey() as ArrayBuffer),
  coseAlg: attestation.getPublicKeyAlgorithm(),
};

The credential id (kid) should always be captured to look up the user’s keys, as it will be the primary key in the public_keys table.

From there:

  1. The server would check the clientDataJSON to ensure the same challenge is used.
  2. The origin is checked, and the type is set to webauthn.create.
  3. We check the attestationObject to ensure it has an fmt of none, the rpIdHash of the authData, as well as any flags and the signCount.

Optionally, we could check to see if the attestationObject.attStmt has a sig and verify the public key against it, but that’s for other types of WebAuthn flows we won’t go into.

We should store the public key and the COSE algorithm in the database at the very least. It is also beneficial to store the attestationObject in case we require more information for verification. The signCount is always incremented on every login attempt if supporting other types of WebAuthn logins; otherwise, it should always be for 0000 for a passkey.

Asserting Yourself #

Now we have to retrieve a stored passkey using the navigator.credentials.get API. From it, we receive the AuthenticatorAssertionResponse, which we want to send portions of to the Relying Party for verification.

const { challenge } = await (await fetch("/assertion/generate")).json(); // Server call mock to get a random challenge

const options = {
  challenge: new TextEncoder().encode(challenge),
  rpId: window.location.host,
  timeout: 60_000,
};

// Sign the challenge with our private key via the Authenticator
const credential = await navigator.credentials.get({
  publicKey: options,
  mediation: 'optional',
});

// Our main assertion response. See: <https://developer.mozilla.org/en-US/docs/Web/API/AuthenticatorAssertionResponse>
const assertion = credential.response as AuthenticatorAssertionResponse;

// Now send this information off to the Relying Party
// An example payload with most of the useful information
const payload = {
  kid: credential.id,
  clientDataJSON: safeByteEncode(assertion.clientDataJSON),
  authenticatorData: safeByteEncode(assertion.authenticatorData),
  signature: safeByteEncode(assertion.signature),
};

The AuthenticatorAssertionResponse again has the clientDataJSON, and now the authenticatorData. We also have the signature that needs to be verified with the stored public key we captured in the attestation phase.

Decoding The Assertion clientDataJSON #

The assertion clientDataJSON is very similar to the attestation version. We again have the challenge, origin, and type. Everything is the same, except the type is now webauthn.get.

type DecodedClientDataJSON = {
  challenge: string,
  origin: string,
  type: string
};

const decoded: DecodedClientDataJSON = JSON.parse(new TextDecoder().decode(assertion.clientDataJSON));
const {
  challenge,
  origin,
  type
} = decoded;

Understanding The authenticatorData #

The authenticatorData is similar to the previous attestationObject.authData, except we no longer have the public key included (e.g., the attestedCredentialData ), nor any extensions.

NameLength (bytes)Description
rpIdHash32This is a SHA-256 hash of the origin, e.g., my.passkeys.com.
flags1Flags that determine multiple pieces of information (specification).
signCount4This should always be 0000 for passkeys, just as it should be for authData.

Verifying The signature #

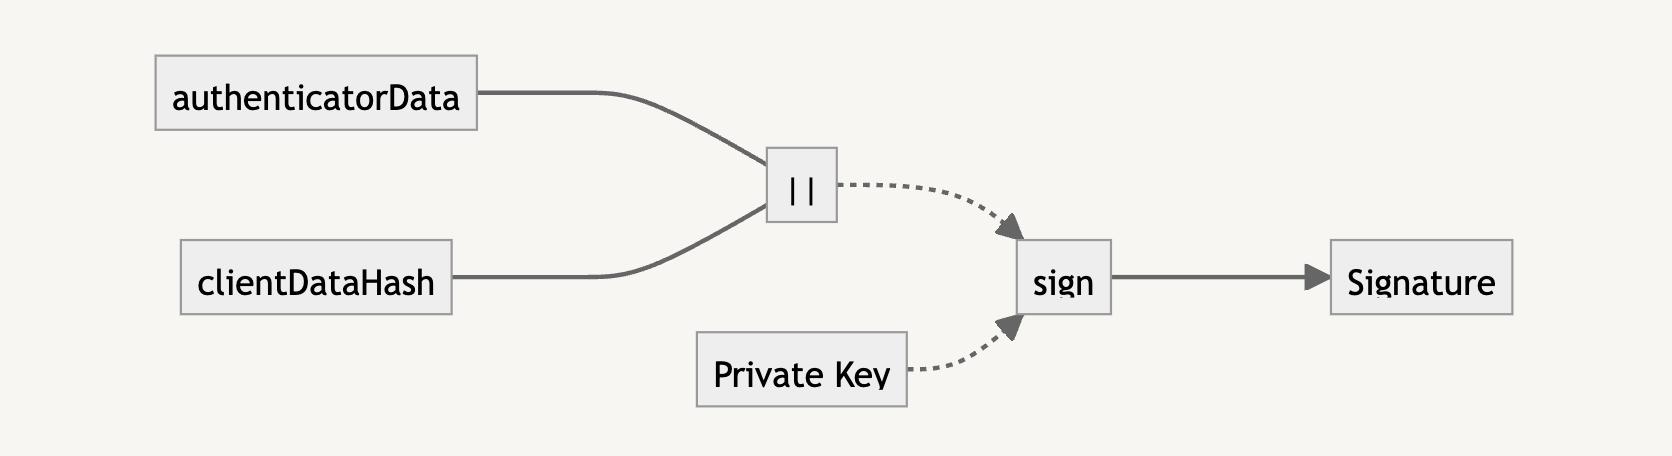
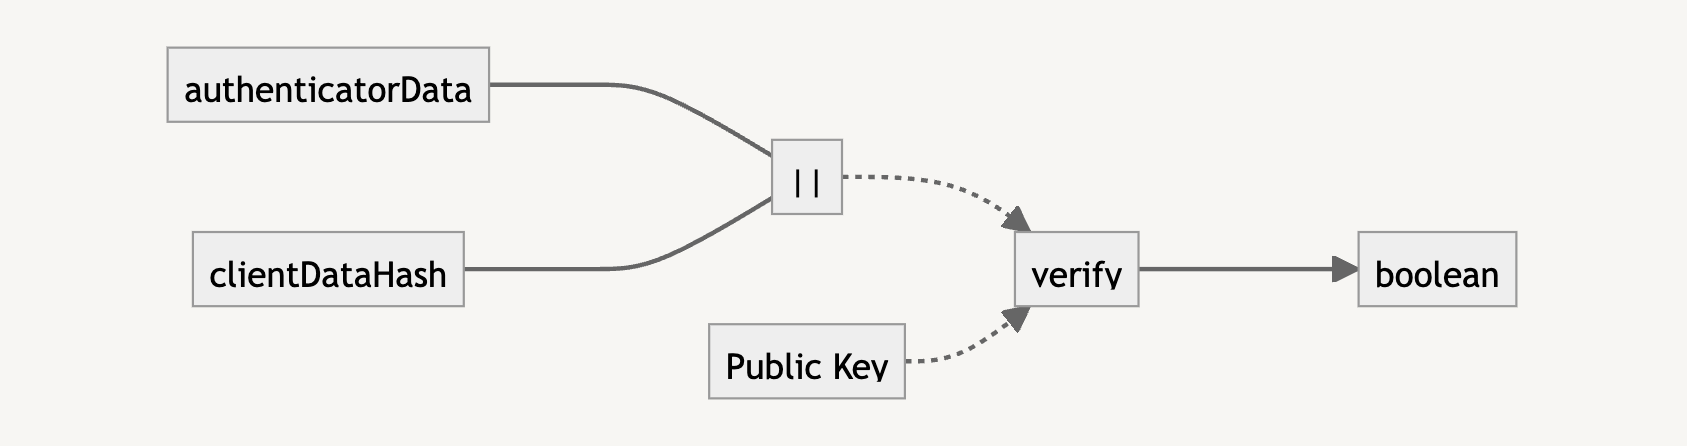
The signature is what we need to verify that the user trying to log in has the private key. It is the result of the concatenation of the authenticatorData and clientDataHash (i.e., the SHA-256 version of clientDataJSON).

Verifying the signature
(Large preview)

To verify with the public key, we need to also concatenate the authenticatorData and clientDataHash. If the verification returns true, we know that the user is who they say they are, and we can let them authenticate into the application.

Verifying the public key
(Large preview)

Here’s an example of how this is calculated:

const clientDataHash = await crypto.subtle.digest(
  'SHA-256',
  assertion.clientDataJSON
);
// For concatBuffer see: <https://github.com/nealfennimore/passkeys/blob/main/src/utils.ts#L31>
const data = concatBuffer(
  assertion.authenticatorData,
  clientDataHash
);

// NOTE: the signature from the assertion is in ASN.1 DER encoding. To get it working with Web Crypto
//We need to transform it into r|s encoding, which is specific for ECDSA algorithms)
//
// For fromAsn1DERtoRSSignature see: <https://github.com/nealfennimore/passkeys/blob/main/src/crypto.ts#L60>'
const isVerified = await crypto.subtle.verify(
  { name: 'ECDSA', hash: 'SHA-256' },
  pubkey,
  fromAsn1DERtoRSSignature(signature, 256),
  data
);

Sending The Assertion Payload #

Finally, we get to send a response to the server with the assertion for logging into the application.

type AssertionCredentialPayload = {
  kid: string;
  clientDataJSON: string;
  authenticatorData: string;
  signature: string;
};

const payload: AssertionCredentialPayload = {
  kid: credential.id,
  clientDataJSON: safeByteEncode(assertion.clientDataJSON),
  authenticatorData: safeByteEncode(assertion.authenticatorData),
  signature: safeByteEncode(assertion.signature),
};

To complete the assertion phase, we first look up the stored public key, kid.

Next, we verify the following:

  • clientDataJSON again to ensure the same challenge is used,
  • The origin is the same, and
  • That the type is webauthn.get.

The authenticatorData can be used to check the rpIdHash, flags, and the signCount one more time. Finally, we take the signature and ensure that the stored public key can be used to verify that the signature is valid.

At this point, if all went well, the server should have verified all the information and allowed you to access your account! Congrats — you logged in with passkeys!

No More Passwords? #

Do passkeys mean the end of passwords? Probably not… at least for a while anyway. Passwords will live on. However, there’s hope that more and more of the industry will begin to use passkeys. You can already find it implemented in many of the applications you use every day.

Passkeys was not the only implementation to rely on cryptographic means of authentication. A notable example is SQRL (pronounced “squirrel”). The industry as a whole, however, has decided to move forth with passkeys.

Hopefully, this article demystified some of the internal workings of passkeys. The industry as a whole is going to be using passkeys more and more, so it’s important to at least get acclimated. With all the security gains that passkeys provide and the fact that it’s resistant to phishing attacks, we can at least be more at ease browsing the internet when using them