⭐ If you would like to buy me a coffee, well thank you very much that is mega kind! : https://www.buymeacoffee.com/honeyvig Hire a web Developer and Designer to upgrade and boost your online presence with cutting edge Technologies
Showing posts with label Networking. Show all posts

Tuesday, February 10, 2026

ERP And SAP


SAP, an acronym for Systeme, Anwendungen und Produkte in der Datenverarbeitung (Systems, Applications, and Products in Data Processing), is a multinational software corporation headquartered in Walldorf, Germany. SAP is widely known for its enterprise resource planning (ERP) software and solutions.

History and Founders:

SAP was founded in 1972 by five former IBM employees: Dietmar Hopp, Hasso Plattner, Claus Wellenreuther, Klaus Tschira, and Hans-Werner Hector. They initially aimed to develop standard software for real-time data processing, focusing on business applications. The company's first product, called SAP R/1 (Real-Time Data Processing System), was released in 1973 and ran on IBM mainframes.


Over the years, SAP experienced significant growth and introduced new versions of its software, such as SAP R/2 and SAP R/3. The introduction of SAP R/3 in 1992 marked a turning point for the company, as it transitioned from a mainframe-based system to a client-server architecture, making it more flexible and adaptable.


What does SAP do?

SAP is primarily known for its ERP software, which integrates various business processes and functions into a single system, providing organizations with a comprehensive view of their operations. ERP systems help streamline and optimize business activities, including finance, human resources, manufacturing, supply chain management, customer relationship management, and more.


SAP's ERP software enables companies to manage their operations efficiently, improve decision-making, and enhance collaboration across departments. It provides a centralized platform where organizations can store and analyze their data, automate processes, and gain actionable insights.


ERP and SAP Modules: Within SAP's ERP software, different modules are designed to address specific functional areas of an organization. These modules can be implemented individually or integrated together based on the specific needs of a company. Some of the commonly known SAP modules include:

  1. Financial Accounting (FI): Manages financial transactions, general ledger, accounts payable and receivable, asset accounting, and financial reporting.
  2. Controlling (CO): Provides tools for cost accounting, budgeting, profitability analysis, and internal reporting.
  3. Sales and Distribution (SD): Handles sales processes, order management, pricing, shipping, and billing.
  4. Materials Management (MM): Deals with procurement, inventory management, goods receipt, and material valuation.
  5. Production Planning (PP): Controls manufacturing processes, including capacity planning, bill of materials, work orders, and shop floor control.
  6. Human Capital Management (HCM): Manages employee data, payroll, time management, recruitment, training, and organizational management.
  7. Customer Relationship Management (CRM): Supports customer-centric processes, including sales, marketing, service, and customer analytics.
  8. Supply Chain Management (SCM): Optimizes supply chain operations, including demand planning, logistics, warehouse management, and supplier collaboration.

These are just a few examples of SAP modules, and the company offers many more to cater to various industry-specific requirements.


SAP's continuous innovation and expansion into cloud-based solutions have further diversified its product portfolio, offering solutions for analytics, business intelligence, mobility, database management, and more. Today, SAP is one of the world's largest software companies, serving customers across industries and empowering organizations to thrive in the digital age.

I hope this post finds you all in good health and high spirits. Today, I am excited to announce the creation of the SAP Professionals WhatsApp Group, a platform aimed at fostering collaboration, networking, and knowledge sharing within the SAP community.

As the creator of this group, I firmly believe in the power of collective intelligence and the immense value it can bring to individuals and organizations alike. In today's fast-paced world, staying up-to-date with the latest trends, industry insights, and best practices is essential for professionals working with SAP technologies. This group aims to bridge the gap between industry experts, consultants, developers, and enthusiasts, enabling them to connect, learn, and grow together.

So, what makes the SAP Professionals WhatsApp Group unique? Let's explore some key features and benefits:

  1. Open to All SAP Professionals: Whether you are an experienced SAP consultant, a skilled developer, a product manager, a business analyst, or an aspiring professional seeking insights into the world of SAP, this group welcomes you. By bringing together a diverse range of individuals, we create a vibrant community that thrives on shared expertise.
  2. Knowledge Sharing and Problem Solving: One of the primary objectives of this group is to provide a platform for knowledge sharing. Members can discuss SAP-related topics, seek advice, and share their own experiences. From troubleshooting technical issues to brainstorming innovative solutions, our collective wisdom will help drive success in SAP projects.
  3. Networking Opportunities: Networking plays a crucial role in professional growth. By joining the SAP Professionals WhatsApp Group, you gain access to a vast network of like-minded individuals, potential mentors, and industry leaders. Expand your professional connections, exchange ideas, and explore new opportunities.
  4. Stay Updated with Industry Trends: The SAP ecosystem is constantly evolving, and staying on top of the latest trends is vital. Group members will benefit from curated updates on SAP news, product releases, upcoming events, and relevant insights. Engage in meaningful discussions around these topics and discover how they impact your work.
  5. Exclusive Learning Resources: Learning never stops, and this group aims to foster continuous professional development. Discover and share valuable learning resources such as blogs, articles, tutorials, webinars, and online courses related to SAP technologies. Together, we can enhance our skills and stay ahead in this dynamic field.

To join the SAP Professionals WhatsApp Group, simply follow these steps:

  1. Send a direct message to me, stating your interest in joining the group. We as a SAP community will validate your profile and share the group link.
  2. Provide a brief introduction, including your professional background and your motivation for joining.
  3. Please ensure your LinkedIn profile is up-to-date to help us maintain the quality and professionalism of the group.

A word of caution: This group is for professionals genuinely interested in SAP and committed to contributing positively. It is important to maintain a respectful, inclusive, and supportive environment for everyone.

I am excited about the endless possibilities that this WhatsApp group holds for all of us. Let us embrace this opportunity to connect, collaborate, and share knowledge, ultimately empowering ourselves and the SAP community as a whole.

If you have any questions or suggestions regarding the group, please feel free to reach out. I look forward to welcoming you to the SAP Professionals WhatsApp Group and witnessing the incredible impact we can create together!

Introducing the SAP Professionals WhatsApp Group: Unlocking Collaboration and Knowledge Sharing

Enterprise Resource Planning (ERP) software is used to manage a company's day-to-day operations.

Accounting, human resources (HR), procurement, customer connections (CRM), supply chain, manufacturing, engineering, maintenance, projects, service, and other functions are aided by it. An ERP solution combines the functions listed above into a single piece of software, ensuring that the business runs as efficiently as possible and giving the organization with a single source of truth for better decision-making. In a nutshell, ERP software is a collection of tools that integrates an organization's value chain into a unified environment.

Difference between ERP and SAP

ERP stands for Enterprise Resource Planning and it’s a business process management system which automates and integrates all the core business processes of an organization into a shared database in order to streamline processes and information across the organization. SAP (Systems, Applications, and Products in Data Processing) can be referred to as the products offered by the company SAP AG. SAP is one of the largest providers of ERP software in the world.

2023 News:At its annual Sapphire conference, SAP is announcing innovations to modernize ERP. AI plays an important role in this, but what else on the roadmap? In any case, SAP promises that the innovations will give enterprise organizations “the tools they need to tackle the future with confidence.”

Looking at what is most important to SAP users right now, we can see that it is whether or not they are upgrading to the more modern ERP S/4HANA. Official recent numbers are not available, however the market indicates that a considerable percentage of users continue to use the older ERP system ECC. However, this method is based on outdated market standards and will be obsolete in a few years. Overall, SAP has lately made two significant advances to make modernization more appealing. First, RISE with SAP, a software package that assists businesses in modernizing their business processes. It includes tools for redesigning and migrating business processes to a modular software environment. It means that your organization creates processes to fulfill the market standards set and built by SAP for your industry. A variety of services to host SAP workloads on the cloud and apply process mining to optimize processes are also included in the bundle.

Following up from RISE with SAP, the ERP behemoth has released GROW with SAP. The distinction lies in the target audience and the services tailored to them; RISE with SAP is intended at enterprise organizations, whilst GROW with SAP is focused at midsize businesses. According to SAPPHIRE news, of these solutions, RISE with SAP will receive enhancements. This is because ERP announcements specifically target very large enterprises.

AI Built for Business

At the dawn of a new AI era, SAP is strengthening its commitment to embed powerful AI capabilities across its portfolio to help customers solve business-critical problems in the flow of work.

Customers can use SAP Business AI with confidence because it is built responsibly. Today, SAP is announcing a raft of advancements to SAP Business AI, including innovations that personalize customer engagement, make procurement more productive and expand organizations’ abilities to find and develop critical talent across their entire workforce.

SAP also draws on the strength of its rich ecosystem to benefit customers. Yesterday SAP announced the next step in its long-standing partnership with Microsoft. The companies will collaborate on integrating SAP SuccessFactors solutions with Microsoft 365 Copilot and Copilot in Viva Learning as well as with Microsoft’s Azure OpenAI Service to access powerful language models that analyze and generate natural language. The integrations will enable new experiences designed to improve how organizations attract, retain and skill their people.

Reference from: https://news.sap.com/2023/05/sap-sapphire-future-proofed-business-age-of-ai/

https://news.sap.com/2023/05/sap-sapphire-icertis/

SAP and contract intelligence pioneer Icertis are delivering a new integration that connects AI-driven contract intelligence with SAP S/4HANA in order to enable more profitable and compliant procurement operations.

Icertis Contract Intelligence (ICI) for SAP S/4HANA (purchase side) is the next step in SAP and Icertis' combined product roadmap, as the businesses continue to change contract-driven operations by combining contract intelligence with SAP solutions.

Contract intelligence enables SAP S/4HANA procurement teams to streamline sourcing, negotiate better commercial terms, and increase compliance with regulatory and corporate regulations. By automatically recommending terms based on prior business interactions and tracking commitments to guarantee the goal of all agreements is completely realized, the ICI platform accelerates value and increases savings both pre- and post-signature. Artificial intelligence (AI) built in the ICI platform also reduces risk by detecting deviations from conventional terms, while specified norms and templates further decrease liability via contract self-generation capabilities that enable procurement teams to play a more strategic role in driving business performance.

Benefits and Advantages of ERP Tools

  1. Data Security : Data has become a prized possession for businesses because it’s so critical to making the best possible decisions, and ERP software can help protect that asset. The fact that all this data is in one place, rather than spread across multiple systems with varying levels of security, increases the level of protection. It replaces spreadsheets and other documents sitting on employees’ desktops and being passed around via email. With a cloud ERP system, your information is typically distributed across multiple remote servers to establish redundancies and protect against a single point of failure, adding another layer of security. This is especially important if your company handles a lot of sensitive customer data. In another sense, an ERP system can increase data security by limiting who can view and edit data. Most systems have permissions that are easy to control, ensuring employees only see the information they need to and reducing opportunities for fraud or other nefarious activities.
  2. Centralized Data : Much of the benefit of ERP can be attributed to the fact that all information from all departments is maintained in a single location. Without such a system, data is frequently dispersed across a business in numerous apps and spreadsheets, making it difficult for personnel to find what they need. Furthermore, this strategy frequently results in duplicate data in inconsistent forms, adding to the difficulties. An ERP system can also help with this by standardizing all of your vital data. Because it's all in one system, everything will be in the same format, so you won't have any problems running reports or analytics. Standardized data enables you to obtain all of the insights you require to make more educated decisions.
  3. Compliance : Having accurate, up-to-date records that are easy to find and searchable can really reduce the work required to comply with any regulations your company must adhere to. Customizable reporting tools within the software also make it far easier to track compliance and adjust as necessary. This makes you much more auditable, as well, because all the information an auditor might need to review is easily accessible. Certain ERP systems can even support specific financial standards like GAAP or regulations like the Sarbanes-Oxley Act (SOX).
  4. Increased Productivity : There are countless ways an ERP system can give a major boost to productivity. One way is that it automates many basic, repetitive tasks, freeing up employees to work on other projects that bring more value to the organization.
  5. Visibility : Visibility is another one of the broad, fundamental benefits of ERP — everyone having visibility into various aspects of the business is a powerful thing. It enables faster and better decisions because managers have all relevant context that can assist them. For example, if the purchasing team can see the status of in-transit purchase orders that have not yet reached the warehouse, they can factor that into the orders they’re about to submit to avoid excess or insufficient stock.
  6. Collaboration : So many of the benefits we’ve already covered here facilitate collaboration. Visibility into the way other teams work and what information they’re looking at makes it far easier to work hand-in-hand and for staff to reach out proactively when they see an opportunity to help colleagues. No longer are teams operating on an island and using applications that only they have access to and that aren’t integrated with other back-end systems.
  7. Accurate Forecasting : Your business can only be prepared for what’s coming if it knows what to expect. That’s where forecasting comes in: it uses a wide range of historical data and sometimes other inputs to predict future demand, revenue, expenses and other numbers. Forecasts are much more accurate once you’re running an ERP system because they’re based on more accurate and comprehensive information, since all that data is now in one place. More accurate forecasts mean you can make the appropriate preparations for what is likely to happen. If sales are expected to climb 30%, you can strategically purchase more inventory or, if you’re a services business, hire more employees with the skills where you expect increased demand.

Thursday, December 8, 2022

ESX Clusterbombed FOG Update


BIG problem – our ESX cluster has fallen over. Kind of. Not entirely – but enough to be a complete pain.

The symptom – our student webserver called ‘studentnet’ (which also hosts lots of student storage) stopped working. Actually, for a while I suspected something may happen, because we were observing very high memory usage (95% memory usage on a server with ~132GB of memory?!) which was all being used up by studentnet (with high CPU usage spikes too). A student may have been running something that went nuts – but regardless, I went to log into the VM client to check what was happening. This is where it all started to go really wrong.

The vCentre host was down. But the internal wiki site we host was up. Really weird stuff. I tried to log into the individual hosts that run the VMs and could get in fine; although studentnet just wasn’t responding at all. At some point – stupidly – I decided to restart the host machines, as one wasn’t appearing to respond (it turns out later that it just was just active directory permissions that either were never set up or have somehow – at the time of writing – died a horrible death).

This was stupid because, mostly, it was un-necessary – but crucially it meant all of the VMs that *were* running were now turned off. Very bad news in one or two cases – as I will try and cover later (when I talk about turning certain servers back on) – because any servers that were running in memory now have to reload from storage.

And the storage is where the problem lies.

When my previous boss left in December, I asked him what we should do to move forward; what thing we should try and carry on working on if he was to have stayed around. He was quite focused in saying that storage is the one thing that needs attention and a proper solution for because – well – we have no backups. We have told everyone who uses studentnet this – as we have also told them that it isn’t a primary storage location in the first place (and I have a feeling many were using it for this – as well as running files directly from their user area, potentially causing lots of constant I/O activity) – but that is really of little comfort to those who were needing to submit assignments last night.

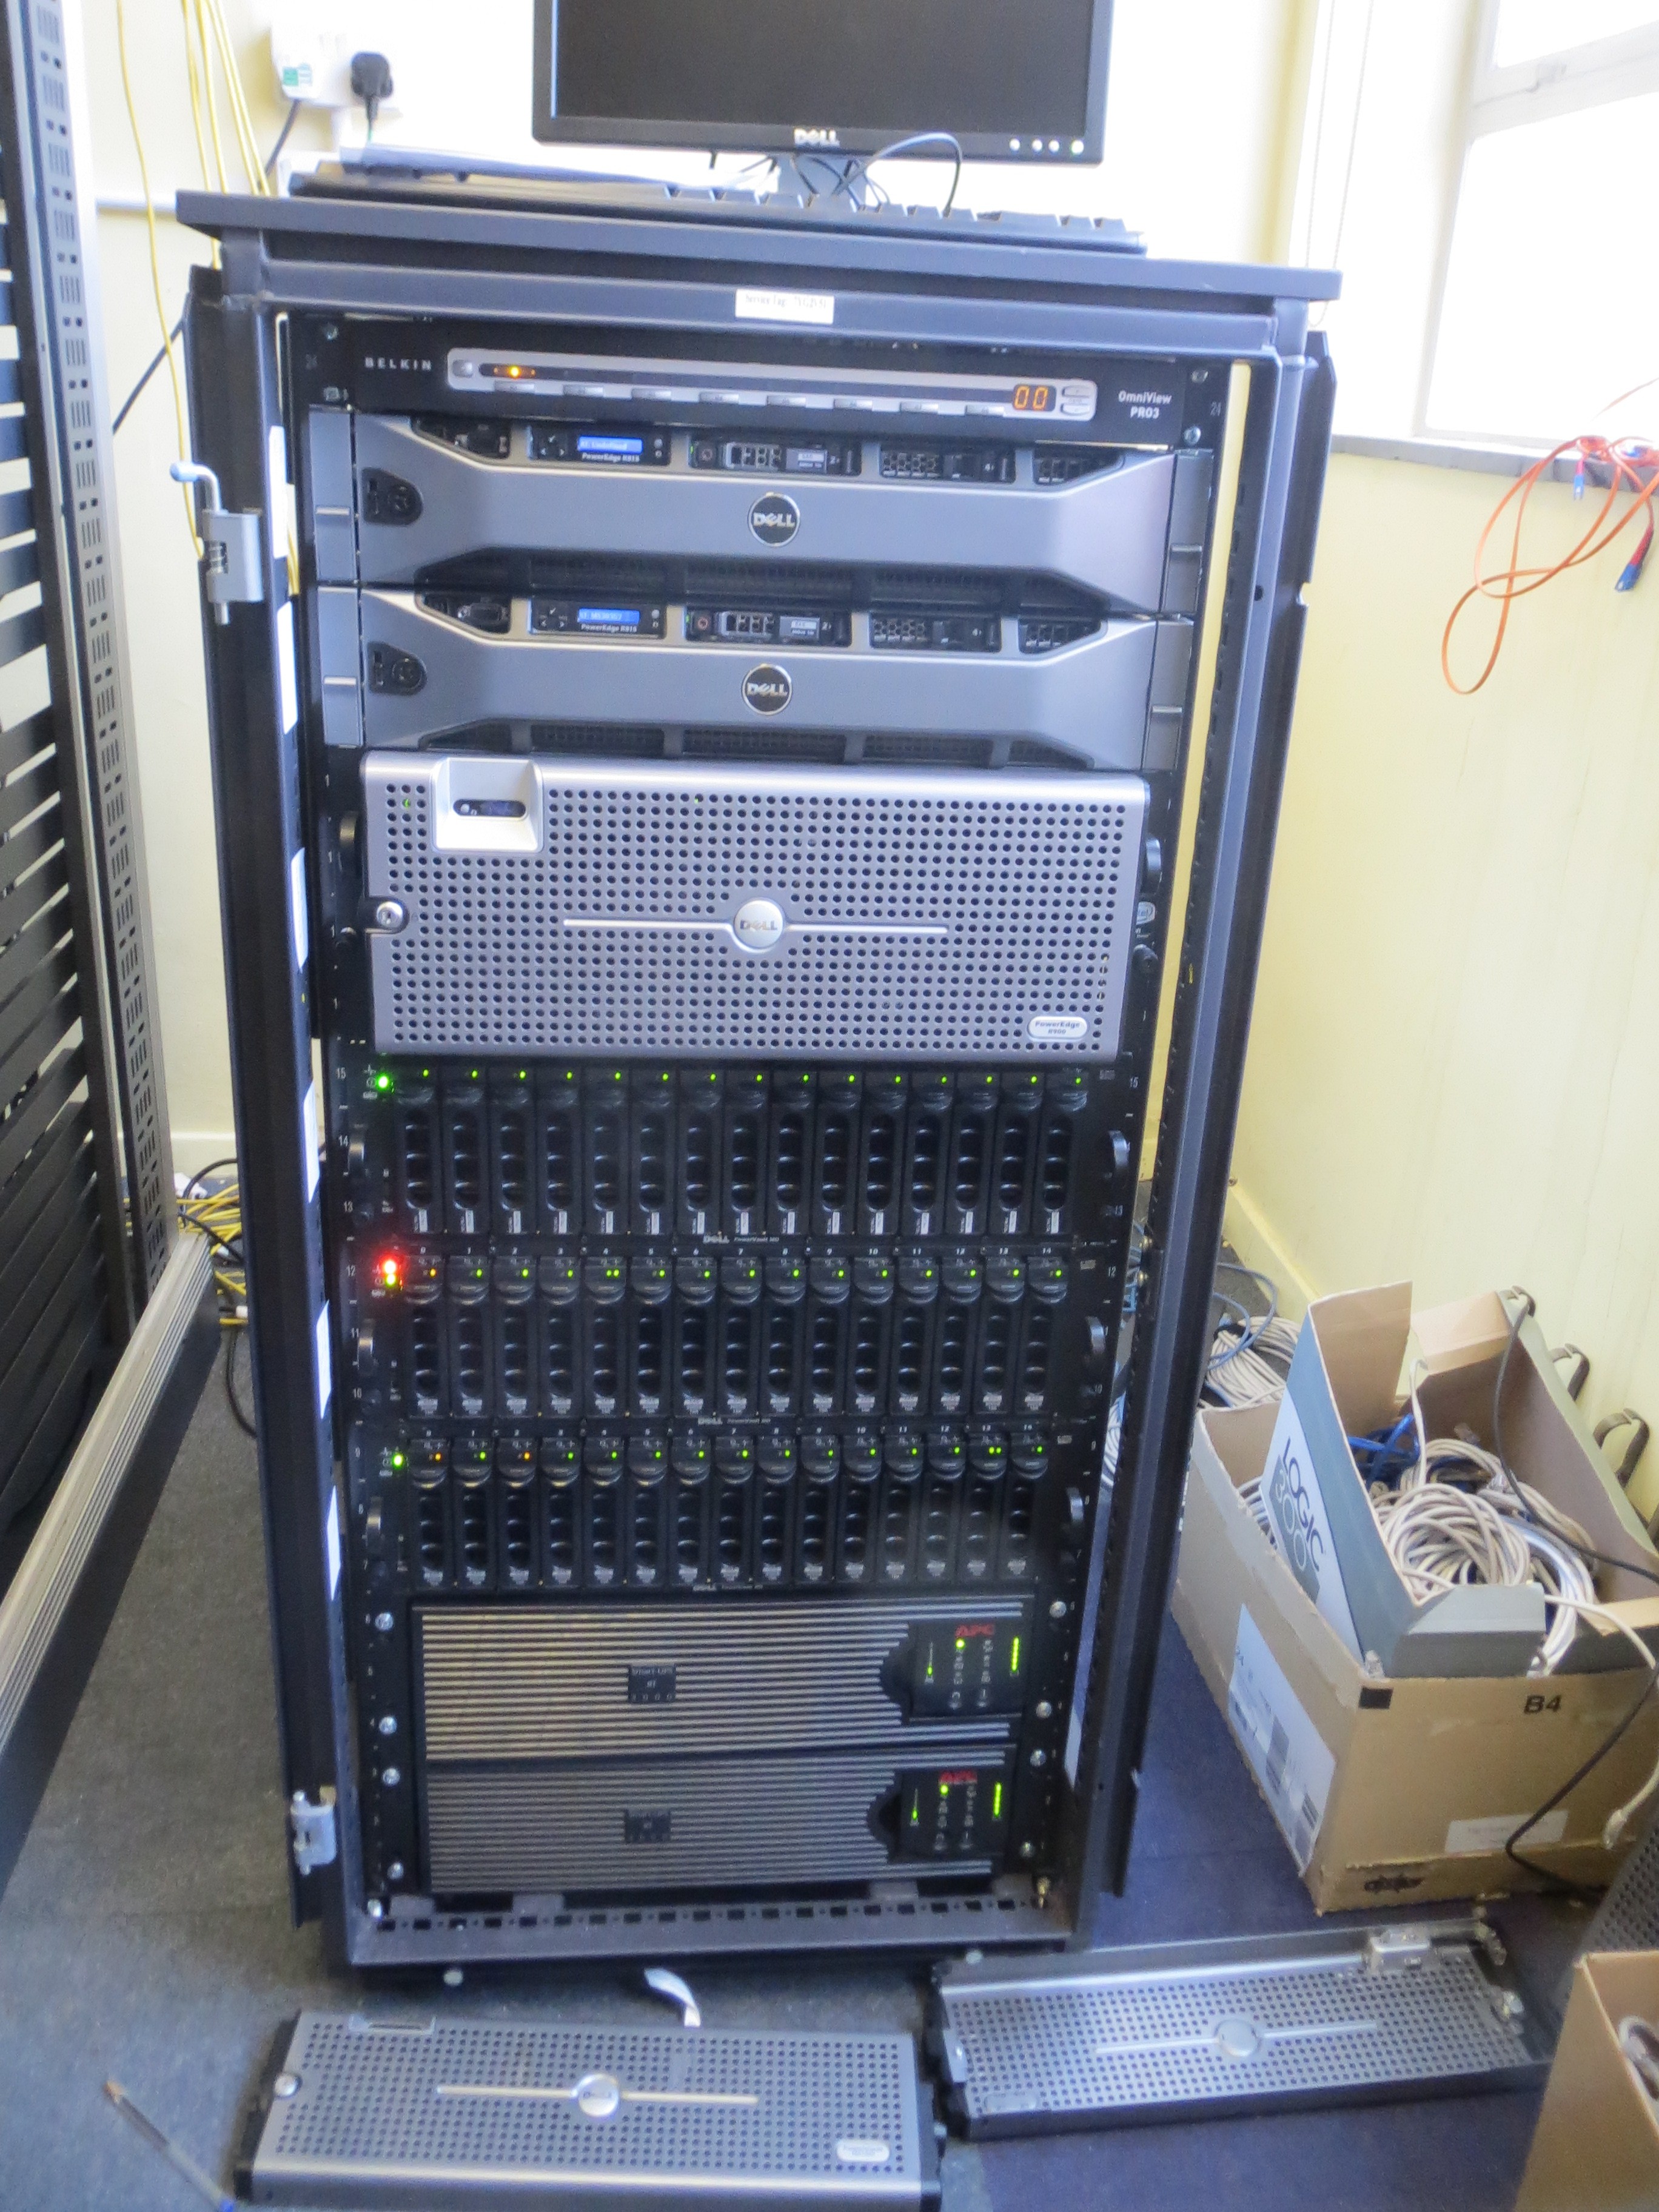
For our two ESX hosts (Dell PowerEdge R815s which have 16 CPUs and 132GB RAM each) we are running a Dell MD3000i storage array with two MD1000 enclosures connected. This is probably about 7 years old now – and although my experience with storage management like this is limited, I have a feeling that we should be looking to have at least some sort of backup, if not replacement.

Our compact ESX cluser with storage nodes

Our compact ESX cluser with storage nodes

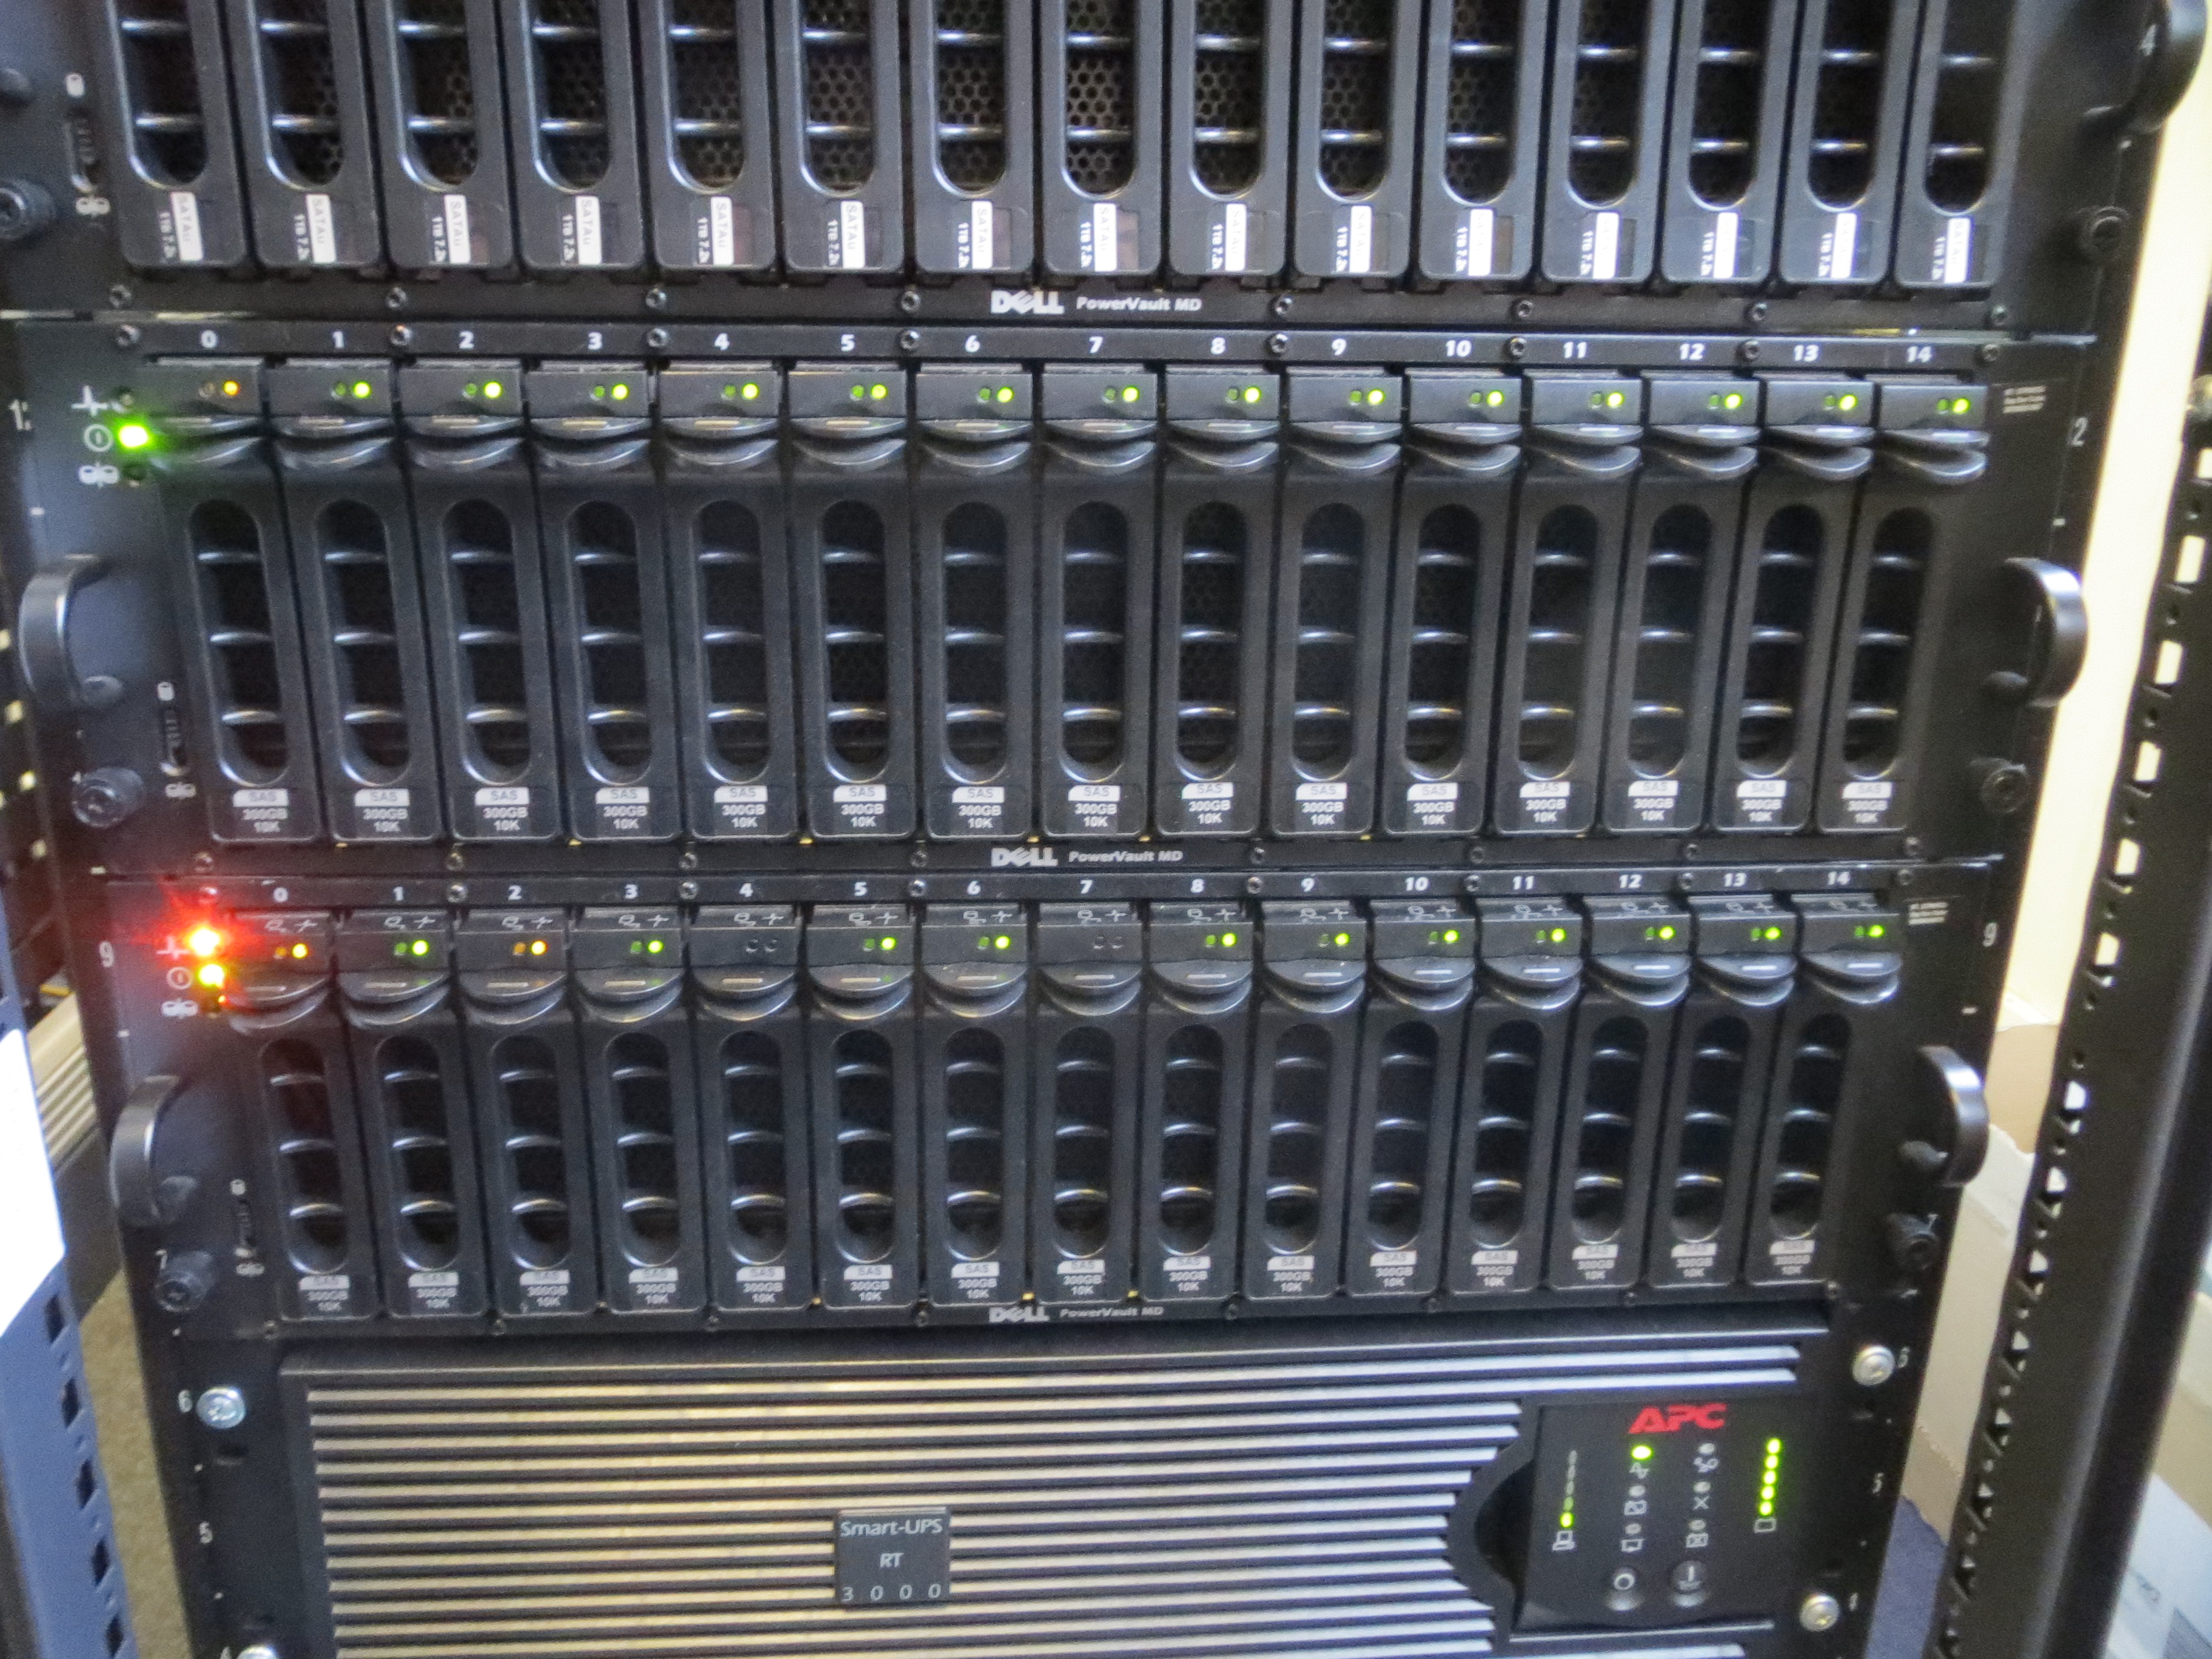
Nevertheless, performance has been ok – even if it has been sometimes intermittent. However, there is a “procedure” for re-initialising the array in the event of a power cut or if something just goes wrong – essentially disconnecting the head node (which is the MD3000i – 15 disks of slower, but big 1TB, SATA drives) and powering it off, before then power off the MD1000 enclosures (each has 15 disks of faster, but smaller 300GB, SAS drives). I should really read up more about uSATA and SAS drives – but for now, the main thing is to get things running again. Before doing this, you should really power off all VMs as this stops I/O activity – but the VM will still keep running (just without the ability to write back to disk) even if you disconnect the hosts from the storage array.

I realised after the hosts had been restarted (as I had stupidly done earlier) where the problem lay. On both hosts, several VMs failed to even be recognised – including Studentnet and frustratingly, the vCentre machine (seriously, why is this running as a virtual machine stored on the flakey storage array!!). And these happen to all be stored on our MD1000 enclosure 2.

The storage enclosures

The storage enclosures

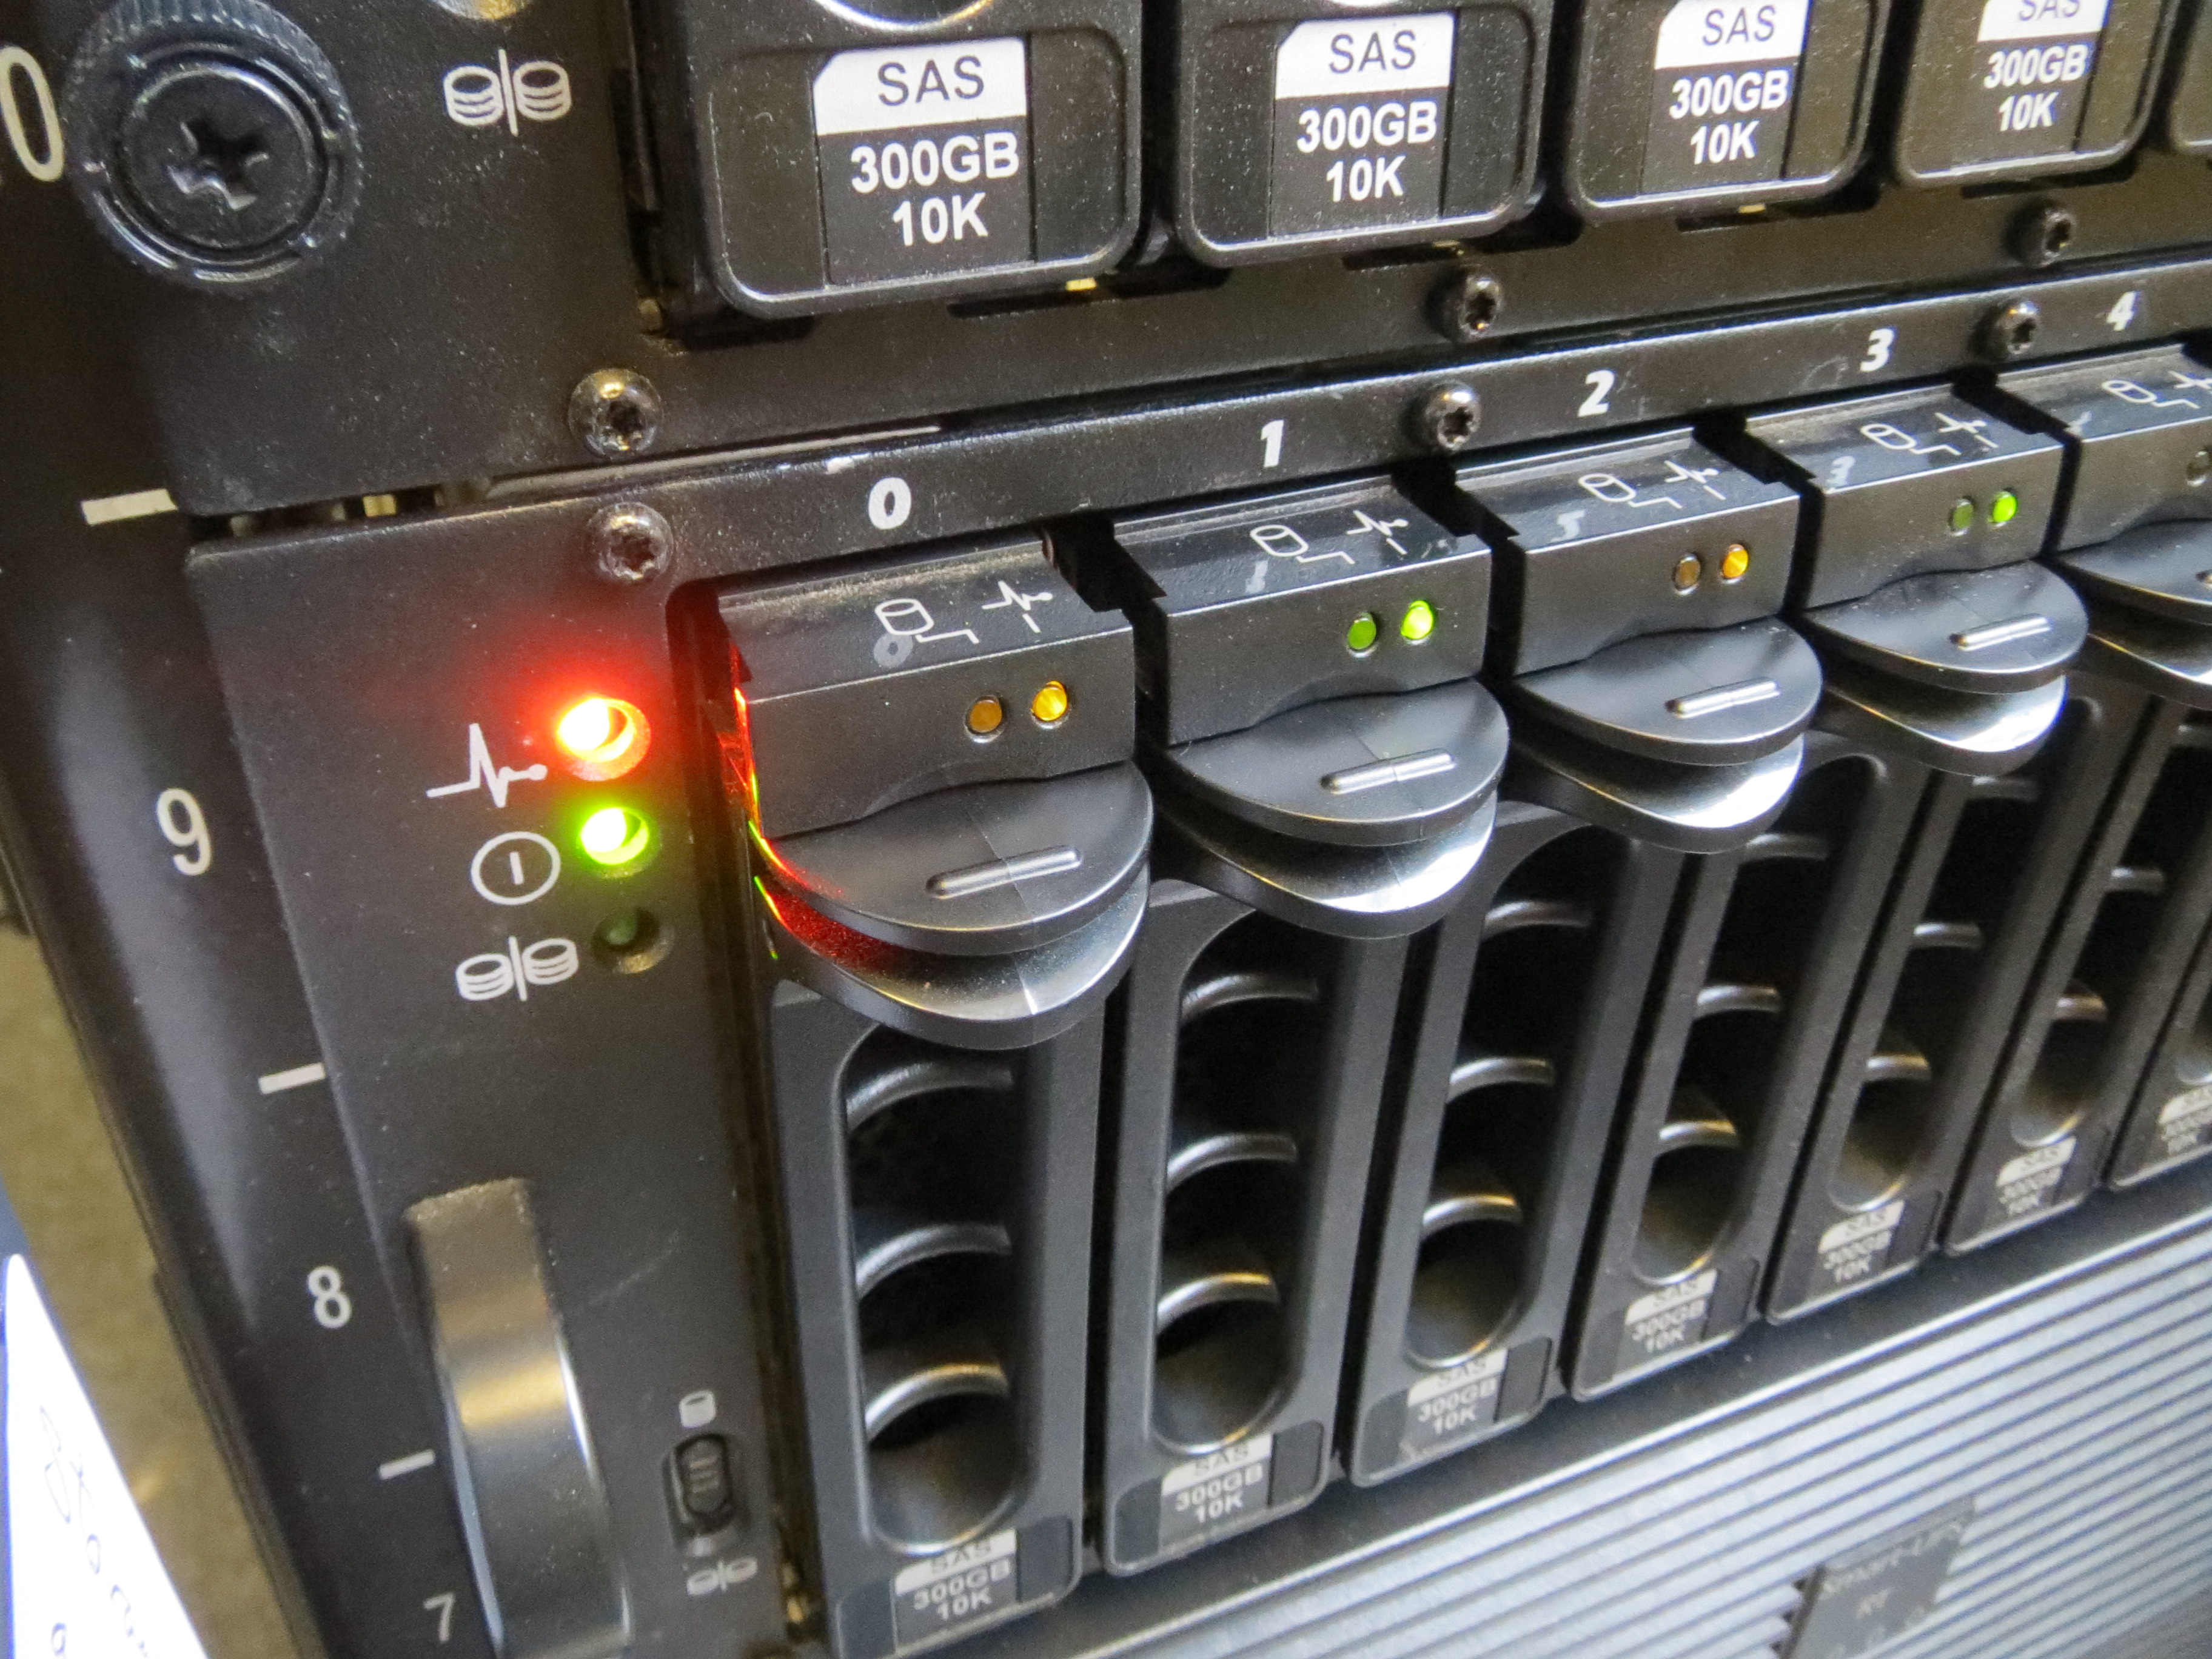
Going back to the server room, I had a look at the lights on the disks. Several orange lights. That was probably bad. It was very bad. You probably shouldn’t do this, but I simply removed and replaced back into position the disks that had orange lights on – and several of them actually went green again. I thought that might be an improvement.

This doesn't bode well...

This doesn’t bode well…

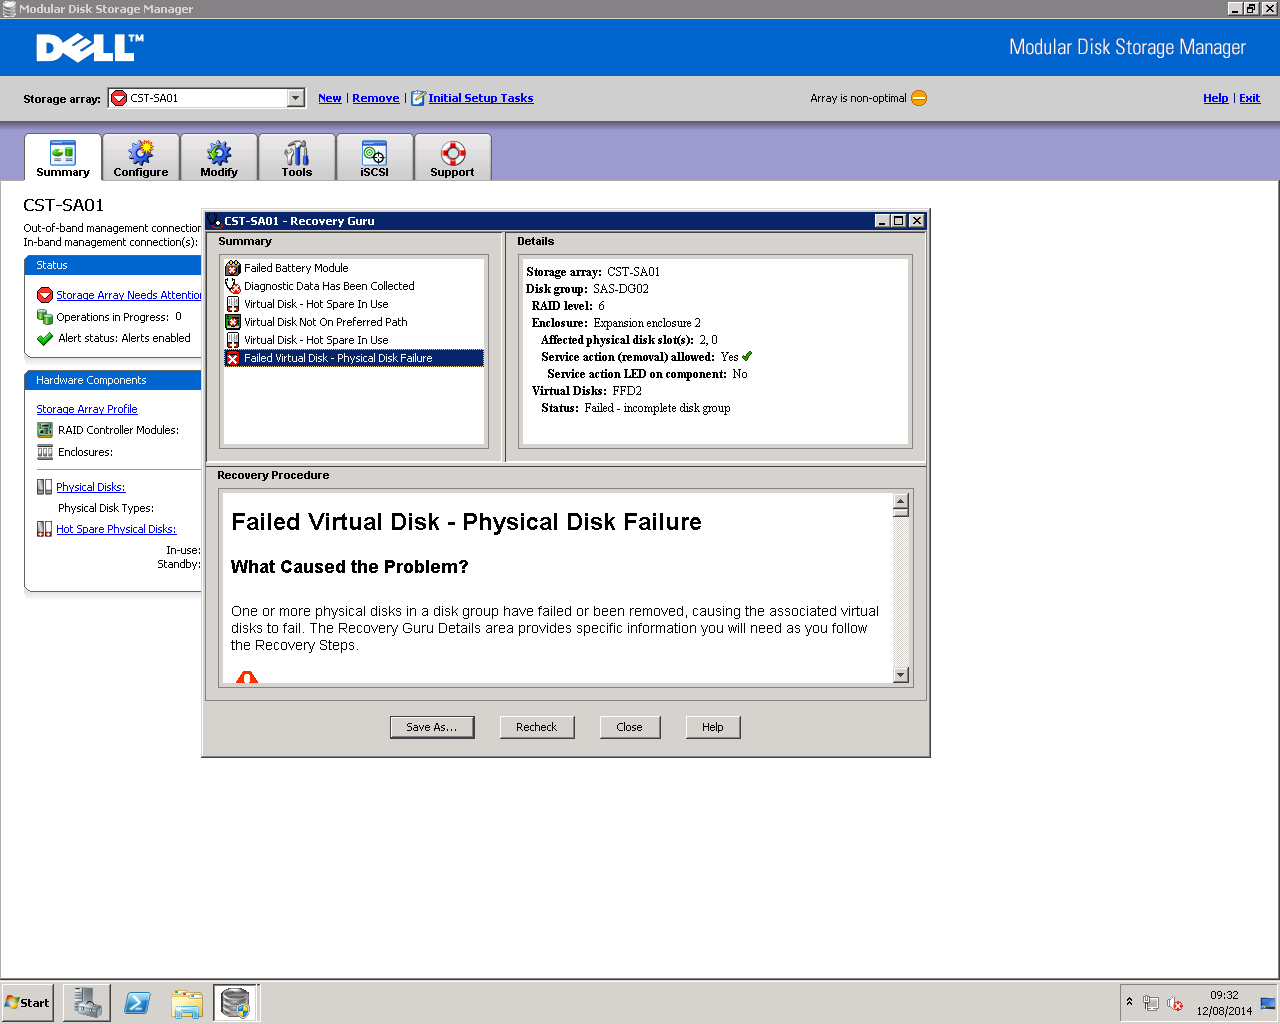
And actually, it was to some degree. The first enclosure was now orange-light-free – with the main unit’s LED now showing blue and not orange. I thought this might be good. But opening Dell’s Modular Disk Storage Manager tool (useful, but it should be more visual and show more log information. Or maybe I can’t find it), showed me the true extent of the problem;

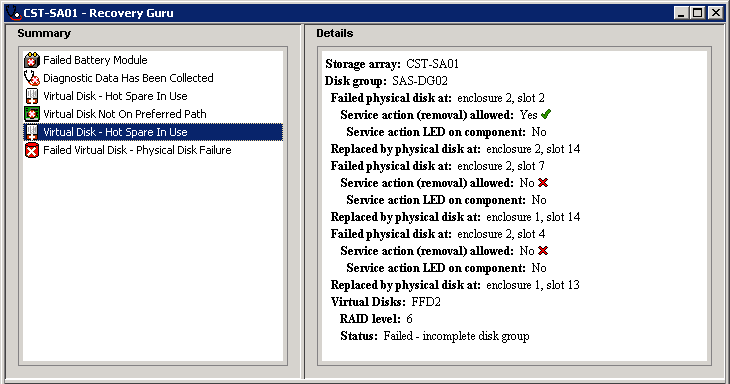
fail1

Yeah, things are pretty bad. FFD2 (the second fast enclosure) has failed. In fact, drives 0, 2, 4, 7 and 13 (which was a spare) have all failed.

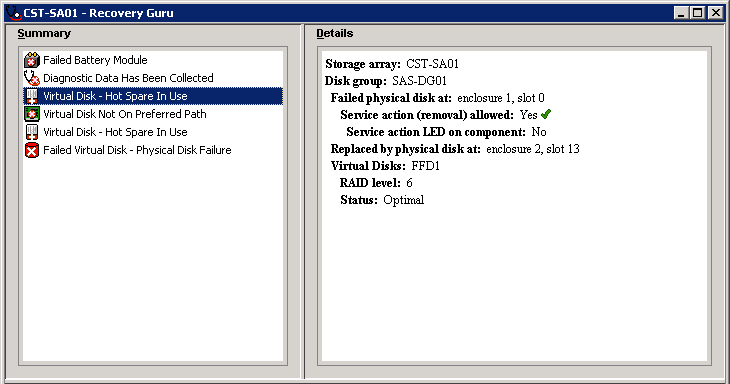
fail2 fail3

The strange thing is, though, is that even with the current replacement mapping, RAID 6 should allow for 2 failures and still be able to operate. I would have thought that means you can have six failures on one of the arrays, using four hotspares to rebuild data and accepting two drives as total failures. But again – my experience of storage management is limited and I have no clue how hotspares are actually used within a RAID scenario.

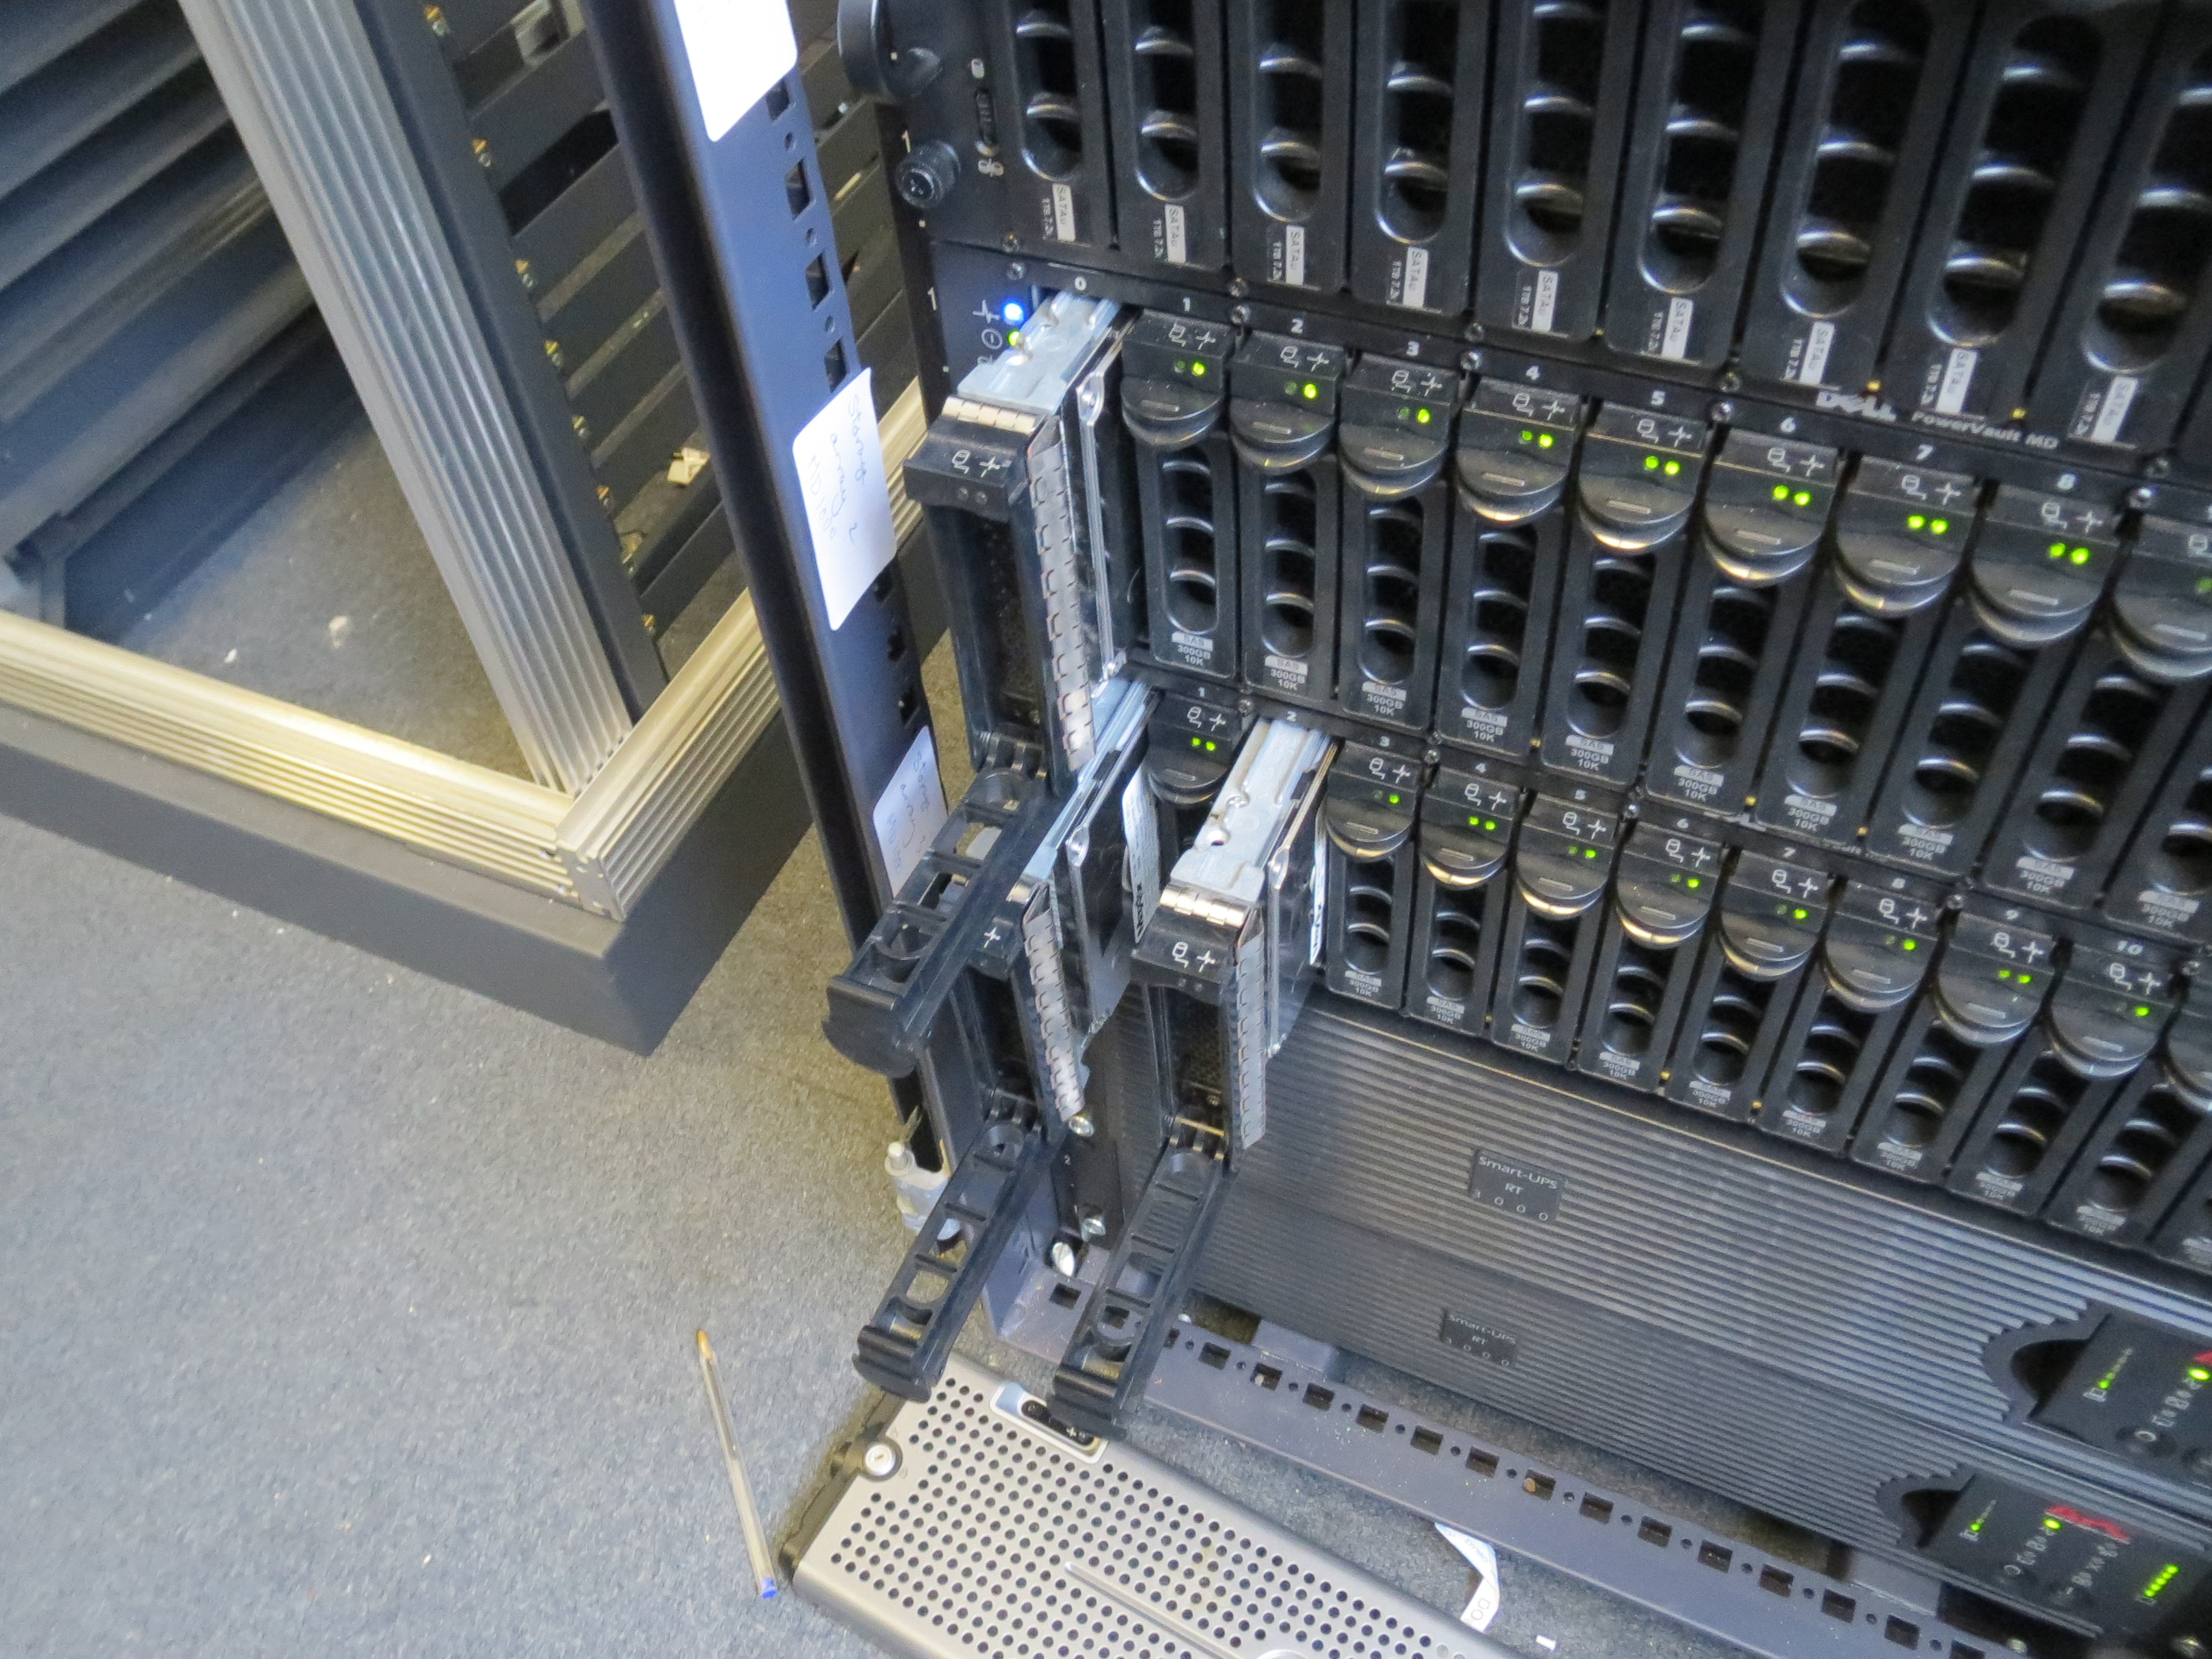
Taking out the dead drives..

Taking out the dead drives..

The next thing I’m off to try is to restart the arrays again. This needs to be really sorted as soon as possible and the total loss of that enclosure is just not something that can happen. If hot spares fail, i’ll replace them with disks from another machine that also has 300GB 10k SAS drives in (what can go wrong?) one at a time and see what happens.

Whatever happens after this, a key thing we need to look into is buying more storage, as well as the backup and maintenance for it. And, for now, FOG has to be on hold too.

Looks like the storage array is dead. After a bunch of messing around a couple of days ago, it really is apparent that we have lost the FFD2 enclosure.

With it, we lose a few server, but we can also gain a load of storage disks. Until we manage come up with a new storage solution that has backups, I’m taking all the old SAS drives out to use as hotspares for FFD1. I have a feeling we have lots of 15k RPM SAS drives lying around that were used in other servers – more recently – and of the same brand to use to rebuild FFD2 again. It should work. If not, it’ll be a learning experience.

I ended up familiarising myself a lot with the Dell Modular Storage Manager (DMSM) software and found out the correct way to assign hotspares and replace drives in the enclosure. A lot of messing around, unplugging and restarting took place on Tuesday, eventually resulting in a hot spare being designated as a physical replacement on another enclosure. I had actually written a good amount up about this but it was being written on notepad on a virtual machine that subsequently got restarted when – at some unknown point – it was decided to restart everything that was already running. Frustrating. But not the end of the world.

Moving forward, what needs to be done now is:

  • Have a backup solution:
    • If a server fails, if the hosts fail and if everything is lost, we need to be able to – at worse – rebuild and reconfigure those servers. Each server should have a designated backup plan associated with it
    • Designate some replacement hot spare drives.
    • Purchase a new storage array and an appropriate backup, with perhaps something like a scheduled daily backup of the system.
    • Ideally the content from our internal wiki should be mirrored elsewhere so thatin the event of a disaster, we can recap on how to fix it.
  • Maintain the storage array and the ESX hosts more closely. Someone needs to monitor alarms as they appear and be informed of any storage array issues. I also need to look into why we no longer receive support emails automatically generated by alarms on the storage array (and this used to happen).
  • Rebuild the vCentre server – probably on a physical host rather than a virtual one. Will need to look into that.

For each of these points, I would probably make a new post – but this is just one part of what I am working with. FOG and the redeployment of our labs is also a priority, as are some other projects I have been working on lately. To be continued!

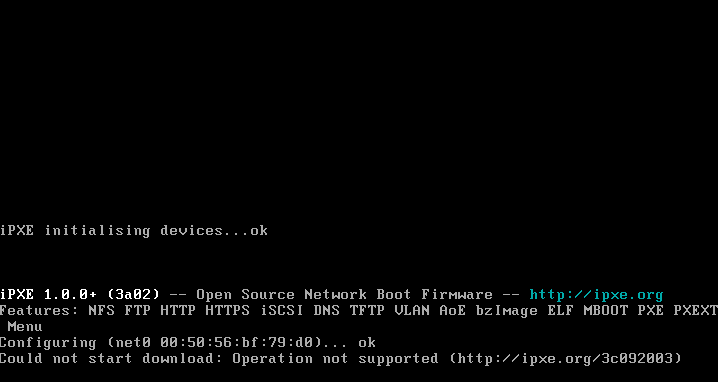
Last week was spent trying to get our ESX cluster back up and working, so now its back onto FOG. Towards the end of the week, I did manage to spend some time on this again. I changed our switch configurations for the three rooms we manage the network of ourselves to point from pxelinux.0 to undionly.kpxe, which now uses iPXE (a bit better and can use other protocols rather than tftp, such as http). Whether this provides any speed differences remains to be seen.

Host registration

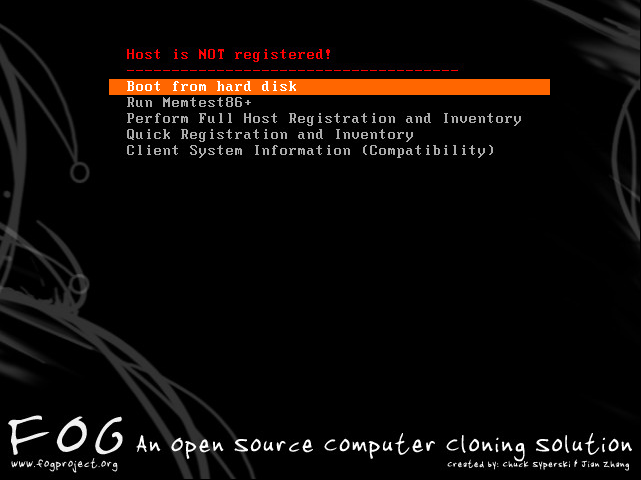
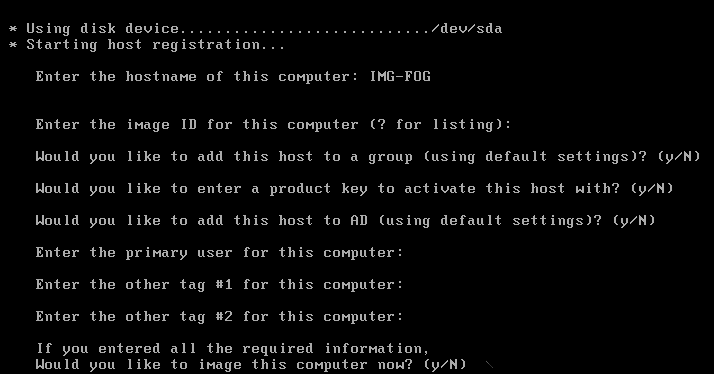
For our own rooms, this small change actually worked and the following screen became visible for a new, unregistered host.

failboot5 The timeout option for the menu can be changed from the FOG management webpage – for us it is 3 seconds but, after registration has been performed, I will likely reduce it to 0. I am pretty sure that, also, the timeout can be altered to depend on the host’s registration status.

I spent some time working with the rest of the team here walking through the procedure for registering new host machines (since I decided to not bother with exporting and importing a saved list from the previous FOG installation) and, with only five of us left in the team, it was important that we all know how do use FOG in case one of us isn’t here. The registration of ~500 PCs will be a monumental task, but with some tips and tricks, it shouldn’t take too long. When registering a host, all we really need to do is to give it a name – the rest can be edited (including the name, to be fair) in the FOG management menu. A quick way to do this is to just enter the name, hold down the enter key and move onto the next host. Because I haven’t defined any groups right now for the hosts to go into, I can manually add them later – however, it may be a good idea to modify the registration options to not only strip out a load of the useless options but to also extract the group to add the PC into from the host names (as each PC is numbered according to the room it is in).

failboot7

One thing to add here is that if your organisation, like ours, uses asset tags on their systems, this may have also been recorded by the OEM onto the motherboard. If this is the case, the asset tag (which, for example, DELL would provide for their systems) will be uploaded with the rest of the hardware inventory and can be viewed in the FOG webpage management under each host’s hardware information. When it comes to auditing your hardware, this can be very handy (as it was when we once had to record the MAC addresses for every new PC we had ordered, once – presumably someone had forgotten to do this at an earlier stage before their arrival with us!)

failboot6

And here we have a fully registered host! If you get the name wrong (as will inevitably happen in the process of manually adding so many hosts), you can actually delete the host using “quick removal” here, which then takes you back to this menu again.

Bootfiles – Pxelinux, Syslinux and Undionly

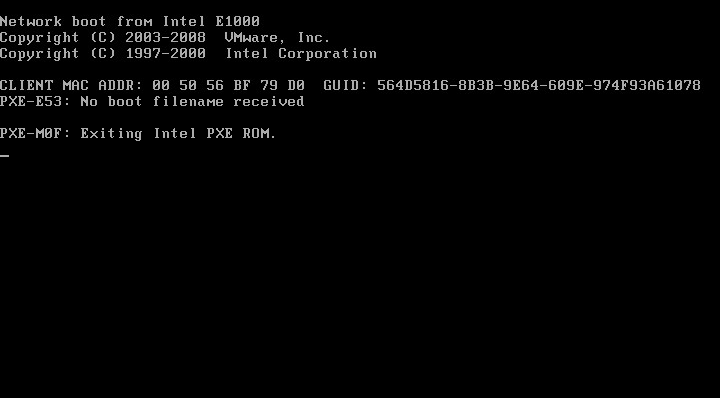
Now to try out the other labs! Upon boot, this happens:

failboot1

As suspected, this didn’t work on the rest of the rooms we manage, unfortunately. After hanging for a while on PXE booting any of the computers in the labs, the machines time-out saying “PXE E-53: No boot filename received.” This can be from a few causes, but generally it is because the PXE server didn’t respond or that there is no boot file specified even if the server is able to be contacted.

Or, now that we have changed to undionly.kpxe, perhaps the bootfile specified in DHCP option 67 is incorrect. FOG now uses undionly.kpxe as its bootfile. I was a bit confused by what this was, so I’ve been looking around a bit and this article answers it through part of its explanation of PXELinux. It seems that Etherboot’s undionly.kpxe and Syslinux’s pxelinux.0 are combined in the article’s scenario, as they both serve different purposes, but FOG has replaced the latter with the former rather than using both?

I decided to actually check the FOG site out. It explains it quite well and, through a link to an Etherboot blog, it seems that pxelinux.0 IS still used, but that it has been moved to a different stage of the loading chain. Its generated from .kkpxe files, and the undionly.kpxe file is used as a kind of generic PXE loader. The key thing to note is that (and this post by Tom Elliott* back in February details some of the motivations too) iPXE can use different methods of delivery, rather than just tftp – and apparently this can make things faster if done through http (as well as being able to use some cool php magic and things too). *Tom now appears to be one of the main FOG people as, after the change from 0.32, he is listed on the FOG credits as the third creator. 

My assumption initially was that, because we can only manage the DHCP pools for three rooms, the rest of the labs’ DHCP pools were unmodifiable by us and, therefore, need to be changed by ICT services.

However, the only thing that had to be changed, ever, on the rest of the University network was that, on the core switches, for each VLAN that we wanted FOG to work on, we needed the ip-helper address to be set. But this hadn’t changed at all – so I couldn’t work out what the issue would be…

proxyDHCP

Then I remembered something – we had to actually configure FOG as a proxyDHCP server. It isn’t that way by default. For this to work, we can use dnsmasq – which is a simple install and adding of a configuration file called ltsp.conf into the /etc/dnsmasq.d directory. Here, certain options are configured to actually enable the proxyDHCP server. The example configuration is commented, so I won’t detail it here. However, a few things to note:

  • Each IP address listed represents the network for which the proxyDHCP server will respond to requests from – without listing them, the FOG server won’t respond to any requests from those subnets.
  • You can subnet it however you like – so we could do 10.0.0.1 255,255,255.0 and get the whole University – but only the subnets that the University network had configured the IP helper address on would be able to get the FOG booting on anyway, so I decided we should probably list each subnet (and be able to disable each subnet) as we wanted FOG booting to be used on.
  • After you add a new subnet for FOG to serve, after saving and exiting the configuration, you should do a” service restart dns-masq”

So in order for this to all work in an environment where you have no access to the DHCP configurations, the following had to be configured:

  • iphelper address of the proxyDHCP/fog server had to be included on the core switch, where vlans are specified
  • ltsp.conf had to be configured on the fog server running dnsmasq

However, this didn’t help at all.

failboot2

This turned out to be because, of course, pxelinux.0 is no longer used and the FOG wiki instructs you to change a couple of lines to point to undionly.kpxe

This line:

dhcp-boot=pxelinux.0

is now,

dhcp-boot=undionly.kpxe,,x.x.x.x

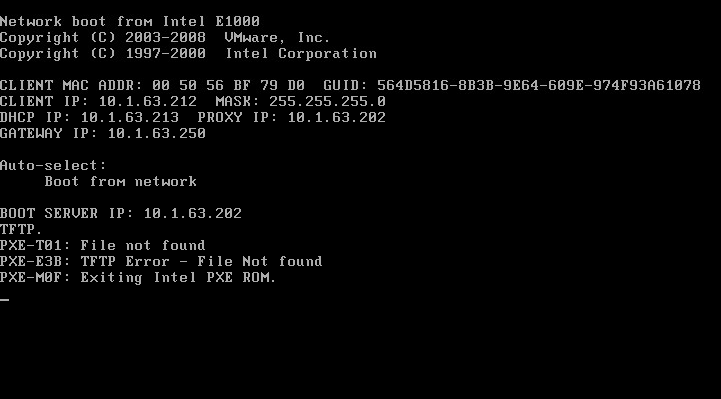
Where x.x.x.x points to the FOG IP. Note, that the IP is necessary as, otherwise, you get this error:

failboot3

and the line:

pxe-service=X86PC, "Boot from network", pxelinux

is now

pxe-service=X86PC, "Boot from network", undionly

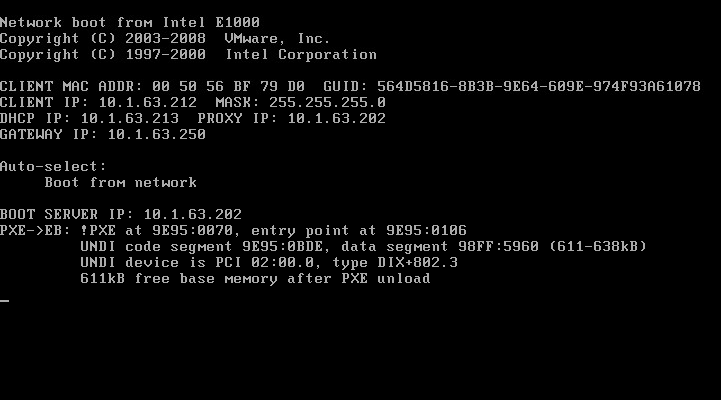
I saved, restarted and now, finally, it works!

failboot4

But why did it work on our rooms?

As I remember from before, our labs that we manage (three rooms) are served by a stack of Cisco switches where we could add next-server and bootfile. But the rest of the University uses Windows DHCP servers and they never configured options 66 and 67 for us, ever. So why were our rooms able to PXE-boot, by configuring the options 66 and 67? It seems that by having our single DHCP pool include all the details for the FOG server, this will allow it to explicitly point to the FOG server and explicitly include the file name to get. Because the tftp boot folder has been setup already in FOG, the request for the file will be directed to the folder. However, this wouldn’t normally happen across the rest of the University network as the DHCP servers don’t point to our tftp boot server at all. Even when the ip helper address is used it still didn’t work – because the proxyDHCP service wasn’t running (and therefore it wouldn’t respond to any DHCP requests). This is why dnsmasq was used – to start a DHCP service on the FOG system, but without actually giving out any IP addresses.

So if this worked originally for all of the subnets that we configured in ltsp.conf, why couldn’t we just configure it for our own labs? The IP ranges were there, yet they weren’t serving the labs where we maintain all of the configuration for. I will update this post later after looking for a possible original misconfiguration.

Next time: I will try and upload and download a FOG image, with attention to ease of use, speed and how it compares to my experiences with 0.32.

With FOG registration tested and verified to be working, its time to move onto actually testing image uploading and downloading. If that doesn’t work, its game over. For Part 5, I will deal with how to upload an image to FOG and the process that I take to do this from scratch.

Creating and uploading an image using FOG

There are several useful links that are on the FOG wiki already, which outline the main steps:

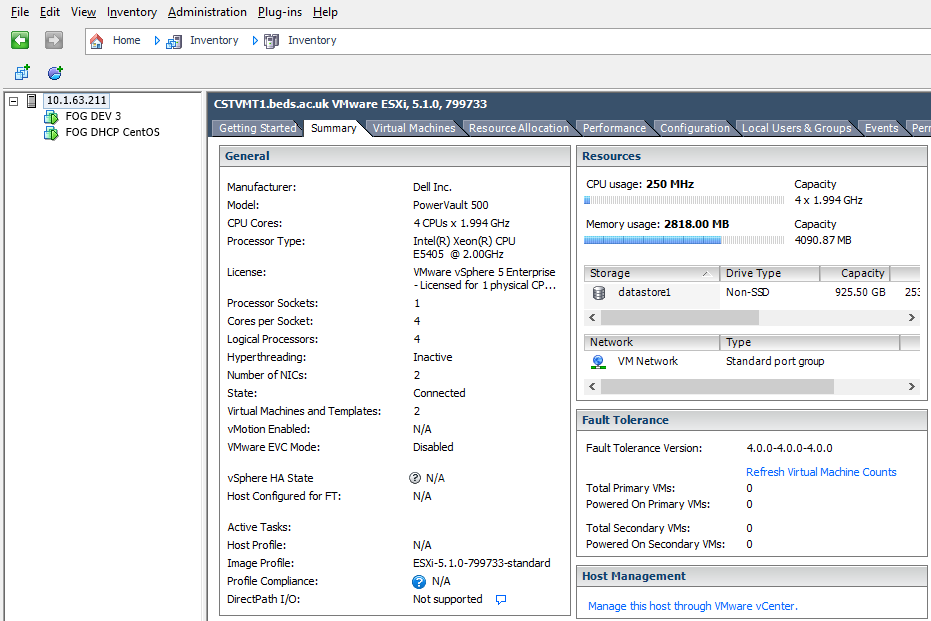
To facilitate all of this, a dedicated Dell 2950 server is running ESX 5.1 so that we can create a virtual machine to emulate our default build.

esx


Why the DHCP server?

The DHCP server runs purely to give out an address to the single virtual machine we have running. This is because within our server room, all servers are configured to have static addresses and therefore, DHCP isn’t needed.

Except that in order to boot from FOG, you need DHCP to be running (and access to a proxyDHCP service). So this server will simply deal out a single address to one client of a specific MAC address – that stops anyone else being able to get given the address accidentally and it means that now we can boot from FOG on our virtual machine.

Why use a virtual machine?

During the sysprep process, all hardware information can be stripped out using the /generalize switch, so the platform and hardware is largely irrelevant. However, the advantage to using a virtual machine is that, not only can it be accessed remotely, but it also can have its state saved in snapshots.

This makes it easy to roll back in time to an earlier version where, say, an older version of software is used and, crucially, after sysprep has been performed, the image can continue being edited later as if the sysprep process has never been even touched.

The Process

For anyone thinking of doing the same, I would suggest reading the above FOG guides as they get to the point and give you pretty much all the steps you need. But here’s how I did – and still – do it myself.

I started with a clean Windows 7 build, although at the stage where you actually enter any details, you can enter audit mode by pressing Ctrl+Shift+F3. While in audit mode, you are modifying the default profile (although the user folder is called Administrator), so everything you do gets replicated to all users.

Note that this can be an issue in some cases. For example, I found out that Opnet writes files to /Appdata/Local and explicitly saves the user as Administrator. This has to be manually changed, otherwise all subsequent profiles will try and access the Administrator user area. Similarly, if Eclipse is launched, it will save the user in preferences as Administrator, meaning that any subsequent users are unable to launch Eclipse at all. I will make a separate post about this in future…

I install most of the software we used manually because, with a 1gbps network connection, a ~70GB system installation can take somewhere from 5 – 15 minutes to download onto a host machine, depending on how the intermediary switches are behaving. The alternative way to image systems is to install nothing after this base installation and, instead, use FOG’s Snapin functionality to remotely push packages out. However, it was felt that given the speed of multicasting, it can be far more efficient to restore a saved image of a system onto all PCs at once, rather than have each one manually pull down packages that may, or may not, individually fail.

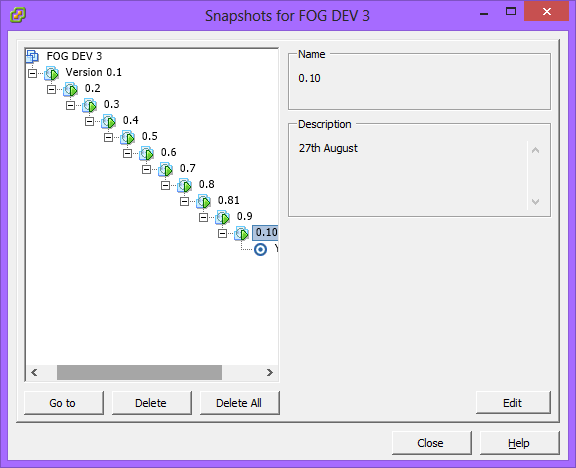
At various points, windows updates are done, software is updated and changed and restarts are made. I found an issue once with a Windows Media Player Network service, which caused the sysprep process to fail, so although doing updates to Windows on the base image is fine, I make snapshots along the way. These are crucial, actually, and are the main motivation for using a virtual machine for this process. It means we can delay Windows activation until the end and we can undo huge volumes of changes within seconds, being able to roll back to a different point in time as necessary.

snaps

Of course, alongside this, I keep a changelog and note down what I installed, uninstalled and changed at each point in time. This is really important because uninstalling one package can have affects on others, especially if they use Visual C++ redistributable packages (one application may rely on a specific, yet old, version of the redistributable, as Broadcom seem to have made happen with some of their wireless/bluetooth software).

When ready to deploy, I then take a snapshot of the system as it currently is (ideally saving the contents of what is in memory) and install the Fog service. This is a cool client-side application that allows for host naming, Active Directory registration, printing, and snapins (among other thing) to happen, with the snapins being one of the best parts of FOG. Some packages, such as Unity, can be used for free only by individuals. Unity is used at our University, but only on ~50 of the PCs we own. Therefore, we could install it everywhere, but not legally. Snapins mean we can deploy Unity remotely to only specific PCs, or run commands on those PCs.

Finally, I use Sysprep. I used to use Fogprep, which made certain registry changes as far as I can tell to prepare the system to be imaged, but FOG now seems to do this for you during the image restore process as far as I can tell. Sysprep is a Microsoft tool for preparing the system for first use; the OOBE option presents the user with a first-use screen (like when you buy a new PC) and the “generalize” option removes all hardware information from the system, so that new hardware can be detected. For this to work with all hardware types, I specified in the registry (HKEY_LOCAL_MACHINE/Software/Microsoft/Windows/Current Version) the additional folders to search for drivers that I know the system needs (usually the extracted NVIDIA drivers and each motherboard driver type). Now, when Windows is first booted after this process has been run, it will scan for drivers for attached hardware.

Sysprep also can use an “answer” file to automate most of the process. So, for the OOBE, you can skip all of the language, region and even license key steps if you have all of this included in a sort of configuration file, usually named as “unattend.xml”. Back in Windows XP, this was mostly the same, but now the tool to create this file is included in the Windows Automated Installation Kit (WAIK). However, you can manually pick this file apart and make your own if you understand a bit about XML, so you can specify a command to activate Windows through KMS, specify locale options, choose to skip the rearm process (to stop Windows reactivating; it can only be reactivated 3 times ever!) and a range of other things.

The following command does the above and will shut Windows down afterwards.

C:WindowsSystem32sysprepsysprep.exe -OOBE -generalize -unattend:unattend.xml

Note that, from this point, starting the “sealed” machine will initiate everything and set up Windows as it would be, had you gone through the whole customisation process. For this reason, I make a snapshot right before initiating Sysprep – although if you are thick provisioning for your virtual machine, snapshots can get HUGE.

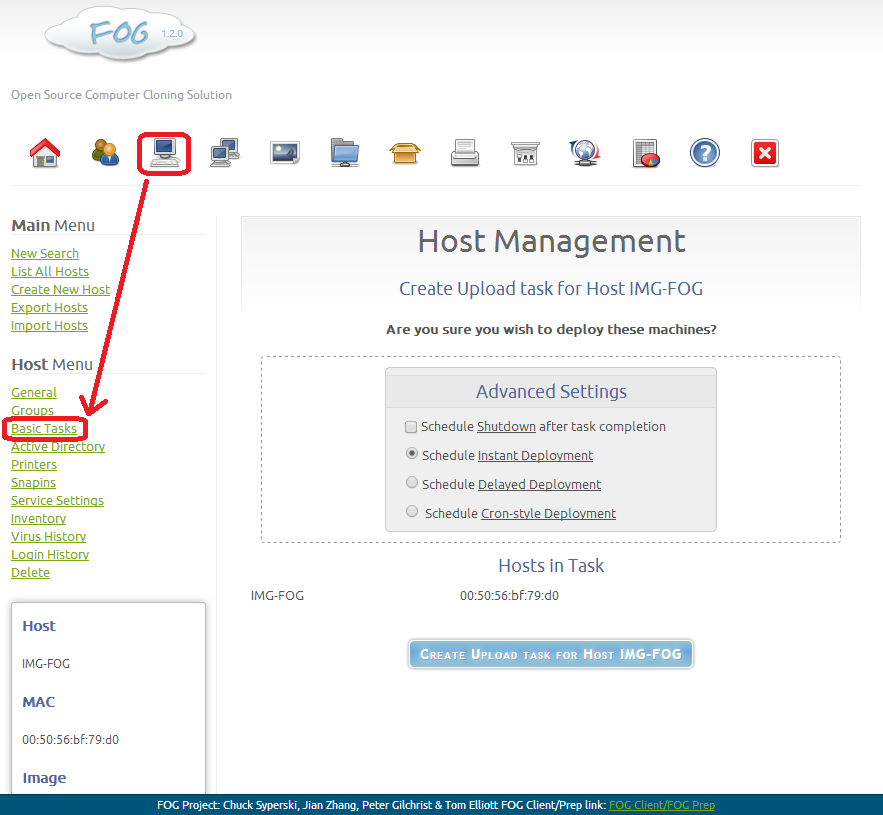
Now, to actually make the host upload its current image, the host has to be associated with an image. Whatever is selected as the associated image will replace anything that exists for that image already – so make sure you really want to overwrite what is already there! From the FOG management webpage, navigate to the host where you are uploading from under “Host management”, go to basic tasks and select “Upload”. upload


When you start this, the host – during PXE boot – will see that there is a job for it to do and it will then start uploading the contents of the drive to the FOG server. This is usually a very smooth process – so long as the virtual machine is set up to network boot (otherwise, you will just boot into Windows..).

I restarted the VM and got the following screen:

imaging

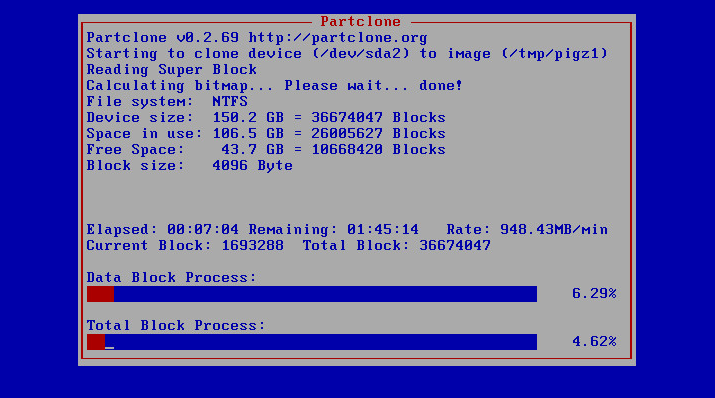
So far so good. I preferred the old look, to be honest, and the refresh rate of the information is every second, so it “feels” sluggish – but actually it shouldn’t be any different. However, initially I noticed that the speed was oddly very slow. In fact, it only climbed to about ~400MB/min – seems still really slow when you consider it should have a 1gbps link; its acting as though its only a 100mbps link! For comparison, it used to just touch 1000MB/min (and lab PCs could top 5000MB/min, which seems still slow, as I would reckon that makes each connection only use 600mbps – but accounting for switching, perhaps it is not too bad).

However, by default, the PIGZ compression rate is set to “9”, under the FOG settings. Changing it to 0 results in an upload speed that approached what I was used to seeing:

uploadFAST

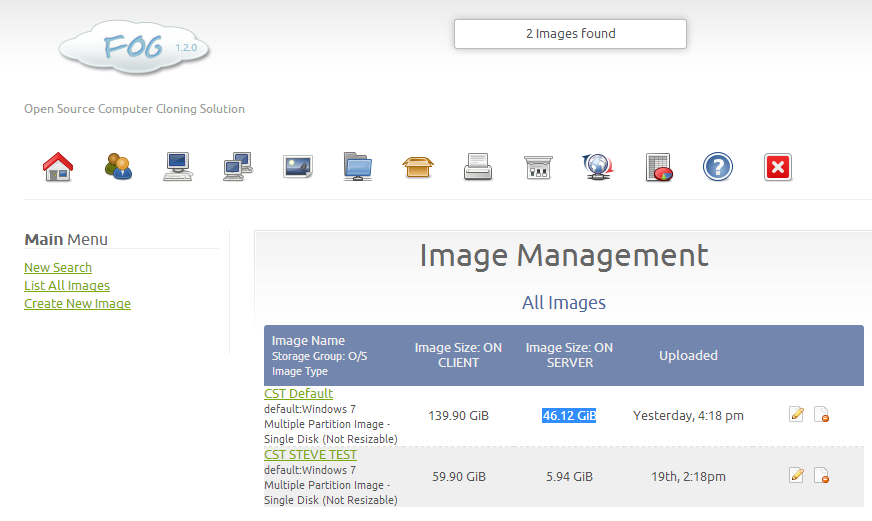
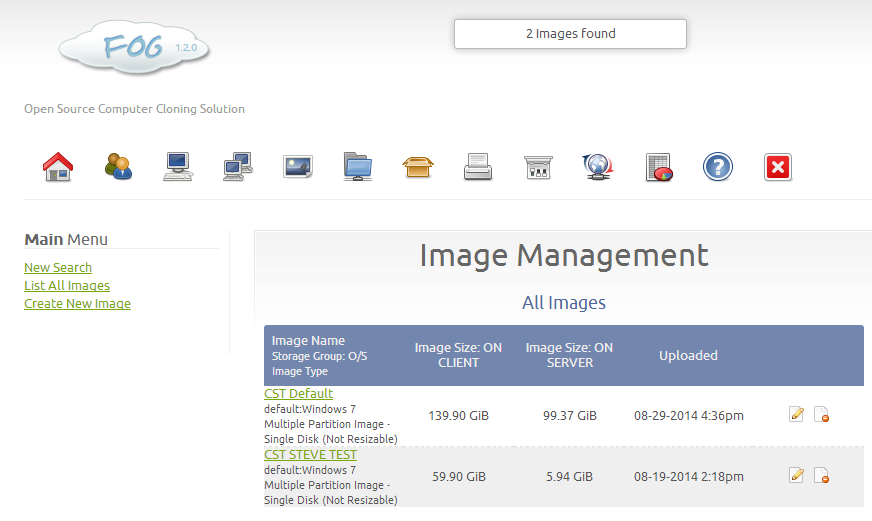
However, this comes at a cost:

imgmamangement

imgmamangement2

So the space taken up on the server by the image is around 90GB – compression that would halve the upload speed and halve the upload size. Its a tradeoff for a quick image creation – and with over 1TB storage, I am happy to use no compression for now. However, in future, it’ll have to be maximum compression when using many images. Note: I tested out downloading a compressed versus uncompressed image with no speed difference at all – so there is no gain or change in speeds when downloading to clients. I’d be interested to find out more why the speeds vary so much and never hit their potential maximum!

Anyhow, this will take a few hours to upload but once this is done, the real test will be downloading to a host and multicasting! And while we are waiting, one of the new cool things in the FOG browser is being able to see the client speed and progress (which didn’t seem to work in 0.32 for me..)

Active Directory settings in FOG 1.0+

Back in FOG Update – Part 2, I said that you could just copy and paste settings from the old FOG to the new one. Except that, as of version 1.0, the username for the account that can add machines to Active Directory should NOT contain the domain. In other words: Domain/User should now just be User.

So that was why computers were no longer being joined to a domain after imaging had finished..

Further to the previous post, everything seems to have been a success. I wiped out list of hosts from the FOG database when I installed the server from scratch and so have been going around all of our PCs re-registering them all from the FOG host registration menu, using some sort of naming convention (<department><room>-<assettag>). As they are already all on Active Directory, the FOG script to join them (which initially didn’t work, see the previous post!) to AD sets them back into their groups again.

Speeds seem to be around 2.5GB/minute – which again still seems slow, however multicasting works as it did before, which is absolutely fine. We recently had some switch upgrades to Cisco 3850s, which should make all links 1gbps now. More testing of our other labs will take place over the coming weeks. But as far as FOG is concerned, this is likely to be the last post on FOG for a while (or, at least, it should be). The issue to cover now, will be snapins.

FOG versus Desktop Management software

Currently, our base image for Windows 7 has all of our software installed. This weighs in at around 90GB and means that, once deployed, a computer has everything it needs for every possible lesson taught in our labs. Additionally, once completed, every PC will be configured the same; with ZenWorks, our University would deploy a basic copy of Windows XP and the packages for a given lab would be added and downloaded.

The problems we faced were that we wanted to be able to use Windows 7, about 10% of all PCs would fail to image and – even the ones that did image – were inconsistent in which packages they had managed to receive. The University now uses LANDesk, Windows 7 and has better infrastructure, but our department still is using our own system – FOG – and we have been quite happy with the process that we have in place.

One problem with our method is that the image is big. Its HUGE. A very basic, cut-down Windows 7 image is a fraction of the size – but this means having to deploy all the software to each machine which, really, works out as no quicker (it will likely take longer, too, as a multicast of a 90GB image is just as quick for potentially every PC in our labs as a single PC – the alternative is to transmit the same packages individually to PCs). So this was our logic behind making a single large image. But aside from the upload and download times for the image, the real issue is changes that might be made to the systems; this means adding, removing or changing software.

Zenworks had a bunch of management features and LANDesk seems to have quite a number, too. FOG, on the other hand, seems to really focus on imaging and not much more; there are some things that are useful, such as remote initiation of system reimaging, Wake On Lan, remote virus scanning, memory testing, user login recording and system inventorying – but it isn’t really a management tool to the level LANDesk is, which is something we may have to address in future. However, FOG does have a service component present on all client machines that checks in with the FOG server every so often to check if it has any tasks active. This FOG client service has modules that will do things such as hostname changing and active domain registration, logging on and logging off, printer management and so on. This is expandable by simply adding our own modules that can be written in C# (so we could replicate lots of managment functionality if we could write it, for example).

However, the one really cool thing that I hadn’t really explored until now is the ability to deploy packages through “snapins”. Properly managed, snapins can accomplish a few things that we need to be able to do; remote deployment, removal and uninstallation of software installations on multiple PCs and being able to run commands remotely on systems. This means that we can now update software without having to redeploy an image or manually manage those workstations by hand (although the same changes we may make would still be replicated to the base image for updating future PCs).

Snapins with FOG

The first thing to note is, actually, I have used snapins before. However, they were just command-line .bat files which would essentially remotely initiate installers that were locally stored on PCs. One example is a Sophos package we have, which once installs, attempts to update itself. It should then restart a PC, but there needs to be a timer added. This batch file worked quite well. However, I couldn’t work out how to run an executable .MSI or .EXE by uploading it. This is where I then found this guide, which walks through how to make an snapin from start to finish using 7-ZIP SFX maker.

Essentially, however, the simplest explanation is (for SFX 3.3):

  • Have every file you want in a 7zip file archive (including your batch script or cmd file or whatever)
  • Open SFX maker (Probably stashed under Program Files (x86) folder) and drag and drop your .7z file onto the big empty space. Check the following:
    • Dialogs->General->Tick “Extract to temporary folder”
    • Dialogs->General->Tick “Delete SFX file after extraction”
    • Dialogs->ExtractPath->Untick “Allow user to change path”
  • Navigate to the “Tasks” tab, click the big plus sign, click “Run Program” and just add the file name of your batch script or cmd file at the end of whatever is in the %%T box (eg myfile.bat)
  • Click “Make SFX”

The file will be output the same directory as the .7z file. To add the new snapin, under FOG management, click the box at the top.

snapin1

However, one important thing to note before uploading the snapin is that, by default, the snapin file size limit is 8MB, as above. Editing /etc/php5/apache2/php.ini, I changed the following values to be:

memory_limit = 2000M (2GB memory usage limit for snapins)
post_max_size = 8000M 
upload_max_filesize = 8000M (8GB upload maximum!)

snapin2

This should give us no problems with any of the packages that are bigger than 8MB. Afterwards, the web server needs to be restarted with “sudo /etc/init.d/apache2 restart” (and make sure its M in the PHP file – don’t write MB, otherwise the php file gets upset!).

After uploading the snapin to FOG, you can assign it just like an image; either to an individual host or to multiple hosts through groups. Within a host, you can actually now remove snapins much easier. You can also choose to deploy a single snapin to a host immediately or all snapins; generally, I would assign snapins to a group (such as a room where only one piece of software is licensed for) and any hosts in that would receive this software when the image is initially deployed, with the snapins then automatically deployed post-image. However, in the case of the example used here, Questionmark is a piece of software that we have, relatively late-on, been tasked with installing for another department in the University. Automation of certain uninstallations and updates should also be possible this way too – hopefully in a future update, I’ll be able to talk about making custom modules for FOG or any ways in which snapins are tweaked and deployed further.

But so far, FOG 1.2 seems to be running absolutely fine!

Recovering a deleted fog user – or – resetting a user’s password

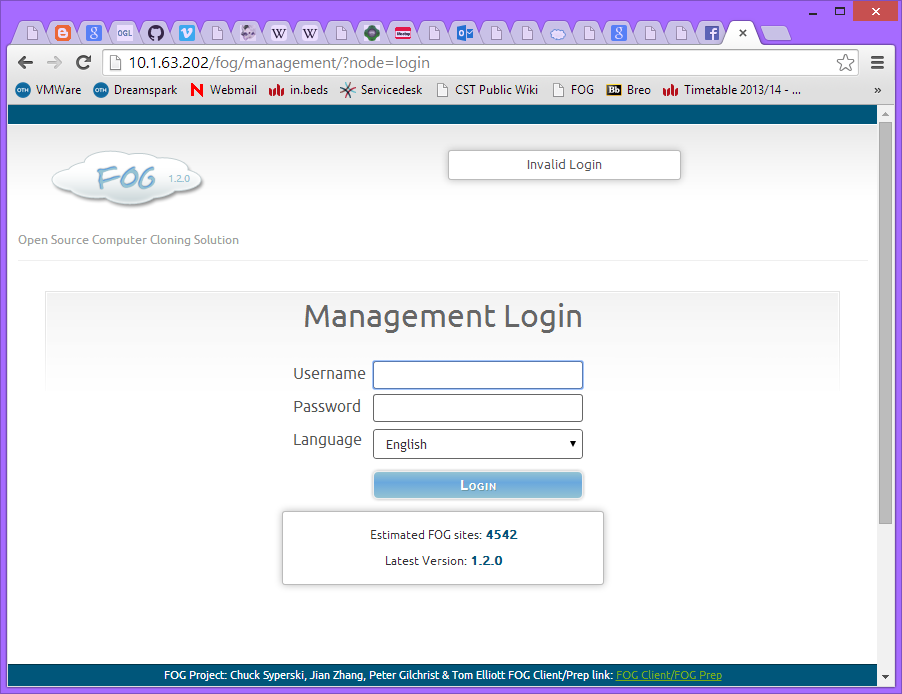
Today is off to a frustrating start. I couldn’t log into the web UI anymore – it kept telling me I had an invalid password. I rembered a while ago that I had a problem with my username – it turns out that this was because I had deleted it when trying to rename it; however, here I had simply changed the password from the default (which is ‘password’!).

I logged into the database and decided to check it out for myself to see what was going on. To do this, I just typed:

sudo mysql -u root -p fog

That prompts me for my password and opens up the “fog” database. You can then see all the tables using just SQL statements like SHOW tables; but make sure you add a semi colon afterwards (and not just because, here, it makes grammatical sense to).

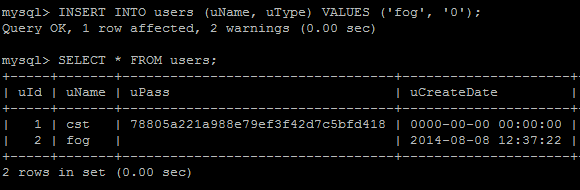
Anyhow, if I do a SELECT * from users; statement, it should show up all my users – and there should be two; one for quick imaging and one for my fog user.

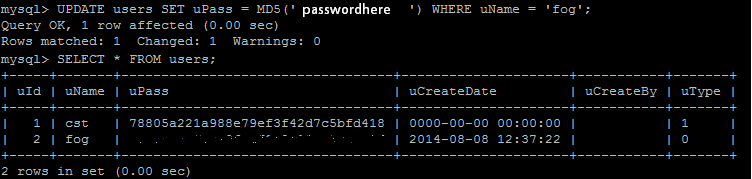
sql1

…and there isn’t. WHAT’S WRONG WITH YOU, FOG? I think I said that out loud, too. Ok, no big deal – we can just add another one. Because I can’t be bothered to type out too much, and beause the uId gets added automatically, I just want to insert a new user with the name “fog” and, to make sure it is a proper user that can do everything, I set the type to 0 (1 = the inability to do anything except for performing quick image tasks).

sql2

Ok, so the user is back now – all I have to then do is update that user by setting the password to whatever I want (in single ‘quotes’) and encrypt it with MD5.

sql3

And it works! I can log in again finally. Hopefully it won’t keep doing this – if so, I’ll write and rant more about it and see if I can figure out why!

Looking to install FOG 1.2.0 from scratch? Check out my more updated post.

Yesterday was mostly spent backing up the original FOG installation just in case this all goes horribly wrong (we do actually need to use this server, after all). This was taking absolutely forever, so I gave up and only backed up the server minus the images that I made over the last year or so (except the default one we are currently using). Plus, I wanted to actually get on and install this thing this week! I headed over to pendrivelinux.com and downloaded a cool piece of software that allowed me to install Linux to a USB stick to boot from. Absolutely fine, except the Dell PowerEdge 2950 server I was using doesn’t seem to do absolutely anything when I put the pendrive in. It just refuses to boot from it and, even after messing with the partition table, it eventually gave up and said invalid operating system.Plan B today, therefore, was to put in a CD (from an external CD drive). This worked fine and after a few reinstalls (the first time I messed up the RAID configuration and the second time I forgot to add a user or set a password for root), everything else has so far gone fine. It is a very barebone linux system – the only two things I did was to upgrade/update the system and packages and to install ssh for remote access from my office (its a lovely cold room, but I can’t spent all day up there. Well, on a hot day, I very well could..).

The next phase is to install FOG using this guide [edit: you may want to use this guide instead]. It seems to be one of the most unbelievably straight-forward processes – although the network has already been setup for our FOG server already. Except that, now, it seems that the original pxelinux.0 has now become undionly.kpxe. pxelinux.0 was the bootfile that is specified in some DHCP environments’ option 67 setting. The three switches that I set up to support our networking labs have this set, meaning now I will probably have to change it at some point. I’ll writeup about that next time, or perhaps it will just work. The FOG community will know, either way (and for anyone who is thinking of using FOG, it has a very active and helpful forum). Finally, after all of the LAMP stuff had been set up, I was told to go to the web management page. Luckily, as the IP and hostname are all the same still, I just had to open my browser and navigate to my FOG page tab.

newfog

New FOG! Yay!

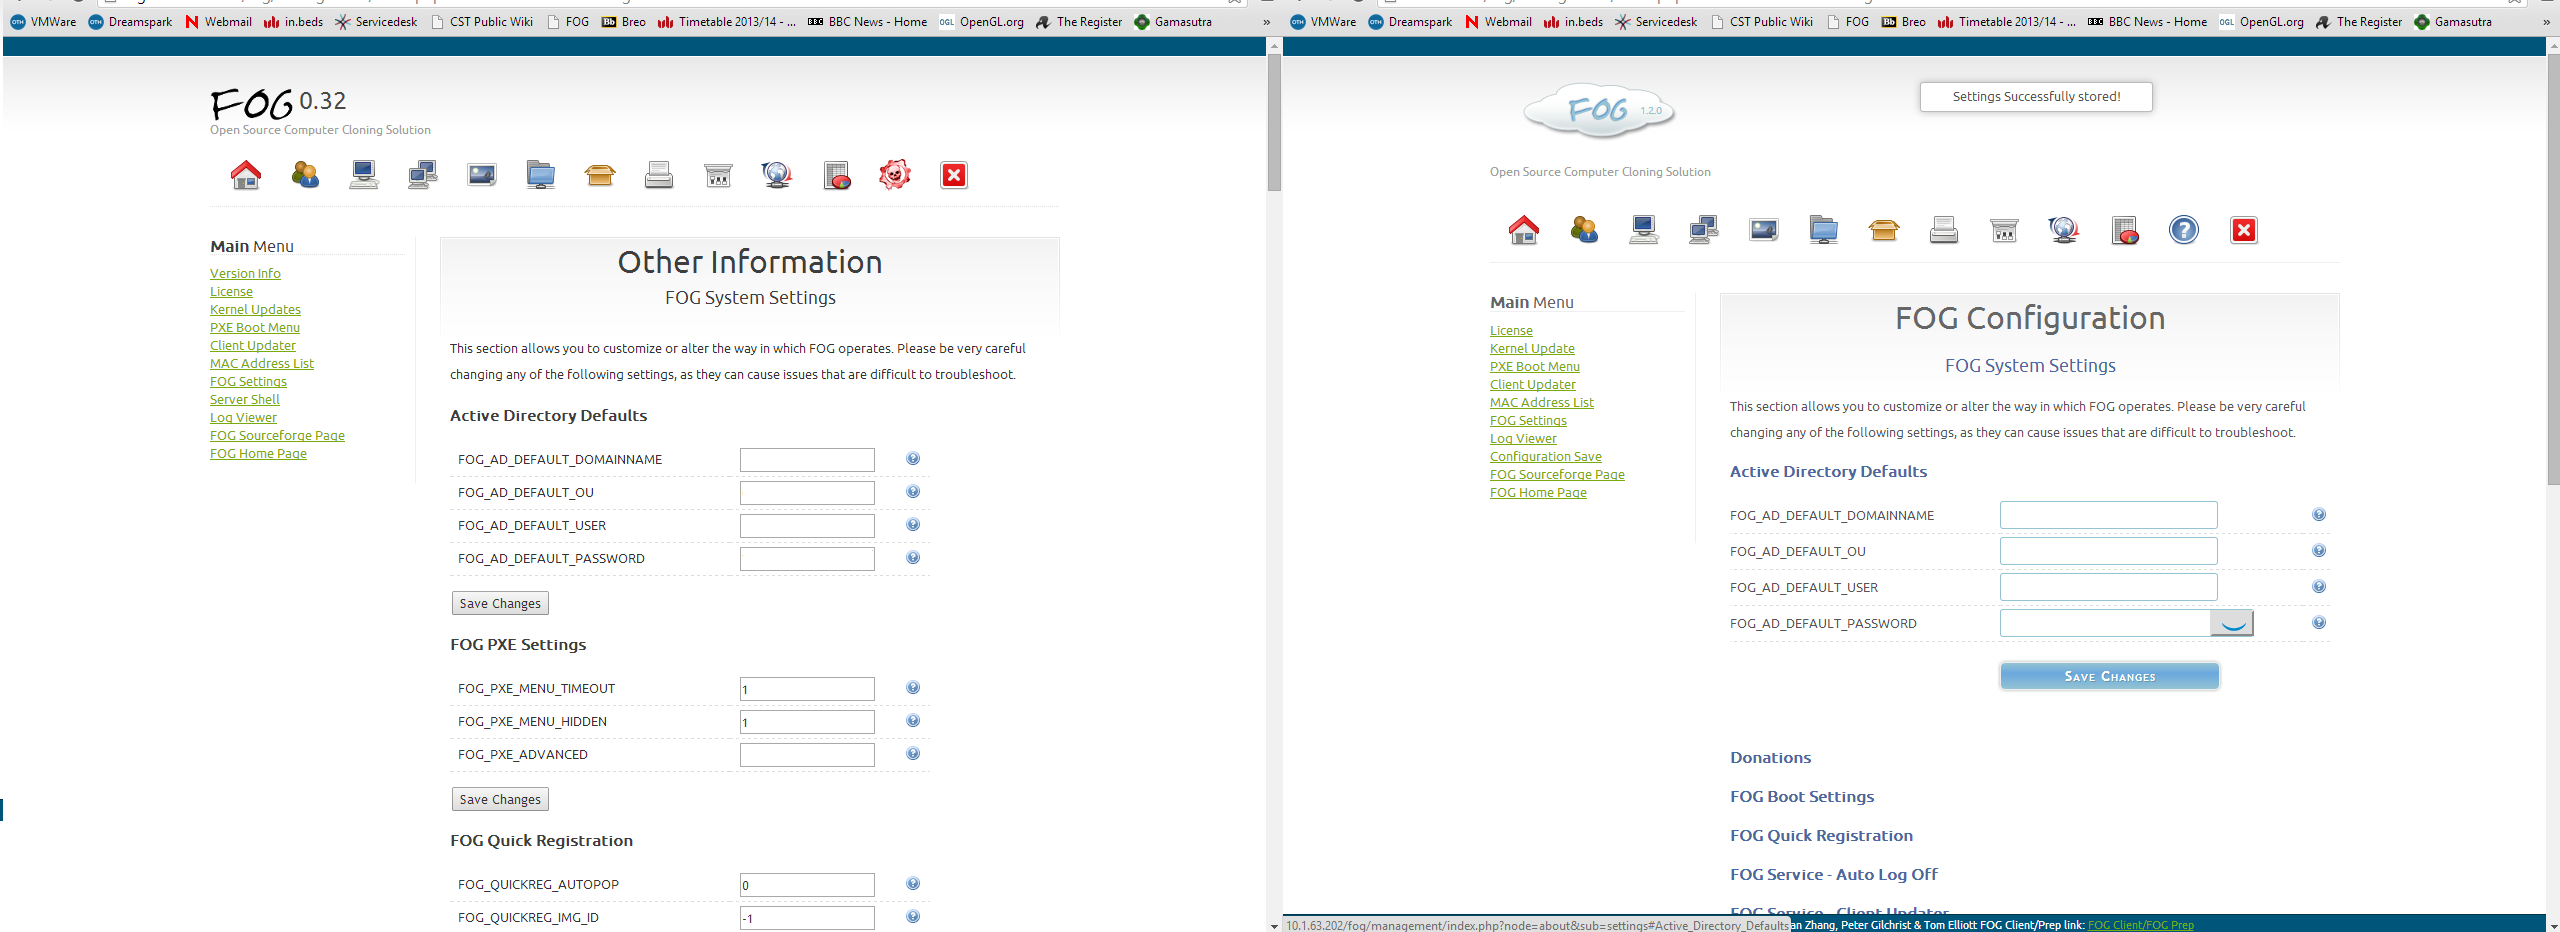
So first impressions are that this is great – actually installing a server from scratch and putting FOG onto it took perhaps a couple of hours tops (including burning a CD and downloading Ubuntu 14). It looks very much like 0.32 looked, so I know where everything is.

newfog2

I still had a tab open from earlier today, when the server was still running. Useful, as I can just copy-paste all of the settings from one tab to the other 

Configuration from now on can be done through the browser for the most part. The settings look pretty much the same as 0.32 looked – although, sneaked in, is the option to donate CPU time to mine cryptocurrency for FOG donations. Kind of inefficient to be honest – the power and heat consumption will cost far more than you would save by donating probably half as much in cash, with Bitcoin’s current difficulty rate. But its a nice idea; especially as, at the time of writing, there are supposedly ~4500 FOG servers – and each one could have many hundred hosts all performing mining tasks.

Configuration aside, there is just one problem now – the FOG database. Everything is gone – all registered hosts and groups. To be honest, this isn’t really too big an issue as I think it is probably time to go around and inventory our computers again. There are several computers that have been moved, changed or that we don’t use anymore – plus it gives us a chance to check out every computer manually and verify that network/video/keyboard connectivity works.

So that was quite easy – so far – the next step is to test out what happens with network booting (and IT services are the ones that are in control of the majority of the network infrastructure here and therefore are the ones who set the DHCP options). Stay tuned! (like anyone is reading at this point!)

Edit 12/09 – You can also go ahead and delete /var/www/html/index.html which will then cause index.php to be loaded, thus redirecting you automatically to the fog/management page. 


Network cable management and mapping switch ports


Keeping a track of computers that are all connected to a network can be a hassle, without desktop management software. Even with it, you can’t necessarily tell exactly which physical computer is connected to a given switch port. Eventually, you will come back to a switch closet, but this doesn’t necessarily help the situation at all; especially when you encounter a stack of Cisco 3750s, spewing yellow ropes of technological vomit off in all kinds of directions. So the best things you (we) can determine are a wall socket (if it is labelled) and maybe a MAC address too, if you log in.

But this is all a heap of work that just shouldn’t have to be done at all and really frustrates, further, any problems that you’re trying to troubleshoot. So, I decided to come up with a plan. This is quite a long post, but it gives background to what motivated me to do this in the first place!

Standard problems:

In lots of situations, you’ll know what the cause of a network problem is. In some cases, we notice connection issues across the board and it is likely that the problem is already known by the IT services department. Specific PCs with issues can often come down to the issues below:

  • DHCP scope has been exhausted, so no more IP addresses can be given out
  • Port is disconnected (no signal)
  • Port is shutdown (electrical connection is present but no traffic goes over the wire)
  • VLAN mismatch (subnets of specific PCs will be assigned differently than that designated to the rest of a given room)

(This is just going to go and assume that a PC has been physically checked that it is connected to the right network interface (each interface has a different MAC address which can affect FOG host registration settings and port security settings on a switch) and is connected through the correct wall port that was assigned to that PC (or to a port that we know is – or should be – assigned to a specific network)).

In the case of a DHCP scope issue, the problem can be partly determined by the PXE boot message popups, for example it may display a message that it is receiving proxyDHCP offers but not DHCP offers. If a port is disconnected, this can be determined through a network cable tester. A shutdown can be determined in a similar fashion (electrical signal present but no traffic received) but in all these cases, the only information that can be provided to IT services, that would be of any use, are a patch panel port number and a system MAC address. However, these won’t necessarily help in determining the right location of the switch in a building that has possibly 100 or more switches around.

The case could even be that a PC may work fine and even connect to the internet with no problem – but then if a room of 30 PCs were to receive multicast traffic on a system and, say, two or three are on a different subnet, multicast issues will present themselves and PCs may stop imaging before others have finished. In fact, it is only if someone knows the symptoms and has had experience with the last issue – VLAN mismatches – that you can really identify that as the cause of the issue.

Working with others

Now, in this environment, all PCs are allocated an IP address in specific subnets that corresponds to a respective VLAN, which in turn corresponds to a room (usually). VLAN configuration is implemented by switches. If we want to check some of this information to see what has been – perhaps incorrectly – configured, then we need to be able to access the switch configuration. As these switches are (almost all) operated by the IT services people, our team cannot see this configuration. Even if we were given the configuration, it would eventually become outdated, especially as things can be disconnected and reconnected by other people.

So we could be simply stuck at only being able to provide patch panel numbers (the wall sockets that a PC is connected to), a room number that the PC is in, a MAC address of the PC and an IP address. With the MAC address, IT services could possibly find out where a PC is connected to if a MAC address is provided, but this information is not readily available unless we provide it – and this is assuming it will be accurate and never change. Plus this presents another issue; if the configurations are stored on switches, how can any of the information we provide correlate to what is stored on a switch? The answer is it can’t – unless someone can trace a computer back to a switch port or someone can produce a mapping of this information and stores it elsewhere.

What has been tried

In our networking environment, all computers are connected to switches. Most importantly, this means that, regardless of all cables and panels, there is a direct link between a switch port and a PC. These switch ports are where VLANs are assigned to and where any port security will be set on. Therefore, being able to identify what is connected to all switchports is highly valuable – arguably to both IT services and our own technical team.

When there is an issue with a port or a PC, somebody has to trace that port back. If a port is broken, someone has to go to where the switch is physically located and trace back the cable from the switch-end of a patch panel to the switchport. As mentioned at the beginning, this is a nightmare approach, but it still has to be done.

However, this method is just too labourious for my liking. So the next thing to try is to use something called a fluke tester. These devices, which I think cost way too much money (even second hand they appear to be going for around £1000 – £1500 at the time of writing) for what we would be using them for, can be plugged into a wall socket and tell you all sorts of information about what is on the other side. Crucially for us, they tell us the switchport number and the switch IP address. This is actually brilliant and – whilst this method also requires manual work – is far more accurate. In conjunction with collating a list of wall ports, it can be used to accurately map out switch port to patch panel mapping.

This actually worked very effectively and, by late 2013, I had finished making a chart of many of our labs and detailed this on our internal wiki site.

wikitab

The idea was for part of it to be updated and maintained by our IT services and part of it by our department; we would make sure that PCs were in the correct position according to our own records for lab checks and that they were plugged into a corresponding wall socket. But this requires extensive user input and, predictably, will be prone to user errors. It was also pointed out to me at the time, when I borrowed the Fluke tester, that this collation of patch panel/switch port IDs had already been done by some interns and was now almost certainly already outdated. Nevertheless, I finished the mapping and maintained our side of things as changes were made.

And then changes were made that completely invalidated the entire chart.

Over the summer period in 2014, we had a network upgrade that saw the replacement of over 100 switches around the campus. Whilst no word to this effect had been made, it seems as though the switch configurations were probably from over a year ago – before any requested changes to the configuration had ever been made. With absolutely no communication about the upgrade or what might have happened, this presented a huge issue when upgrading our imaging system as it was slowly realised that there were a lot of small – with minimal overall impact – issues with the network configuration.

A new solution

It is clear by now that something more than just checking each PC individually needs to be done. This method is still viable for single sytems that might have the odd issue here or there, but to ensure 100% accuracy across all our systems there needs to be a different approach.

Wireshark provides a really cool piece of functionality that could help. Actually, this was what I have been using for about a year since I realised that it can be used to filter out LLDP and CDP packets after I noticed that the Fluke tester would pick up its information through these two types of packet (LLDP packets are broadcast every 30 seconds and CDP packets every minute across our network). The structure of these packets is very different (CDP uses an Ethernet frame and LLDP uses an Ethernet II frame) but both contain VLAN information, Switch information (for example IP, platform, version) and.. the switchport ID. This is accurate, it can be run on all PCs and we can get more information (VLAN ID, for example) than the Fluke tester would give us (I think it must be able to pull VLAN information out but I didn’t work out how to when I had a go with the one we used for a couple of weeks).

It is progress, but it was still intensive to do it this way, even with 4 or 5 people helping to go around a room. So can this be scripted?

If you strip out the GUI and just look at what Wireshark does, its functionally very similar to the Linux tool tcpdump which has a Windows port, WinDump (Actually, it is built using the same fundamental protocol – WinPCap, which itself is a port of libpcap). So in late 2014, I went about seeing what I could do to script WinDump and found through some quick googling that I could capture an LLDP packet or a CDP packet and then stop the capture after outputting the results of this one packet to a text file. This is great, although the formatting of the file isn’t particularly useful and would require some additional post-processing.

Windump curiously hasn’t implemented a nice formatting for LLDP packets and I would like to be able to utilise either CDP or LLDP outputs in a nice way – or really any network protocol. The only consistent way to output data is in the form of hexadecimal values. Both CDP or LLDP packets should output in the same format if the hex option is specified, but then what? There is still the issue to do with efficiency of data collection and obtaining the meaningful information – you still have to have somebody actually collect these results. The logical thing to do is to perhaps extend such a script to upload the output to a central server, but then I would have to process all of these text files and pick the useful information out.

So why not just do that processing on the PC before sending it? This is possible with a script, which could perhaps dissect an output text file – but with developing complexity, I decided that it could be a good idea to – instead – make a bespoke application that would actually grab all of this of data and upload only the useful parts that I want. Furthermore; rather than uploading a file, it would make sense to upload a record to a database that can store all of these results, foregoing any human interaction and even without needing WinDump at and only capture the relevant data we want in the first place.

So my work on this project, when time permits, has been to write a C (or C++) command-line application that utilises libpcap/winpcap – just as Win/TCPDump or Wireshark does – to capture either a CDP or LLDP packet and upload a string of text from that containing the switchport, vlan, hostname and IP address to a central database. So far it works quite well and hopefully will be releasing it for people to test out before making the source code freely available. I hope people can contribute to and help improve it and make it a genuinely useful tool for sysadmins across multiple platforms.

Edit: It could be suggested that I find out about connected hosts from the switches themselves or by using SNMP. The thing with various “switchport mappers” out there, however, is that they mostly seem to rely on using SNMP only. If you query a device that runs SNMP, you don’t necessarily get any more information than you would if you were to just look at that device yourself (for example, you can see all of a Cisco switch’s interface details to see host mac addresses; this is all you would receive back if you interrogated it with SNMP anyway).

What this program does, however, is a bit different. Whereas SNMP will give you a network map from the switch-side, this application will generate more detailed host information from the client-side. Switches won’t know a host’s IP address in all likelihood and certainly not hostname or any other information that you might want. Although you can find most of this out with other applications, this program will combine its own information with that given to it by a switch.

Of course, having the SNMP-derived information about a switch actually is not un-useful; this way, you can see every device that is connected to a switch, whereas what I have developed will only show you the information about hosts that you have run this application on (or that you can have remote access to, or have imaged with it already on and scheduled). It is quite possible in an environment such as the one that I work in that you can have other devices that you don’t have access to (AV and Wifi access points for example) and so you can’t make assumptions about free space on switches. So for the future, perhaps some SNMP integration with this application would make it a step beyond what most switchport mappers would normally provide (without being overly complicated). I guess this could help direct what the name should be, a bit more..

Network cable management and mapping switch ports


Keeping a track of computers that are all connected to a network can be a hassle, without desktop management software. Even with it, you can’t necessarily tell exactly which physical computer is connected to a given switch port. Eventually, you will come back to a switch closet, but this doesn’t necessarily help the situation at all; especially when you encounter a stack of Cisco 3750s, spewing yellow ropes of technological vomit off in all kinds of directions. So the best things you (we) can determine are a wall socket (if it is labelled) and maybe a MAC address too, if you log in.

But this is all a heap of work that just shouldn’t have to be done at all and really frustrates, further, any problems that you’re trying to troubleshoot. So, I decided to come up with a plan. This is quite a long post, but it gives background to what motivated me to do this in the first place!

Standard problems:

In lots of situations, you’ll know what the cause of a network problem is. In some cases, we notice connection issues across the board and it is likely that the problem is already known by the IT services department. Specific PCs with issues can often come down to the issues below:

  • DHCP scope has been exhausted, so no more IP addresses can be given out
  • Port is disconnected (no signal)
  • Port is shutdown (electrical connection is present but no traffic goes over the wire)
  • VLAN mismatch (subnets of specific PCs will be assigned differently than that designated to the rest of a given room)

(This is just going to go and assume that a PC has been physically checked that it is connected to the right network interface (each interface has a different MAC address which can affect FOG host registration settings and port security settings on a switch) and is connected through the correct wall port that was assigned to that PC (or to a port that we know is – or should be – assigned to a specific network)).

In the case of a DHCP scope issue, the problem can be partly determined by the PXE boot message popups, for example it may display a message that it is receiving proxyDHCP offers but not DHCP offers. If a port is disconnected, this can be determined through a network cable tester. A shutdown can be determined in a similar fashion (electrical signal present but no traffic received) but in all these cases, the only information that can be provided to IT services, that would be of any use, are a patch panel port number and a system MAC address. However, these won’t necessarily help in determining the right location of the switch in a building that has possibly 100 or more switches around.

The case could even be that a PC may work fine and even connect to the internet with no problem – but then if a room of 30 PCs were to receive multicast traffic on a system and, say, two or three are on a different subnet, multicast issues will present themselves and PCs may stop imaging before others have finished. In fact, it is only if someone knows the symptoms and has had experience with the last issue – VLAN mismatches – that you can really identify that as the cause of the issue.

Working with others

Now, in this environment, all PCs are allocated an IP address in specific subnets that corresponds to a respective VLAN, which in turn corresponds to a room (usually). VLAN configuration is implemented by switches. If we want to check some of this information to see what has been – perhaps incorrectly – configured, then we need to be able to access the switch configuration. As these switches are (almost all) operated by the IT services people, our team cannot see this configuration. Even if we were given the configuration, it would eventually become outdated, especially as things can be disconnected and reconnected by other people.

So we could be simply stuck at only being able to provide patch panel numbers (the wall sockets that a PC is connected to), a room number that the PC is in, a MAC address of the PC and an IP address. With the MAC address, IT services could possibly find out where a PC is connected to if a MAC address is provided, but this information is not readily available unless we provide it – and this is assuming it will be accurate and never change. Plus this presents another issue; if the configurations are stored on switches, how can any of the information we provide correlate to what is stored on a switch? The answer is it can’t – unless someone can trace a computer back to a switch port or someone can produce a mapping of this information and stores it elsewhere.

What has been tried

In our networking environment, all computers are connected to switches. Most importantly, this means that, regardless of all cables and panels, there is a direct link between a switch port and a PC. These switch ports are where VLANs are assigned to and where any port security will be set on. Therefore, being able to identify what is connected to all switchports is highly valuable – arguably to both IT services and our own technical team.

When there is an issue with a port or a PC, somebody has to trace that port back. If a port is broken, someone has to go to where the switch is physically located and trace back the cable from the switch-end of a patch panel to the switchport. As mentioned at the beginning, this is a nightmare approach, but it still has to be done.

However, this method is just too labourious for my liking. So the next thing to try is to use something called a fluke tester. These devices, which I think cost way too much money (even second hand they appear to be going for around £1000 – £1500 at the time of writing) for what we would be using them for, can be plugged into a wall socket and tell you all sorts of information about what is on the other side. Crucially for us, they tell us the switchport number and the switch IP address. This is actually brilliant and – whilst this method also requires manual work – is far more accurate. In conjunction with collating a list of wall ports, it can be used to accurately map out switch port to patch panel mapping.

This actually worked very effectively and, by late 2013, I had finished making a chart of many of our labs and detailed this on our internal wiki site.

wikitab

The idea was for part of it to be updated and maintained by our IT services and part of it by our department; we would make sure that PCs were in the correct position according to our own records for lab checks and that they were plugged into a corresponding wall socket. But this requires extensive user input and, predictably, will be prone to user errors. It was also pointed out to me at the time, when I borrowed the Fluke tester, that this collation of patch panel/switch port IDs had already been done by some interns and was now almost certainly already outdated. Nevertheless, I finished the mapping and maintained our side of things as changes were made.

And then changes were made that completely invalidated the entire chart.

Over the summer period in 2014, we had a network upgrade that saw the replacement of over 100 switches around the campus. Whilst no word to this effect had been made, it seems as though the switch configurations were probably from over a year ago – before any requested changes to the configuration had ever been made. With absolutely no communication about the upgrade or what might have happened, this presented a huge issue when upgrading our imaging system as it was slowly realised that there were a lot of small – with minimal overall impact – issues with the network configuration.

A new solution

It is clear by now that something more than just checking each PC individually needs to be done. This method is still viable for single sytems that might have the odd issue here or there, but to ensure 100% accuracy across all our systems there needs to be a different approach.

Wireshark provides a really cool piece of functionality that could help. Actually, this was what I have been using for about a year since I realised that it can be used to filter out LLDP and CDP packets after I noticed that the Fluke tester would pick up its information through these two types of packet (LLDP packets are broadcast every 30 seconds and CDP packets every minute across our network). The structure of these packets is very different (CDP uses an Ethernet frame and LLDP uses an Ethernet II frame) but both contain VLAN information, Switch information (for example IP, platform, version) and.. the switchport ID. This is accurate, it can be run on all PCs and we can get more information (VLAN ID, for example) than the Fluke tester would give us (I think it must be able to pull VLAN information out but I didn’t work out how to when I had a go with the one we used for a couple of weeks).

It is progress, but it was still intensive to do it this way, even with 4 or 5 people helping to go around a room. So can this be scripted?

If you strip out the GUI and just look at what Wireshark does, its functionally very similar to the Linux tool tcpdump which has a Windows port, WinDump (Actually, it is built using the same fundamental protocol – WinPCap, which itself is a port of libpcap). So in late 2014, I went about seeing what I could do to script WinDump and found through some quick googling that I could capture an LLDP packet or a CDP packet and then stop the capture after outputting the results of this one packet to a text file. This is great, although the formatting of the file isn’t particularly useful and would require some additional post-processing.

Windump curiously hasn’t implemented a nice formatting for LLDP packets and I would like to be able to utilise either CDP or LLDP outputs in a nice way – or really any network protocol. The only consistent way to output data is in the form of hexadecimal values. Both CDP or LLDP packets should output in the same format if the hex option is specified, but then what? There is still the issue to do with efficiency of data collection and obtaining the meaningful information – you still have to have somebody actually collect these results. The logical thing to do is to perhaps extend such a script to upload the output to a central server, but then I would have to process all of these text files and pick the useful information out.

So why not just do that processing on the PC before sending it? This is possible with a script, which could perhaps dissect an output text file – but with developing complexity, I decided that it could be a good idea to – instead – make a bespoke application that would actually grab all of this of data and upload only the useful parts that I want. Furthermore; rather than uploading a file, it would make sense to upload a record to a database that can store all of these results, foregoing any human interaction and even without needing WinDump at and only capture the relevant data we want in the first place.

So my work on this project, when time permits, has been to write a C (or C++) command-line application that utilises libpcap/winpcap – just as Win/TCPDump or Wireshark does – to capture either a CDP or LLDP packet and upload a string of text from that containing the switchport, vlan, hostname and IP address to a central database. So far it works quite well and hopefully will be releasing it for people to test out before making the source code freely available. I hope people can contribute to and help improve it and make it a genuinely useful tool for sysadmins across multiple platforms.

Edit: It could be suggested that I find out about connected hosts from the switches themselves or by using SNMP. The thing with various “switchport mappers” out there, however, is that they mostly seem to rely on using SNMP only. If you query a device that runs SNMP, you don’t necessarily get any more information than you would if you were to just look at that device yourself (for example, you can see all of a Cisco switch’s interface details to see host mac addresses; this is all you would receive back if you interrogated it with SNMP anyway).

What this program does, however, is a bit different. Whereas SNMP will give you a network map from the switch-side, this application will generate more detailed host information from the client-side. Switches won’t know a host’s IP address in all likelihood and certainly not hostname or any other information that you might want. Although you can find most of this out with other applications, this program will combine its own information with that given to it by a switch.

Of course, having the SNMP-derived information about a switch actually is not un-useful; this way, you can see every device that is connected to a switch, whereas what I have developed will only show you the information about hosts that you have run this application on (or that you can have remote access to, or have imaged with it already on and scheduled). It is quite possible in an environment such as the one that I work in that you can have other devices that you don’t have access to (AV and Wifi access points for example) and so you can’t make assumptions about free space on switches. So for the future, perhaps some SNMP integration with this application would make it a step beyond what most switchport mappers would normally provide (without being overly complicated). I guess this could help direct what the name should be, a bit more..