⭐ If you would like to buy me a coffee, well thank you very much that is mega kind! : https://www.buymeacoffee.com/honeyvig Hire a web Developer and Designer to upgrade and boost your online presence with cutting edge Technologies
Showing posts with label smpf. Show all posts

Thursday, December 8, 2022

Network cable management and mapping switch ports


Keeping a track of computers that are all connected to a network can be a hassle, without desktop management software. Even with it, you can’t necessarily tell exactly which physical computer is connected to a given switch port. Eventually, you will come back to a switch closet, but this doesn’t necessarily help the situation at all; especially when you encounter a stack of Cisco 3750s, spewing yellow ropes of technological vomit off in all kinds of directions. So the best things you (we) can determine are a wall socket (if it is labelled) and maybe a MAC address too, if you log in.

But this is all a heap of work that just shouldn’t have to be done at all and really frustrates, further, any problems that you’re trying to troubleshoot. So, I decided to come up with a plan. This is quite a long post, but it gives background to what motivated me to do this in the first place!

Standard problems:

In lots of situations, you’ll know what the cause of a network problem is. In some cases, we notice connection issues across the board and it is likely that the problem is already known by the IT services department. Specific PCs with issues can often come down to the issues below:

  • DHCP scope has been exhausted, so no more IP addresses can be given out
  • Port is disconnected (no signal)
  • Port is shutdown (electrical connection is present but no traffic goes over the wire)
  • VLAN mismatch (subnets of specific PCs will be assigned differently than that designated to the rest of a given room)

(This is just going to go and assume that a PC has been physically checked that it is connected to the right network interface (each interface has a different MAC address which can affect FOG host registration settings and port security settings on a switch) and is connected through the correct wall port that was assigned to that PC (or to a port that we know is – or should be – assigned to a specific network)).

In the case of a DHCP scope issue, the problem can be partly determined by the PXE boot message popups, for example it may display a message that it is receiving proxyDHCP offers but not DHCP offers. If a port is disconnected, this can be determined through a network cable tester. A shutdown can be determined in a similar fashion (electrical signal present but no traffic received) but in all these cases, the only information that can be provided to IT services, that would be of any use, are a patch panel port number and a system MAC address. However, these won’t necessarily help in determining the right location of the switch in a building that has possibly 100 or more switches around.

The case could even be that a PC may work fine and even connect to the internet with no problem – but then if a room of 30 PCs were to receive multicast traffic on a system and, say, two or three are on a different subnet, multicast issues will present themselves and PCs may stop imaging before others have finished. In fact, it is only if someone knows the symptoms and has had experience with the last issue – VLAN mismatches – that you can really identify that as the cause of the issue.

Working with others

Now, in this environment, all PCs are allocated an IP address in specific subnets that corresponds to a respective VLAN, which in turn corresponds to a room (usually). VLAN configuration is implemented by switches. If we want to check some of this information to see what has been – perhaps incorrectly – configured, then we need to be able to access the switch configuration. As these switches are (almost all) operated by the IT services people, our team cannot see this configuration. Even if we were given the configuration, it would eventually become outdated, especially as things can be disconnected and reconnected by other people.

So we could be simply stuck at only being able to provide patch panel numbers (the wall sockets that a PC is connected to), a room number that the PC is in, a MAC address of the PC and an IP address. With the MAC address, IT services could possibly find out where a PC is connected to if a MAC address is provided, but this information is not readily available unless we provide it – and this is assuming it will be accurate and never change. Plus this presents another issue; if the configurations are stored on switches, how can any of the information we provide correlate to what is stored on a switch? The answer is it can’t – unless someone can trace a computer back to a switch port or someone can produce a mapping of this information and stores it elsewhere.

What has been tried

In our networking environment, all computers are connected to switches. Most importantly, this means that, regardless of all cables and panels, there is a direct link between a switch port and a PC. These switch ports are where VLANs are assigned to and where any port security will be set on. Therefore, being able to identify what is connected to all switchports is highly valuable – arguably to both IT services and our own technical team.

When there is an issue with a port or a PC, somebody has to trace that port back. If a port is broken, someone has to go to where the switch is physically located and trace back the cable from the switch-end of a patch panel to the switchport. As mentioned at the beginning, this is a nightmare approach, but it still has to be done.

However, this method is just too labourious for my liking. So the next thing to try is to use something called a fluke tester. These devices, which I think cost way too much money (even second hand they appear to be going for around £1000 – £1500 at the time of writing) for what we would be using them for, can be plugged into a wall socket and tell you all sorts of information about what is on the other side. Crucially for us, they tell us the switchport number and the switch IP address. This is actually brilliant and – whilst this method also requires manual work – is far more accurate. In conjunction with collating a list of wall ports, it can be used to accurately map out switch port to patch panel mapping.

This actually worked very effectively and, by late 2013, I had finished making a chart of many of our labs and detailed this on our internal wiki site.

wikitab

The idea was for part of it to be updated and maintained by our IT services and part of it by our department; we would make sure that PCs were in the correct position according to our own records for lab checks and that they were plugged into a corresponding wall socket. But this requires extensive user input and, predictably, will be prone to user errors. It was also pointed out to me at the time, when I borrowed the Fluke tester, that this collation of patch panel/switch port IDs had already been done by some interns and was now almost certainly already outdated. Nevertheless, I finished the mapping and maintained our side of things as changes were made.

And then changes were made that completely invalidated the entire chart.

Over the summer period in 2014, we had a network upgrade that saw the replacement of over 100 switches around the campus. Whilst no word to this effect had been made, it seems as though the switch configurations were probably from over a year ago – before any requested changes to the configuration had ever been made. With absolutely no communication about the upgrade or what might have happened, this presented a huge issue when upgrading our imaging system as it was slowly realised that there were a lot of small – with minimal overall impact – issues with the network configuration.

A new solution

It is clear by now that something more than just checking each PC individually needs to be done. This method is still viable for single sytems that might have the odd issue here or there, but to ensure 100% accuracy across all our systems there needs to be a different approach.

Wireshark provides a really cool piece of functionality that could help. Actually, this was what I have been using for about a year since I realised that it can be used to filter out LLDP and CDP packets after I noticed that the Fluke tester would pick up its information through these two types of packet (LLDP packets are broadcast every 30 seconds and CDP packets every minute across our network). The structure of these packets is very different (CDP uses an Ethernet frame and LLDP uses an Ethernet II frame) but both contain VLAN information, Switch information (for example IP, platform, version) and.. the switchport ID. This is accurate, it can be run on all PCs and we can get more information (VLAN ID, for example) than the Fluke tester would give us (I think it must be able to pull VLAN information out but I didn’t work out how to when I had a go with the one we used for a couple of weeks).

It is progress, but it was still intensive to do it this way, even with 4 or 5 people helping to go around a room. So can this be scripted?

If you strip out the GUI and just look at what Wireshark does, its functionally very similar to the Linux tool tcpdump which has a Windows port, WinDump (Actually, it is built using the same fundamental protocol – WinPCap, which itself is a port of libpcap). So in late 2014, I went about seeing what I could do to script WinDump and found through some quick googling that I could capture an LLDP packet or a CDP packet and then stop the capture after outputting the results of this one packet to a text file. This is great, although the formatting of the file isn’t particularly useful and would require some additional post-processing.

Windump curiously hasn’t implemented a nice formatting for LLDP packets and I would like to be able to utilise either CDP or LLDP outputs in a nice way – or really any network protocol. The only consistent way to output data is in the form of hexadecimal values. Both CDP or LLDP packets should output in the same format if the hex option is specified, but then what? There is still the issue to do with efficiency of data collection and obtaining the meaningful information – you still have to have somebody actually collect these results. The logical thing to do is to perhaps extend such a script to upload the output to a central server, but then I would have to process all of these text files and pick the useful information out.

So why not just do that processing on the PC before sending it? This is possible with a script, which could perhaps dissect an output text file – but with developing complexity, I decided that it could be a good idea to – instead – make a bespoke application that would actually grab all of this of data and upload only the useful parts that I want. Furthermore; rather than uploading a file, it would make sense to upload a record to a database that can store all of these results, foregoing any human interaction and even without needing WinDump at and only capture the relevant data we want in the first place.

So my work on this project, when time permits, has been to write a C (or C++) command-line application that utilises libpcap/winpcap – just as Win/TCPDump or Wireshark does – to capture either a CDP or LLDP packet and upload a string of text from that containing the switchport, vlan, hostname and IP address to a central database. So far it works quite well and hopefully will be releasing it for people to test out before making the source code freely available. I hope people can contribute to and help improve it and make it a genuinely useful tool for sysadmins across multiple platforms.

Edit: It could be suggested that I find out about connected hosts from the switches themselves or by using SNMP. The thing with various “switchport mappers” out there, however, is that they mostly seem to rely on using SNMP only. If you query a device that runs SNMP, you don’t necessarily get any more information than you would if you were to just look at that device yourself (for example, you can see all of a Cisco switch’s interface details to see host mac addresses; this is all you would receive back if you interrogated it with SNMP anyway).

What this program does, however, is a bit different. Whereas SNMP will give you a network map from the switch-side, this application will generate more detailed host information from the client-side. Switches won’t know a host’s IP address in all likelihood and certainly not hostname or any other information that you might want. Although you can find most of this out with other applications, this program will combine its own information with that given to it by a switch.

Of course, having the SNMP-derived information about a switch actually is not un-useful; this way, you can see every device that is connected to a switch, whereas what I have developed will only show you the information about hosts that you have run this application on (or that you can have remote access to, or have imaged with it already on and scheduled). It is quite possible in an environment such as the one that I work in that you can have other devices that you don’t have access to (AV and Wifi access points for example) and so you can’t make assumptions about free space on switches. So for the future, perhaps some SNMP integration with this application would make it a step beyond what most switchport mappers would normally provide (without being overly complicated). I guess this could help direct what the name should be, a bit more..

Using characters, malloc, memcpy and compiling in C in Visual Studio (aka weird stuff that can happen when adding strings)


(I am trying out a new theme today called Crayon syntax highlighter which should hopefully make some of these coding examples I do look a bit prettier. I set it to the Visual Studio 2022 theme, which means using Consolas as the font. So lets see how this goes!)

Today I will show you what happens when you do something totally logical but, actually, not in the correct way (and arguably not even a way in which you should do it at all, but we will have to ignore that for now). First of all, some background; in an attempt to add together some strings of an undetermined length, I created a function which did some very bizarre things. I will go through some background of using characters and lead onto what happened. So as a really basic example, we can just make a new C++ console project in Visual Studio and do the following in a main .cpp;

Characters

#include "stdafx.h"
int _tmain(int argc, _TCHAR* argv[])
{
	firstname = "Arseniy ";
	surname = "Yatsenyuk";

	addstrings(&name, firstname, surname);
	return 0;
}

We basically have two strings of text that represent a first name and a surname (I was going to choose Putin but I decided that Yatsenyuk is a good guy at this point in time and I feel quite positive writing this).

Important note here: a string is an array of ascii characters. Each character is one byte and can be anywhere from 0 to 255 in value. Actually, it is an array of characters, terminated with a null termination character. This means we just fill up a character, or an array of characters, with numbers that correspond to text (or escape characters, such as the termination character).

Oh yeah, we need to add three strings too, so if we declare them outside of the main function, we can use them everywhere in our program;

char * name;
char * firstname;
char * surname;

So what we do here is to declare three character pointers. Which can represent a string. What does this do? It allocates a pointer to a memory location that will represent a character (which is a single byte of data). Why is this important? Because this post relies on using memory addresses quite a lot and understanding how pointers work is really important in this basic example. Or rather, this basic example should be able to demonstrate using pointers a bit more.

If we then look back at what we are doing by giving a value to “firstname”, we are actually not giving it a single value (which would be written using a single-quote, for example ‘a’ or ‘H’) but a string of values.

What this statement does is to create a new array of characters, of the correct length (plus one, actually, as it will add a null-termination character onto the end of the array – which is a ‘\0’. The length, therefore, is going to be one character more than you would think it should be!). It does this by assigning some new memory to an array of characters and, because the variable “firstname” is a pointer, what we actually get back is just that – a pointer to the memory location where this new array of characters is stored. So “firstname” does not store any text; it stores the memory address of where the character array actually resides in memory.

So (firstname = “Arseniy “) is an initialisation function, returning the address of “A” as its result. To access any letter, we can just say “firstname[3]” to access the “e” – or we can say “firstname + 3”.

Now hold up a minute, you may rightly say. Adding to an array, what?! Well that would be wrong entirely; you are not adding to an array, because “firstname” is not an array. It is a pointer to a location in memory. So what you actually are doing, is referring to a place in memory that is three values higher than “firstname”. Which is exactly what “firstname[3]” refers to, as well. But if we use this memory address, we will receive the value stored there; which is “e”.

Alternatively we could initialise both of these as arrays in the first place.

char firstname[] = "Arseniy "
char surname[16] = "Yatsenyuk"

These are analogous to doing the following:

char firstname[9] = {'A', 'r', 's', 'e', 'n', 'i', 'y', ' ', '\0'};
char surname[16] = {'Y', 'a', 't', 's', 'e', 'n', 'y', ' u ', 'k', 0, 0, 0, 0, 0, 0, 0 };

There is a difference here, which is that when we specify an array size ourselves, assigning the string to it will not terminate it (and the rest of the values are 0s). However, if we give the array no size, it will be sized as the length of the string we give it plus one (for the termination character). Sometimes we might not want the termination character – indeed, when you are combining strings, you might not want to include this character too!

However, we don’t know necessarily what we are going to do with the character arrays; especially in the case of “name”, which will combine the two. We won’t know until runtime how big this will be so we have to use pointers in order to allocate memory on the heap. This is memory for dynamically allocated resources and, because we have no idea what memory we will necessarily be given at runtime (and it changes depending on system availability), we need to use pointers to store the memory as it is allocated.

(It is worth noting that passing arrays of characters as parameters in functions will pass them by reference by default. This is important to note, because any changes you make within that function will affect the original data being passed in; so to prevent against this, we will specify the signature as being const char * rather than simply char*. What actually will get passed is not the array but the pointer to the first address of the array – even if an array size is specified in the function signature, it is just ignored)

The function

Ok so now we have our character pointers made, let’s look at that actual “addstrings” function. Warning: anyone who really really knows C or C++ will hate how I have written this.

void addstrings(char ** result, char * firstpart, char * secondpart)
{
	int x = strlen(firstpart);
	int y = strlen(secondpart);

	*result = (char *)malloc((x + y + 1) * sizeof(char));

	memcpy(*result,			firstpart,		x);
	memcpy(*result + x,		secondpart,		y);

	*result[x + y] = '\0';
}

What we do here is:

  • Take a pointer to a character pointer (a pointer to a pointer, yes)
  • Take a pointer to a character, twice
  • Calculate the length of those two character pointers
  • Assign a new memory address to the dereferenced pointer which is what we are  going to be using to store our final string in
  • Copy the contents of the first character pointer into this new memory address for its entire length
  • Copy the contents of the second character pointer as well, but starting from the address of the first one’s length, otherwise we just overwrite what we already put into the new pointer.
  • Finally, we add a null terminating character onto the end

So it isn’t terribly complex if you can just remember that all a pointer is is a 4 byte piece of data that contains an address of memory where some data resides. Then, when working with pointers, we can copy addresses and contents of addresses over.

Pointers to pointers

Let’s break this down a bit further. The first thing we have is our “double” pointer. The reason for this is because we have no pointer – I mean, the pointer we call “name” has not been initialised. It has an address of 0 – that is, it has no address at all. It is just nothing. So we want to initialise it. We can’t just pass it as we do the other strings – because they have been initialised with a memory address. So we have to pass a reference to the pointer (which is done with the ampersand symbol), which translates as a pointer to a pointer.

Dereferencing

Now we want to dereference it. This means that, when we modify this reference, we want to modify the data that the reference points to (just like a pointer because.. well.. it is). In this case, we have to say ” *result ” – the asterisk as a prefix now acts as a dereferencing operator. So, instead of the memory address of the passed-in reference, we have access to the memory address of the actual pointer.. which is 0.

Malloc

But that is fine, because we are going to give it a value. And this value is the memory address of a brand new set of data – totally empty, of course, but enough to support the length of the first set of characters, the second set of characters plus a terminating character we will manually add (so x, y and 1). These numbers added together will tell malloc how many bytes to allocate; so if we were doing an allocation of ints, we would need that many ints multiplied by how many bytes an int represents. This is why I added sizeof(char) – it still represents 1, but it emphasises that you would use sizeof() to get the length of a datatype (note that if you were to do sizeof on an array, it will return the size of the array and not the length of a string of characters, which could be much shorter).

It is at this point that I should point out a difference between C and C++.

In C, you don’t actually need to convert the pointer that is returned by malloc into a char. Malloc will do this anyway. I personally liked to do this to get exactly what I want but apparently this is just something that people don’t like to see. But ignoring all of the supposed repetition and clutter you get from just adding the casting from a void pointer to a character pointer (and really, a pointer is a pointer.. the only thing the data type does is to signify how big an element is that the pointer points to), there is a genuine concern. It turns out malloc returns an int – but if you include stdlib.h, malloc apparently will convert whatever you are asking it to make into where you are trying to store it. If you explicitly cast it to (char *), you won’t receive an error that would relate to stdlib not being included – because you are doing what the malloc definition in stdlib would have done.

Lets try this out and take out the implicit cast and also take out using stdlib and see what happens:

mallocerror


Ok so the first problem is that malloc isn’t even found. Hmm. Lets add stdlib.h back in and see what happens.

mallocerror2

An error, still? I thought we can do implicit conversion! But wait – we are still using the C++ compiler…

Compiling using C

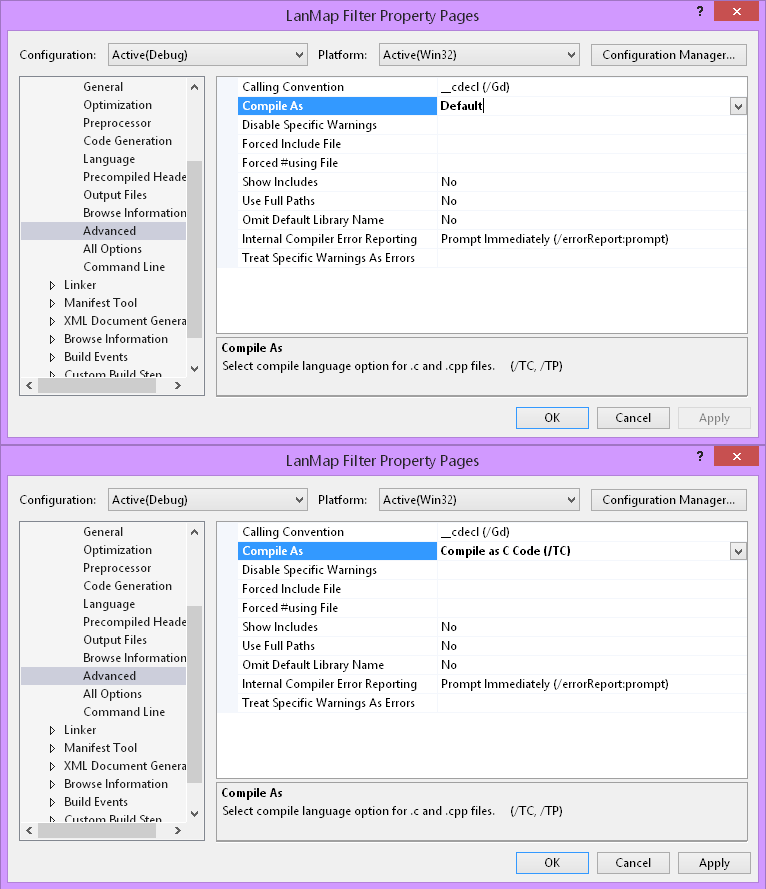
Here we go. How to compile using C++ in Visual Studio. Under the project properties, we can go to the Advanced properties under C/C++. Here we can actually tell it to just use the C compiler

compile as C

And now the errors go away if we include stdlib.h, regardless of whether or not we add (char *) before malloc to convert the pointer to a char* pointer. So lets go back and get rid of stdlib.h:

stdlib

In the first instance, we will get two warnings, but if we add a (char *) conversion, we only get one. Interestingly, we only get warnings and furthermore, we are warned that malloc isn’t defined in either case. But in neither case are we warned about not having stdlib.h included. Perhaps this is related to Microsoft’s C compiler that ships with Visual Studio 2013 SP4 – but it shows how you can actually specify to use the C compiler instead of C++.

Secondly, it is probably worth mentioning that malloc isn’t favoured to be used in C++. One difference is that if you want to deallocate memory allocated by malloc, you have to use free() – in C++, you would use the “new” and “delete” keywords. You can still use malloc, but the std library has functions for handling strings so there isn’t really a reason not to use this instead, except in the case where you might use a string that isn’t a string (u_char isn’t considered a string..). Additionally, malloc simply assigns memory and memcpy copies memory but C++’s new operator will call a constructor. C++’s object-oriented functionality like this is useful and we can say we want a new string if we want to do the above. So there are some important differences here to be aware of but really if you use C then there is no reason not to just use malloc without a conversion and if you use C++ then you can just use “string” types instead.

Anyhow, onto what happens with the code for a final, interesting, look at a problem!

The problem

Ok, so if we take this code and run it as we have made it above, it should work.

#include "stdafx.h"
#include <stdlib.h>
#include <string.h>

char * name;
char * firstname;
char * surname;

void addstrings(char ** result, char * firstpart, char * secondpart)
{
	int x = strlen(firstpart);
	int y = strlen(secondpart);


	*result = (char *) malloc((x + y + 1) * sizeof(char));

	memcpy(*result,		firstpart,	x);
	memcpy(*result + x, secondpart, y);
	  
	*result[x + y] = '\0';
}


int _tmain(int argc, _TCHAR* argv[])
{
	firstname = "Arseniy ";
	surname = "Yatsenyuk";

	addstrings(&name, firstname, surname);
	return 0;
}

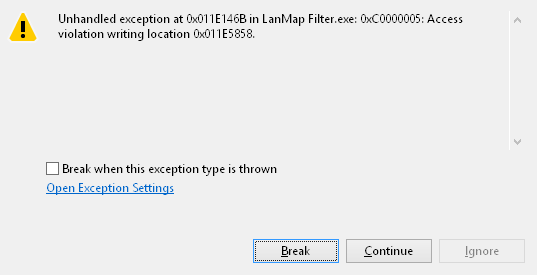
The problem is, is that you get an exception trying to write to memory address 0 when trying to set this line:

*result[x + y] = '\0';

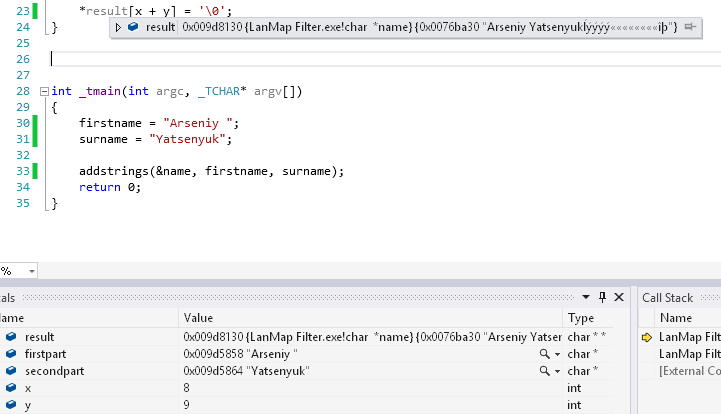
Everything should work fine. Bizarrely, it doesn’t. Everywhere we have dereferenced “result” has worked fine – even examining the variables shows that result points to a pointer that contains the text we want. But we can’t seem to set anything.

p1

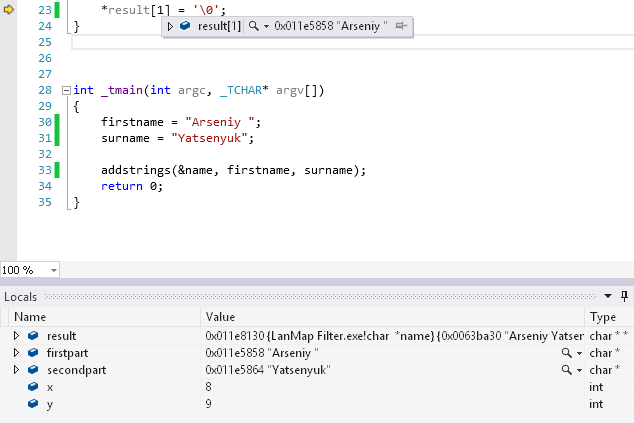
This had me going mental for absolutely ages. It made no sense as to what was going on. However, the first hint as to what it could be came when I just changed the array index that I was trying to alter. If I set it to 0, it cleared the value of result (and, subsequently, the global variable it pointed to). If I set it to 1, something surprising happened.

p2

Still an error, but the address was no longer 0x00000000. On inspection, it turns out that the memory address of position 1 corresponds to the memory address of “firstpart” (which is “firstname”). Sure enough, position 2 of the array corresponds to the memory address of “secondpart”.


p3

In fact, setting result[2] to ‘\0’, without the dereference, will wipe the secondpart pointer entirely (this is exactly why const char pointers are important, to avoid accidentally doing what I just did here!). So what exactly is *result[2] doing?

It turns out that this is to do with the order in which the statement is evaluated. All along, the assumption has been that these two statements were the same thing:

*result[x + y] = '\0';	
(* result) [x + y] = '\0'


When actually, the following is the case:

*(result[x + y]) = '\0';


And what this means is that, all along, we have been de-referencing whatever is located at each part of the pointer reference. The only valid thing to do this to would be results[0] – as this is a pointer to a pointer; but results[1] is a pointer which is already dereferenced. What we actually wanted to do, was to dereference the pointer-pointer first and then access a location relative to that.

The lesson is:

It turns out that

*result[x + y] = '\0';

Is actually saying:

* (result[x + y]) = '\0';

And therefore, I have to explicitly state:

(* result) [x + y] = '\0';

Array notation takes precedence over dereferencing.

And there you have it. If this ever happens to you, make sure that you use brackets to contain whatever you are trying to say or do in this way. If anyone has any questions or issues with the code and statements above, feel free to leave them in a comment below!

Network cable management and mapping switch ports


Keeping a track of computers that are all connected to a network can be a hassle, without desktop management software. Even with it, you can’t necessarily tell exactly which physical computer is connected to a given switch port. Eventually, you will come back to a switch closet, but this doesn’t necessarily help the situation at all; especially when you encounter a stack of Cisco 3750s, spewing yellow ropes of technological vomit off in all kinds of directions. So the best things you (we) can determine are a wall socket (if it is labelled) and maybe a MAC address too, if you log in.

But this is all a heap of work that just shouldn’t have to be done at all and really frustrates, further, any problems that you’re trying to troubleshoot. So, I decided to come up with a plan. This is quite a long post, but it gives background to what motivated me to do this in the first place!

Standard problems:

In lots of situations, you’ll know what the cause of a network problem is. In some cases, we notice connection issues across the board and it is likely that the problem is already known by the IT services department. Specific PCs with issues can often come down to the issues below:

  • DHCP scope has been exhausted, so no more IP addresses can be given out
  • Port is disconnected (no signal)
  • Port is shutdown (electrical connection is present but no traffic goes over the wire)
  • VLAN mismatch (subnets of specific PCs will be assigned differently than that designated to the rest of a given room)

(This is just going to go and assume that a PC has been physically checked that it is connected to the right network interface (each interface has a different MAC address which can affect FOG host registration settings and port security settings on a switch) and is connected through the correct wall port that was assigned to that PC (or to a port that we know is – or should be – assigned to a specific network)).

In the case of a DHCP scope issue, the problem can be partly determined by the PXE boot message popups, for example it may display a message that it is receiving proxyDHCP offers but not DHCP offers. If a port is disconnected, this can be determined through a network cable tester. A shutdown can be determined in a similar fashion (electrical signal present but no traffic received) but in all these cases, the only information that can be provided to IT services, that would be of any use, are a patch panel port number and a system MAC address. However, these won’t necessarily help in determining the right location of the switch in a building that has possibly 100 or more switches around.

The case could even be that a PC may work fine and even connect to the internet with no problem – but then if a room of 30 PCs were to receive multicast traffic on a system and, say, two or three are on a different subnet, multicast issues will present themselves and PCs may stop imaging before others have finished. In fact, it is only if someone knows the symptoms and has had experience with the last issue – VLAN mismatches – that you can really identify that as the cause of the issue.

Working with others

Now, in this environment, all PCs are allocated an IP address in specific subnets that corresponds to a respective VLAN, which in turn corresponds to a room (usually). VLAN configuration is implemented by switches. If we want to check some of this information to see what has been – perhaps incorrectly – configured, then we need to be able to access the switch configuration. As these switches are (almost all) operated by the IT services people, our team cannot see this configuration. Even if we were given the configuration, it would eventually become outdated, especially as things can be disconnected and reconnected by other people.

So we could be simply stuck at only being able to provide patch panel numbers (the wall sockets that a PC is connected to), a room number that the PC is in, a MAC address of the PC and an IP address. With the MAC address, IT services could possibly find out where a PC is connected to if a MAC address is provided, but this information is not readily available unless we provide it – and this is assuming it will be accurate and never change. Plus this presents another issue; if the configurations are stored on switches, how can any of the information we provide correlate to what is stored on a switch? The answer is it can’t – unless someone can trace a computer back to a switch port or someone can produce a mapping of this information and stores it elsewhere.

What has been tried

In our networking environment, all computers are connected to switches. Most importantly, this means that, regardless of all cables and panels, there is a direct link between a switch port and a PC. These switch ports are where VLANs are assigned to and where any port security will be set on. Therefore, being able to identify what is connected to all switchports is highly valuable – arguably to both IT services and our own technical team.

When there is an issue with a port or a PC, somebody has to trace that port back. If a port is broken, someone has to go to where the switch is physically located and trace back the cable from the switch-end of a patch panel to the switchport. As mentioned at the beginning, this is a nightmare approach, but it still has to be done.

However, this method is just too labourious for my liking. So the next thing to try is to use something called a fluke tester. These devices, which I think cost way too much money (even second hand they appear to be going for around £1000 – £1500 at the time of writing) for what we would be using them for, can be plugged into a wall socket and tell you all sorts of information about what is on the other side. Crucially for us, they tell us the switchport number and the switch IP address. This is actually brilliant and – whilst this method also requires manual work – is far more accurate. In conjunction with collating a list of wall ports, it can be used to accurately map out switch port to patch panel mapping.

This actually worked very effectively and, by late 2013, I had finished making a chart of many of our labs and detailed this on our internal wiki site.

wikitab

The idea was for part of it to be updated and maintained by our IT services and part of it by our department; we would make sure that PCs were in the correct position according to our own records for lab checks and that they were plugged into a corresponding wall socket. But this requires extensive user input and, predictably, will be prone to user errors. It was also pointed out to me at the time, when I borrowed the Fluke tester, that this collation of patch panel/switch port IDs had already been done by some interns and was now almost certainly already outdated. Nevertheless, I finished the mapping and maintained our side of things as changes were made.

And then changes were made that completely invalidated the entire chart.

Over the summer period in 2014, we had a network upgrade that saw the replacement of over 100 switches around the campus. Whilst no word to this effect had been made, it seems as though the switch configurations were probably from over a year ago – before any requested changes to the configuration had ever been made. With absolutely no communication about the upgrade or what might have happened, this presented a huge issue when upgrading our imaging system as it was slowly realised that there were a lot of small – with minimal overall impact – issues with the network configuration.

A new solution

It is clear by now that something more than just checking each PC individually needs to be done. This method is still viable for single sytems that might have the odd issue here or there, but to ensure 100% accuracy across all our systems there needs to be a different approach.

Wireshark provides a really cool piece of functionality that could help. Actually, this was what I have been using for about a year since I realised that it can be used to filter out LLDP and CDP packets after I noticed that the Fluke tester would pick up its information through these two types of packet (LLDP packets are broadcast every 30 seconds and CDP packets every minute across our network). The structure of these packets is very different (CDP uses an Ethernet frame and LLDP uses an Ethernet II frame) but both contain VLAN information, Switch information (for example IP, platform, version) and.. the switchport ID. This is accurate, it can be run on all PCs and we can get more information (VLAN ID, for example) than the Fluke tester would give us (I think it must be able to pull VLAN information out but I didn’t work out how to when I had a go with the one we used for a couple of weeks).

It is progress, but it was still intensive to do it this way, even with 4 or 5 people helping to go around a room. So can this be scripted?

If you strip out the GUI and just look at what Wireshark does, its functionally very similar to the Linux tool tcpdump which has a Windows port, WinDump (Actually, it is built using the same fundamental protocol – WinPCap, which itself is a port of libpcap). So in late 2014, I went about seeing what I could do to script WinDump and found through some quick googling that I could capture an LLDP packet or a CDP packet and then stop the capture after outputting the results of this one packet to a text file. This is great, although the formatting of the file isn’t particularly useful and would require some additional post-processing.

Windump curiously hasn’t implemented a nice formatting for LLDP packets and I would like to be able to utilise either CDP or LLDP outputs in a nice way – or really any network protocol. The only consistent way to output data is in the form of hexadecimal values. Both CDP or LLDP packets should output in the same format if the hex option is specified, but then what? There is still the issue to do with efficiency of data collection and obtaining the meaningful information – you still have to have somebody actually collect these results. The logical thing to do is to perhaps extend such a script to upload the output to a central server, but then I would have to process all of these text files and pick the useful information out.

So why not just do that processing on the PC before sending it? This is possible with a script, which could perhaps dissect an output text file – but with developing complexity, I decided that it could be a good idea to – instead – make a bespoke application that would actually grab all of this of data and upload only the useful parts that I want. Furthermore; rather than uploading a file, it would make sense to upload a record to a database that can store all of these results, foregoing any human interaction and even without needing WinDump at and only capture the relevant data we want in the first place.

So my work on this project, when time permits, has been to write a C (or C++) command-line application that utilises libpcap/winpcap – just as Win/TCPDump or Wireshark does – to capture either a CDP or LLDP packet and upload a string of text from that containing the switchport, vlan, hostname and IP address to a central database. So far it works quite well and hopefully will be releasing it for people to test out before making the source code freely available. I hope people can contribute to and help improve it and make it a genuinely useful tool for sysadmins across multiple platforms.

Edit: It could be suggested that I find out about connected hosts from the switches themselves or by using SNMP. The thing with various “switchport mappers” out there, however, is that they mostly seem to rely on using SNMP only. If you query a device that runs SNMP, you don’t necessarily get any more information than you would if you were to just look at that device yourself (for example, you can see all of a Cisco switch’s interface details to see host mac addresses; this is all you would receive back if you interrogated it with SNMP anyway).

What this program does, however, is a bit different. Whereas SNMP will give you a network map from the switch-side, this application will generate more detailed host information from the client-side. Switches won’t know a host’s IP address in all likelihood and certainly not hostname or any other information that you might want. Although you can find most of this out with other applications, this program will combine its own information with that given to it by a switch.

Of course, having the SNMP-derived information about a switch actually is not un-useful; this way, you can see every device that is connected to a switch, whereas what I have developed will only show you the information about hosts that you have run this application on (or that you can have remote access to, or have imaged with it already on and scheduled). It is quite possible in an environment such as the one that I work in that you can have other devices that you don’t have access to (AV and Wifi access points for example) and so you can’t make assumptions about free space on switches. So for the future, perhaps some SNMP integration with this application would make it a step beyond what most switchport mappers would normally provide (without being overly complicated). I guess this could help direct what the name should be, a bit more..

Using characters, malloc, memcpy and compiling in C in Visual Studio (aka weird stuff that can happen when adding strings)


(I am trying out a new theme today called Crayon syntax highlighter which should hopefully make some of these coding examples I do look a bit prettier. I set it to the Visual Studio 2022 theme, which means using Consolas as the font. So lets see how this goes!)

Today I will show you what happens when you do something totally logical but, actually, not in the correct way (and arguably not even a way in which you should do it at all, but we will have to ignore that for now). First of all, some background; in an attempt to add together some strings of an undetermined length, I created a function which did some very bizarre things. I will go through some background of using characters and lead onto what happened. So as a really basic example, we can just make a new C++ console project in Visual Studio and do the following in a main .cpp;

Characters

#include "stdafx.h"
int _tmain(int argc, _TCHAR* argv[])
{
	firstname = "Arseniy ";
	surname = "Yatsenyuk";

	addstrings(&name, firstname, surname);
	return 0;
}

We basically have two strings of text that represent a first name and a surname (I was going to choose Putin but I decided that Yatsenyuk is a good guy at this point in time and I feel quite positive writing this).

Important note here: a string is an array of ascii characters. Each character is one byte and can be anywhere from 0 to 255 in value. Actually, it is an array of characters, terminated with a null termination character. This means we just fill up a character, or an array of characters, with numbers that correspond to text (or escape characters, such as the termination character).

Oh yeah, we need to add three strings too, so if we declare them outside of the main function, we can use them everywhere in our program;

char * name;
char * firstname;
char * surname;

So what we do here is to declare three character pointers. Which can represent a string. What does this do? It allocates a pointer to a memory location that will represent a character (which is a single byte of data). Why is this important? Because this post relies on using memory addresses quite a lot and understanding how pointers work is really important in this basic example. Or rather, this basic example should be able to demonstrate using pointers a bit more.

If we then look back at what we are doing by giving a value to “firstname”, we are actually not giving it a single value (which would be written using a single-quote, for example ‘a’ or ‘H’) but a string of values.

What this statement does is to create a new array of characters, of the correct length (plus one, actually, as it will add a null-termination character onto the end of the array – which is a ‘\0’. The length, therefore, is going to be one character more than you would think it should be!). It does this by assigning some new memory to an array of characters and, because the variable “firstname” is a pointer, what we actually get back is just that – a pointer to the memory location where this new array of characters is stored. So “firstname” does not store any text; it stores the memory address of where the character array actually resides in memory.

So (firstname = “Arseniy “) is an initialisation function, returning the address of “A” as its result. To access any letter, we can just say “firstname[3]” to access the “e” – or we can say “firstname + 3”.

Now hold up a minute, you may rightly say. Adding to an array, what?! Well that would be wrong entirely; you are not adding to an array, because “firstname” is not an array. It is a pointer to a location in memory. So what you actually are doing, is referring to a place in memory that is three values higher than “firstname”. Which is exactly what “firstname[3]” refers to, as well. But if we use this memory address, we will receive the value stored there; which is “e”.

Alternatively we could initialise both of these as arrays in the first place.

char firstname[] = "Arseniy "
char surname[16] = "Yatsenyuk"

These are analogous to doing the following:

char firstname[9] = {'A', 'r', 's', 'e', 'n', 'i', 'y', ' ', '\0'};
char surname[16] = {'Y', 'a', 't', 's', 'e', 'n', 'y', ' u ', 'k', 0, 0, 0, 0, 0, 0, 0 };

There is a difference here, which is that when we specify an array size ourselves, assigning the string to it will not terminate it (and the rest of the values are 0s). However, if we give the array no size, it will be sized as the length of the string we give it plus one (for the termination character). Sometimes we might not want the termination character – indeed, when you are combining strings, you might not want to include this character too!

However, we don’t know necessarily what we are going to do with the character arrays; especially in the case of “name”, which will combine the two. We won’t know until runtime how big this will be so we have to use pointers in order to allocate memory on the heap. This is memory for dynamically allocated resources and, because we have no idea what memory we will necessarily be given at runtime (and it changes depending on system availability), we need to use pointers to store the memory as it is allocated.

(It is worth noting that passing arrays of characters as parameters in functions will pass them by reference by default. This is important to note, because any changes you make within that function will affect the original data being passed in; so to prevent against this, we will specify the signature as being const char * rather than simply char*. What actually will get passed is not the array but the pointer to the first address of the array – even if an array size is specified in the function signature, it is just ignored)

The function

Ok so now we have our character pointers made, let’s look at that actual “addstrings” function. Warning: anyone who really really knows C or C++ will hate how I have written this.

void addstrings(char ** result, char * firstpart, char * secondpart)
{
	int x = strlen(firstpart);
	int y = strlen(secondpart);

	*result = (char *)malloc((x + y + 1) * sizeof(char));

	memcpy(*result,			firstpart,		x);
	memcpy(*result + x,		secondpart,		y);

	*result[x + y] = '\0';
}

What we do here is:

  • Take a pointer to a character pointer (a pointer to a pointer, yes)
  • Take a pointer to a character, twice
  • Calculate the length of those two character pointers
  • Assign a new memory address to the dereferenced pointer which is what we are  going to be using to store our final string in
  • Copy the contents of the first character pointer into this new memory address for its entire length
  • Copy the contents of the second character pointer as well, but starting from the address of the first one’s length, otherwise we just overwrite what we already put into the new pointer.
  • Finally, we add a null terminating character onto the end

So it isn’t terribly complex if you can just remember that all a pointer is is a 4 byte piece of data that contains an address of memory where some data resides. Then, when working with pointers, we can copy addresses and contents of addresses over.

Pointers to pointers

Let’s break this down a bit further. The first thing we have is our “double” pointer. The reason for this is because we have no pointer – I mean, the pointer we call “name” has not been initialised. It has an address of 0 – that is, it has no address at all. It is just nothing. So we want to initialise it. We can’t just pass it as we do the other strings – because they have been initialised with a memory address. So we have to pass a reference to the pointer (which is done with the ampersand symbol), which translates as a pointer to a pointer.

Dereferencing

Now we want to dereference it. This means that, when we modify this reference, we want to modify the data that the reference points to (just like a pointer because.. well.. it is). In this case, we have to say ” *result ” – the asterisk as a prefix now acts as a dereferencing operator. So, instead of the memory address of the passed-in reference, we have access to the memory address of the actual pointer.. which is 0.

Malloc

But that is fine, because we are going to give it a value. And this value is the memory address of a brand new set of data – totally empty, of course, but enough to support the length of the first set of characters, the second set of characters plus a terminating character we will manually add (so x, y and 1). These numbers added together will tell malloc how many bytes to allocate; so if we were doing an allocation of ints, we would need that many ints multiplied by how many bytes an int represents. This is why I added sizeof(char) – it still represents 1, but it emphasises that you would use sizeof() to get the length of a datatype (note that if you were to do sizeof on an array, it will return the size of the array and not the length of a string of characters, which could be much shorter).

It is at this point that I should point out a difference between C and C++.

In C, you don’t actually need to convert the pointer that is returned by malloc into a char. Malloc will do this anyway. I personally liked to do this to get exactly what I want but apparently this is just something that people don’t like to see. But ignoring all of the supposed repetition and clutter you get from just adding the casting from a void pointer to a character pointer (and really, a pointer is a pointer.. the only thing the data type does is to signify how big an element is that the pointer points to), there is a genuine concern. It turns out malloc returns an int – but if you include stdlib.h, malloc apparently will convert whatever you are asking it to make into where you are trying to store it. If you explicitly cast it to (char *), you won’t receive an error that would relate to stdlib not being included – because you are doing what the malloc definition in stdlib would have done.

Lets try this out and take out the implicit cast and also take out using stdlib and see what happens:

mallocerror


Ok so the first problem is that malloc isn’t even found. Hmm. Lets add stdlib.h back in and see what happens.

mallocerror2

An error, still? I thought we can do implicit conversion! But wait – we are still using the C++ compiler…

Compiling using C

Here we go. How to compile using C++ in Visual Studio. Under the project properties, we can go to the Advanced properties under C/C++. Here we can actually tell it to just use the C compiler

compile as C

And now the errors go away if we include stdlib.h, regardless of whether or not we add (char *) before malloc to convert the pointer to a char* pointer. So lets go back and get rid of stdlib.h:

stdlib

In the first instance, we will get two warnings, but if we add a (char *) conversion, we only get one. Interestingly, we only get warnings and furthermore, we are warned that malloc isn’t defined in either case. But in neither case are we warned about not having stdlib.h included. Perhaps this is related to Microsoft’s C compiler that ships with Visual Studio 2013 SP4 – but it shows how you can actually specify to use the C compiler instead of C++.

Secondly, it is probably worth mentioning that malloc isn’t favoured to be used in C++. One difference is that if you want to deallocate memory allocated by malloc, you have to use free() – in C++, you would use the “new” and “delete” keywords. You can still use malloc, but the std library has functions for handling strings so there isn’t really a reason not to use this instead, except in the case where you might use a string that isn’t a string (u_char isn’t considered a string..). Additionally, malloc simply assigns memory and memcpy copies memory but C++’s new operator will call a constructor. C++’s object-oriented functionality like this is useful and we can say we want a new string if we want to do the above. So there are some important differences here to be aware of but really if you use C then there is no reason not to just use malloc without a conversion and if you use C++ then you can just use “string” types instead.

Anyhow, onto what happens with the code for a final, interesting, look at a problem!

The problem

Ok, so if we take this code and run it as we have made it above, it should work.

#include "stdafx.h"
#include <stdlib.h>
#include <string.h>

char * name;
char * firstname;
char * surname;

void addstrings(char ** result, char * firstpart, char * secondpart)
{
	int x = strlen(firstpart);
	int y = strlen(secondpart);


	*result = (char *) malloc((x + y + 1) * sizeof(char));

	memcpy(*result,		firstpart,	x);
	memcpy(*result + x, secondpart, y);
	  
	*result[x + y] = '\0';
}


int _tmain(int argc, _TCHAR* argv[])
{
	firstname = "Arseniy ";
	surname = "Yatsenyuk";

	addstrings(&name, firstname, surname);
	return 0;
}

The problem is, is that you get an exception trying to write to memory address 0 when trying to set this line:

*result[x + y] = '\0';

Everything should work fine. Bizarrely, it doesn’t. Everywhere we have dereferenced “result” has worked fine – even examining the variables shows that result points to a pointer that contains the text we want. But we can’t seem to set anything.

p1

This had me going mental for absolutely ages. It made no sense as to what was going on. However, the first hint as to what it could be came when I just changed the array index that I was trying to alter. If I set it to 0, it cleared the value of result (and, subsequently, the global variable it pointed to). If I set it to 1, something surprising happened.

p2

Still an error, but the address was no longer 0x00000000. On inspection, it turns out that the memory address of position 1 corresponds to the memory address of “firstpart” (which is “firstname”). Sure enough, position 2 of the array corresponds to the memory address of “secondpart”.


p3

In fact, setting result[2] to ‘\0’, without the dereference, will wipe the secondpart pointer entirely (this is exactly why const char pointers are important, to avoid accidentally doing what I just did here!). So what exactly is *result[2] doing?

It turns out that this is to do with the order in which the statement is evaluated. All along, the assumption has been that these two statements were the same thing:

*result[x + y] = '\0';	
(* result) [x + y] = '\0'


When actually, the following is the case:

*(result[x + y]) = '\0';


And what this means is that, all along, we have been de-referencing whatever is located at each part of the pointer reference. The only valid thing to do this to would be results[0] – as this is a pointer to a pointer; but results[1] is a pointer which is already dereferenced. What we actually wanted to do, was to dereference the pointer-pointer first and then access a location relative to that.

The lesson is:

It turns out that

*result[x + y] = '\0';

Is actually saying:

* (result[x + y]) = '\0';

And therefore, I have to explicitly state:

(* result) [x + y] = '\0';

Array notation takes precedence over dereferencing.

And there you have it. If this ever happens to you, make sure that you use brackets to contain whatever you are trying to say or do in this way. If anyone has any questions or issues with the code and statements above, feel free to leave them in a comment below!

Wednesday, December 7, 2022

Reading a configuration file into a C++ application


Carrying on with my network-switchport-mapping-program, here’s the latest thing I was working on; making a configuration file. Because I keep changing where I am, so also does my active network connection (in other words, at work the IP address is something like 10.x.x.x and at home its 192.x.x.x). The thing is, it isn’t going to just by myself who might end up using this program – so to make this as usable and adaptive as possible, some settings need to manually be added that are relevant to a particular environment.

How would you go about doing this? You could use something like cin or scanf (although, which one is best? (Or this)), but this would mean having to use user input in your program. So if you want to automate a program to not have to use any user input to determine its operation, a simple text file can work very well at providing values to certain variables you use in your code.

So far, in my case, this is going to be the (1)Server name, (2)Network IP, (3) Timeout value for receiving a packet and whether or not to capture (4)LLDP and/or (5)CDP packets.

Implementation

First of all I made a new function to handle this in my code called loadConfig(). I could modify it to take a filename as its parameter, but given that this implementation is very program-specific, it doesn’t really matter too much for now.

int loadConfig()
{
	char * fileName = "config.ini";
	FILE *pFile = fopen(fileName, "r");


        #FILE *pFile;
        #fopen_s(&pFile, fileName, "r");

	char buffer2[TEXTSIZE][TEXTSIZE];
	char * delimiters = " =,\n;";	

        //All the rest of the code goes here

	fclose(pFile);
}

The first thing I do here is to make a new string with the name of the text file to open and pass that as a parameter to fopen (or fopen_s), which returns a FILE object. This is also passed a parameter to “read” the file (another option is to be able to write to a file instead).

The next two declarations below this are a 2d buffer that will hold each line of text (the first dimension is a new line, the next dimension is each character of text) and a string of every character that we will use to represent a new “token” in our string. This will be explained later. After we have done everything, we then close the file and carry on (or exit) with our program.

So, extending the above gap in the code further, we can then start to read from the file and break it up a bit using fgets.

...

size_t linesRead = 0;
	
while (fgets(buffer2[linesRead], TEXTSIZE, pFile) != NULL)
{

...


This will place text into our buffer above at a new point in the array, with the length of TEXTSIZE (used also in defining the maximum length of our buffer’s elements), from the file we specified above. If it detects the end of the file, it will end the loop and exit out.

size_t linesRead = 0;

while (fgets(buffer2[linesRead], TEXTSIZE, pFile) != NULL)
{		
	if (buffer2[linesRead][0] == '\n' || buffer2[linesRead][0] == '#')
	{			
		continue;
	}

	char * variable;
        #char * next		;
	variable = strtok(buffer2[linesRead], delimiters);
        #variable = strtok_s(buffer2[linesRead], delimiters, &next);		

	if (!variable)
	{
		continue;
	}

//Put anything else you want to do here

	linesRead++;
}

Once the file is opened, the first thing to do is to check the first character. If it is a new line, then we can just skip this as it is blank space and if it is a hashtag (#) we can also skip it as it is a comment. The continue statement will continue the while loop but it will skip over the current iteration (by contrast, if you wanted to break out of the loop entirely, you would use break instead).

You can then use strtok (or strtok_s) to break apart the current string of text further. When you specify the buffer to operate on, it will actually modify it – but we still have to return the result in order to use it (unless you use strtok_s, which stores the next result in next, rather than modifying the original set of results). We also specify the characters, in a string, to use to separate values out. An equals sign will denote to us the end of a variable name and the start of its value, so we remove them, immediately separating out these two values. Spaces may be added in around the equals sign, so we can add in a space too, to the list of values to look for. Although fgets will stop its iteration at the end of a line, the new line character (\n) is still included, so we remove this too and finally, we get rid of semi-colons and commas (I had an idea to use these but haven’t properly, yet).

Note that the linesRead variable is only incremented on a successful iteration of the while loop. This means that, by not incrementing, that element of the buffer is over-written on the next iteration and so empty and invalid lines don’t fill up the buffer.

Now to add in the magic; copying a value from the text to something usable in the program!

if (strcmp(variable, "server") == 0)
{			
        #variable = strtok_s(NULL, delimiters, &next);
	variable = strtok(NULL, delimiters);			

	settingsServer = (char *)malloc((strlen(variable) + 1) * sizeof(char));
	memcpy(settingsServer, variable, strlen(variable));
	settingsServer[strlen(variable)] = '\0';

	printf("Server is %s\n", variable);
}

First of all, we do a string comparison. “variable” is a character pointer and anything in quotes is also a character pointer, too. If the contents of both pointers are the same, the result is 0.

Then we call strtok again, this time passing it NULL as a parameter for the string to operate on. What this will do, is cause strtok to continue from the last string it was working on. If we pass it the same delimiters, it will, essentially, separate out everything that isn’t a delimiter and give us back the start of the next string (until the next delimiter, which will at the very least be a new line).

After this, the next three lines do a memory allocation and a memory copy to, essentially, do a string copy. I prefer using this way because it doesn’t complain when you just want to copy data in a format that you know will work (such as when you are using typedefs like u_char) and when you need to copy past a “\0” character (something I might need to do with a raw packet capture), but if anyone knows of a compelling reason to use strcpy over memcpy, I would be interested to hear.

Finally, I add a null terminating character on the end. Its worth being careful about this; the terminating character is important for printing text, but adding strings together and manipulating strings with \0 in the middle could present a problem if using strcpy or strncpy, for example. However, elsewhere in the program I use memcpy to add strings together so this isn’t a problem and I can just exclude these characters myself.

Of course, this is useful for text; but if I want to convert a numerical value to an integer, for example, I need to convert a character (ASCII) to an integer (a number). It would be nice to just use something simply like (int)variable, however the problem is that a two-byte character (e.g. ‘1’ and ‘0’, which we would see to mean the number 10) would be considered two separate numbers which remove the exponents of the decimal numbering system. The way to write a function would be to multiply each character’s value by 10, for as many times as there are columns, in a loop; but the simpler way is to use itoa.

So the full code would be something like this:


#include <string>
#include <stdlib.h>

#define TEXTSIZE 64


char * settingsServer;
int settingsNetwork;
int settingsTimeout;
int settingsCDP;
int settingsLLDP;


int loadConfig()
{
	char * fileName = "config.ini";
	FILE *pFile = fopen(fileName, "r");
	char buffer2[TEXTSIZE][TEXTSIZE];
	char * delimiters = " =,\n;";
	
	if (!pFile)
	{
		return 1;
	}

	size_t linesRead = 0;
	
	while (fgets(buffer2[linesRead], TEXTSIZE, pFile) != NULL)
	{
		if (buffer2[linesRead][0] == '\n' || buffer2[linesRead][0] == '#')
		{			
			continue;
		}


		char * variable;
		variable = strtok(buffer2[linesRead], delimiters);
		

		if (!variable)
		{
			continue;
		}
		
		
		if (strcmp(variable, "server") == 0)
		{			
			variable = strtok(NULL, delimiters);
			if (!variable)
			{
				printf("Error in configuration file: no value for server!\n");
				{
					system("PAUSE");
					return 2;
				}
			}
			
			settingsServer = (char *)malloc((strlen(variable) + 1) * sizeof(char));
			memcpy(settingsServer, variable, strlen(variable));
			settingsServer[strlen(variable)] = '\0';
			printf("Server is %s\n", variable);
		}
		else if (strcmp(variable, "network") == 0)
		{
			variable = strtok(NULL, delimiters);
			if (!variable)
			{
				printf("Error in configuration file: no value for network!\n");
				{
					system("PAUSE");
					return 2;
				}
			}
			settingsNetwork = atoi(variable);
			printf("Network is %s\n", variable);
		}
		else if (strcmp(variable, "timeout") == 0)
		{
			variable = strtok(NULL, delimiters);
			if (!variable)
			{
				printf("Error in configuration file: no value for timeout!\n");
				{
					system("PAUSE");
					return 2;
				}
			}
			settingsTimeout = atoi(variable);
			printf("Timeout is %s\n", variable);
		}
		else if (strcmp(variable, "protocdp") == 0)
		{
			variable = strtok(NULL, delimiters);
			if (!variable)
			{
				printf("Error in configuration file: no value for protocdp!\n");
				{
					system("PAUSE");
					return 2;
				}
			}
			if (strcmp(variable, "true") == 0)
			{
				settingsCDP = 1;
			}
			else
			{
				settingsCDP = 0;
			}

			printf("CDP is %s\n", variable);
		}
		else if (strcmp(variable, "protolldp") == 0)
		{
			variable = strtok(NULL, delimiters);
			if (!variable)
			{
				printf("Error in configuration file: no value for protolldp!\n");
				{
					return 2;
				}
			}
			if (strcmp(variable, "true") == 0)
			{
				settingsLLDP = 1;
			}
			else
			{
				settingsLLDP = 0;
			}
			printf("LLDP is %s\n", variable);
		}
		else
		{
			continue;
		}	
		linesRead++;
	}

	fclose(pFile);
	return 0;

}

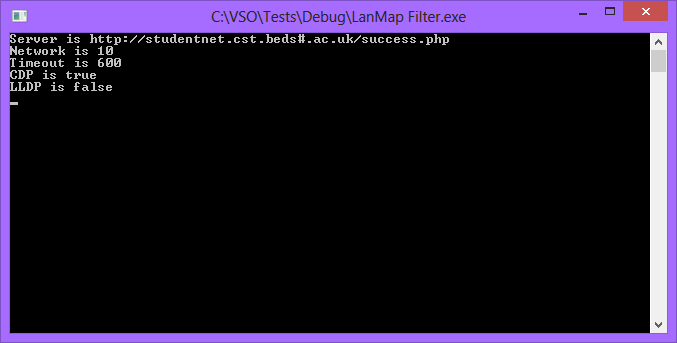
This will populate a mixture of strings and integers with text from a file in the same output directory called config.ini. It can be any file name and extension, really, so long as the location and the filename in the program match. I added a few more error checks and with some testing it all seems to work fine. The data I gave it in the config.ini file is as follows:

 server = http://studentnet.cst.beds#.ac.uk/success.php;
network = 10;

;

kk d 


timeout=600;
protocdp=true;
protolldp=false;

There are some blank spaces here, new lines, gaps and junk data; just to see how it would work. Well, it came out ok! (Note that the space at the beginning of the buffer, which was in the original file, is not copied over after the first strtok call, hence why it doesn’t break during being compared directly to the term “server”).

Test1

Test2

The values seem to work fine and look tolerant to user error. In the next step, I will probably have created a way to configure the settings through a user interface which will then generate the config.ini file without manual editing.


Footnote: At first I had tried the following for string comparison instead of strcmp:

if (variable == "server")

But of course, this would be comparing pointers. Another solution would have been the following, by dereferencing both pointers:

if (*variable == *"server")


Tuesday, December 6, 2022

Feeding the frontend – displaying data with D3.js


It’s been a while since I’ve posted any updates about Switchy McPortface. It works just fine in my dayjob and the data can be viewed by anyone wanting to see what is plugged into what, which has been helpful in a few situations.

However, aside from a few customised tables and functions, there’s not really a lot more that I’ve done to improve functionality. What I have done, however, is embark on making a nicer frontend with some interaction. Essentially what I am aiming to do is to display all of the computers on a single webpage for a given room, roughly corresponding to the positions that they actually exist in in each room. My first thought a few years ago was to use Unity3d or C++ and OpenGL but, since I’ve already used these things before, why not try something new and use Javascript to make a web app or something?

This guide is going to go through a nicer way to display data than just using a table generated from some basic HTML in php. There’s a few libraries out there, but I thought it would be nice to get stuck into something that has some widespread use and the name Data Driven Documents sums up nicely what I’m trying to do – generate something visual based on some underlying data. D3 gives a nice way to manipulate the DOM, bind data and provide some visualisation and I felt it fit somewhere between jQuery and (other) visualisation libraries for this project. So without further ado, here is a quick rundown of one way to use d3.js to generate something prettier than a few table rows and columns!

Starting out

Because this builds on my previous work (with the desktop client now uploaded to Github), I won’t go into exactly how you get this specific data generated, or a web server set up and running. The focus here is how to interpret data with a basic web page – so hopefully you’ll already have a way to serve and process some php files.

For this project overall, I used three files:

  • index.html – the main file you’ll call when you open your browser. It’ll also contain the page styles, instead of a separate .css file, and invoke the Javascript file
  • main.js – the file that will contain the scripts used that, in turn, call d3.js
  • query.php (this comes in part 2) – the file that handles the communication between your page and a database

The index and js files can sit at the web directory root of the server, or they can reside on your own machine. I’ve been using Brackets and testing this on my local machine, with php files running off a virtual machine and the concept is really simple:

  • Open index.html 
  • Load d3.js and the main.js files
  • Load in some data that represents computers
  • Create an SVG on the main page
  • Create a sub shape for that SVG for each computer

Index.html

The html landing page isn’t going to have an awful lot in it. Its primary purpose is to load the JS files, which in this case are d3.js v4 and jquery (used for simple AJAX calls later in part 2).

<html>
    <head>
        <title>Room test</title>
        <script src="https://d3js.org/d3.v4.js"></script>
        <script src="jquery-3.1.1.js"></script>       
    </head>
    <body>  
    </body>    
        <script src="main.js"></script>
</html>

Note that main.js is called after everything else; this is so that it loads after other JS libraries. You also don’t need to type out the entire <script type=”text/javascript” src=”main.js”></script> as of html5, since Javascript is the default script type now and the “type” attribute can be omitted.

main.js

This is where the main gubbins of this example resides. The gist of it is:

  • Create a blank SVG
  • Load in list of computers and a list of positions
  • Draw a new circle for each computer at its respective position
  • For fun, display the hostname for each of those computers when you hover over it with the mouse

Here’s each part broken down:

Creating a blank SVG

Once you’ve loaded the d3.js library in your index.html file, you can access d3 functions as in the example below. All it does is to create a blank SVG, appended to the body of the page, with an arbitrary width and height.

var w = 500;
var h = 450;
var svg = d3.select("body")
            .append("svg")
            .attr("width", w)
            .attr("height", h);


Load in computers and positions

So far so good? Next I’m just going to create two objects for a Computer and a Position, each taking some parameters to represent what they are. A computer is, for now, defined as simply a name – and this has a “place”. A position is a combination of a place number and its respective x and y coordinates. The reason these are separate is because at some point we might have different rooms or position layouts and I want to keep the computer and position data separate.

function Computer(place, hostname) {
    this.place = place;
    this.hostname = hostname;
}

function Position(place, posx, posy) {
    this.place = place;
    this.posx = posx;
    this.posy = posy;
}

var positions = [
    new Position('10', 0, 0),
    new Position('20', 80, 0),
    new Position('30', 160, 0),
    new Position('40', 240, 0),
    new Position('50', 0, 100),
    new Position('60', 80, 100),
    new Position('70', 160, 100),
    new Position('80', 240, 100)
];

var computers = [
    new Computer('10', "WS10562"),
    new Computer('20', "WS10239"),
    new Computer('50', "WS10555"),
    new Computer('60', "WS9111"),
    new Computer('70', "WS11032"),
    new Computer('40', "WS11031")
];

So here are two arrays of data for the computers and positions. The logic is that, whilst there may be any number of positions, they may not all be filled by a computer. Anyhow, this is all sort of irrelevant to D3 for now (and it could have been loaded in externally), so I’ll get on and demonstrate how you can now put something on screen.

Draw a new circle for each computer at its respective position

Very simply, I’m going through that array of computers and, for each one, I’ll add a circle at that position.

for (var x = 0; x < computers.length; x += 1) {
    
    var posIndex = positions.findIndex(y => y.place == computers[x].place);
                                        
    svg.append("svg")
        .append("circle")
        .attr("cx", positions[posIndex].posx + 30)
        .attr("cy", positions[posIndex].posy + 30)
        .attr("r", 20)
        .style("fill", "purple");

}

To match the data in the positions array up with the computers array, I need to first find the index of the correct item in positions array that corresponds with the “place” of the computer at the current index. In SQL, a left or an inner join would do what we need to do but in this example, I’m using two separate arrays of data that I need to match up.

Apparently, as of ES6, you can use findIndex. What this will do is return the index of positions where it finds a match by the function provided. Because I’m trying to match a property of an item in the array, the function needs to compare that “place” property for each item in the position array to the current computer’s “place” property. The => operator shortens the need to make that function by using y as the variable to represent the operative array item and it will return true when it is equal to the condition given.

For each of these computers, you can then append the SVG created earlier with a circle and give it the attributes for the radius, x and y coordinates (with an offset) and modify their style (which could be done in the index.html file but you can do it now too), which is just the fill colour here. This just adds some circles nested within the SVG tag that has been added to the page – nothing hugely complex, which is the great thing about D3. It is just a nice way to access the DOM and to add elements to a webpage dynamically.

It is important to note that this is not the best way to use D3. The way in which it should be done is to say you’ll add all of the elements of a given shape in one call then pass the data in – here, we’re going through the data first and then just adding one element on each iteration of the loop. There is no need to use a for loop in d3 and so what I’ve done is counter-intuitive to the way you’d normally learn it; but I’m simplifying the process of combining two arrays’ worth of data which I haven’t been able to find a nicer way to do when using D3. Besides, later it won’t be necessary; however, it was useful to figure out a nice way to make things work for now.

Display the hostname on mouse events

This is really easy to do. You first need to modify the previous code a little to look like this:

    svg.append("svg")
        .append("circle")
        .data(computers) //Add this!
        .attr("cx", positions[posIndex].posx + 30)
        .attr("cy", positions[posIndex].posy + 30)
        .attr("r", 20)
        .style("fill", "purple")
        .on("mouseover", fadein) //Mouse over event
        .on("mouseout", fadeout); //Mouse moved away event

Although it isn’t used as extensively as it will be later, the data function has been added in which is needed to provide the hostnames to each of the shapes when you mouse over them. For that to happen, two events need to be added with the on function – which are “mouseover” and “mouseout” (events that are triggered when the mouse is detected to have entered and exited the boundaries of the element in question). As much as I like the whole anonymous function thing in JS, I’m just going to call some named ones because I hate polluting what should be simple code with a bunch of ugly long functions that are more than 2 or 3 lines long.

And these are the functions you need:

var div = d3.select("body")
            .append("div")
            .attr("class", "tooltip")
            .style("opacity", 0)
            .text("");


function fadein(d, i) {
    div.transition().duration(200).style("opacity", 0.9);
    div.style("left", d3.mouse(this)[0])
	.style("top", d3.mouse(this)[1])
	.html(d.hostname);
    //console.log("fadeoin");
}

function fadeout() {
    div.transition().duration(400).style("opacity", 0);
    console.log("fadeout");
}

Here, the two functions can take two parameters passed into them by d3, which are the data and an index.The data is the element of the array used when each shape is created (although, in this case, that will always just be the first element, since only one circle is added at a time). The index will be which iteration that d3 element was created during.

I’ve also added a new div to the page up there too – that’s because, in order to have text pop up, I want to do it in a tiny floating “box”, which is really just an HTML element. As a result, changing the text is as simple as changing the html property of the object to whatever the hostname of that data object is. Note that, if you were to use a totally different dataset for this, “hostname” would have to be replaced by whatever else you would want to have displayed instead. I also have it appear at wherever the mouse is with a bit of a transition time, because that makes it look a bit swishier.

One last thing is that, to make it actually look nice, you might want to add a style just for the tooltip (hence div.tooltip) to the main html file within the <head> section somewhere:

<style>          
div.tooltip {
                position: absolute;
                text-align: center;
                width: 60px;
                height: 29px;
                padding: 2px;
                font: 12px sans-serif;
                background: green;
                border: 0px;
                border-radius: 9px;
                pointer-events: none;
		color: white;
            }
</style>

This centers the text and gives it a solid colour background with a bit of a rounded border and some padding.

Conclusion

If you’ve done it right, the result should look something like this (I’ve added both circles and rectangles here as a test and reduced the number of “computers” a bit for this example)


Carrying straight on from my previous post on the subject, I’m going to go through the alluded to third page to add, which is query.php and change main.js a little, too. The purpose is to swap out the hard coded arrays of data for an external data source, namely a web-based resource rather than any locally stored files using AJAX and JSON.

Query.php

What we’ve got so far are some blobs being drawn at various positions on the screen, based on the data stored in a couple of arrays. It isn’t all that exciting, but the main thing is that we have data in an array that can be visualised. The next step is then to load in that list of a computers from an external source. D3 can do things like load CSVs and JSON data in from a file, but since I’ve been using php to fetch data already from my database, I felt that it would be worth just adding a bit more code to what is already there to put that data into d3.

In another previous post I’d displayed the results of a query in a table, but what I want to do instead is to store them in JSON format. Its a data format that can be read and used by many different parsers on different platforms as well as being able to be directly read in by Javascript and interpreted as a list of objects.

Below is what you should be able to use to return and display a JSON string.

<?php 
	
	$username = "user";
	$password = "password";
	$room = $_GET['room'];

	$serverDB = "mysql:host=localhost;dbname=inventory";
	$conn = new PDO($serverDB, $username, $password);

	if ($conn->connect_error) {
		die("Connection failed: " . $conn->connect_error);
	}
		
	$getHosts = "SELECT * from hosts WHERE Room = '". $room ."'";

	$hosts = array();
	
	if ($result = $conn->query($getHostsPlaces))
	{
	while ($row = $result->fetch(PDO::FETCH_ASSOC))
		{
			$hosts[] = $row;
		}
		
	echo json_encode($hosts);
	}
	
	$result->closeCursor();
	$conn = null;

The first thing to note here is that, in this example, the request for the page will take the form of http://url/query.php?room=A001 – where “A001” would be the room you are asking to have the computers returned from. This lets me create the select statement with the room specified and return only the computers in a certain room.

I then create an array that has a new element added for each row (leftover terminology from the previous example). The syntax isn’t obvious but assinging a value to an array without specifying a key seems to be the same as array.push() in Javascript. After that, I then call json_encode and pass it the array of hosts, which serialises the data to be read in by something else later. In this instance I simply echo the data, which should be an array of data.

One last thing is that, unlike any previous examples, I try to now use PDOs. Included with most php/mysql installations of Linux, its a technology-neutral way to access most databases (although the connection string does specify that it is a MYSQL database), so in lieu of any real reason not to, I have decided to go down that route. However, one important thing I found out was that, if you don’t properly close the connection and queries when you’re done, you get internal server errors. So, whilst you didn’t have to do this with mysql(i) connections, you absolutely do have to with PDOs, which is probably a good thing.

When I call this page from my browser, what is displayed is the JSON’d data, as expected:


With that done, I can now go back to my main.js file and make some changes so that this data is read in.

main.js

jQuery and d3.json

It is at this point that the reference to the jQuery library becomes relevant. To access the jQuery object, you just have to use a $. It turns out that this is actually a legitimate variable name – but thankfully nobody else would be crazy enough to use it on its own so jQuery can use it all on its own. What it can then be used to do is to manipulate the DOM, like D3, although in a different way. But it can also be used to perform an AJAX request – used to grab data from another page via an XML HTTP Request, but with a fraction of the code. To call our query.php page and interpret the returned data as JSON, you can use the following code below.

$.ajax({
	url: "query.php?room=w004",
	dataType: "JSON",
	success: makeComputers
});

The callback function is what is invoked (with the data passed in as a parameter) when the AJAX call is successful (you can create a similar callback for a failure, too). I’ve made a function called makeComputers, where I will put all of the previous code.

Update: I have since found that there is an even simpler way, when using d3.xhr or d3.json. For this example, you can reduce the above code down to a single line and cut jQuery out completely:

d3.json("query.php?room=w004", makeComputers);

In either case, the result will be the same; makeComputers will be called when the call has completed. This is an asynchronous call, though, so any code inside makeComputers will likely happen a few milliseconds after whatever follows either call.

I’ve modified the original code from last time to be as follows:

function Computer(place, hostname) {
    this.place = place;
    this.hostname = hostname;
}
function Position(place, posx, posy) {
    this.place = place;
    this.posx = posx;
    this.posy = posy;
}

var positions = [
    new Position('1', 0, 0),
    new Position('2', 80, 0),
    new Position('3', 160, 0),
    new Position('4', 240, 0),
    new Position('5', 320, 0),
    new Position('6', 400, 0),
    new Position('7', 0, 100),
    new Position('8', 80, 100),
    new Position('9', 160, 100),
    new Position('10', 240, 100),
    new Position('11', 320, 100),
    new Position('12', 400, 100),
    new Position('13', 0, 200),
    new Position('14', 80, 200),
    new Position('15', 160, 200),
    new Position('16', 240, 200),
    new Position('17', 320, 200),
    new Position('18', 400, 200),
    new Position('19', 0, 300),
    new Position('20', 80, 300),
    new Position('21', 160, 300),
    new Position('22', 240, 300),
    new Position('23', 320, 300),
    new Position('24', 400, 300),
];

var computers = [];

var w = 450;
var h = 450;
var svge = d3.select("body")
            .append("svg")
            .attr("width", w)
            .attr("height", h);
var div = d3.select("body")
            .append("div")
            .attr("class", "tooltip")
            .style("opacity", 0)
            .text("Tooltip");

function makeComputers(jsony){
	for(var k=0; k<jsony.length; k++){
		computers.push(new Computer(k+1,jsony[k]['hostname']));
	}
	var recties = svge.selectAll("rect")
			.data(computers)
			.enter()
			.append("svg")
			.attr("data-hello", function (d,i) {return d[i]; })
			.append("rect")
			.attr("width", 30)
			.attr("height", 30)
			.attr("x", function(d,i) {var xloc = positions.findIndex(y => y.place == computers[i].place); return positions[xloc].posx +15})
			.attr("rx", 6)
			.attr("ry", 6)
			.attr("y", function(d,i) {var xloc = positions.findIndex(y => y.place == computers[i].place); return positions[xloc].posy +15})
			.style("fill", "Lavender")
			.on("mouseover", fadein)
			.on("mouseout", fadeout)
			.on("mousemove", moviemouse);
}
function fadein(d, i) {
    div.transition().duration(200).style("opacity", 0.9);
    div.style("left", d3.mouse(this)[0])
	.style("top", d3.mouse(this)[1])
	.html(d.hostname);
}
function fadeout(e) {
    div.transition().duration(400).style("opacity", 0);
}
function moviemouse(e) {
    div.style("left", d3.mouse(this)[0])
        .style("top", d3.mouse(this)[1]);
}

d3.json("query.php?room=w004", makeComputers);

Just to break this down in summary:

  • The makeComputers function starts off by adding all of the computers imported to the computers array based on their hostname
  • It then adds in rectangles, with the mouse listeners, using the better D3 method of adding SVGs to the page.
  • I’ve also used the findIndex function without needing a for loop, since D3 provides the index to be able to do this.
  • There are no longer any computers specified in the array of computers
  • There are now three functions associated with fading in/out and movement of the mouse (so the position of the tooltip box will change as the mouse moves)
  • Finally, this all happens when I call makeComputers at the end as the function that is executed once the request to the given URL has completed

The only last modification you may need to make, if your query.php file is stored on a different server to the one you are running your index.html and main.js from, is to add this to the top of your query.php file:

<?php 
 header("Access-Control-Allow-Origin: *");

This allows calls from other domains to be made, which is disabled by default for security reasons. However, if you’re confident that (for testing purposes at least) this won’t be an issue, then you can go ahead and enable to it, which lets you do things like run your index.html page and JS files from your local disk and make queries to the remote server.

This should have hopefully got you to a stage where you can make requests for JSON data to a web server and have it return some SQL results as readable data by JavaScript, but if anyone has any issues or encounters any oddities, do get in touch!


Ok so this is a bolt-on post to my previous post, where I am now essentially trying to figure out a nice way to map the data between the computers and their positions in a room. The way I’ve designed the system is that I have three tables with the relevant data:

  • Hosts: The main piece of data here is the hostname and other data – but it also contains the room that the host belongs to (and the “place”, which is just a notional number that I placed on a diagram)
  • Rooms: This is the list of rooms and their “layout type”. We could have ten different rooms each with the same layout, so this is a way to say which room has which layout type. Its sole purpose is to join the other two tables.
  • Places: The combination of a layout type and a position will give you an x and a y coordinate. This is a relative coordinate. It doesnt have to know which rooms are associated with it, its purely data on where – for a given layout type – a “position” would exist.

The idea for this is that you would fetch the respective coordinates for a host from the places table. The hosts table only has the place, so its necessary to fetch the correct layout type that matches the room, and then fetch the coordinates based on that data.

Complicated? A little. Especially for something that doesn’t seem too big. But I want it to be scalable and to separate out the data for positions from the hosts; a room may entirely change its layout but, so long as the room doesn’t change, the only thing I would need to change is the layout type and then the coordinates. However, I could have just placed all of this data into the hosts table – or removed the third table for places and just have mapped each room directly to sets of coordinates (and I still may!).

But I did find a solution, although it took a few iterations. I needed to refresh myself on inner and left joins a bit but my original plan was to do a left join between the hosts table and places table where the hosts’ room is a specific room. But then the places table works on layout type and noot a room number.

Ok so the first step would be something like this:

SELECT hostname, place, room, posx, posy
FROM hosts
INNER JOIN places ON places.position = hosts.place 

WHERE room = "W004"

Select the hostname from hosts, the coordinates from places, the room and the place from the inner join’d josts and places. The inner join will be done where the position field from places matches the place field from hosts. To limit it, I then just put “where room = w004”.

This would return a lot of results, since there’s many hosts potentially with the same place and many places with the same position. The “where” limitation narrows the hosts down to only the selection relevant to the one room, but it still leaves lots of entries potentially from the position, since there will likely be n times as many results as there are positions and layouts. That would then give duplicate host results, a duplicate for each recurring position that appears in the places table.

So the next step is to narrow this further, which was causing me a lot of headaches. I had an idea to expand the “WHERE” statement to include the room, but that isn’t a part of the dataset constructed by the joins. The solution was to do two joins – the second join being where the layout type matches the room specified in the room table and where the room matches in both the room and hosts table. This narrows both the hosts and rooms down to just one room, which means in turn there will only be one layout – and this further restricts the results from places down to what I need.

SELECT hostname, place, rooms.room, posx, posy 
FROM hosts 
INNER JOIN places ON places.position = hosts.place
INNER JOIN rooms ON rooms.room = hosts.room AND rooms.layoutType = places.layout 

WHERE rooms.room = "W004"

Note that I could have used left joins, which would preserve all the host data, but I am trying to narrow it down and there’s just no need for anything else. I should probably also tidy up some of the names a bit, especially since there is now ambiguity between the different “room”s, but not between place and position.

With that done, I can now replace my original SQL statement:

$getHosts = "SELECT * from hosts WHERE Room = '". $room ."'";

With the following:

$getHosts = "SELECT hostname, place, rooms.room, posx, posy FROM hosts INNER JOIN places ON hosts.place = places.position INNER JOIN rooms ON rooms.room = hosts.room AND rooms.layoutType = places.layout WHERE rooms.room = '". $room ."'";

A lot longer, but it returns a single dataset with all the position data we need for a given room!