Hire a web Developer and Designer to upgrade and boost your online presence with cutting edge Technologies

Friday, July 28, 2023

Shines, Perspective, And Rotations: Fancy CSS 3D Effects For Images

 CSS has all kinds of tricks that are capable of turning images into neat, interactive elements. This article is a collection of fancy 3D effects for images that demonstrate those CSS powers. Get ready to learn how they work as we get our hands dirty with CSS features that add perspective, depth, rotation, and even a slick shine to images that you can use on your next project.

We all agree that 3D effects are cool, right? I think so, especially when they are combined with subtle animations. In this article, we will explore a few CSS tricks to create stunning 3D effects!

“Why do we need another article about CSS 3D effects… aren’t there already a million of those?” Yes, but this one is a bit special because we are going to work with the smallest amount of HTML possible. In fact, this is the only markup we will use to craft some pretty amazing CSS effects for images:

<img src="" alt="">

That’s it! All we need is an <img> tag. Everything else will be done in CSS.

Here’s how it’s going to work. We are going to explore three different effects that are not linked to each other but might borrow a little from one another. You don’t need to read the entire article in one sitting. Actually, I suggest reading one section at a time, taking time to understand the concepts and what the underlying code is doing before moving on to another effect.

Table Of Contents #

More after jump! Continue reading below ↓

CSS 3D Shine #

For the first effect, we are going to add a shine animation to the image, as well as a slight rotation when hovered.

See the Pen 3D Shine effect on hover by Temani Afif.

See that? The image starts slightly askew but then straightens out on hover while a shine reflects off the surface. This is a neat way to add a bit of realism to a UI without going overboard.

The first thing I did in that demo was add a rotation to the image in CSS:

img {
  transform: perspective(400px) rotate3d(1, -1, 0, 8deg);
}
img:hover {
  transform: perspective(400px) rotate3d(1, -1, 0, -8deg);
}

rotate3d allows us to define an axis for the image to rotate around. I won’t dig into the math details, but to get a diagonal axis, we make the z-axis equal to 0 and use 1 or -1 for both the x-axis and y-axis.

Then, we use the perspective property to add a little imbalance to the image. There is no particular logic behind the 400px value or the 8deg applied to the rotation, but I’ve found that a small angle combined with a big perspective gives a good result. Feel free to edit them, and maybe you will find better values for your specific use case.

We can simplify this! To avoid repetition on :hover, we can use a CSS variable to update the sign of the angle on hover. That way, there’s no need to re-write the entire declaration simply to change 8deg to -8deg.

img {
  transform: perspective(400px) rotate3d(1, -1, 0, calc(var(--i, 1) * 8deg));
}
img:hover {
  --i: -1;
}

Notice how I’m using calc() in there. By multiplying the degree value by 1 (defined by the --i variable), we get 8deg by default. Then we swap that out by changing 1 to -1 in the hover ruleset and let calc() do the heavy lifting.

That’s fun! But it gets even more interesting when we start working on the shine. An intuitive approach to making a shine might be to rely on an overlay that we place above the image. But remember, we’re working with nothing but a single <img> element, and an overlay would require more markup.

You might also be tempted to reach for a pseudo-element instead. But that’s not going to work here, unfortunately, because they won’t work with the <img> tag.

What we are going to do is “fake” it with a CSS mask and an animated gradient. I am saying “fake” because, in reality, the image you see is partially transparent. On hover, the transparency is updated to create a shiny effect.

I know it’s not easy to grasp, but if you consider that our background is black — and, yes, that is part of the trick! — making the image partially transparent is similar to making the image darker. And when the image is hovered, we adjust the transparency to brighten it up.

Here is a simplified example using opacity to better understand what I mean:

See the Pen Opacity transition by Temani Afif.

That’s the basic idea. Now, instead of opacity, we are going to use mask with a linear-gradient()

/* Diagonal gradient that is opaque 
 * in the center and semi-transparent 
 * on both sides.
*/
mask: linear-gradient(135deg, #000c 40%, #000, #000c 60%);

When masking in CSS, the color doesn’t matter considering the default mask-mode. All that matter is the alpha channel that will define the level of transparency. In our case, the diagonal part is opaque, while the sides are partially transparent. #000c is equivalent to rgb(0 0 0 / 80%).

See the Pen Adding the gradient mask by Temani Afif.

The gradient is super subtle because we only reduced the transparency a little. That’s a good thing because we don’t want the user to notice that the image is partially transparent by default.

The next step is to animate that gradient. We increase its size to the point where the opaque center is out of view. Then we move it from the top-left corner of the image to the bottom-right corner:

img {
  mask:
    linear-gradient(135deg, #000c 40%, #000, #000c 60%)
    100% 100%/ /* initial position, bottom-right */
    240% 240%; /* width and height */
}
img:hover {
    mask-position: 0 0; /* Move to the top-left on hover */
}

Check it out; we have a nice shine on hover!

See the Pen Adding the hover effect by Temani Afif.

Cool, right? Now let’s combine that shine above with the 3D rotation to get the full effect.

img {
  transform: perspective(400px) rotate3d(1,-1,0,calc(var(--i,1)*8deg));
  mask:
    linear-gradient(135deg,#000c 40%,#000,#000c 60%)
    100% 100%/240% 240%;
  transition: .4s;
  cursor: pointer;
}
img:hover {
  --i: -1;
  mask-position: 0 0;
}

One HTML element and a few lines of CSS are all we needed to make that happen. Here is a figure to illustrate the different values used inside the mask:

Demonstrating how the CSS mask covers the image and how it slides on hover
Demonstrating how the CSS mask covers the image and how it slides on hover. (Large preview)

The green box illustrates the gradient where the blue lines define the color stops we used. Initially, it’s placed at 100% 100%, and on hover, we slide it to 0 0. The slide effect will move the diagonal part of the gradient (the opaque part) along the image to create the shine effect.

Here is the full demo again. I’m even including a second variation for you to tear apart and investigate how it works.

See the Pen 3D Shine effect on hover by Temani Afif.

CSS 3D Parallax #

We normally think of “parallax” as this thing we use for interesting scrolling effects where elements change position at different speeds. But we can use it to make a slick hover effect on our image too.

See the Pen 3D parallax effect on hover by Temani Afif.

Like the shine effect we made in the last section, we start with a slightly skewed image that straightens out on hover. But, instead of applying a shine, we’re sliding the image over a smidge with a transition to make it look like the focal point rotates with the image, adding a sense of depth to it.

You might think we need to stack two versions of the same image to pull this off, but not at all! The effect is done with a single image and a few lines of CSS for the “fake” parallax effect. Yes, I’m calling this a “fake” effect because it’s not really a parallax implementation but a combination of movements that trick your brain into thinking it is! If you want to see “real” parallax at work, this pen from Sladjan is a great example.

The image is very important here. For a perfect illusion, consider an image where the main element is placed at the center, and the background is uniform. That might be a bit of a limitation as far as this effect goes, so it might not be the best approach for every image.

The image rotates and changes perspective on hover, just like the shine effect in the last section. This time, however, we’re rotating along the y-axis (rotateY()) instead of all three axes (rotate3d()).

img {
  transform: perspective(400px) rotateY(8deg);
}
img:hover {
  transform: perspective(400px) rotateY(-8deg);
}

We accomplish the sliding movement with a combination of CSS clipping and translation. This is the trickiest part of the effect. Here is a simplified demo to illustrate the main idea:

See the Pen Moving the image inside a box by Temani Afif.

We have an image inside a box with a green border representing the clipped area. The clipped area is square, and the image overflows the right edge a bit. On hover, we slide the image to the left (using transform: translateX()) while the clipped area remains in place.

If we hide the part of the image that overflows the clipped area (overflow: hidden) and add the same rotation we made in the last section, we get the “fake” parallax effect we want:

See the Pen Adding the rotation + the overflow by Temani Afif.

But that demo uses an extra <div> element to pull it off. Our challenge is to do the same thing without that element. That’s where clip-path is really helpful:

img {
  --f: .1; /* parallax factor (the smaller, the better) */

  --_f: calc(100 * var(--f) / (1 + var(--f)));
  width: 250px; /* image size */
  aspect-ratio: calc(1 + var(--f));
  object-fit: cover;
  clip-path: inset(0 var(--_f) 0 0);
  transition: .5s;
}
img:hover {
  clip-path: inset(0 0 0 var(--_f));
  transform: translateX(calc(-1 * var(--_f)))
}

The --f variable controls the effect, describing how much the image should move. You will notice that I am using it to calculate an aspect-ratio that is slightly greater than 1 to create a non-square image that we later clip to get a square image. --_f defines the portion we must cut from the image to get a 1:1 square ratio.

Demonstrating how the clip-path values change when the image is in a hovered state
Demonstrating how the clip-path values change when the image is in a hovered state. (Large preview)

The clip-path defines the clipped area, and we need that area to remain fixed. That’s why we added a translation on hover to move the image in the opposite direction of the clip-path.

See the Pen Clip-path + translation by Temani Afif.

We add the rotation to the mix, and the effect is perfect:

img {
  --f: .1; /* parallax factor (the smaller the better) */
  --r: 10px; /* the radius */

  --_f: calc(100%*var(--f)/(1 + var(--f)));
  --_a: calc(90deg*var(--f));

  width: 250px; /* image size */
  aspect-ratio: calc(1 + var(--f));
  object-fit: cover;
  clip-path: inset(0 var(--_f) 0 0 round var(--r));
  transform: perspective(400px) translateX(0px) rotateY(var(--_a));
  transition: .5s;
}
img:hover {
  clip-path: inset(0 0 0 var(--_f) round var(--r));
  transform: perspective(400px) translateX(calc(-1*var(--_f))) rotateY(calc(-1*var(--_a)));
}

I’ve rounded the edges of the clipped area slightly to make the effect a little more fancy. If you’re wondering why I didn’t use the border-radius property, it’s because the property doesn’t work well with clipped areas. Luckily, clip-path accepts a round value to get the same sort of rounded corners.

That’s it! We’re actually done with this neat hover effect on our image.

See the Pen 3D parallax effect on hover by Temani Afif.

You can adjust the parallax factor and the rotation angle, then work with the best image possible for using it in your own work. If you do use it, please show me your demos in the comments!

CSS 3D Rotation #

For this last demo, we will add depth to the image and transform it into a 3D box.

See the Pen 3D images with hover effect by Temani Afif.

For this one, I will skip the rotation part because it’s the same as what we just made in the last demo. Let’s focus instead on the 3D part, using the outline and clip-path properties. The following image illustrates how they come together to form a 3D box.

An outline surrounds the image (1), then is offset to cover the image (2) so that it can be clipped in the shape of a box (3)
An outline surrounds the image (1), then is offset to cover the image (2) so that it can be clipped in the shape of a box (3). (Large preview)

Here’s how that works. First, we add some padding to the top and the bottom of the image and apply an outline that is semi-transparent black.

Second, we apply a negative outline-offset so that the outline covers the image on the left and right sides but leaves the top and bottom alone:

img {
  --d: 18px;  /* depth */

  padding-block: var(--d);
  outline: var(--d) solid #0008;
  outline-offset: calc(-1 * var(--d));
}

Notice that I have created a variable, --d, that controls the thickness of the outline. This is what gives the image depth.

The last step is to add the clip-path. We need a polygon with eight points for that.

An image with the eight points of the clipped polygon shape
Showing the eight points of the clipped polygon shape. (Large preview)

The red points are fixed, and the green points are ones that we will animate to reveal the depth. I know it’s far from a 3D box, but this next visual, where we add the rotation, gives a better illustration.
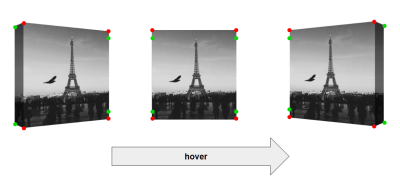
The image starts with depth facing in one direction (left), then is rotated on hover to hide the depth for a flat appearance (center). We can change the direction of the depth as well (right)
The image starts with depth facing in one direction (left), then is rotated on hover to hide the depth for a flat appearance (center). We can change the direction of the depth as well (right). (Large preview)

Initially, the image is rotated with some perspective. The green points on the right are aligned with the red ones. Thus, we hide the outline on that side to keep it visible only on the left side. We have our 3D box with the depth on the left.

On hover, we move the green points on the left while rotating the image. Halfway through the animation, all the green points are aligned with the red ones, and the rotation angle is equal to 0deg, hiding the outline and giving the image a flat appearance.

Then, we continue the rotation, and the green points on the right move while the left ones remain in place. We get the same 3D effect but with the depth on the right side.

Bear with me because the next block of code is going to look really confusing at first. That’s due to a few new variables and the eight-point polygon we’re drawing on the clip-path property.

@property --_l {
  syntax: "<flength>";
  initial-value: 0px;
  inherits: true;
}
@property --_r {
  syntax: "<length>";
  initial-value: 0px;
  inherits: true;
}

img {
  --d: 18px;  /* depth */
  --a: 20deg; /* angle */
  --x: 10px;

  --_d: calc(100% - var(--d));
  --_l: 0px;
  --_r: 0px;

  clip-path: polygon(
    /* The two green points on the left */
    var(--_l) calc(var(--_d) - var(--x)),
    var(--_l) calc(var(--d)  + var(--x)),

    /* The two red points on the top */
    var(--d) var(--d),var(--_d) var(--d),

    /* The two green points on the right */
    calc(var(--_d) + var(--_r)) calc(var(--d)  + var(--x)),
    calc(var(--_d) + var(--_r)) calc(var(--_d) - var(--x)),

    /* The two red points on the bottom */
    var(--_d) var(--_d),var(--d) var(--_d)

    );
  transition: transform .3s, --_r .15s, --_l .15s .15s;
}

/* Update the points of the polygon on hover */
img:hover{
  --_l: var(--d);
  --_r: var(--d);
  --_i: -1;
  transition-delay: 0s, .15s, 0s;
}

I’ve used comments to help explain what the code is doing. Notice I am using the variables --_l and --_r to define the position of the green points. I animate those variables from 0 to the depth (--d) value. The @property declarations at the top allow us to animate the variables by specifying the type of values they are (<length>).

Note: Not all browsers currently support @property. So, I’ve added a fallback in the demo with a slightly different animation.

After the polygon is drawn on the clip-path property, the next thing the code does is apply a transition that handles the rotation. The full rotation lasts .3s, so the green points need to transition at half that duration (.15s). On hover, the polygon points on the left move immediately (0s) while the right points move at half the duration (courtesy of a .15s delay). When we leave the hovered state, we use different delays because we need the right points to move immediately (0s) while the left points move at half the duration.

What’s up with that --x variable, right? If you check the first image that I provided to illustrate the clip-path points, you will notice that the green points are slightly shifted from the top and bottom edges, which is logical to simulate the 3D effect. The --x variable controls how much shifting takes place, but the math behind it is a bit complex and not easy to express in CSS. So, we update it manually based on each case until we get a value that feels right.

That gives us our final result!

See the Pen 3D images with hover effect by Temani Afif.

Wrapping Up #

I hope you enjoyed — and perhaps were even challenged by — this exploration of CSS 3D image effects. We worked with a whole bunch of advanced CSS features, including masks, clipping, gradients, transitions, and calculations, to make some pretty incredible hover effects for images that you certainly don’t see every day.

And we did it in a way that only needed one line of HTML. No divs. No classes or IDs. No pseudo-elements. Just a single <img> tag is all we need. Yes, it’s true that more markup may have made the CSS less complex, but the fact that it relies on a plain HTML element means the CSS can be used more broadly. CSS is powerful enough to do all of this on a single element!

I’ve written extensively about advanced CSS styles for images. If you’re looking for more ideas and inspiration, I encourage you to check out the following articles I’ve published:

I also run a site called CSS Tip that explores even more fancy effects — subscribe to the RSS feed to keep up with the experiments I do over there!

How To Become A Better Speaker At Conferences

 During a ten-year run curating the UX London and Leading Design conferences, Andy Budd has watched thousands of presentations. This article outlines some of the things that make a potentially amazing presentation, as well as a few big gotchas. If you’ve ever wondered what it takes to get a speaking slot at a conference, this article is for you.

During my time curating the UX London and Leading Design events, I used to watch a few hundred presentations each year. I’d be looking at a range of things, including the speaker’s domain experience and credibility, their stage presence and ability to tell a good story, and whether their topic resonated with the current industry zeitgeist.

When you watch that many presentations, you start to notice patterns that can either contribute to an absolutely amazing talk or leave an audience feeling restless and disengaged. But before you even start worrying about a delivery, you need to secure yourself a spot on the stage. How? Follow me along, and let’s find out!

Choosing What To Speak About #

I think one of the biggest misunderstandings people have about public speaking is the belief that you need to come up with a totally new and unique concept — one that nobody has spoken about before. As such, potentially amazing speakers will self-limit because they don’t have “something new to share.” While discovering a brand new concept at a conference is always great, I can literally count the number of times this has happened to me on the one hand. This isn’t because people aren’t constantly exploring new approaches.

However, in our heavily connected world, ideas tend to spread faster than a typical conference planning cycle, and the type of people who attend conferences are likely to be taped into the industry zeitgeist already. So even if the curator does find somebody with a groundbreaking new idea, by the time they finally get on stage, they’ve likely already tweeted about it, blogged about it, and potentially spoken about it at several other events.

The photo shows the audience at the dConstruct conference, lots of seated people in the room, some of them with their laptops open; all are looking at the stage where the ‘dConstruct’ logo is displayed
The audience at dConstruct conference. (Large preview)

I think the need to create something unique comes from an understandable sense of insecurity.

“Why would anybody want to listen to me unless I have something groundbreaking to share?”

The answer is actually more mundane than you might think. It’s the personal filter you bring to the topic that counts. Let’s say you want to do a talk about OKR’s (Objectives and Key Results) or Usability Testing — two topics which you might imagine have been “talked to death” over the years.

However, people don’t know the specific way you tackled these subjects, the challenges you personally faced, and the roadblocks you overcame. There’s a good chance that people in your audience will already have some awareness of these techniques. Still, there’s also a good chance that they’ve been facing their own challenges and want nothing more than to hear how you navigate your way around them, hopefully in an interesting and engaging manner.

Also, let’s not forget that there are new people entering our industry every day. There are so many techniques I’ve made the mistake of taking for granted, only to realize that the people I’m talking to have not only never practiced them before but might not have even come across them; or if they have, they might have only the scantest knowledge about them, gleaned from social media and a couple of poorly written opinion pieces.

In fact, I think our industry is starting to atrophy as techniques we once thought were core ten years ago barely get a mention these days. So just because you think a subject is obvious doesn’t mean everybody feels the same, and there isn’t room for new voices or perspectives on the subject.

Another easy way to break into public speaking is to do some kind of **case study**. So think about an interesting project you did recently. What techniques did you use, what approach did you take, what problems did you encounter, and how did you go about solving them? The main benefit of a case study type talk is that you’ll know the subject extremely well, which also helps with the nerves (more on this later).

During the past few years, there were published many excellent, very detailed case studies on Smashing Magazine — take a look at this list for some inspiration.

More after jump! Continue reading below ↓

Invest The Right Amount of Time Doing Prep #

Another thing people get wrong about public speaking is feeling the need to write a new talk every time. This also comes from insecurity (and maybe a little bit of ego as well). We feel like once our talk is out in the world, everybody will have seen it. However, the sad reality is that the vast majority of people won’t be rushing to view your talk when the video comes online, and even if they do, there’s a good chance they’ll only have taken in a fraction of what you said if they remember any of it at all.

Margaret Lee is speaking (for the first time) at the Leading Design conference in 2016. She’s standing behind a lectern; a slide is projected on the screen next to her on the stage
Margaret Lee using personal stories to great effect at her first Leading Design talk in 2016. (Large preview)

It’s also worth noting that talks are super context-sensitive. I remember watching a talk from former Adaptive Path founder Jeff Veen at least five times. I enjoyed every single outing because while the talk hadn’t changed, I had. I was in a different place in my career, having different conversations and struggling with different things. As such, the talk sparked whole new trains of thought, as well as reminded me of things I knew but had forgotten.

It should be mentioned that, like music or stand-up comedy, talks get better with practice. I generally find that it takes me three or four outings before the talk I’m giving really hits its stride. Only then have I learnt which parts resonate with the audience and which parts need more work; how to improve the structure and cadence, moving sections around for a better flow, and I’ve learnt the bits which people find funny (some international and some not), and how to use pacing and space to make the key ideas land. If you only give a talk once, you’ll be missing out on all this useful feedback and delivering something that’s, at best, 60% of what it could potentially be.

On a practical level, a 45-minute talk can take a surprisingly long time to put together. I reckon it takes me at least an hour of preparation for every minute of content. That’s at least a week’s worth of work, so throwing that away after a single outing is a huge waste. Of course, that’s not what people do. If the talk is largely disposable, they’ll put a lot less effort in, often writing their talk “the night before the event.”

Unless you’re some sort of wunderkind, this will result in a mediocre talk, a mediocre performance, and a low chance of being asked to come back and speak again. Sadly this is one of the reasons we see a lot of the same faces on the speaker circuit. They’re the ones who put the effort in, deliver a good performance, and are rewarded with more invites. Fortunately, the quality bar at most conferences is so low that putting a little extra time into your prep can pay plenty of dividends.

Nailing The Delivery #

As well as 45 minutes being a lot of content to create, it’s also a lot of content to sit through. No matter how interesting the subject is, a monotone delivery will make it very hard for your audience to stay engaged. As such, nailing the delivery is key. One way to do this is to see public speaking for what it is — a performance — and as the performer, you have a number of tools at your disposal.

First of all, you can use your voice as an instrument and try varying things like speed, pitch, and volume. Want to get people excited? Use a fast and excitable tone. Want people to lean in and pay attention? Slow down and speak quietly. Varying the way you speak gives your talks texture and can help you hold people’s attention for longer.

Another thing you can use is the physical space. While most people (including myself) feel safe and comfortable behind the lectern, the best speakers use the entire stage to good effect, walking to the front of the stage to address the audience in a more human way or using different sides of the stage to indicate different timelines or parts of a conversation.

Scott Belsky speaking at the UX London conference. The ‘UX London’ logo in the form of cubes is arranged on the stage next to the speaker
Scott Belsky using the whole stage at UX London. (Large preview)

Storytelling is an art, so consider starting your talk in a way that grabs your audience’s attention.

This generally isn’t a 20-minute bio of who you are and why you deserve to be on the stage. One of the most interesting talks I ever saw started with one such lengthy bio causing a third of the audience to get up and walk out. I felt really bad for the speaker — who was visibly knocked — so I stuck with it, and I’m so glad I did! The talk turned out to be amazing once all the necessary cruft was removed.

“When presenting at work or [at a conference or] anywhere else, never assume the audience has pledged their undivided attention. They have pledged maybe 60 seconds and will divide their attention as they see fit after that. Open accordingly.”

Mike Davidson

A little trick I like to use is to start my talk in the middle of the story: “So all of a sudden, my air cut out. I was in a cave, underwater, in the pitch black, and with less than 20 seconds of air in my lungs.” Suddenly the whole audience will stop looking at their phones. “Wait, what?” they’ll think. What’s happening? Who is this person? Where are they? How did he get there? And what the hell does this have to do with design? You’ve suddenly created a whole series of open questions which the audience desperately wants to be closed, and you’ve just bought yourself five minutes of their undivided attention where you can start delivery.

UX London conference. The room is full, and people are looking at the stage (the stage is off-screen) with apparently undivided attention. ‘UX London’ letters are projected at the far side wall in the room
The (captivated) audience at UX London conference. (Large preview)

Taking too long to get to the meat of the talk is a common problem. In fact, I regularly see speakers who have spent so long on the preamble that they end up rushing the truly helpful bits. One of the reasons folks get stuck like this is that they feel the need to bring everybody up to the same base level of knowledge before they jump into the good stuff.

Instead, it’s much better to assume a base level of knowledge. If the talk stretches your audience’s knowledge, that’s fine. If it goes over some people’s heads, it might encourage them to look stuff up after the event. However, if you find yourself teaching people the absolute basics, there’s a good chance the more experienced members of the audience will zone out, and capturing their interest will become that much harder later on.

When speakers don’t give themselves enough time to prepare a good narrative, it’s easy to fall back on tried and tested patterns. One of these is the “listicle talk” where the speaker explains, “Here are twelve things I think are important, and I’m going to go through them one by one.” It’s a handy formula, but it makes people super-conscious of the time. (“Crikey, they’re still only at number five! I‘m not sure I’m going to make it through another seven of these points.”)

In a similar vein are the talks, which are little more than a series of bullet points that the speaker reads through. The problem is that the audience is likely to read through them much quicker than the speaker, so people basically know what you’re going to say in advance. As such, keep these sorts of lists in your speaker notes and pick some sort of title or image that illustrates the points you’re about to make instead.

Tame The Nerves #

Public speaking is unnatural for us, so everybody feels some level of stress. I have one friend who is an absolutely amazing speaker on stage — funny, charming, and confident — but an absolute wreck moments before. In fact, it’s fairly common before going on stage to think, “Why the hell am I doing this to myself?” only to come off the stage 45 or 60 minutes later thinking, “That was great. When can I do it again!”.

One way to minimize these nerves is to memorize the first five minutes of your talk. If you can go on the stage with the first five minutes in the bag, the nerves will quickly subside, and you’ll be able to ease into your presentation some more. This is another reason why starting with a story can be helpful, as they’re easy to remember and will give you a reasonable amount of creative license.

A sure way to tame the nerves is to feel super-prepared and practiced; as such, it’s worth reading your talk out loud a bunch of times before you deliver it to an audience. It’s amazing how often something sounds logical when you say it in your head, but it doesn’t quite flow properly when said out loud. Practicing in front of people is very helpful, so consider asking friends or colleagues if you could practice on them. Also, consider doing a few dry runs with a local group before getting on a bigger stage. The more you know your material, the less nervous you’ll feel.

Molly Nix is on the stage of UX London in 2019, speaking there for the first time. The stage is dark/black, with a violet color highlight behind the speaker
Molly Nix giving a brilliantly practiced talk for the first time at UX London 2019. (Large preview)

While some speakers like to brag about how little prep they’ve done or how little sleep they’ve got the night before, don’t get tricked into thinking that this is the standard approach. Often these folks are actually very nervous and are saying things like this in an attempt to preempt or excuse potential poor performance.

It reminds me of the kids at school who used to claim they didn’t study and revise the material and ended up getting a B-. They almost certainly did some revision, albeit probably not enough. But this posturing was actually a way for them to manage their own shortcomings. “I bet I could have gotten an A if I’d put some extra work in.” Instead, make sure you’re well prepared, well rested, and set yourself up for success.

It’s worth mentioning that most people get nervous during public speaking, even if they like to tell you otherwise. As such, nerves are something you just need to get better at managing. One way to do this is to re-frame “nerves” (which have negative connotations) to something more positive like “excitement.” That feeling of excitement you get before giving a talk can actually be a positive thing if you don’t let it get out of hand. It’s basically your body’s way of getting you ready to perform.

However, this excess energy can bleed out in some less helpful ways, such as the “speaker square dance.” This is where speakers either shift their weight from one foot to the other or take a step forwards, a step to the side, and a step back, like some sort of a caged zoo animal. Unfortunately, this constant shifting can feel very unsettling and distracting for the audience, so if you can, try to plant your feet firmly and just move with deliberate intent when you want to make a point.

It’s also great if you can try to minimize the “ums” and “ahs.” People generally do this to give themselves pause while they’re thinking about the next thing they want to say. However, it can come across as if you are a little unprepared. Instead, do take actual breaks between concepts and sentences. At first, it can feel a bit weird doing this on stage, but think of it as an aural whitespace, making it easier for your audience to take in one concept before transitioning on to the next.

Note: I feel comfortable calling these behaviors out as they’re both things I personally do, and I’m working on fixing them — with mixed results so far.

Avoid The Clichés #

At least once during every conference I attend, a speaker will say something jokingly along the lines of “I’m the only one standing between you and tea/lunch/beer.” It’s meant as a wry apology, and the first time I heard it, I gave a gentle chuckle.

However, I’ve been at some conferences where three speakers in a row had made the same joke. Apart from a lack of originality, this also shows that the speakers haven’t actually been listening to the other talks, probably because they’ve been in their room or backstage, tweaking their slides. Sometimes this is necessary, but I always appreciate speakers who have been engaged with the content, make references to earlier talks, and don’t trot out the same old clichés as the previous speakers.

Note: I should also add that personally, I find the joke (“the only thing between you and beer”) by the last speaker of the day somewhat problematic, as it implies that people are here for the drink rather than the conference content, and because it also somewhat normalizes overconsumption.

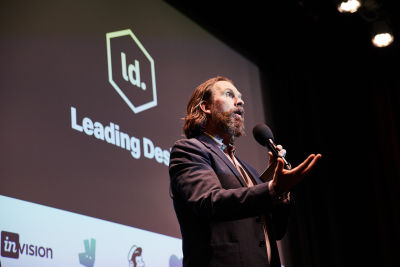
The author of this article (Andy Budd) is on stage, speaking at the Leading Design conference. The Leading Design logo is behind him
Andy Budd speaking at Leading Design conference. (Large preview)

One thing some speakers do in order to calm their nerves (and also to increase people’s engagement, as a side-effect) is through audience participation. If you get people from the audience interacting with each other for five minutes, it takes some of the pressure and focus off of you. It’s also five fewer minutes of content you need to prepare.

However, I see audience participation go wrong far more often than it goes right. This happens especially in front of Brits and Northern Europeans who would rather curl up into a ball and die rather than risk the social awkwardness of talking to their neighbors.

I remember seeing one American speaker walk up the aisle at a European conference encouraging the audience to whoop and cheer while they high-fived everybody or at least attempted to high-five everybody. Although this sort of hype-building might have worked well in Vegas, the assembled audience of Northern Europeans found the whole episode deeply embarrassing, and the speaker never truly recovered for the rest of the talk.

And, on the opposite side of things, if you do get your audience interacting, it can be quite hard to get them to stop a few minutes later! I have seen far too many speakers asking people to introduce themselves to their neighbors, only to cut them off 30 or so seconds later. So if you have such an activity planned, make sure you leave enough time for it to become a meaningful connection, and have a strategy on how you’re going to bring people’s focus back to you.

Another (negative) thing I see a lot of speakers do is make jokes about how they didn’t write their talk till last night or didn’t get to bed till late because they were out drinking. While it’s good to appear to be vulnerable and human, if played wrong, the message you might actually be sending is that you don’t really care about the audience, so be careful.

How To Get Invited Back? #

Organizing conferences can be stressful work. You’re trying to coordinate with a bunch of different people with widely different workloads, communication styles, and response times. People are super quick to say “Yes!” to a speaking gig, but then they might go dark for months on end. This is really difficult if you’re trying to get enough information to launch your event site and start selling tickets. It’s even harder if you’re trying to organize things like travel and accommodation and you are seeing the price of everything going up.

As such, you can make conference organizers’ lives a lot easier by responding to their emails in a timely manner, sending them your talk descriptions, bio information, and headshots when asked, and confirming or booking your travel details enough time in advance so that the prices don’t double in size.

Speakers who are a pleasure to work with get recommended and invited back. Speakers who don’t respond to emails, send in overly-short descriptions or leave booking travel to the last minute often don’t. In fact, I’m a member of several conference organiser Slack groups where this sort of behaviour is regularly talked about, causing invites for certain speakers to dry up quickly.

This is, sadly, another reason why you see the same speakers talking at events time and again. Not necessarily because they’re the best speakers, but because they’re reliable and don’t give the organizers a heart attack.

Conclusion #

I know this article has covered a lot of public speaking do’s and don’t’s. But before wrapping things up, it’s worth mentioning that speaking is also a lot of fun. It’s a great way to attend conferences you might not have otherwise been able to afford; you get to meet speakers whose work you might have been following for years and learn a ton of new things. It also provides a great sense of personal accomplishment, being able to share what you’ve learnt with others and “pay it forward.”

While it’s easy to assume that all speakers are extroverts, (the art of) speaking is actually surprisingly good for introverts, too. A lot of people find it quite awkward to navigate conferences, go up to strangers, and make small talk. Speaking pretty much solves that problem as people immediately have something they can talk to you about, so it’s super fun walking around after your talk and chatting with people.

Andy Budd is chatting with attendees during a coffee break. People are smiling, talking, and gathered around tables with some food and beverages arranged on top of them
Andy Budd enjoying chatting to attendees during a coffee break. (Large preview)

All that being said, please don’t feel pressured into becoming a speaker. I think a lot of people think that they need to add a “conference speaker” to their LinkedIn bio in order to advance their careers. However, some of the best, most successful people I know in our industry don’t speak at public events at all, so it’s definitely not an impediment.

But if you do want to start sharing your experience with others, now is a good time. Sure, the number of in-person conferences has dropped since the start of the pandemic, but the ones that are still around are desperate to find new, interesting voices from a diverse set of backgrounds. So if it’s something you’re keen to explore, why not put yourself out there? You’ll have nothing to lose but potentially a lot to gain as a result.

Further Reading #

Here are a few additional resources on the topic of speaking at conferences. I hope you will find something useful there, too.

  • Breaking into the speaker circuit,” by Andy Budd
    Here are some more thoughts on breaking into public speaking by yours truly. As somebody who both organizes and often speaks at events, I’ve got a good insight into the workings of the conference circuit. This is probably why I regularly get emails from people looking for advice on breaking into the speaking circuit. So rather than repeating the same advice via email, I thought I’d write a quick article I could point people to.
  • Confessions of a Public Speaker,” by Scott Berkun
    In this highly practical book, author and professional speaker Scott Berkun reveals the techniques behind what great communicators do and shows how anyone can learn to use them well. For managers and teachers — and anyone else who talks and expects someone to listen — the Confessions of a Public Speaker provides an insider’s perspective on how to effectively present ideas to anyone. It’s a unique and instructional romp through the embarrassments and triumphs Scott has experienced over fifteen years of speaking to audiences of all sizes.
  • Demystifying Public Speaking,” by Lara Hogan (A Book Apart), with foreword by Eric Meyer
    Whether you’re bracing for a conference talk or a team meeting, Lara Hogan helps you identify your fears and face them so that you can make your way to the stage, big or small.
  • Slide:ology: The Art and Science of Presentation Design,” by Nancy Duarte
    No matter where you are on the organizational ladder, the odds are high that you’ve delivered a high-stakes presentation to your peers, your boss, your customers, or the general public. Presentation software is one of the few tools that requires professionals to think visually on an almost daily basis. But unlike verbal skills, effective visual expression is not easy, natural, or actively taught in schools or business training programs. This book fills that void.
  • Presentation Zen: Simple Ideas on Presentation Design and Delivery,” by Garr Reynolds
    A best-selling author and popular speaker, Garr Reynolds, is back in this newly revised edition of his classic, best-selling book in which he showed readers there is a better way to reach the audience through simplicity and storytelling and gave them the tools to confidently design and deliver successful presentations.
  • How To — Public Speaking,” a video talk by Ze Frank
    You may benefit a lot from this video that Ze Frank made several years ago.
  • Getting Started In Public Speaking: Global Diversity CFP Day,” by Rachel Andrew (Smashing Magazine)
    The Global Diversity CFP Day (Call For Proposals, sometimes also known as a Call For Papers) is aimed to help more people submit their ideas to conferences and get into public speaking. In this article, Rachel Andrew rounds up some of the best takeaways along with other useful resources for new speakers.
  • Getting The Most Out Of Your Web Conference Experience,” by Jeremy Girard (Smashing Magazine)
    To be a web professional is to be a lifelong learner, and the ever-changing landscape of our industry requires us to continually update and expand our knowledge so that our skills do not become outdated. One of the ways we can continue learning is by attending professional web conferences. But with so many seemingly excellent events to choose from, how do you decide which is right for you?
  • Don’t Pay To Speak At Commercial Events,” by Vitaly Friedman (Smashing Magazine)
    The state of commercial web conferences is utterly broken. What lurks behind the scenes of such events is a widely spread, toxic culture despite the hefty ticket price. And more often than not, speakers bear the burden of all of their conference-related expenses, flights, and accommodation from their own pockets. This isn’t right and shouldn’t be acceptable in our industry.
  • How to make meaningful connections at in-person conferences,” by Grace Ling (Figma Config)
    This is an excellent Twitter post about how to make meaningful connections at in-person conferences — a few concise, valuable, and practical tips.

How To Create A Rapid Research Program To Support Insights At Scale

 Accelerate your organization’s growth and innovation with the power of Rapid Research. From inception to implementation, here is the step-by-step roadmap on how to build the program from scratch and uncover the untapped ROI opportunities waiting to propel your initiatives to new heights.

While the User Experience practice has been expanding and will continue to balloon in the coming years, so have its sub-disciplines such as content strategy, operations, and user research. As the practice of UX Research matures, scalability will continue to be important in order to meet the rapid needs of iterative product development.

While there are several effective ways to scale user research, such as increasing researcher-to-designer ratios, leveraging big data and real-time analytics, or research democratization, one of the most effective methods is developing a Rapid Research program. In a Rapid Research program, teams are provided quick insight into key problems at an unprecedented operational speed.

Rapid Research-type support has been around for a while and has taken different shapes across different organizations. What remains true, however, is the goal to provide actionable insights from end-users at a quick pace that fits within product sprints and maintains pace with agile development practices.

In this article, I’m going to unpack what a Rapid Research program is, how to build one in your organization, and underscore the unique benefits that a program like this can provide to your team. Given that there is no singular ‘right way’ to scale insights or mature a user research practice, this outline is intended to provide building blocks and considerations that you may take in the context of the culture, opportunities, and challenges of your organization.

What Is Rapid Research? #

Rapid research is a relatively recent program where typical user research practices and operations are standardized and templatized to provide a consistent, repeatable cadence of insights. As the name suggests, a core requirement of a rapid research program is that it delivers quicker-than-average insights. In many teams, this means delivering research on a weekly cadence where a confluence of guardrails, templates, and requirements work to ensure a smooth and consistent process.

Programs like Rapid Research may be created out of a necessity to keep up with the pace of development while freeing the bandwidth of expert researchers’ time for more complex discovery work that often takes longer. A rapid research program can be a crucial component of any team’s insight ecosystem, balanced against solving different business problems with flexible levels of support.

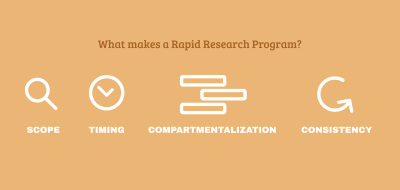
A visualization of what makes a rapid research, which is Scope, Timing, Compartmentalization, and Consistency
Rapid Research programs are carefully crafted by focusing on scope, timing, compartmentalization, and consistency. (Large preview)

Scope #

Research Methods #

In order to make research more rapid, teams may consider some research methodologies out of the question in their Rapid Research program. Methods such as longitudinal diary studies, surveys, or long-form interviews might suffer from lower quality if done too quickly. When determining the scope of your rapid research program, ask yourself what methods you can easily templatize and, most importantly, which best support the needs of your experience teams.

For example, if your experience teams work on 2-week sprints and need insights in that time, then you will need to consider which research methods can reliably be conducted in 1–2 week increments.

Sample Size And Research Duration #

Methods alone won’t ensure a successful implementation of a rapid research program. You will also need to consider sample size and session duration. Even if you decide usability tests are a reasonable methodology for your rapid research framework, you may be introducing too much complexity to run them with 15+ users within 60-min sessions and analyze all that data efficiently. This may require you to narrow your focus to fewer sessions with shorter duration.

Participant Recruitment #

While there may be fewer and shorter sessions for each study, you also need to consider your participant pool. Recruitment is one of the most difficult aspects of conducting any user research, and this effort must be considered when determining the scope of the program. Recruitment can jeopardize the pace of your program if you source highly specific participants or if they are harder to reach due to internal bureaucracy or compliance constraints.

In order to simplify recruitment, consider what types of participants are both the easiest to reach and who account for the most use cases or products you expect to be researching. Be careful with this, though, as you don’t want to broaden your customer profiles too much for fear of not getting the helpful feedback you need, as UserZoom says:

“Why is sourcing participants such a challenge? Well, you could probably find as many users as you like by spreading the net as wide as possible and offering generous incentives, but you won’t necessarily find the ‘right’ participants.”

— UserZoom, “Four top challenges UX teams face in 2020 and how to solve them

Timing #

Why Timing Matters #

Coupled tightly with scope, the timing of your rapid research end-to-end process will be paramount to the program’s success. Even if you have narrowed the scope to only a handful of research methods with limited sessions at shorter durations and with specific participant profiles, it won’t be ‘rapid’ if your end-to-end project timeline is as long as your average traditional study. Care must be taken to ensure that the project timelines of your rapid research studies are notably quicker than your average studies so that this program feels differentiating and adds value on top of the work your team is already doing.

Reconsidering scope #

If your timelines are about the same, or your rapid cadence is less than 50% more efficient than your average study, consider whether or not you’re being judicious enough in your scope above. Always monitor your timelines and identify where you can speed things up or limit the scope in order to reach a quick turnaround, which is acceptable. One way to support shorter project timelines is through compartmentalization.

Compartmentalization #

About Compartmentalization #

One way to balance scope, timing, and consistency is by breaking up pieces of your average study process into smaller, separate efforts. Consider what your program would look like if you separated project intake from the study kick-off or if discussion guides were not dependent on recruitment or participant types. Splitting out your workflow into separate parts and templating them may eliminate typical dependencies and streamline your processes.

Ways To Compartmentalize #

Once you’ve determined the set of research methods and ideal participants to include in your program, you may:

  • Templatize the discussion guides to provide a quick starting point for researchers and cut down on upfront preparation time.
  • Create a consistent recruitment schedule independent of the study method to start before study intake or kick-off to save upfront time.
  • Pre-schedule recurring kick-off and readout sessions to set expectations for all studies while limiting timeline risk when at the mercy of others’ calendars.

There is a myriad of opportunities to do things differently than your typical research study when you reconsider the relationships and interdependencies in the process.

Consistency #

Expectability #

While a quality rapid research program takes into consideration scope, timing, and compartmentalization, it also needs to consider consistency. It would be difficult to discern whether or not the program was ‘rapid’ if, on one week, a study takes one week, and on another week, a study takes 2.5 weeks. Both may be below your current study average. However, project stakeholders may blur the lines between the differences in your rapid studies and your typical studies due to the variability in approach. In addition, it may be difficult to operationalize compartmentalization or rapid recruitment without some form of expected cadence.

More Agility #

As you and your team get used to operating within your rapid cadence, you may identify additional opportunities to templatize, compartmentalize or focus scope. If the program is inconsistent from study to study, it may be more difficult to notice these opportunities for increased agility, hindering your program from becoming even more rapid over time.

More after jump! Continue reading below ↓

A Rapid Research Case Study #

While working at one of the largest telecommunications companies in the US, I had the privilege of witnessing the growth of the UX Research team from just four practitioners to over 25 by the time I left. During this time, the company had matured its user experience practice, including the standards, processes, and discipline of user research.

Identifying The Need #

As we grew, human insight became a central part of the product development process, which meant an exponential increase in its demand. While this was a great thing and allowed our team to grow, the work we were doing was not sustainable — we were constantly trying to keep pace with product teams who brought us in too late in the process simply to validate their ideas. Not only did we always feel rushed, but we were stuck doing only evaluative work, which not only stifled innovation but also did not satisfy our more senior researchers who wished to do more generative research.

How It Fits In #

Once diagnosing this issue, our leadership initiated several new processes to build a more well-rounded research portfolio that supported iterative research while enabling generative research. This included a democratization program, quarterly planning, and my initiative: Rapid Research. We determined that we needed a program that would allow us to take on mid-sized projects at the pace of product development while providing a new opportunity to hire junior researchers who would be a great talent pool for our team and provide a meaningful way for those new to the field to grow their skills.

Getting Started #

In order to build the rapid research program, I audited the previous year’s worth of research to determine our average timelines, the most common methodologies used for iterative and mid-sized projects, and to identify our primary customer who we do research with most often. My findings would be the bedrock of the program:

  • Most iterative research was lite interviews and brief usability tests.
  • Many objectives could be covered in 30-minute sessions.
  • Mid-sized projects were often with just a handful of current customers.
  • Our average study time was 2–3 weeks, so we’d need to cut this down.
  • Given the above constraints, study goals should be highly focused.

Building The Program #

At first, we did not have the budget for hiring new junior researchers to staff the program team. What we did have, however, was a contract with a research vendor who we’ve worked with for years, so we decided to partner with researchers from their team to run our rapid research program.

  • We created specific templates for ‘rapid’ usability tests and interviews.
  • Studies were capped at two objectives and only a handful of questions in order to fit into 30-min sessions.
  • Study intake was governed via a simple intake form, required to be filled out by EOD every Wednesday.
  • We scheduled standing kick-off and readout sessions every Friday and shared these invites with product teams for visibility.
  • To further establish our senior researchers as Portfolio Research Leads and to protect against scope creep, we required teams to formally request ‘rapid’ studies through them first.
  • We started our rapid cadence at two weeks and were able to cut it down to just one week after piloting the program for a month.

Strong Results #

We saw the incredible value and strong results from building our rapid research program, especially alongside the other processes our team was standing up to support varying insights needs.

  • Speed
    We were able to eventually run three research studies simultaneously, enabling us to deliver more research at twice the pace of a traditional study.
  • Scale
    Through this enablement of speed, consistent recruitment, and templatized process, we ran over 100 studies & 650+ moderated interviews.
  • Impact
    Because we outsourced rapid research to a vendor, our team was freed up to deliver foundational research, which doubled our work capacity.
  • Growth
    Eventually, we hired junior researchers and transitioned the program from the vendor, increasing subject matter expertise & operational efficiency.

How To Build A Rapid Research Program #

The following steps outline a process for getting started with building your own rapid research program in your organization. Exactly which steps you choose to follow, or if you decide to add more or less to your process, will be entirely up to you and the unique needs of your team. Follow the proceeding steps while considering the above guidelines regarding scope, timing, compartmentalization, and consistency.

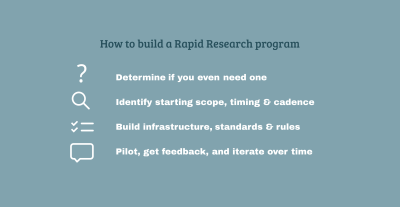
Build your rapid research program in four steps: determine if you even need one in the first place; identify your starting scope, timing and cadence; build infrastructure, standards and rules; pilot, get feedback, and iterate over time
Follow these four steps to build your rapid research program. (Large preview)

Determine If You Even Need A Rapid Research Program #

While seemingly counter-intuitive, the first step in building a rapid research program is considering whether you even need one in the first place. Every new initiative or tactic intended to mature user research practice should consider the available talent and capabilities of the team and the needs or opportunities of the organization it sits within. It would be unfortunate to invest time to build a robust, rapid research program only to find that nobody uses or needs it.

Reflection On Current Needs #

Start by documenting the needs of your experience teams or the organization you support by the different types of requests you receive.

  • Are you often asked to deliver research faster?
  • What are the types of research which are most often requested?
  • Does your team have the capability or operational rigor required to deliver at a faster pace?
  • Are you staffed enough to support a more rapid pace, even if you could deliver one?
  • Is delivering faster, rigidly-scoped research in service to your long-term goals as a research team, or might it sacrifice them?

Gather More Information #

Answering these questions should be your first step before any meaningful work is done to build a rapid research program. In addition, you might consider the following information-gathering activities:

  • Audit previous research you or your team have done to determine their average scope, timeline, and method.
  • Conduct a series of internal stakeholder interviews to identify what potential value a rapid research program might hold.
  • Look for signals for where the organization is going. If leadership is hiring or training teams on agile methods or demanding teams to take a step back to focus on discovery can help you decide when and where to invest your time.

These additional inputs will either help you refine your approach to building a program or to steer away from doing so.

Limitations Of Rapid Research #

Finally, when considering if you should build a rapid research program in the first place, you should consider what the program cannot do.

  • What a rapid research program might save on time, it cannot necessarily save on effort. You will still need researchers to deliver this work, which means you may need to restructure your team or hire more people.
  • If you decide to make your rapid research program self-service, you likely will still need ResOps support for recruitment and managing the intake process effectively.
  • It is also possible to hire a research vendor partner to lead this program, though that will require a budget that not every team may have.
  • As mentioned above, a good rapid research program is tight and focused in its scope, which limits the type of projects it can accommodate.

Identify Your Starting Scope, Timing & Cadence #

Once you’ve decided to pursue a rapid research program, you’ll need to understand what form your program should take in order to deliver the highest value to your team and those you support. As mentioned above, a right-sized scope should consider the research methods, requirements, session quantity & duration, and participant profiles, which you can confidently accommodate. And you will need to determine the end-to-end timing and program cadence that differentiates from current work while providing just enough time to still deliver sustainable quality.

Determine Participant Profiles #

Start building your scope backwards from the needs gaps you’re filling within your team based on the answers to the discovery questions above. You’ll want to identify the primary type(s) of end-users this program will research.

  1. Audit the past 6–12 months of research you or your team has done, looking at the most common customer type with whom you do research.
  2. Then, couple that with any knowledge you may have of where the business or your experience teams will be focused for the following 6–12 months.

For example, if your audit revealed that your team had focused most frequently on current customers over the past year, and you also know that your business will soon focus on the acquisition of new customers, consider including both current customers and prospective customers in your rapid research scope.

Remember the important note about consistency above? Once you’ve identified potential participant profiles, make sure you can consistently recruit them. For example, if you use a research panel to source participants for research studies, test the incidence of your participant profiles. If you find they don’t have many panelists with the attributes you need, you might spend too much time in recruitment and jeopardize the speed of the program.

A balance should be struck between participant profiles that are specific enough to be useful for most projects and those broad enough to reach easily.

Determine Research Methods #

You can conduct the same audit and rough forecasting when determining the research methods your program ought to support but with two additional considerations:

  1. Team strategy,
  2. Individual career development.

User researchers tend to focus their work further upstream, where they’re driving product roadmaps or influencing business strategy. This can bode well for your rapid research program if it is focused on evaluative research projects, which are often quicker and cheaper to conduct.

The ultimate goal is for the rapid research program to be a complement to what your team provides or as an enabler for freeing up their bandwidth so that they can focus on the type of work they want to do more of.

Right-size Research Methods #

Once you’ve determined which research methods you want to include in your rapid research program, consider the level of rigor you need to balance effort and complexity.

Determining Timelines #

Project timelines within a rapid research cadence are directly affected by the above scope decisions for participant profiles and research methodology. Timelines can also compound in highly regulated industries such as healthcare or banking, where you may be required to gather legal & compliance approval on every moderation guide. In order to call this a rapid research program, the end-to-end project timelines need to be shorter than a typical project of a similar scope, or at least feel that way.

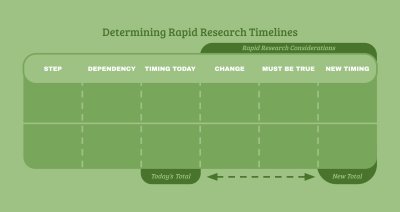
Determine rapid research timelines through a table which documents Steps, Dependencies, Timing Today, Changes, Must Be true, and New Timing in columns from left to right. Changes, Must Be True, and New Timing are your new Rapid Research considerations. Under the table, comparison can be made between Today’s Total Timing and the New Total Timing
Build a table of the current steps in your process, their dependencies, and timing. Then, compare that with new timing expectations based on changes in efficiency. (Large preview)
  1. Scope current minimum effort
    Start by jotting down the minimum amount of time it takes a researcher on your team to do each sub-step in your current non-rapid research process. Do this for the same participant profiles and methods you want to include in your rapid research program.
  2. Dependencies
    Now, identify which sub-steps are dependent on others and think of ways to program them in order to build efficiency. For example, if you need legal approval on every moderation guide before data collection, which takes 2–3 days, see if Legal will commit to a change to a 24-hour SLA for rapid research-specific projects. Another example is if you typically give stakeholders a few days to provide feedback on moderation guides, change this for rapid research projects to cut down dependency time.
  3. Identify compartmentalization
    In addition to programming project dependencies, consider the above guidance for compartmentalizing some of the programs in order to remove dependencies entirely, such as with recruitment. Identify what parts of the process don’t have the same dependencies in your rapid research program and can be started earlier. By removing dependencies entirely, you may be able to do several things simultaneously to speed up project timelines.

Once you’ve documented your current research process (steps, dependencies, timing) and the changes you need to make to build efficiencies or remove dependencies, document what ‘must be true’ in order to consistently deliver identified changes. Create a table to document all of these details, then sum up the total timelines to compare your typical end-to-end research project timeline with your potential new ‘rapid’ timeline.

Ask yourself if this seems ‘rapid’ when stacked against your average study duration.

  • If not, look back at the guidance above. Ask yourself if there are other customer types that may be easier to get in front of that you haven’t considered. Consider whether you need to create a new process, expedite existing processes, or create new relationships in order to make your timelines even more rapid.
  • If so, congratulations! You might have just landed on the right scope for your rapid research program. Consider whether this new rapid timeline is something that you can deliver consistently and reliably over time and whether or not you have enough access to participants, and enough budget, to carry out this cadence long-term.

Build Infrastructure, Standards & Rules #

It’s time to set the foundation. Return back to the tables you made above and create an action plan with the following steps and a timeline to build the infrastructure required to bring your program to life. As part of this, you’ll need to establish the rules and standards for communicating with partners. You might consider a playbook and formal scope document to inform others of the ins/outs of the program.

Gather Buy-in #

Prioritize any work that requires buy-in, generating understanding, or acquiring budget first before spending your time and energy building templates or documentation. You wouldn’t want to create a 20-page scope document outlining the bandwidth for two researchers, a limit to 1 round of stakeholder feedback, and a 24hr SLA for legal approval, only to find out others cannot commit to that.

Create Templates #

You’ll need plenty of templates, tools, and processes specific to the scope of your program.

  • If you’re limiting moderation guides to a maximum of 10 questions, then create a specific discussion guide template reflecting that.
  • If your data analysis will be sped up by using structured note-taking templates, create those.
  • If you’ve determined that all rapid research projects only require an executive summary one-pager, make that too.

Staffing #

As mentioned above, even a drastically reduced version of your typical research processes still requires effort to support. You’ll need to determine, based on the expected scope and cadence of each rapid research project, how many researchers and/or research operations coordinators you’ll need to support the program. While all rapid research programs will require dedicated effort, there are creative ways of staffing the program, such as:

  • A dedicated team of 1–2 researchers and 1–2 Ops coordinators to deliver projects with the greatest efficiency and quality.
  • A dedicated team of 1–2 researchers who also handle the operations of running the program itself.
  • A self-service program, with 1–2 Ops coordinators for supporting anyone doing the research work.
  • Outsourcing the entire program to a vendor.

Work with your leadership, HR, and TA professionals on securing approval for any team restructure, needed headcount budget, or to onboard a new vendor. Then, take the appropriate steps to hire your next researcher or secure the staffing help you need to support your program.

Coaching And Guidance #

Consider training, coaching, and check-in meetings as part of your infrastructure.

  • If you are staffing new researchers to this rapid research program, make sure they understand the expectations and have what they need to succeed.
  • If you’re implementing a self-service model, provide brown-bag sessions to partners to explain the program do’s and don’ts.
  • Schedule quarterly check-ins with partners and leadership to discuss the program accomplishments and any needed adjustments to ensure it stays relevant.

Pilot, Get Feedback, And Iterate Over Time #

No matter how much preparation you do or how much time and effort you spend building the alliances, infrastructure, training, and support required to run your rapid research program effectively, you will learn that there are improvements you should make once you put it into practice.

There are many benefits to piloting a new program in an organization. One benefit is that it can mitigate risks and allow teams to learn quickly and early enough to make positive enhancements.

“Piloting offers a realistic preview experience for users at the earliest stages of development. It allows the organization and design team to gather real-time insights that can be used to shape and refine the product and prepare it for commercialization.”

— Entrepreneur, “Tasting As You Go: The 5 Benefits of ‘Piloting’

This means setting expectations early. Consider your first few projects as pilots and expect them to be rocky and imperfect. Use this to your advantage by asking stakeholders you’re closest with to be your trial projects and let them know how important their honest feedback is throughout the process. Ensure that you have clear mechanisms to gather feedback at each project milestone so that you can track progress. It is especially important to capture what might be slowing you down along the way or putting your ‘rapid’ timelines at risk.

Program Evolutions, Impacts & Considerations #

Potential Evolutions & Variations #

While I’ve outlined a process for getting started, there are many ways in which your rapid research program may evolve over time to meet the needs of your organization better.

  • After a few periods, you might identify volume isn’t as high as you anticipated, so you extend the 1-week timeline to every two weeks.
  • After a few months, your business might launch a new product line, requiring you to consider a new set of customer profiles in recruitment.
  • You may decide to leverage your rapid cadence for individual segments of a longitudinal diary study to accommodate new methods.
  • You might use rapid research projects to exclusively evaluate in-market products while others on the team focus on in-progress / new products.
  • Rapid research projects could be a stage-gate for larger projects — proving a customer need before larger time investments are made.

However your rapid research program takes shape, revisit its goals, scope, and operations often in relation to your organizational needs and context so that it remains relevant and delivers the highest impact.

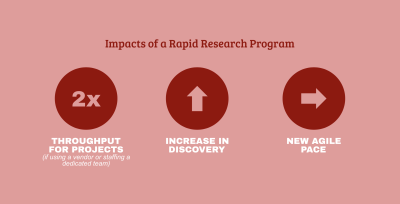
Impacts of a Rapid Research Program, as seen in three areas: two times throughput for projects if using a vendor or when staffing a dedicated team, upward increase in discovery research, and an ability to keep pace with agile development
While exact impacts of your rapid research program will look unique to your team and organization, these are a few you can expect of most programs. (Large preview)

Solid Impacts From Rapid Research #

Building a rapid research program can have a big impact and can contribute positively toward your team’s long-term strategy. One impact of instituting a rapid research program could be that now your team is freed up to focus on more generative research, which unlocks your ability to deliver deep customer insights that pave the way for innovation or strategy. And due to your new rapid pace, you may be able to keep pace with agile development and conduct end-to-end research within 2-week sprints. Another impact is that you may catch more usability issues further upstream, saving you over 100x in overhead business cost. A final impact of a rapid research program is that it can double your team’s throughput, allowing your team to deliver more research, more frequently, to accommodate more organizational needs.

Be sure to track these impacts over time so that you not only get credit for the hard work you put into building the program but so that you can sustain and grow the program over time.

Considerations When Building A Rapid Research Program #

As mentioned in this article, there are many benefits to building a rapid research program. That being said, there are limitations to rapid research in regard to its pros and cons when it should be used, and if you have the available time to stand up a program yourself.

Pros And Cons #

As with building any new program, one should consider both its benefits as well as drawbacks. Here are a few for rapid research programs:

Pros:

  • Can free time for foundational work;
  • Rapid studies may keep a better pace with development cycles;
  • Can create meaningful opportunities for junior staff;
  • Can double project throughput, increasing output volume.

Cons:

  • Still requires work and dedicated bandwidth;
  • Another thing to diligently track and manage;
  • Not great for all types of research studies;
  • May cost more money or resources you don’t have.

Guidance For Using The Program #

Rapid Research programs are best for specific types of research which do not take a long time to complete or require rigorous expertise. You may want to educate your partners on when they should expect to use a rapid research program and when they should not.

  • Use rapid research when:
    • Agility or quick turnaround is needed;
    • You need simple iterative research;
    • Stakeholder groups are easier to rally;
    • Participants are easy to reach.
  • Do not use rapid research when:
    • The study method cannot be done quickly without risking quality;
    • A highly complex or mixed-methods study is needed;
    • A project requires high visibility or stakeholder alignment;
    • You have specific, hard-to-reach participants.

Ramp Up Time #

While the exact timeline of building a rapid research program varies from team to team, it does take time to do it right. Make sure to plan out enough time to do the upfront work of identifying the appropriate scope, timing, and cadence, as well as gathering consensus from leadership and appropriate stakeholder groups. Standing up a Rapid Research program can take anywhere from 3 months to 1 year, depending on the following:

  • Legal and compliance limitations or requirements.
  • The number of stakeholder groups you need buy-in from.
  • Approval of budget for outside vendors or for hiring an in-house team.
  • Time it takes to build templates, guidelines, and materials.
  • Onboarding, training, and iteration when starting out.

Conclusion #

A rapid research program can be a fundamental part of your team’s UX Research strategy, enabling your team to take on new insight challenges and deliver efficient research at an unprecedented pace. Building a rapid research program with high intention by determining the goals, appropriate scope, and necessary infrastructure will set your team up for success and enable you to deliver more value for your organization as you scale your user research practice.

Don’t be afraid to try a rapid research program today!