⭐ If you would like to buy me a coffee, well thank you very much that is mega kind! : https://www.buymeacoffee.com/honeyvig
Hire a web Developer and Designer to upgrade and boost your online presence with cutting edge Technologies

Monday, June 17, 2024

What Are CSS Container Style Queries Good For?


We’ve relied on media queries for a long time in the responsive world of CSS but they have their share of limitations and have shifted focus more towards accessibility than responsiveness alone. This is where CSS Container Queries come in. They completely change how we approach responsiveness, shifting the paradigm away from a viewport-based mentality to one that is more considerate of a component’s context, such as its size or inline-size.

Querying elements by their dimensions is one of the two things that CSS Container Queries can do, and, in fact, we call these container size queries to help distinguish them from their ability to query against a component’s current styles. We call these container style queries.

Existing container query coverage has been largely focused on container size queries, which enjoy 90% global browser support at the time of this writing. Style queries, on the other hand, are only available behind a feature flag in Chrome 111+ and Safari Technology Preview.

The first question that comes to mind is What are these style query things? followed immediately by How do they work?. There are some nice primers on them that others have written, and they are worth checking out.

But the more interesting question about CSS Container Style Queries might actually be Why we should use them? The answer, as always, is nuanced and could simply be it depends. But I want to poke at style queries a little more deeply, not at the syntax level, but what exactly they are solving and what sort of use cases we would find ourselves reaching for them in our work if and when they gain browser support.

Why Container Queries #

Talking purely about responsive design, media queries have simply fallen short in some aspects, but I think the main one is that they are context-agnostic in the sense that they only consider the viewport size when applying styles without involving the size or dimensions of an element’s parent or the content it contains.

This usually isn’t a problem since we only have a main element that doesn’t share space with others along the x-axis, so we can style our content depending on the viewport’s dimensions. However, if we stuff an element into a smaller parent and maintain the same viewport, the media query doesn’t kick in when the content becomes cramped. This forces us to write and manage an entire set of media queries that target super-specific content breakpoints.

Container queries break this limitation and allow us to query much more than the viewport’s dimensions.
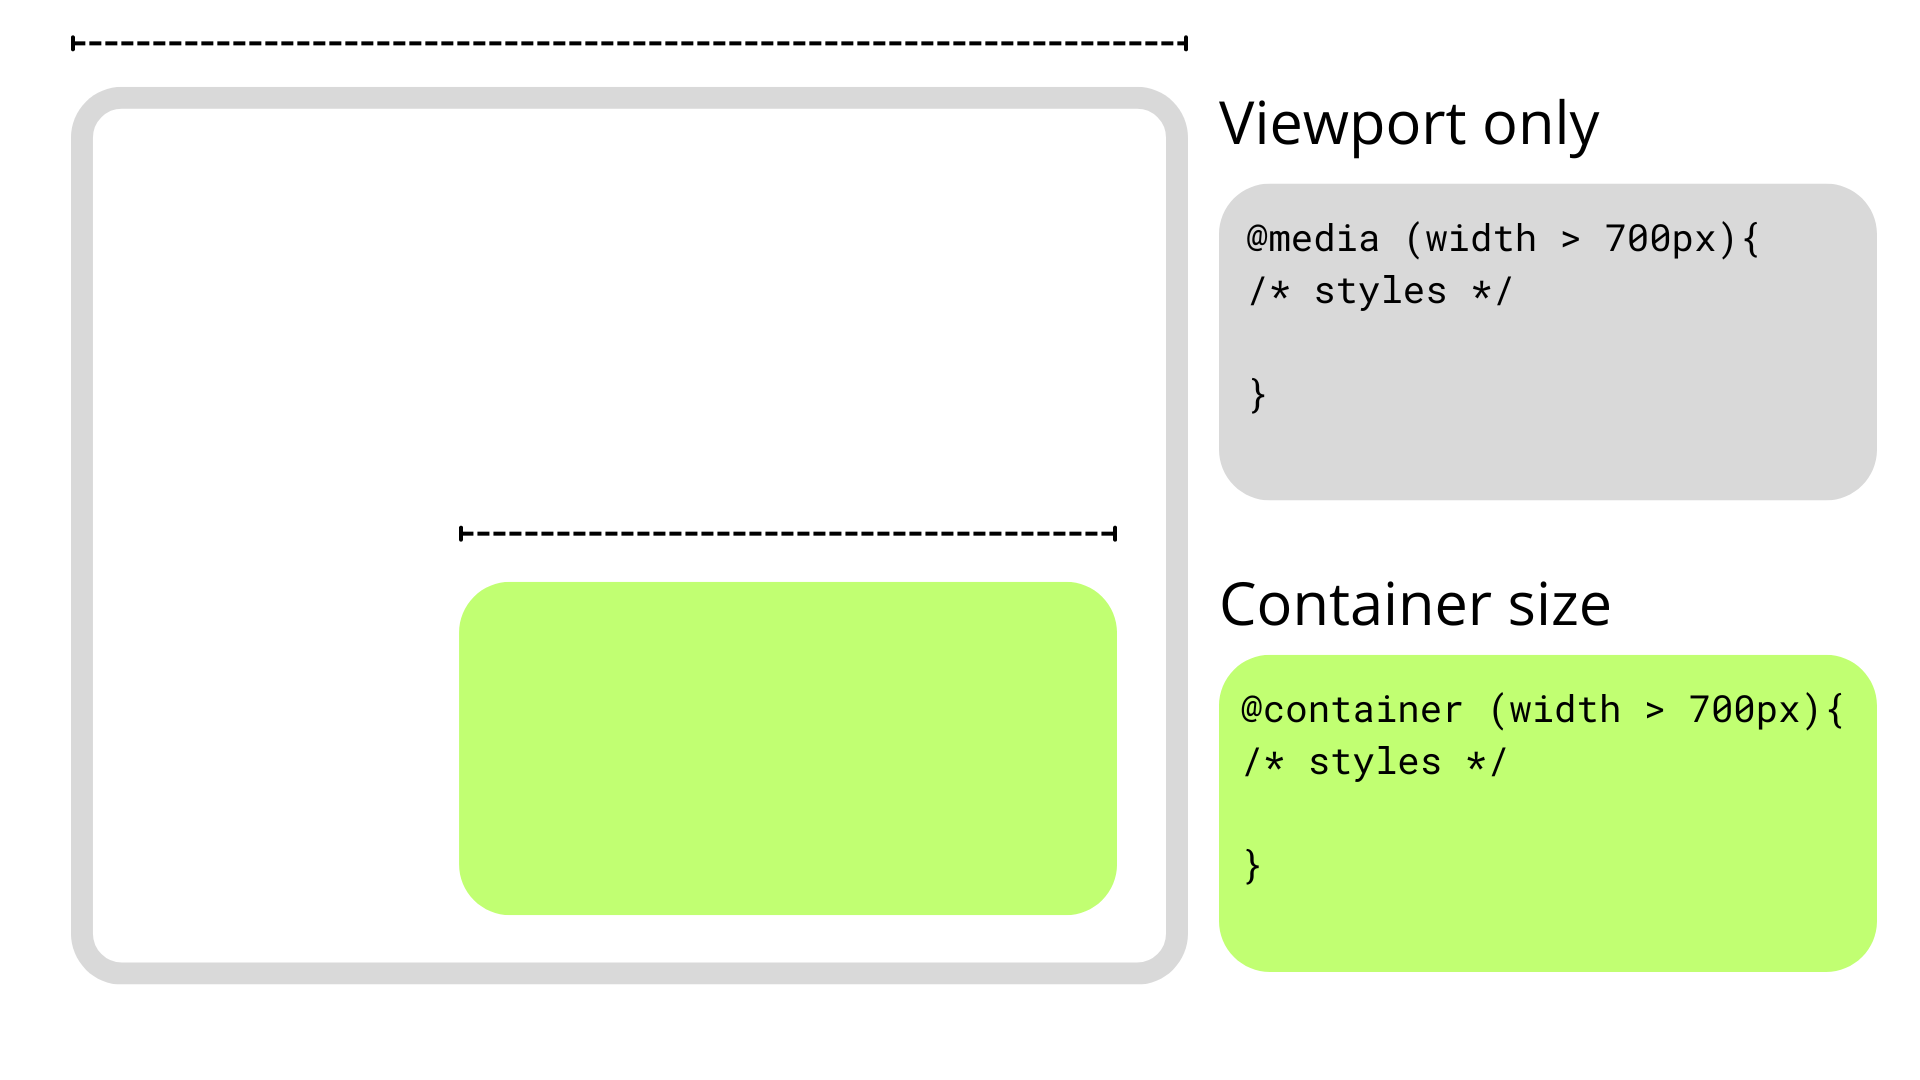
Diagram of a component in a web browser with examples of how to query its size and the viewport size.
Figure 1: When media queries look only at the viewport, they overlook important details about the elements in the viewport, most

How Container Queries Generally Work

Container size queries work similarly to media queries but allow us to apply styles depending on the container’s properties and computed values. In short, they allow us to make style changes based on an element’s computed width or height regardless of the viewport. This sort of thing was once only possible with JavaScript or the ol’ jQuery, as this example shows.

As noted earlier, though, container queries can query an element’s styles in addition to its dimensions. In other words, container style queries can look at and track an element’s properties and apply styles to other elements when those properties meet certain conditions, such as when the element’s background-color is set to hsl(0 50% 50%).

That’s what we mean when talking about CSS Container Style Queries. It’s a proposed feature defined in the same CSS Containment Module Level 3 specification as CSS Container Size Queries — and one that’s currently unsupported by any major browser — so the difference between style and size queries can get a bit confusing as we’re technically talking about two related features under the same umbrella.

We’d do ourselves a favor to backtrack and first understand what a “container” is in the first place.

Containers

An element’s container is any ancestor with a containment context; it could be the element’s direct parent or perhaps a grandparent or great-grandparent.

A containment context means that a certain element can be used as a container for querying. Unofficially, you can say there are two types of containment context: size containment and style containment.

Size containment means we can query and track an element’s dimensions (i.e., aspect-ratio, block-size, height, inline-size, orientation, and width) with container size queries as long as it’s registered as a container. Tracking an element’s dimensions requires a little processing in the client. One or two elements are a breeze, but if we had to constantly track the dimensions of all elements — including resizing, scrolling, animations, and so on — it would be a huge performance hit. That’s why no element has size containment by default, and we have to manually register a size query with the CSS container-type property when we need it.

On the other hand, style containment lets us query and track the computed values of a container’s specific properties through container style queries. As it currently stands, we can only check for custom properties, e.g. --theme: dark, but soon we could check for an element’s computed background-color and display property values. Unlike size containment, we are checking for raw style properties before they are processed by the browser, alleviating performance and allowing all elements to have style containment by default.

Did you catch that? While size containment is something we manually register on an element, style containment is the default behavior of all elements. There’s no need to register a style container because all elements are style containers by default.

And how do we register a containment context? The easiest way is to use the container-type property. The container-type property will give an element a containment context and its three accepted values — normal, size, and inline-size — define which properties we can query from the container.

/* Size containment in the inline direction */
.parent {
  container-type: inline-size;
}

This example formally establishes a size containment. If we had done nothing at all, the .parent element is already a container with a style containment.

Size Containment

That last example illustrates size containment based on the element’s inline-size, which is a fancy way of saying its width. When we talk about normal document flow on the web, we’re talking about elements that flow in an inline direction and a block direction that corresponds to width and height, respectively, in a horizontal writing mode. If we were to rotate the writing mode so that it is vertical, then “inline” would refer to the height instead and “block” to the width.

Consider the following HTML:

<div class="cards-container">
  <ul class="cards">
    <li class="card"></li>
  </ul>
</div>

We could give the .cards-container element a containment context in the inline direction, allowing us to make changes to its descendants when its width becomes too small to properly display everything in the current layout. We keep the same syntax as in a normal media query but swap @media for @container

.cards-container {
  container-type: inline-size;
  }

  @container (width < 700px) {
  .cards {
    background-color: red;
  }
}

Container syntax works almost the same as media queries, so we can use the and, or, and not operators to chain different queries together to match multiple conditions.

@container (width < 700px) or (width > 1200px) {
  .cards {
    background-color: red;
  }
}

Elements in a size query look for the closest ancestor with size containment so we can apply changes to elements deeper in the DOM, like the .card element in our earlier example. If there is no size containment context, then the @container at-rule won’t have any effect.

/* 👎 
 * Apply styles based on the closest container, .cards-container
 */
@container (width < 700px) {
  .card {
    background-color: black;
  }
}

Just looking for the closest container is messy, so it’s good practice to name containers using the container-name property and then specifying which container we’re tracking in the container query just after the @container at-rule.

.cards-container {
  container-name: cardsContainer;
  container-type: inline-size;
}

@container cardsContainer (width < 700px) {
  .card {
    background-color: #000;
  }
}

We can use the shorthand container property to set the container name and type in a single declaration:

.cards-container {
  container: cardsContainer / inline-size;

  /* Equivalent to: */
  container-name: cardsContainer;
  container-type: inline-size;
}

The other container-type we can set is size, which works exactly like inline-size — only the containment context is both the inline and block directions. That means we can also query the container’s height sizing in addition to its width sizing.

/* When container is less than 700px wide */
@container (width < 700px) {
  .card {
    background-color: black;
  }
}

/* When container is less than 900px tall */
@container (height < 900px) {
  .card {
    background-color: white;
  }
}

And it’s worth noting here that if two separate (not chained) container rules match, the most specific selector wins, true to how the CSS Cascade works.

So far, we’ve touched on the concept of CSS Container Queries at its most basic. We define the type of containment we want on an element (we looked specifically at size containment) and then query that container accordingly.

Container Style Queries

The third value that is accepted by the container-type property is normal, and it sets style containment on an element. Both inline-size and size are stable across all major browsers, but normal is newer and only has modest support at the moment.

I consider normal a bit of an oddball because we don’t have to explicitly declare it on an element since all elements are style containers with style containment right out of the box. It’s possible you’ll never write it out yourself or see it in the wild.

.parent {
  /* Unnecessary */
  container-type: normal;
}

If you do write it or see it, it’s likely to undo size containment declared somewhere else. But even then, it’s possible to reset containment with the global initial or revert keywords.

.parent {
  /* All of these (re)set style containment */
  container-type: normal;
  container-type: initial;
  container-type: revert;
}

Let’s look at a simple and somewhat contrived example to get the point across. We can define a custom property in a container, say a --theme.

.cards-container {
  --theme: dark;
}

From here, we can check if the container has that desired property and, if it does, apply styles to its descendant elements. We can’t directly style the container since it could unleash an infinite loop of changing the styles and querying the styles.

.cards-container {
  --theme: dark;
}

@container style(--theme: dark) {
  .cards {
    background-color: black;
  }
}

See that style() function? In the future, we may want to check if an element has a max-width: 400px through a style query instead of checking if the element’s computed value is bigger than 400px in a size query. That’s why we use the style() wrapper to differentiate style queries from size queries.

/* Size query */
@container (width > 60ch) {
  .cards {
    flex-direction: column;
  }
}

/* Style query */
@container style(--theme: dark) {
  .cards {
    background-color: black;
  }
}

Both types of container queries look for the closest ancestor with a corresponding containment-type. In a style() query, it will always be the parent since all elements have style containment by default. In this case, the direct parent of the .cards element in our ongoing example is the .cards-container element. If we want to query non-direct parents, we will need the container-name property to differentiate between containers when making a query.

.cards-container {
  container-name: cardsContainer;
  --theme: dark;
}

@container cardsContainer style(--theme: dark) {
  .card {
    color: white;
  }
}

Weird and Confusing Things About Container Style Queries

Style queries are completely new and bring something never seen in CSS, so they are bound to have some confusing qualities as we wrap our heads around them — some that are completely intentional and well thought-out and some that are perhaps unintentional and may be updated in future versions of the specification.

Style and Size Containment Aren’t Mutually Exclusive

One intentional perk, for example, is that a container can have both size and style containment. No one would fault you for expecting that size and style containment are mutually exclusive concerns, so setting an element to something like container-type: inline-size would make all style queries useless.

However, another funny thing about container queries is that elements have style containment by default, and there isn’t really a way to remove it. Check out this next example:

.cards-container {
  container-type: inline-size;
  --theme: dark;
}

@container style(--theme: dark) {
  .card {
    background-color: black;
  }
}

@container (width < 700px) {
  .card {
    background-color: red;
  }
}

See that? We can still query the elements by style even when we explicitly set the container-type to inline-size. This seems contradictory at first, but it does make sense, considering that style and size queries are computed independently. It’s better this way since both queries don’t necessarily conflict with each other; a style query could change the colors in an element depending on a custom property, while a container query changes an element’s flex-direction when it gets too small for its contents.

See the Pen Conflicting Style and Size Queries [forked] by Monknow.

If active style and size queries are configured to apply conflicting styles, the most specific selector wins according to the cascade, so the elements have a black background color until the container gets below 700px and the size query (which is written with more specificity in this example than the last one) kicks in.

Unnamed Style Queries Check Every Ancestor For a Match

In that last example, you may have noticed another weird thing in style queries: The .card element is inside an unnamed style query, so since all elements have a style containment, it should be querying its parent, .cards. However, the .cards element doesn’t have any kind of --theme property; it’s the .cards-container element that does, but the style query is active!

.cards-container {
--theme: dark;  
}

@container style(--theme: dark) {
  /* This is still active! */
  .card {
    background-color: black;
  }
}

How does this happen? Don’t unnamed style queries query only their parent element? Well, not exactly. If the parent doesn’t have the custom property, then the unnamed style query looks for ancestors higher up the chain. If we add a --theme property on the parent with another value, you will see the style query will use that element as the container, and the query no longer matches.

.cards-container {
--theme: dark;  
}

.cards {
  --theme: light; /* This is now the matching container for the query */
}

/* This query is no longer active! */
@container style(--theme: dark) {
  .card {
    background-color: black;
  }
}

I don’t know how intentional this behavior is, but it shows how messy things can get when working with unnamed containers.

Elements Are Style Containers By Default, But Styles Queries Are Not #

The fact that style queries are the default container-type and size is the default query seems a little mismatched in that we have to explicitly declare a style() function to write the default type of query while there is no corresponding size() function. This isn’t a knock on the specification, but one of those things in CSS you just have to remember.

What Are Container Style Queries Good For?

At first look, style queries seem like a feature that opens up endless possibilities. But after playing with them, you don’t really get a clear idea of what problem they’d solve — at least not after the time I’ve spent with them. All the use cases I’ve seen or thought up aren’t immediately all that useful, and the most obvious ones solve problems with well-established solutions already in place. A new way of writing CSS based on styles reacting to other styles seems liberating (the more ways to write CSS, the merrier!), but if we’re already having trouble generally naming things, imagine how tough managing and maintaining those states and styles can be.

I know all these are bold statements, but they aren’t unfounded, so let me unpack them.

The Most Obvious Use Case #

As we’ve discussed, we can only query custom properties with style queries at the moment, so the clearest use for them is storing bits of state that can be used to change UI styles when they change.

Let’s say we have a web app, perhaps a game featuring a global leaderboard of top players. Each item in the leaderboard is a component based on a player that needs different styling depending on that player’s position on the leaderboard. We could style the first-place player with a gold background, the second-place player with silver, and the third-place with bronze, while the remaining players are all styled with the same background color.

Let’s also assume that this is not a static leaderboard. Players change places as their scores change. That means we’re most likely serving the using a server-side rendering (SSR) framework to keep the leaderboard up to date with the latest data, so we could insert that data into the UI through inline styles with each position as a custom property, --position: number.

Here’s how we might structure the markup:

<ol>
  <li class="item-container" style="--position: 1">
    <div class="item">
      <img src="..." alt="Roi's avatar" />
      <h2>Roi</h2>
    </div>
  </li>
  <li class="item-container" style="--position: 2"><!-- etc. --></li>
  <li class="item-container" style="--position: 3"><!-- etc. --></li>
  <li class="item-container" style="--position: 4"><!-- etc. --></li>
  <li class="item-container" style="--position: 5"><!-- etc. --></li>
</ol>

Now, we can use style queries to check the current item’s position and apply their respective shiny backgrounds to the leaderboard.

.item-container {
  container-name: leaderboard;
  /* No need to apply container-type: normal */
}

@container leaderboard style(--position: 1) {
  .item {
    background: linear-gradient(45deg, yellow, orange); /* gold */
  }
}

@container leaderboard style(--position: 2) {
  .item {
    background: linear-gradient(45deg, grey, white); /* silver */
  }
}

@container leaderboard style(--position: 3) {
  .item {
    background: linear-gradient(45deg, brown, peru); /* bronze */
  }
}
See the Pen Style Queries Use Case [forked] by Monknow.

Some browser clients don’t fully support style queries from an embedded CodePen, but it should work if you fully open the demo in another tab. In any case, here is a screenshot of how it looks just in case.
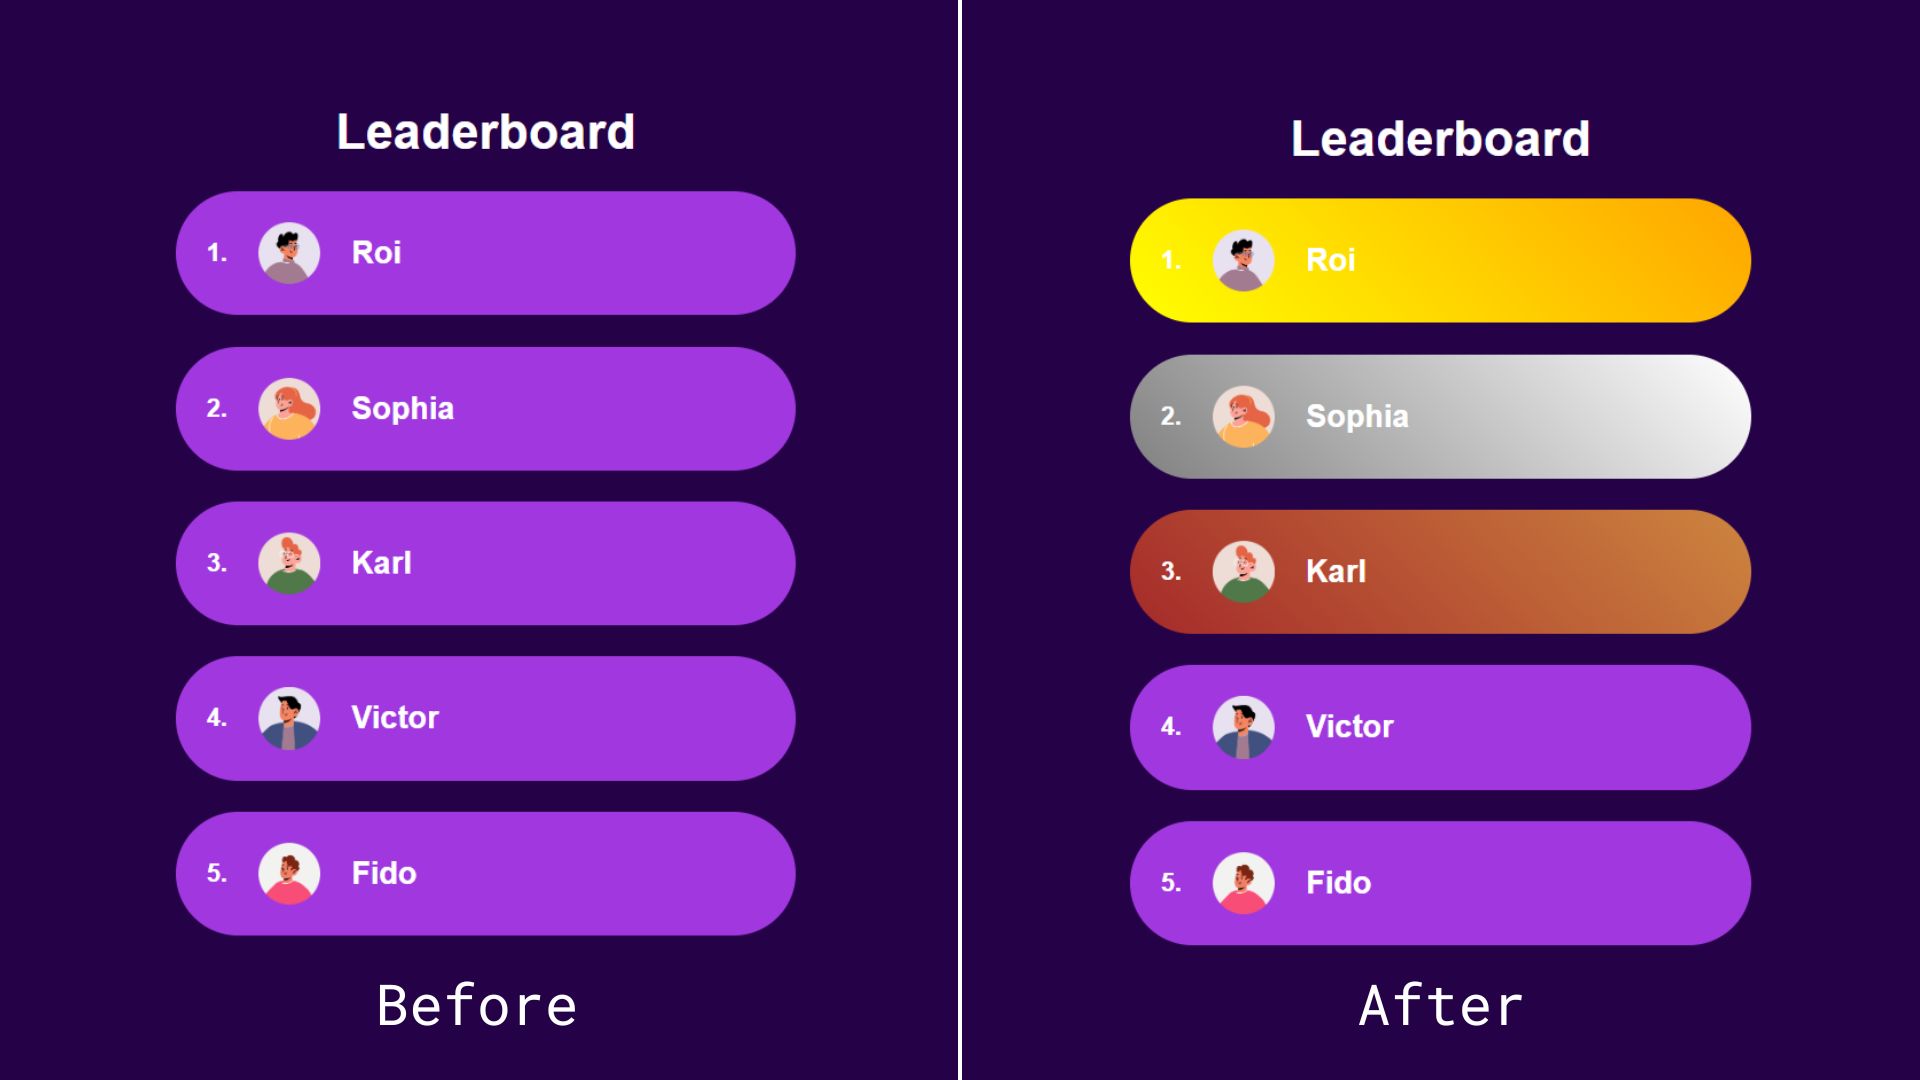
Two leaderboard UIs. One before style queries and one after styles have been applied
Figure 2: We can apply styles to an element’s children and descendants when the element’s styles match a certain condition. (Large preview)

But We Can Achieve the Same Thing With CSS Classes and IDs #

Most container query guides and tutorials I’ve seen use similar examples to demonstrate the general concept, but I can’t stop thinking no matter how cool style queries are, we can achieve the same result using classes or IDs and with less boilerplate. Instead of passing the state as an inline style, we could simply add it as a class.

<ol>
  <li class="item first">
    <img src="..." alt="Roi's avatar" />
    <h2>Roi</h2>
  </li>
  <li class="item second"><!-- etc. --></li>
  <li class="item third"><!-- etc. --></li>
  <li class="item"><!-- etc. --></li>
  <li class="item"><!-- etc. --></li>
</ol>

Alternatively, we could add the position number directly inside an id so we don’t have to convert the number into a string:

<ol>
  <li class="item" id="item-1">
    <img src="..." alt="Roi's avatar" />
    <h2>Roi</h2>
  </li>
  <li class="item" id="item-2"><!-- etc. --></li>
  <li class="item" id="item-3"><!-- etc. --></li>
  <li class="item" id="item-4"><!-- etc. --></li>
  <li class="item" id="item-5"><!-- etc. --></li>
</ol>

Both of these approaches leave us with cleaner HTML than the container queries approach. With style queries, we have to wrap our elements inside a container — even if we don’t semantically need it — because of the fact that containers (rightly) are unable to style themselves.

We also have less boilerplate-y code on the CSS side:

#item-1 {
  background: linear-gradient(45deg, yellow, orange); 
}

#item-2 {
  background: linear-gradient(45deg, grey, white);
}

#item-3 {
  background: linear-gradient(45deg, brown, peru);
}
See the Pen Style Queries Use Case Replaced with Classes [forked] by Monknow.

As an aside, I know that using IDs as styling hooks is often viewed as a no-no, but that’s only because IDs must be unique in the sense that no two instances of the same ID are on the page at the same time. In this instance, there will never be more than one first-place, second-place, or third-place player on the page, making IDs a safe and appropriate choice in this situation. But, yes, we could also use some other type of selector, say a data-* attribute.

There is something that could add a lot of value to style queries: a range syntax for querying styles. This is an open feature that Miriam Suzanne proposed in 2023, the idea being that it queries numerical values using range comparisons just like size queries.

Imagine if we wanted to apply a light purple background color to the rest of the top ten players in the leaderboard example. Instead of adding a query for each position from four to ten, we could add a query that checks a range of values. The syntax is obviously not in the spec at this time, but let’s say it looks something like this just to push the point across:

/* Do not try this at home! */
@container leaderboard style(4 >= --position <= 10) {
  .item {
    background: linear-gradient(45deg, purple, fuchsia);
  }
}

In this fictional and hypothetical example, we’re:

  • Tracking a container called leaderboard,
  • Making a style() query against the container,
  • Evaluating the --position custom property,
  • Looking for a condition where the custom property is set to a value equal to a number that is greater than or equal to 4 and less than or equal to 10.
  • If the custom property is a value within that range, we set a player’s background color to a linear-gradient() that goes from purple to fuschia.

This is very cool, but if this kind of behavior is likely to be done using components in modern frameworks, like React or Vue, we could also set up a range in JavaScript and toggle on a .top-ten class when the condition is met.

See the Pen Style Ranged Queries Use Case Replaced with Classes [forked] by Monknow.

Sure, it’s great to see that we can do this sort of thing directly in CSS, but it’s also something with an existing well-established solution.

Separating Style Logic From Logic Logic

So far, style queries don’t seem to be the most convenient solution for the leaderboard use case we looked at, but I wouldn’t deem them useless solely because we can achieve the same thing with JavaScript. I am a big advocate of reaching for JavaScript only when necessary and only in sprinkles, but style queries, the ones where we can only check for custom properties, are most likely to be useful when paired with a UI framework where we can easily reach for JavaScript within a component. I have been using Astro an awful lot lately, and in that context, I don’t see why I would choose a style query over programmatically changing a class or ID.

However, a case can be made that implementing style logic inside a component is messy. Maybe we should keep the logic regarding styles in the CSS away from the rest of the logic logic, i.e., the stateful changes inside a component like conditional rendering or functions like useState and useEffect in React. The style logic would be the conditional checks we do to add or remove class names or IDs in order to change styles.

If we backtrack to our leaderboard example, checking a player’s position to apply different styles would be style logic. We could indeed check that a player’s leaderboard position is between four and ten using JavaScript to programmatically add a .top-ten class, but it would mean leaking our style logic into our component. In React (for familiarity, but it would be similar to other frameworks), the component may look like this:

const LeaderboardItem = ({position}) => {
  <li className={`item ${position >= 4 && position <= 10 ? "top-ten" : ""}`} id={`item-${position}`}>
    <img src="..." alt="Roi's avatar" />
    <h2>Roi</h2>
  </li>;
};

Besides this being ugly-looking code, adding the style logic in JSX can get messy. Meanwhile, style queries can pass the --position value to the styles and handle the logic directly in the CSS where it is being used.

const LeaderboardItem = ({position}) => {
  <li className="item" style={{"--position": position}}>
    <img src="..." alt="Roi's avatar" />
    <h2>Roi</h2>
  </li>;
};

Much cleaner, and I think this is closer to the value proposition of style queries. But at the same time, this example makes a large leap of assumption that we will get a range syntax for style queries at some point, which is not a done deal.

Conclusion

There are lots of teams working on making modern CSS better, and not all features have to be groundbreaking miraculous additions.

Size queries are definitely an upgrade from media queries for responsive design, but style queries appear to be more of a solution looking for a problem.

“

It simply doesn’t solve any specific issue or is better enough to replace other approaches, at least as far as I am aware.

Even if, in the future, style queries will be able to check for any property, that introduces a whole new can of worms where styles are capable of reacting to other styles. This seems exciting at first, but I can’t shake the feeling it would be unnecessary and even chaotic: styles reacting to styles, reacting to styles, and so on with an unnecessary side of boilerplate. I’d argue that a more prudent approach is to write all your styles declaratively together in one place.

Maybe it would be useful for web extensions (like Dark Reader) so they can better check styles in third-party websites? I can’t clearly see it. If you have any suggestions on how CSS Container Style Queries can be used to write better CSS that I may have overlooked, please let me know in the comments! I’d love to know how you’re thinking about them and the sorts of ways you imagine yourself using them in your work.

Wednesday, May 29, 2024

How to add FILTERS to a STRATEGY SCRIPT 🤖 AutoView Guide

 all right traders welcome back to another pinescript lesson this is the second last blog post i have planned in my auto view series so if you haven't watched the previous videos make sure to go back and watch them because this lesson will build on the previous lesson where we built out the strategy script that you see on my screen right here in today's lesson we're going to add a bunch of filters to this script so we're going to add an ema filter an atr filter a time of day filter and a date filter we're also going to implement our gtd code for our limit orders our expiry code that calculates the expiry date for the limit orders we send to oanda so i hope you're excited to get started adding filters to our scripts is quite easy all we need to do is create a series of boolean true or false values and add them to our setup detection the hardest thing about implementing filters into your scripts is you need trading experience and creativity so you need to understand how the markets work so you know what an effective filter might be and then you need to have the creativity to build that filter and implement all the parameters you think might be necessary so today should be an interesting lesson for those of you who have never done this before and for those of you who have done this before maybe this lesson will inspire some new ideas for your own scripts so let's get started here i am with the script from the previous lesson nothing has been changed since that lesson yet uh before we continue i just want to address these warnings we're getting down here in the editor in case you're not sure what's going on here the first one here is that the tradingview team have implemented new functions called color.new and color.rgb these are the functions we should be using to specify the transparency of our plots because the trans parameter argument function argument will be deprecated soon which means basically made redundant and is no longer encouraged to be used in your scripts so you can ignore these warnings for now it doesn't really matter but this is a new habit i'm personally going to have to get into with my scripts is using these functions to specify the transparency of my plots not sure why they chose to do this because i thought the transparency argument was quite convenient to use but i'm sure they have their reasons and then the last two warnings here say the function two whole should be called on each calculation for consistency it is recommended to extract the call from this scope so if we go down to line 84 that is because we are calling this function two-hole within an if block so everything that occurs within this if statement will only occur will only execute if this boolean is true and that is not going to be the case on every bar on our chart which means that whatever this function does will not be consistent if it depends on bar data in order to calculate whatever it outputs in this particular case this two-hole function is only converting pips into whole numbers it doesn't depend on any actively changing data on our chart so it doesn't matter that this function is being called within this if statement if however we were calculating something within this if statement using a indicator value so for example if we needed the atr distance and we did something like this this would produce incorrect calculations because the atr function needs to be executed on every single bar on our chart in order to accurately calculate its value over the past 14 bars and so what we would need to do in this case if we were using an indicator function or any function even a custom function that depends on price data we'd need to extract the call from the scope that's what that warning means so what you would need to do is create a new variable here and then paste that over the top of this indicator call this could be anything this could be an rsi or a macd anything that or moving average anything that requires previous data you would need to extract that call from the scope so i just wanted to go over that really quickly before we move on because i feel like i'm doing you guys a disservice if i don't explain that information so the first thing i want to do today is add the gtd functionality to our script so the expiry for our limit orders we've already got the input for this our days to leave limit order so if i scroll down to just before we begin calculating our stops and targets this is where i want to calculate the expiry date for my limit order so i'm going to call this set up our gtd good till day or date border info so the first thing we need to do is get the time in milliseconds for the date we want our order to expire on so for that i'm going to create a new variable called gtd time and this is going to be set to the current bar's time plus and then we need to calculate how many milliseconds from now from the current bars time would constitute x amount of days from wherever we are so this is set to 2 by default we need to calculate two days worth of milliseconds and add that onto the current bar's time to get the expiry time and then once we have that time in milliseconds we can use a bunch of pine script inbuilt functions to convert that into a date so we could just google how many milliseconds are in a day and times that number by two but a more intuitive way might be to break down this math so we need to get how many days we want our limit order to be on the broker or exchange for we need to multiply that number by how many minutes are in a day 1440 then we need to multiply that number by how many uh seconds are in a minute which is 60 and then to convert that number into milliseconds we need to multiply that by 1000 so this will give us two days worth of milliseconds and add that onto the current bar's time in milliseconds and if you're not sure what we're working with basically pine script when working with time deals in unix format which is the number of milliseconds that have elapsed since midnight of the first of january 1970. so that's just a standard programming practice to use this unix format and this number gives us 86 million four hundred thousand milliseconds per day so that's the hard work now all we need to do is convert all this information into a date and then convert the date into a string to add to our auto view command so first we need gtd year then we need gtd month then we need gtd day of the month and then finally we need our gtd string which will convert all this data into a into text so first up gtd year we just use the inbuilt function year and we pass our gtd time into that and that will retrieve the year from this unix timestamp same with the month gtd time and same with the day but for here we need to use day of month gtd i'll just keep doing that gtd time it's hard to type around my microphone sometimes i need to uh i need to work on that so now we have all the information we need to calculate our date it's time to convert that into a string so for this we need to specify our order view parameter out the syntax for specifying this command which is dt or date slash time and then we need to add and convert these numbers to strings so that the script will compile first we need to add the format for this is the year first and then we need to add a hyphen and then two string again and then the second parameter is the month and again another hyphen and then the final parameter is our gtd day of month so this would give us the current time of today plus two days worth of milliseconds so whatever time it is right now this string here will be set to the date of two days from now and that's it really all we need to do now is add this string to our order view parameter list here and you can add it in anywhere i personally added on at the very end so we just add a new string here and then for this we have already put in our date time parameter here syntax command and now we can just add our gtd string variable here but we need to check if the user is actually using a limit order before we just pass a two day expiry because they might not have this turned on and they don't want this number to be used at all so the way we check that is we use a conditional statement and we want to check is the gtd order not equal to zero so the user has set the days to leave limit order to something other than zero and have they turned on the limit order checkbox here so if the user turns this off and the script detects a setup on the current bar then a market order will be sent to oanda to buy or sell at market with our stops and targets and we'll pay the spread if the user turns this on but sets this to zero then the script will send a limit order command to oanda at the closing price of our setup and our stops and targets the same as the market order except that the limit order will stay on our broker indefinitely for whatever the maximum time is and then finally if the user changes this number to something other than zero so if you set this to zero this disables the expiry date if you set it to a positive number this is how many days we want our limit order to stay active so now the final thing is to check if this condition is true then we want to pass our gtd string to the end of our alert syntax otherwise we just want to pass nothing just a blank string then we need to add a comma on the end here we can copy this line of code and paste it to our short trade command as well since this information applies to both long and short trades so now we can save the script and we have a error uh let me check what that is 93 plus i forgot to get rid of this comma here at the end of ftp and i probably did the same there yep so now the script should compile because remember all of these parameters belong to all of these arguments for this alert message parameter is just one long string broken up by concatenations or these plus signs and so we need to add the comma at the very end of all of these lines which is why i got an error just then so the script is now compiling everything's working fine we have added expiries to our limit orders so if we come up to the settings menu if we set this up and i leave this as it is and i come up and set an alert select the script and select alert function calls only if i were to click create now then next time a setup is detected the script will send a limit order with a two-day expiry to oanda to enter into the position at a good price ignoring the spread so obviously this is not trading advice i'm not encouraging you to go and trade this script it's not that profitable anyway uh because it is a daily chart strategy and it only works on forex and it only works on a handful of forex pairs it's not an extremely profitable script but it does work on some pairs as you can see here the 57 win rate with a one to one risk reward is profitable and we can bump this up as high as 1.4 and still have a 50 win rate so it is a profitable script but 184 trades from the year what 2000 or something is not a lot of trades so even though it's profitable i wouldn't suggest trading this script or if you do trade this script it should really be part of a wider portfolio of multiple strategies but i'm not allowed to give trading advice because i don't know your risk preferences your risk tolerance i don't know your financial situation your trading experience all of that so none of this is trading advice this is all for example purposes but in saying that i am using this script myself in my own trading and so far it has been working just fine one thing to note is you might want to change the day days to leave limit order to three so that if you get a signal on a friday and there's a long weekend or something you can still get filled on the monday or tuesday or even four four days four or five days on a daily chart strategy is not an unreasonable amount of time to leave a limit order on your chart to get filled by price action if we were trading a 15-minute chart or something then yeah maybe three days would be far too long remember the purpose of having this gtd order is to prevent the script from leaving a position let's say for example the script detected a short trade here but price action just fell from here all the way down to our target and never filled our limit order we don't want the order to stay on our chart any longer than necessary to give the limit order time to be filled because otherwise if this scenario were to unfold we could end up getting filled after the trade's already played out hit our take profit and then it might come up and stop us out and then we just took a loss on a trade that does not meet our trading strategies rules because it's already played out and we've missed it so that's the purpose of having an expiry on limit orders we use limit orders to mitigate the issue of spread but then we use the expiry to mitigate the issue of leaving our limit orders on for too long and then finally before i move on to the filter section of today's lesson it's worth noting that you can change this to something like hours let's say you wanted to leave a limit order that only remains active for one hour you could simply change this to sixty thousand and this would add sixty thousand milliseconds or one hour to the current time and one hour from the time that your order is sent to oanda it will expire so this particular script is designed and optimized to be traded on the daily chart so this approach doesn't really make sense if you were using autoview to automate a script that trades a lower time frame then that is how you would add a limit order with an expiry that only lasts a few minutes or a few hours but to keep today's lesson short we'll leave that there and we'll move on to the next section of this lesson which is adding a couple of filters to our script to hopefully optimize our trading setup accuracy or quality so let's come up to the top here because we need to add a bunch of new user inputs i'm going to keep these new inputs separate from the existing ones just to make the changes we're making to the script a little easier to read so i'm going to create a new comment here called filter settings and the first setting we're going to create is an atr filter now these are filters i already use in my existing scripts so i'm just going to copy and paste the inputs for these particular filters just to save time because you don't need to sit here and watch me type out 15 lines of inputs you should already know by now how inputs work if you've watched any of my previous videos so the first inputs we're working with here are our atr minimum filter size and atr maximum filter size and these are just float inputs with a default value for the minimum of 0.0 and for the maximum of 3.0 so the minimum atr filter means that the current bar the size of the current bar from its high to as low must be at least this many times the atr so by default it's essentially disabled because zero times anything is zero and so any bar size will meet this condition by default the second filter here though is set to three so if the bar size is three times the value of the atr then the setup will be ignored because that bar is far too large to enter on and this stops the script from entering on like flash crash candles like this one if we were to enter long on this bar with a stop loss below this low and a target up here i mean we could be in this trade literally for years and so that's the purpose of having an atr filter in our script so if i save this script now we should have two new inputs up here here they are down the bottom in their own filter section and now let's add this filter to the script so first we need to check atr filter and we need to check the atr minimum filter and the atr maximum filter so for this we need to calculate the candle size in pips so we just subtract the low from the high and that will give us the size and pips of all the bars on our chart and we need to compare this is this number greater than or equal to our atr min filter size multiplied by the current atr value if this is true then the candle size exceeds our minimum filter size and this is a valid setup or if atr min filter size is set to 0.0 then the user has disabled this filter and this min filter boolean will also return true and if either of these conditions are not met it will return false and the setup will not be taken we need to do the same for our max so the high minus the low needs to be less than or equal to our atr max filter size multiplied by the current atr or the user must have set our atr max filter size to 0.0 now we simply add these two filter checks to the setup detection code but before we do that because we are adding multiple filters to this script i'm going to preemptively set up a few variables where we can combine all of our filters for long and short trades so here i'll just say merge filters and we'll have our long filters and our short filters but first let's merge our two atr filters so atr filter is going to be atr min filter and atr max filter so we need both of our filters to pass their checks in order for this to be true and we can paste that into our long and short filters now if we come down to our valid hammer and valid star setups and add on the end here a hammer candle is a long setup so we need to check our long filters and the opposite for our short trades we want to check our short filters now we can save the script make sure everything compiles which it should and there we go so let's play around with these settings make sure they work let's set the minimum atr filter to three that should remove all of the setups on our chart because an atr or a candle size greater than three times the atr is very rare on the daily chart so that's working let's change our maximum atr filter to one and see what that does there we go that changes the setups that are detected to only very small candles and you can see how that affects your win rate and your trade quantity and all of that and that's the point of these filters so that we can play around with them and see how they affect our win rate okay so that's our atr filter let's move on to the next filter i want to add which is an ema filter so for this i'm going to comment this as ema filter and we need to get an ema filter length and again i'll just copy and paste this over to save time this input is just getting an integer input by default it's set to zero and that means that this filter is disabled you could add a checkbox like this for these filters but i find that just setting them to zero to disable them reduces interface clutter so that's why i take this approach so this will be our ema length for this filter so next up let's check ema filter so for this we need to get an ema value and first we need to check is ema filter length set to zero if so then we don't want to do anything we want to set ema to na or null otherwise we want to get the current ema based on the closing price and pass in our ema filter length as the ema period length for calculating this moving average so now we have our ema variable or value we can check our ema long and short filters and for this it's going to be extremely simple while price is trading above the ema we will only look for long trades and when price trades below the ema we will only look for short trades or star candles so for that we need to create two new variables ema long filter so if our ema filter length is set to zero then our ema filter is disabled and ema long filter will return true so we want all of our filters to return true in order to have a valid setup so this will return true if the user has turned ema filter off or left it disabled or if they haven't set email length to zero we want to check if the current closing price is greater than the ema value and the ema value is not n a so remember when dealing with indicator values on our charts it's important to check that the ema has been calculated so 50 ema for example on our chart needs 50 bars to plot onto this chart before it can start calculating its values and so if we don't add this check in here to make sure that the ema has a value that can mess with how the script detects our filters and if you remember from the previous lesson i went over that when we added our atr na check so that's our ema long filter check next we need our ema short filter which is going to be the same sort of thing we need to check has the user left ema filter off or is the closing price of the current bar less than the current ema value and the ema value is not n a just to make sure this is working we can add a visual check here we can add a plot that checks is the ema filter length equal to zero if so we want to plot nothing otherwise we want to plot our ema value and then we can change the color based on whether price is above the ema so the if price is above the ema we can set the color to green otherwise we can set it to red and then we can title this ema filter all right so now if i save the script we should have an ema plotting onto our chart when we specify an ema length in the settings menu so there we go script is loaded let's change our ema length to let's do 50 and now we have a 50 ema plotting onto the chart changing color based on whether price is above or below it the last thing we need to do is add this same check to our setup detection and the purpose of this i don't know if it will increase the accuracy of the script or not but the purpose of this is to stop taking short trades when price is trading to the upside all of these filters are just for example purposes so it's possible that some of these filters we add may decrease the accuracy of the script but that's okay this is all for example purposes and that's why i'm leaving the filters off by default so now if we come down to our long filters we can add and ema long filter and add and ema short filter to our short filters save the script and then we can check to see if the script will still take the short trade if we put the ema filter onto 50 5 0 okay and that trade goes away and the accuracy of the script has actually increased a little bit i think our trade quantity has decreased but the win rate has gone up just slightly 57 percent so that's interesting something to play around with uh 10 ema 20 ema 20 ema actually produces a 61 win rate over as still a decent sample size being that this is a daily chart that's pretty cool so there's a successful ema filter added to the chart and just because i like to keep my scripts tidy i'm going to move this plot down to the end here i'll just paste it under draw trade data and come back up and we'll add our next filter which is going to be a date filter so date filter i'll copy these inputs over yet again so these inputs are getting a input.time data type which is a timestamp and you can see here that we've passed two default time stamps between 1st of january 2000 and 1st of january 2099. and so by default the script will only take trades between these two dates you could change this if you wanted to something like 1000 to include all of price history on any market you load the script onto and then if you want to fine tune your start and end date you can do that in the settings menu so let's come down to our ema filter and add on our date filter underneath there and for this all we need to do is add a new boolean called date filter and this one is the easiest filter of all all we need to do is check if the current bar's time its unix timestamp falls between our start time and our end time so is the current bar's millisecond unix timestamp greater than or equal to our start time timestamp and is the time of the current bar less than or equal to our end time timestamp so now if i copy this boolean onto the end of our long and short filters we have now added a date filter to our script and so if i come up to the settings menu and we change this to 2000 and let's go 20 click ok if i zoom out you can see that the script is no longer taking any trades that fall between 1st of january 2020 and we can see how these strategy performed over certain time periods so for example we could see how it performed during the 2008 financial crisis so between 2007 2009 uh it still had a decent win rate 51 1.4 profit factor so that's the purpose of a date filter it's useful for back testing your script and just seeing how it performed during certain periods of time and then there's one more filter i want to add to the script which is a time filter now this particular filter is not particularly relevant to the script because as i mentioned earlier this is intended to be a daily chart trading strategy so having a time filter is kind of pointless for the script but i figured while we're here i might as well show you guys how to do this because it's almost as easy as making the date filter so we might as well do it while we're here just so that you guys can go and play around with this in your own scripts in your own time so i'm going to copy these filters as well to save time and we're getting two variables here from the user the first is our time session this is the time session to ignore trades and it uses a type of input.session and the second input is just a boolean checkbox that determines whether or not we actually use the time session filter because there is no way to set this to zero like we can with the ema filter or the atr filter so now we have our session we want to check if the current bar's time falls within this session and if it does we don't want to take any trades so to do that let's come down to our date filter and add in our check time filter code so for this i like to create a custom function called is in session and this custom function is only going to take one input parameter or argument and i'm just going to call this one sess short for session and then we need to declare or define the function and what it does using the equals and then right arrow operator and this function is going to check if the time of our time frame dot period in this current session is not n a so there's a bit going on here let me just break this down so the first thing we're doing is getting the time of the current bar for the specified resolution and session so we've passed in our session which by default is between 6 am and 9 15 am which happens to be when the spread in my place in the world is terrible i don't like trading between 6 am and quarter past nine because my spread is as high as 10 times what it normally is that is why i'm using that session as the default and so we're checking is the current bars time frame within this session that we have specified if it isn't then this time function will return n a and our n a function check will return true and so this block of code here will be true if the current bar's time does not fall within the session we've specified so we're checking if this is equal to false that means that the current bar is within our specified session and is in session will return true otherwise if it's not within that time period it will return false and now we have our time filter so before we use the time filter we need to check i'm going to create a new boolean variable here called time filter and we're going to check is use time filter turned on and are we not in the session that we want to be in or has the user turned off use time filter so if use time filter is not on time filter will return true however if use time filter is turned on and the current bar is not within the session that we've specified and of course we need to pass our session into this function which is this variable here time session this user input paste that into our is in session function call now if i save the script this time filter will return true if the user has turned on the time filter and the bar is not within the session they've specified so let me add on to the end of our filters and time filter and now if i save the script if we come up to the settings menu we now have this new filter at the end of the list so if i turn this on then the script will not take trades within this time period so that's it the script is pretty much completed now just before we wrap things up i will add a quick visual indication for our filters so in this case i want to change the background color of our chart to red if any of our filters are not met so for this i'm going to use the bg color function and i'm going to set the color to and then i want to check is use time filter turned on and are we in the session that we have specified or do we not meet the requirements for our date filter or do we not meet the requirements for our atr filter the only thing i'm not going to check here is our ema filter because if prices above the ema we're looking for longs and if it's below looking for shorts if any of these filters are not met then we're not looking for any trades so i want to set the background color of my chart to red when any of these filters are not met or not satisfied so that we know what the script is doing so i add my conditional check here if any of these are true then we want to set the background color to red otherwise we want to set it to nothing leave it as it is i want to set the transparency to 70 percent and i'll title this filter color and close that off and now if i say the script hopefully that should compile without any problems and our script is now finally completed so let's play around with some of these filters first of all let's check the time filter let me go down to a 15 minute chart and turn on our time session filter now you can see that the background of the chart goes red between 6 a.m and 9 a.m and you can see here that this bar here is obviously greater than three times the atr and that's why the background color turned red for that bar so if this had been a valid trading pattern we would not have entered it because it is invalidated by our atr filter the script is completed this will not be profitable it was highly unlikely to be profitable on lower time frames maybe the higher time frames like 4 hour and above i'm barely about break even but the daily chart is where this particular strategy is the strongest because of the concept we're trading here hammer and shooting star candles are far more reliable on the higher time frames than the lower time frames where there's a lot of noise so that will about do it for today's video hope you found that interesting a link to the source code will be below this video in the video description the next lesson in this series is going to show you how to set up a virtual server private server through something like amazon web services is probably what i'll use so that you can run auto view in your browser 24 7 without needing to leave your computer on if that's not an option for you and then i'll wrap up the series there any future lessons i create on this subject will be going up in the pine script mastery course and i actually want to move on to different topics on this youtube channel in the months to come i'll still be doing pine script videos but just less frequently i'm planning to move over to more general trading related videos make sure to hit the subscribe button i'll be back real soon with a new lesson but if you can't wait for that there's plenty of lessons over at panscriptmastery.com including my free basics course and the panscript mastery course which now has over 100 lessons and 14 hours of content covering pinescript in great detail and of course if you want to steal all of my source code for every script i've ever written over the past four years there is my indicators and strategies course which contains the source code and detailed lessons several hours of video lessons breaking down the source code to all of my most popular scripts take care thanks for watching to the end and i will be back real soon good luck with your trading and thanks for being a part of this community