⭐ If you would like to buy me a coffee, well thank you very much that is mega kind! : https://www.buymeacoffee.com/honeyvig Hire a web Developer and Designer to upgrade and boost your online presence with cutting edge Technologies

Friday, October 31, 2025

AI In UX: Achieve More With Less


A simple but powerful mental model for working with AI: treat it like an enthusiastic intern with no real-world experience. Here shares lessons learned from real client projects across user research, design, development, and content creation.

I have made a lot of mistakes with AI over the past couple of years. I have wasted hours trying to get it to do things it simply cannot do. I have fed it terrible prompts and received terrible output. And I have definitely spent more time fighting with it than I care to admit.

But I have also discovered that when you stop treating AI like magic and start treating it like what it actually is (a very enthusiastic intern with zero life experience), things start to make more sense.

Let me share what I have learned from working with AI on real client projects across user research, design, development, and content creation.

How To Work With AI

Here is the mental model that has been most helpful for me. Treat AI like an intern with zero experience.

An intern fresh out of university has lots of enthusiasm and qualifications, but no real-world experience. You would not trust them to do anything unsupervised. You would explain tasks in detail. You would expect to review their work multiple times. You would give feedback and ask them to try again.

This is exactly how you should work with AI.

The Basics Of Prompting

I am not going to pretend to be an expert. I have just spent way too much time playing with this stuff because I like anything shiny and new. But here is what works for me.

  • Define the role.
    Start with something like “Act as a user researcher” or “Act as a copywriter.” This gives the AI context for how to respond.
  • Break it into steps.
    Do not just say “Analyze these interview transcripts.” Instead, say “I want you to complete the following steps. One, identify recurring themes. Two, look for questions users are trying to answer. Three, note any objections that come up. Four, output a summary of each.”
  • Define success.
    Tell it what good looks like. “I am looking for a report that gives a clear indication of recurring themes and questions in a format I can send to stakeholders. Do not use research terminology because they will not understand it.”
  • Make it think.
    Tell it to think deeply about its approach before responding. Get it to create a way to test for success (known as a rubric) and iterate on its work until it passes that test.

Here is a real prompt I use for online research:

Act as a user researcher. I would like you to carry out deep research online into [brand name]. In particular, I would like you to focus on what people are saying about the brand, what the overall sentiment is, what questions people have, and what objections people mention. The goal is to create a detailed report that helps me better understand the brand perception.

Think deeply about your approach before carrying out the research. Create a rubric for the report to ensure it is as useful as possible. Keep iterating until the report scores extremely high on the rubric. Only then, output the report.

That second paragraph (the bit about thinking deeply and creating a rubric), I basically copy and paste into everything now. It is a universal way to get better output.

Learn When To Trust It

You should never fully trust AI. Just like you would never fully trust an intern you have only just met.

To begin with, double-check absolutely everything. Over time, you will get a sense of when it is losing its way. You will spot the patterns. You will know when to start a fresh conversation because the current one has gone off the rails.

But even after months of working with it daily, I still check its work. I still challenge it. I still make it cite sources and explain its reasoning.

The key is that even with all that checking, it is still faster than doing it yourself. Much faster.

Using AI For User Research

This is where AI has genuinely transformed my work. I use it constantly for five main things.

Online Research

I love AI for this. I can ask it to go and research a brand online. What people are saying about it, what questions they have, what they like, and what frustrates them. Then do the same for competitors and compare.

This would have taken me days of trawling through social media and review sites. Now it takes minutes.

I recently did this for an e-commerce client. I wanted to understand what annoyed people about the brand and what they loved. I got detailed insights that shaped the entire conversion optimization strategy. All from one prompt.

Analyzing Interviews And Surveys

I used to avoid open-ended questions in surveys. They were such a pain to review. Now I use them all the time because AI can analyze hundreds of text responses in seconds.

For interviews, I upload the transcripts and ask it to identify recurring themes, questions, and requests. I always get it to quote directly from the transcripts so I can verify it is not making things up.

The quality is good. Really good. As long as you give it clear instructions about what you want.

Making Sense Of Data #

I am terrible with spreadsheets. Put me in front of a person and I can understand them. Put me in front of data, and my eyes glaze over.

AI has changed that. I upload spreadsheets to ChatGPT and just ask questions. “What patterns do you see?” “Can you reformat this?” “Show me this data in a different way.”

Microsoft Clarity now has Copilot built in, so you can ask it questions about your analytics data. Triple Whale does the same for e-commerce sites. These tools are game changers if you struggle with data like I do.

Screenshot of the Microsoft Clarity with the built-in Copilot
Microsoft Clarity has co-pilot built in, making it so much easier to uncover insights.

Research Projects #

This is probably my favorite technique. In ChatGPT and Claude, you can create projects. In other tools, they are called spaces. Think of them as self-contained folders where everything you put in is available to every conversation in that project.

When I start working with a new client, I create a project and throw everything in. Old user research. Personas. Survey results. Interview transcripts. Documentation. Background information. Site copy. Anything I can find.

Then I give it custom instructions. Here is one I use for my own business:

Act as a business consultant and marketing strategy expert with good copywriting skills. Your role is to help me define the future of my UX consultant business and better articulate it, especially via my website. When I ask for your help, ask questions to improve your answers and challenge my assumptions where appropriate.

I have even uploaded a virtual board of advisors (people I wish I had on my board) and asked AI to research how they think and respond as they would.

Now I have this project that knows everything about my business. I can ask it questions. Get it to review my work. Challenge my thinking. It is like having a co-worker who never gets tired and has a perfect memory.

I do this for every client project now. It is invaluable.

Creating Personas

AI has reinvigorated my interest in personas. I had lost heart in them a bit. They took too long to create, and clients always said they already had marketing personas and did not want to pay to do them again.

Now I can create what I call functional personas. Personas that are actually useful to people who work in UX. Not marketing fluff about what brands people like, but real information about what questions they have and what tasks they are trying to complete.

I upload all my research to a project and say:

Act as a user researcher. Create a persona for [audience type]. For this persona, research the following information: questions they have, tasks they want to complete, goals, states of mind, influences, and success metrics. It is vital that all six criteria are addressed in depth and with equal vigor.

The output is really good. Detailed. Useful. Based on actual data rather than pulled out of thin air.

Ai-generated functional persona
AI makes creating detailed personas so much faster.

Here is my challenge to anyone who thinks AI-generated personas are somehow fake. What makes you think your personas are so much better? Every persona is a story of a hypothetical user. You make judgment calls when you create personas, too. At least AI can process far more information than you can and is brilliant at pattern recognition.

My only concern is that relying too heavily on AI could disconnect us from real users. We still need to talk to people. We still need that empathy. But as a tool to synthesize research and create reference points? It is excellent.

Using AI For Design And Development

Let me start with a warning. AI is not production-ready. Not yet. Not for the kind of client work I do, anyway.

Three reasons why:

  1. It is slow if you want something specific or complicated.
  2. It can be frustrating because it gets close but not quite there.
  3. And the quality is often subpar. Unpolished code, questionable design choices, that kind of thing.

But that does not mean it is not useful. It absolutely is. Just not for final production work.

Functional Prototypes

If you are not too concerned with matching a specific design, AI can quickly prototype functionality in ways that are hard to match in Figma. Because Figma is terrible at prototyping functionality. You cannot even create an active form field in a Figma prototype. It’s the biggest thing people do online other than click links — and you cannot test it.

Tools like Relume and Bolt can create quick functional mockups that show roughly how things work. They are great for non-designers who just need to throw together a prototype quickly. For designers, they can be useful for showing developers how you want something to work.

But you can spend ages getting them to put a hamburger menu on the right side of the screen. So use them for quick iteration, not pixel-perfect design.

Small Coding Tasks #

I use AI constantly for small, low-risk coding work. I am not a developer anymore. I used to be, back when dinosaurs roamed the earth, but not for years.

AI lets me create the little tools I need. A calculator that calculates the ROI of my UX work. An app for running top task analysis. Bits of JavaScript for hiding elements on a page. WordPress plugins for updating dates automatically.

Screenshot of the Bolt tool
I find Bolt an incredibly intuitive tool for building quick prototypes for low-risk apps.

Just before running my workshop on this topic, I needed a tool to create calendar invites for multiple events. All the online services wanted £16 a month. I asked ChatGPT to build me one. One prompt. It worked. It looked rubbish, but I did not care. It did what I needed.

If you are a developer, you should absolutely be using tools like Cursor by now. They are invaluable for pair programming with AI. But if you are not a developer, just stick with Claude or Bolt for quick throwaway tools.

Reviewing Existing Services #

There are some great tools for getting quick feedback on existing websites when budget and time are tight.

If you need to conduct a UX audit, Wevo Pulse is an excellent starting point. It automatically reviews a website based on personas and provides visual attention heatmaps, friction scores, and specific improvement recommendations. It generates insights in minutes rather than days.

Now, let me be clear. This does not replace having an experienced person conduct a proper UX audit. You still need that human expertise to understand context, make judgment calls, and spot issues that AI might miss. But as a starting point to identify obvious problems quickly? It is a great tool. Particularly when budget or time constraints mean a full audit is not on the table.

For e-commerce sites, Baymard has UX Ray, which analyzes flaws based on their massive database of user research.

Screenshot of the Baymard UX-ray
Baymard UX-ray is an incredibly handy tool for improving the quality of your UX audits.

Checking Your Designs

Attention Insight has taken thousands of hours of eye-tracking studies and trained AI on it to predict where people will look on a page. It has about 90 to 96 percent accuracy.

You upload a screenshot of your design, and it shows you where attention is going. Then you can play around with your imagery and layout to guide attention to the right place.

It is great for dealing with stakeholders who say, “People won’t see that.” You can prove they will. Or equally, when stakeholders try to crowd the interface with too much stuff, you can show them attention shooting everywhere.

I use this constantly. Here is a real example from a pet insurance company. They had photos of a dog, cat, and rabbit for different types of advice. The dog was far from the camera. The cat was looking directly at the camera, pulling all the attention. The rabbit was half off-frame. Most attention went to the cat’s face.

An example from a pet insurance company tested by Attention Insight
(Large preview)

I redesigned it using AI-generated images, where I could control exactly where each animal looked. Dog looking at the camera. Cat looking right. Rabbit looking left. All the attention drawn into the center. Made a massive difference.

Redesigned version of the previous example with AI-generated images.
AI can be used to create images that are consistent with a brand identity and are designed to draw attention to specific elements. (Large preview)

Creating The Perfect Image

I use AI all the time for creating images that do a specific job. My preferred tools are Midjourney and Gemini.

I like Midjourney because, visually, it creates stunning imagery. You can dial in the tone and style you want. The downside is that it is not great at following specific instructions.

So I produce an image in Midjourney that is close, then upload it to Gemini. Gemini is not as good at visual style, but it is much better at following instructions. “Make the guy reach here” or “Add glasses to this person.” I can get pretty much exactly what I want.

The other thing I love about Midjourney is that you can upload a photograph and say, “Replicate this style.” This keeps consistency across a website. I have a master image I use as a reference for all my site imagery to keep the style consistent.

Using AI For Content

Most clients give you terrible copy. Our job is to improve the user experience or conversion rate, and anything we do gets utterly undermined by bad copy.

I have completely stopped asking clients for copy since AI came along. Here is my process.

Build Everything Around Questions

Once I have my information architecture, I get AI to generate a massive list of questions users will ask. Then I run a top task analysis where people vote on which questions matter most.

I assign those questions to pages on the site. Every page gets a list of the questions it needs to answer.

Get Bullet Point Answers From Stakeholders

I spin up the content management system with a really basic theme. Just HTML with very basic formatting. I go through every page and assign the questions.

Then I go to my clients and say: “I do not want you to write copy. Just go through every page and bullet point answers to the questions. If the answer exists on the old site, copy and paste some text or link to it. But just bullet points.”

That is their job done. Pretty much.

Let AI Draft The Copy

Now I take control. I feed ChatGPT the questions and bullet points and say:

Act as an online copywriter. Write copy for a webpage that answers the question [question]. Use the following bullet points to answer that question: [bullet points]. Use the following guidelines: Aim for a ninth-grade reading level or below. Sentences should be short. Use plain language. Avoid jargon. Refer to the reader as you. Refer to the writer as us. Ensure the tone is friendly, approachable, and reassuring. The goal is to [goal]. Think deeply about your approach. Create a rubric and iterate until the copy is excellent. Only then, output it.

I often upload a full style guide as well, with details about how I want it to be written.

The output is genuinely good. As a first draft, it is excellent. Far better than what most stakeholders would give me.

Stakeholders Review And Provide Feedback

That goes into the website, and stakeholders can comment on it. Once I get their feedback, I take the original copy and all their comments back into ChatGPT and say, “Rewrite using these comments.”

Job done.

The great thing about this approach is that even if stakeholders make loads of changes, they are making changes to a good foundation. The overall quality still comes out better than if they started with a blank sheet.

It also makes things go smoother because you are not criticizing their content, where they get defensive. They are criticizing AI content.

Tools That Help #

If your stakeholders are still giving you content, Hemingway Editor is brilliant. Copy and paste text in, and it tells you how readable and scannable it is. It highlights long sentences and jargon. You can use this to prove to clients that their content is not good web copy.

Screenshot of the Hemingway Editor
Hemingway Editor is superb at rewriting copy to be more web-friendly.

If you pay for the pro version, you get AI tools that will rewrite the copy to be more readable. It is excellent.

What This Means for You 

Let me be clear about something. None of this is perfect. AI makes mistakes. It hallucinates. It produces bland output if you do not push it hard enough. It requires constant checking and challenging.

But here is what I know from two years of using this stuff daily. It has made me faster. It has made me better. It has freed me up to do more strategic thinking and less grunt work.

A report that would have taken me five days now takes three hours. That is not an exaggeration. That is real.

Overall, AI probably gives me a 25 to 33 percent increase in what I can do. That is significant.

Your value as a UX professional lies in your ideas, your questions, and your thinking. Not your ability to use Figma. Not your ability to manually review transcripts. Not your ability to write reports from scratch.

AI cannot innovate. It cannot make creative leaps. It cannot know whether its output is good. It cannot understand what it is like to be human.

That is where you come in. That is where you will always come in.

Start small. Do not try to learn everything at once. Just ask yourself throughout your day: Could I do this with AI? Try it. See what happens. Double-check everything. Learn what works and what does not.

Treat it like an enthusiastic intern with zero life experience. Give it clear instructions. Check its work. Make it try again. Challenge it. Push it further.

And remember, it is not going to take your job. It is going to change it. For the better, I think. As long as we learn to work with it rather than against it

Thursday, October 30, 2025

How to Generate PDF Programmatically in Magento 2


Magento 2 store admin often want to share their store data. Either be it an invoice to be shared with customer or quote to be shared with the potential visitor! PDF is the preferred format to share the data as it can be easily viewed on any device and it’s highly trusted for security and password protection.

The default Magento methods to generate PDF files are rather inflexible. That’s why I’ve come up with the method to generate PDF programmatically in Magento 2. The method allows to generate PDF displaying any type of the store data, be it grid or invoice or customer data, etc.

Method to generate PDF programmatically in Magento 2:

Implement the below code in your controller action file:

<?php namespace Vendor\Extension\Controller\Index;   use Magento\Framework\App\Action\Action; use Magento\Framework\App\Action\Context; use Magento\Framework\App\Response\Http\FileFactory;   class Index extends Action {     protected $fileFactory;       public function __construct(         Context $context,         FileFactory $fileFactory     ) {         $this->fileFactory = $fileFactory;         parent::__construct($context);     }       public function execute()     {         $pdf = new \Zend_Pdf();         $pdf->pages[] = $pdf->newPage(\Zend_Pdf_Page::SIZE_A4);         $page = $pdf->pages[0]; // this will get reference to the first page.         $style = new \Zend_Pdf_Style();         $style->setLineColor(new \Zend_Pdf_Color_Rgb(0,0,0));         $font = \Zend_Pdf_Font::fontWithName(\Zend_Pdf_Font::FONT_TIMES);         $style->setFont($font,13);         $page->setStyle($style);         $width = $page->getWidth();         $hight = $page->getHeight();         $x = 30;         $pageTopalign = 850;          $this->y = 850 - 100;                   $style->setFont($font,14);         $page->setStyle($style);         $page->drawRectangle(30, $this->y + 10, $page->getWidth()-30, $this->y +70, \Zend_Pdf_Page::SHAPE_DRAW_STROKE);                  $style->setFont($font,13);         $page->setStyle($style);         $page->drawText(__("Cutomer Details"), $x + 5, $this->y+50, 'UTF-8');         $style->setFont($font,11);         $page->setStyle($style);         $page->drawText(__("Name : %1", "Test Meetanshi"), $x + 5, $this->y+33, 'UTF-8');         $page->drawText(__("Email : %1","test@meetanshi.com"), $x + 5, $this->y+16, 'UTF-8');           $style->setFont($font,11);         $page->setStyle($style);                  $page->drawText(__("PRODUCT NAME"), $x + 60, $this->y-10, 'UTF-8');         $page->drawText(__("PRODUCT PRICE"), $x + 200, $this->y-10, 'UTF-8');         $page->drawText(__("QTY"), $x + 310, $this->y-10, 'UTF-8');         $page->drawText(__("SUB TOTAL"), $x + 440, $this->y-10, 'UTF-8');           $style->setFont($font,10);         $page->setStyle($style);         $add = 9;                  $page->drawText("$12.00", $x + 210, $this->y-30, 'UTF-8');         $page->drawText(10, $x + 330, $this->y-30, 'UTF-8');         $page->drawText("$120.00", $x + 470, $this->y-30, 'UTF-8');         $pro = "TEST product";         $page->drawText($pro, $x + 65, $this->y-30, 'UTF-8');                  $page->drawRectangle(30, $this->y -62, $page->getWidth()-30, $this->y + 10, \Zend_Pdf_Page::SHAPE_DRAW_STROKE);         $page->drawRectangle(30, $this->y -62, $page->getWidth()-30, $this->y - 100, \Zend_Pdf_Page::SHAPE_DRAW_STROKE);                  $style->setFont($font,15);         $page->setStyle($style);         $page->drawText(__("Total : %1", "$50.00"), $x + 435, $this->y-85, 'UTF-8');                  $style->setFont($font,10);         $page->setStyle($style);         $page->drawText(__("Test Footer example"), ($page->getWidth()/2)-50, $this->y-200);           $fileName = 'meetanshi.pdf';           $this->fileFactory->create(            $fileName,            $pdf->render(),            \Magento\Framework\App\Filesystem\DirectoryList::VAR_DIR, // this pdf will be saved in var directory with the name meetanshi.pdf            'application/pdf'         );     } }

With the above code, generate PDF programmatically in Magento 2 and share the data securely and user-friendly!

You can also Generate attractive PDF catalogs for various product categories by using our Magento 2 PDF Catalog.

Hopefully, the post is helpful to the readers and easy to implement.

Keep Sharing

How to Import Products in Magento 2


Do you own a Magento 2 store with a large number of products? Do you wish to add a large database related to the products in your backend? Do you want to update the products data? And, are you lazy just like me?

Look no more, because this post is for you! Get the time-saving method that helps import products in Magento 2.

Magento 2 Import Products CSV: an easy solution to save you from going through all the troubles of managing a large database of products in the backend!

Follow the stepwise method given below and you’re done

Method to Import Products in Magento 2:

1. Login to Admin Panel

2. Navigate to System > Import.

Magento 2 Admin panel with browsing product import option

3. Select Products in the Entity Type drop-down and click Download Sample File.

2_Import-Settings

4. You’ll get the CSV file like this:

3_CSV File Sample
4_Add_Update

8. Select the Choose file option and type /pub/media/import in the Image File Directory text field. Then choose the Check Data option.

9. After receiving the validation results notification, click Import.

10. When the product import is finished go to Catalog > Products and check the products with the images are displayed on the product grid. Don’t forget to make the products live in-store – Enable Product Toggle:

5_Enable product

11. You can manage all the import and export activities from the Import History tab. For that, navigate to System>Data Transfer>Import History.

6_Import History

If you want to import products with images in bulk, delete all the sample products from the CSV file and insert your own ones with all the attribute details.

With the help of this tutorial, one should be able to import products in Magento 2 easily!

Magento Instagram – Extension Explained


60% of users discover products on Instagram, says Todd Clarke at Hootsuite. And, out of them, 75% of users take action!

Only someone who does not want to grow his business would not bother about Instagram marketing. Meetanshi, who always strives to offer products to help Magento store owners grow their business, have come up with an excellent Instagram marketing tool for Magento stores.

Magento Instagram extension enables integration of Magento with Instagram to create a beautiful Instagram shop in the Magento store. The module fetches Instagram images, edit and displays them in the front-end of the store. It creates an amazing look that attracts users.

The Magento Instagram widget is a marketing tool to boost traffic and sales. The Instagram images create excellent views on the store that prompts visitors to check the products. Also, it helps in increasing the Instagram followers which can be considered as an additional benefit of the extension.

Why choose Magento Instagram extension by Meetanshi?

Now that the usefulness of the extension is clear, let’s see the features and its configuration.

Once the extension is enabled from the backend, one needs to configure a few settings to get the most out of it. Add the Instagram profile name to be displayed in the image popup. The Instagram images can be fetched using the username or hashtags. Add the username, Instagram user access token and the number of Instagram images to be fetched.

Also, configure the settings to show Instagram images on different pages like the home page, category page, product page, and Instagram page. These images help to flaunt your products in an attractive manner on the store pages.

The Magento Instagram extension offers three Instagram image popup views: Default Insta view, Caption with hyperlink and product feed. One can enable the autoplay feature in the popup for the videos.

1. Caption with Hyperlink: Connect image hotspots with a caption to redirect the visitors to a webpage of your store by linking the image captions.

Edit-Image-Information-Title-with-Cption-View-Settings

2. Product Feed: Assign a unique SKU with each hotspot to make a product feed in the popup. On click of each product feed, visitors can be redirected to a particular product page.

Edit-Image-Information-Product-Feed-View-Settings

3. Default Insta View: Create the Instagram desktop view. No settings required, just select the view from the configuration and it will show the exact view of Instagram in Magento.

One of the important features that make the extension more powerful is the UTM tracking settings. All you have to do is enable the UTM tracking and enter the campaign source, name and medium. One can track the traffic that is gained from Instagram and help shape the Instagram marketing strategy!

Admin can approve or delete the images that are fetched, to be displayed. Not only that, but admin can also edit the image details such as captions, hyperlinks, product SKUs, hotspots from Manage Instagram Images section. Do all the customization that you want for the best output!

Want to enable category specific or product specific Instagram images for your store? The module offers the feature to do it! Select the username or hashtag to fetch the images. Check below.

Category Specific Instagram Settings:

Category-Specific-Instagram-Settings

Product Specific Instagram Settings:

Product-Specific-Instagram-Settings

Once the extension is configured, enjoy its features in the frontend. The Instagram images can be seen in the home page as below. When a user hovers on any of the images, the number of likes and comments can be seen which gives an overview of the popularity of the product.

Instagram-Images-on-Home-Page

Similarly, the extension fetches Instagram images on the category page, product page, and Instagram page.

Based on the Instagram Image Popup View, on click of Instagram Images from any of the pages, it shows the popup accordingly.

  • Caption With Hyperlink View: On hover of captions, hot spots are seen. On click of the captions, users get redirected to page set from the backend.
Title-with-Cption-View-in-Frontend
  • Product Feed ViewOn hover of product feeds, hot spots are seen. On click of the feeds, users get redirected to the product page set from the backend.
Product-Feed-View-in-Frontend
  • Default Insta View: Shows the exact view of Instagram.
Default-Insta-View-in-Frontend

Can’t wait to implement these excellent features in your store? Avail the popularity of Instagram for your profits with Magento Instagram extension. Check UserGuide now, to configure the extension in your Magento!

How to Set Anchor to YES in all Categories in Magento 2


In Magento 2 stores, by default, all the categories created through the admin is set to “No” for the option “is Anchor”. Setting “Is Anchor” to “Yes” activates the Layered Navigation in Magento 2 which is also known as filtered navigation.

To enable layered navigation, the admin has to follow certain steps for each category which areLogin to Admin panel

1. Navigate to Catalog > Categories

2. Navigate to Catalog > Categories

3. Select the Category

4. Expand the Display Settings

5. Enable the Anchor to “YES”.

Manually-set-anchor-to-yes

There is no method to update this setting in bulk from Magento 2 admin and the task to set Anchor to YES in all Magento 2 categories one by one is tedious and time-consuming when you have a lot of categories.

What if I show the programmatic method to enable the layered navigation for all Magento 2 categories at once?

Set anchor to YES in all categories in Magento 2 with the SQL queries given here. It will save your time and offer layered navigation to the store visitors to help them easily find the products.

Method to Set Anchor to YES in all Categories in Magento 2:

Identify the attribute id of the is_anchor attribute:

SELECT * FROM eav_attribute where attribute_code = 'is_anchor'

Now, run the below query to update all the category to Anchor YES:

UPDATE catalog_category_entity_int set value = 1 where attribute_id = 54;

And done!

With the above SQL commands, enrich the user experience on your store and at the same time reduce admin task by the programmatic method to set anchor to YES in all categories in Magento 2.

Thank You

How to Change Admin URL in Magento 2


Magento 2 is widely used CMS for E-commerce stores. Security, which is of prime importance, is given utmost priority in the CMS. Here, I’ll discuss one of the ways to implement security in the store, i.e., change admin URL in Magento 2.

The admin URL is used to access the backend of the store. It allows editing as well as manage the administrative tasks. However, the default format of the URL, “sitename.com/admin” is vulnerable to bots. It is easy to crack the predictable names such as a backend, admin, etc.

It is good practice to have a unique name of the admin URL that’ll help protect the backend admin from automated software’s hacks or bots attack. Experts recommend to change admin URL in Magento 2, hence I’ve come up with the method for the same!

Methods to Change Admin URL in Magento 2:

There are 3 methods to set custom Magento 2 admin URL:

1. via SSH

Run this command:

php bin/magento setup:config:set --backend-frontname="admin_path"

Here set whatever URL you wish to set in place of “admin_path“.

2. Manually

  • Navigate to app/etc/env.php
  • Change ‘frontName’ => ‘admin’,
  • Clear cache

3. via Admin panel

  • Log in the Admin panel
  • Navigate to Stores > Configuration
  • Click on Admin under Advanced section.
  • Under Advanced, click Admin and expand the Admin Base URL section.
  • Set Use Custom Admin URL to “Yes”.
  • Enter the custom admin URL
  • Also, you can enable the “Use Custom Admin Path” field and just set the custom admin path instead of the entire URL. This is an alternate method.
  • You will be logged out and redirected to the new Admin URL.
Change-backend-URL-from-admin-panel

These methods are handy to set custom admin URL in Magento 2. Though the method does not guarantee 100% security from bots, it does contribute to your efforts to secure the admin panel.
After using one of the methods to change the admin URL in Magento 2, you can type the new admin URL and log in as usual. Apart from securing the Magento 2 store against bots and attackers, changing your default admin URL is the tiny step towards the larger security endeavor.

Magento 2 Product Attachments – Meetanshi Extension Explained


If you own a Magento 2 store that sells online products, you may be interested in ways that help to convey your products the better way to visitors. Everyone wants more conversions but the understandability of your products or services plays a major role in it.

The customers who shop online expect maximum information about the items as they themselves are not able to check it. To fulfill this expectation in Magento 2 stores, Meetanshi’s Magento 2 Product Attachments extension is handy!

The Magento 2 File Upload Tool enables to add files on product pages such as user guides, license, warranty cards, price list or any type of documents that delivers extra information about the product.

Leave no chance to miss an opportunity of conversion due to confusion about the product. Moreover, confidently display all the details about the working, configuration, warranties, etc. that prompts visitors to trust your product!

Why choose Magento 2 Product Attachments Extension by Meetanshi?

The extension helps increase conversion rate as well as improve the user experience due to your efforts in delivering product information. Let’s see how!

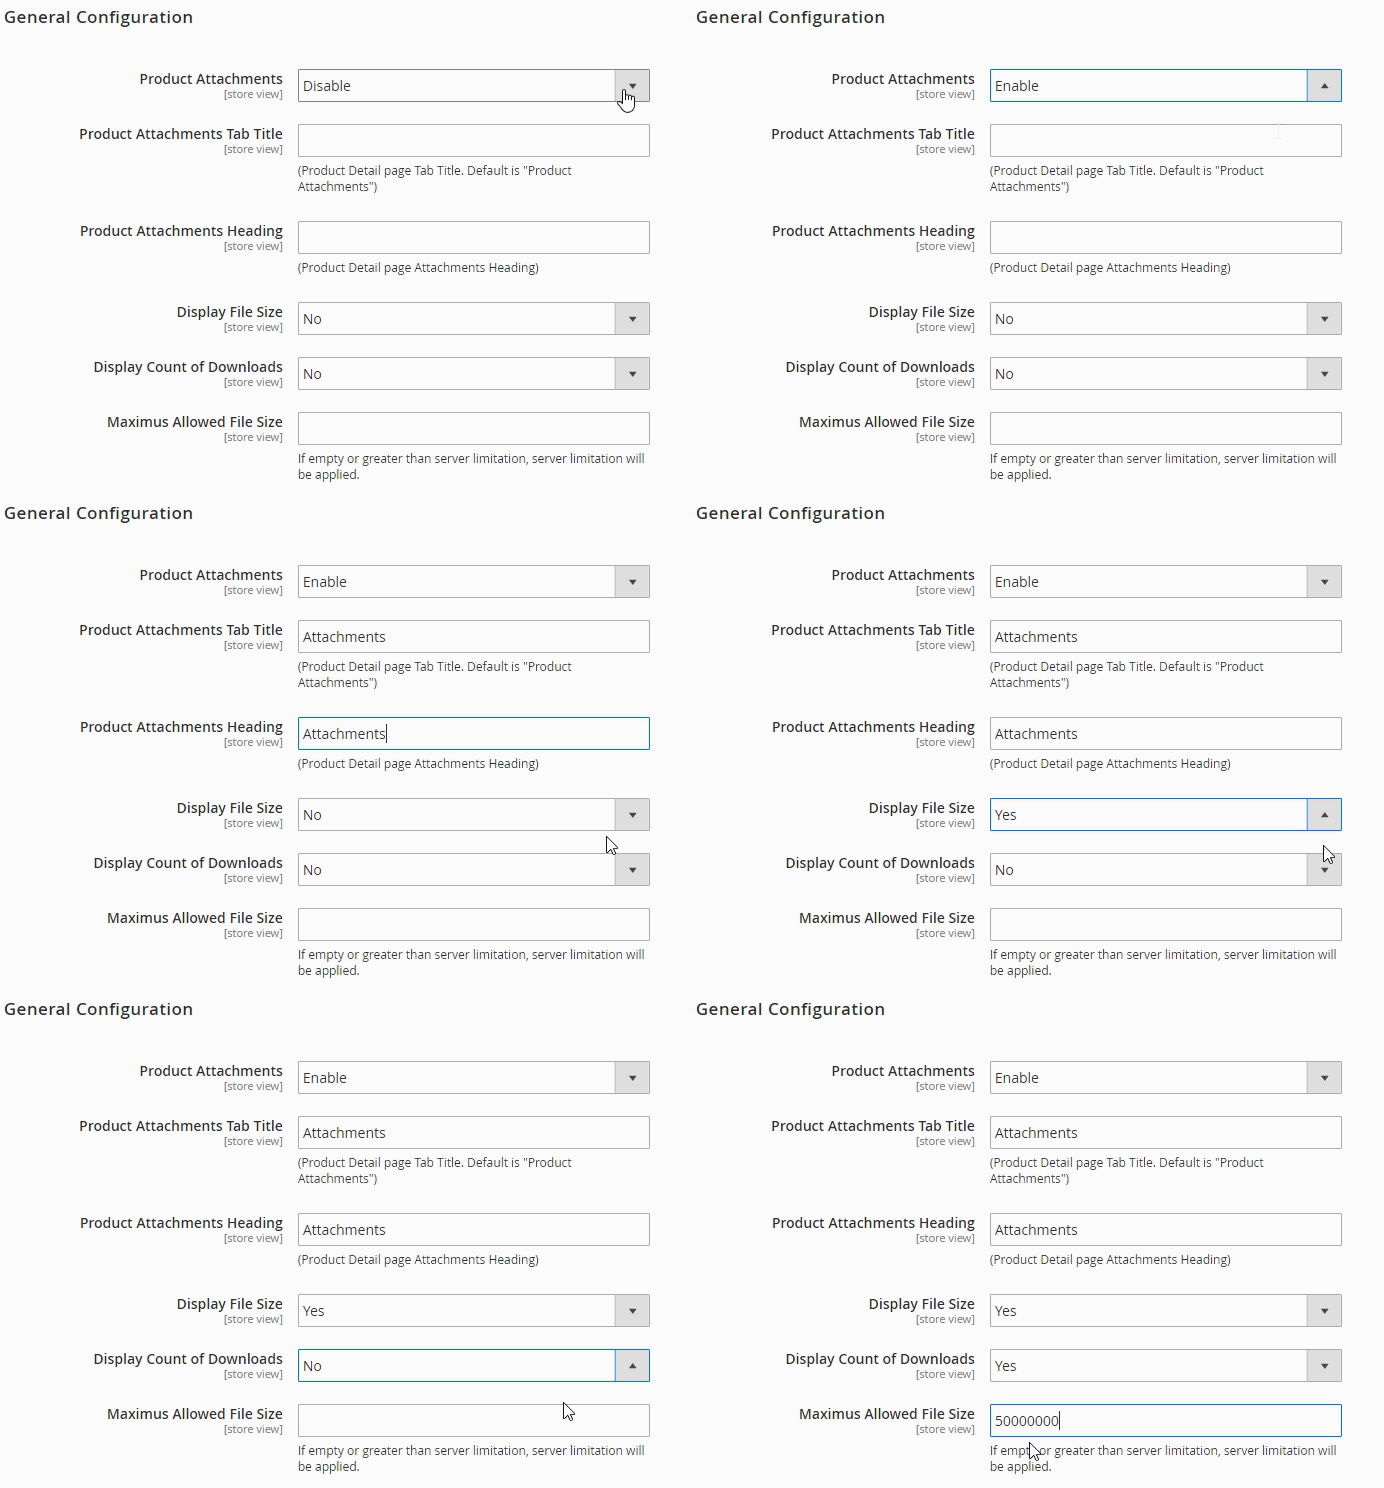
Give a customized title to the attachment tab in the product page as well as the heading for the attachments.

Get help in developing your marketing strategy by keeping the track of the number of downloaded files. For example, when you know that your product video is downloaded by a potential customer, you can direct your marketing efforts for such users specifically! Also, display the file size.

Configure Magento 2 Product Attachment Extension

The extension also allows attaching any type of files in CMS pages, just enable it from the backend. Also, give the CMS page attachments heading.

Magento 2 Product Attachments CMS Page Settings

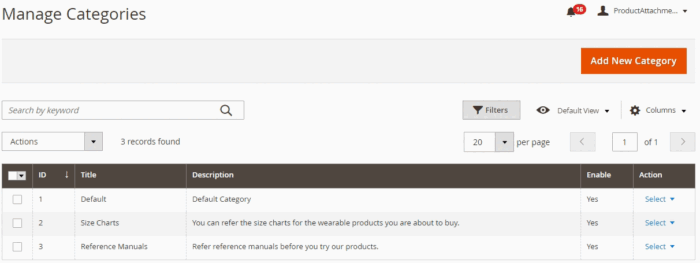
The extension allows managing the categories of attachments from Catalog > Manage Categories. With a backend grid, you can edit or delete a category. Using the “Add New Category” button, add a category with a preferred name, enter the description and activate it.

Manage Categories

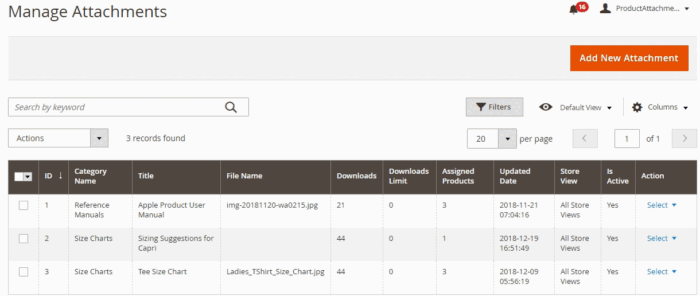
Let’s see how to manage the attachments and add a new attachment from Catalog > Manage Attachments.

Manage Attachments

There is a feature to limit the number of downloads where you can use it to restrict the number of file downloads. For example, you are hosting an offer for first lucky 50 users, you can allow the file download having the coupon code only for 50 times! Admin can also restrict the attachments viewing and downloading based on customer groups and store views.

When you create a new attachment, assign products and CMS pages to attachments in order to display in the frontend.

Magento 2 Product Attachments

The Magento 2 Product Attachments module also allows uploading the attachments from Catalog > ProductsThe figure shows the “Add Attachments” button to upload the file from product edit.

Attach PDF to Product

Let customers access the attachments in the form of file or URL in the frontend.

URL Attachment in Frontend

The product attachments are also displayed in the CMS page.

Customer service
Magento 2 Product Attachment 🔗

Offer in-depth information on the products✨.

Get The Extension Now

Improve the user experience and enjoy increased conversion with Magento 2 Product Attachments extension! After reading this post, you must have understood the configuration thoroughly, however, you can always refer the userguide for any doubts.

List of Useful Magento 2 SSH/CLI Commands


If you are working with Magento 2 CMS, you must have experienced the trouble of finding the particular Magento 2 SSH/CLI command to complete your task such as disable the cache, run cron, reset indexer, etc.

Instead of running for that commands, why not bookmark this post for any future requirements as it is the compilation of all useful Magento 2 SSH commands. You need to have SSH access to your server or use the Command Line for local access.

List of Useful Magento 2 SSH Commands

TypeSSH CommandShortcutDescription
Available commandshelphDisplays help for a command
php bin/magento listphp bin/magento lLists commands
adminphp bin/magento admin:user:createphp bin/magento a:u:cCreates an administrator
php bin/magento admin:user:unlockphp bin/magento a:u:uUnlock Admin Account
appphp bin/magento app:config:dump
Create dump of application
php bin/magento app:config:import
Import data from shared configuration files to appropriate data storage
cachephp bin/magento cache:cleanphp bin/magento c:cCleans cache type(s)
php bin/magento cache:disablephp bin/magento c:dDisables cache type(s)
php bin/magento cache:enablephp bin/magento c:eEnables cache type(s)
php bin/magento cache:flushphp bin/magento c:fFlushes cache storage used by cache type(s)
php bin/magento cache:statusphp bin/magento c:sChecks cache status
catalogphp bin/magento catalog:images:resizephp bin/magento c:i:rCreates resized product images
php bin/magento catalog:product:attributes:cleanupphp bin/magento c:p:a:cRemoves unused product attributes.
configphp bin/magento config:sensitive:set
Set sensitive configuration values
php bin/magento config:set
Change system configuration
php bin/magento config:show
Shows configuration value for given path. If path is not specified, all saved values will be shown
cronphp bin/magento cron:install
Generates and installs crontab for current user
php bin/magento cron:remove
Removes tasks from crontab
php bin/magento cron:runphp bin/magento c:rRuns jobs by schedule
customerphp bin/magento customer:hash:upgradephp bin/magento c:h:uUpgrade customer’s hash according to the latest algorithm
deployphp bin/magento deploy:mode:setphp bin/magento d:m:setSet application mode.
php bin/magento deploy:mode:showphp bin/magento d:m:shoDisplays current application mode.
devphp bin/magento dev:di:info
Provides information on Dependency Injection configuration for the Command.
php bin/magento dev:query-log:disable
Disable DB query logging
php bin/magento dev:query-log:enable
Enable DB query logging
php bin/magento dev:source-theme:deployphp bin/magento d:s:dCollects and publishes source files for theme.
php bin/magento dev:template-hints:disable
Disable frontend template hints. A cache flush might be required.
php bin/magento dev:template-hints:enable
Enable frontend template hints. A cache flush might be required.
php bin/magento dev:tests:runphp bin/magento d:t:rRuns tests
php bin/magento dev:urn-catalog:generatephp bin/magento d:u:gGenerates the catalog of URNs to *.xsd mappings for the IDE to highlight xml.
php bin/magento dev:xml:convertphp bin/magento d:x:cConverts XML file using XSL style sheets
i18nphp bin/magento i18n:collect-phrasesphp bin/magento i1:cDiscovers phrases in the codebase
php bin/magento i18n:packphp bin/magento i:pSaves language package
php bin/magento i18n:uninstallphp bin/magento i:uUninstalls language packages
indexerphp bin/magento indexer:infophp bin/magento i:iShows allowed Indexers
php bin/magento indexer:reindexphp bin/magento i:reiReindexes Data
php bin/magento indexer:resetphp bin/magento i:resResets indexer status to invalid
php bin/magento indexer:set-modephp bin/magento i:setSets index mode type
php bin/magento indexer:show-modephp bin/magento i:shoShows Index Mode
php bin/magento indexer:statusphp bin/magento i:staShows status of Indexer
infophp bin/magento info:adminuriphp bin/magento i:aDisplays the Magento Admin URI
php bin/magento info:backups:listphp bin/magento i:b:lPrints list of available backup files
php bin/magento info:currency:listphp bin/magento i:c:lDisplays the list of available currencies
php bin/magento info:dependencies:show-frameworkphp bin/magento i:d:show-fShows number of dependencies on Magento framework
php bin/magento info:dependencies:show-modules
Shows number of dependencies between modules
php bin/magento info:dependencies:show-modules-circular
Shows number of circular dependencies between modules
php bin/magento info:language:listphp bin/magento i:l:lDisplays the list of available language locales
php bin/magento info:timezone:listphp bin/magento i:t:lDisplays the list of available timezones
maintenancephp bin/magento maintenance:allow-ipsphp bin/magento m:aSets maintenance mode exempt IPs
php bin/magento maintenance:disablephp bin/magento ma:dDisables maintenance mode
php bin/magento maintenance:enablephp bin/magento ma:eEnables maintenance mode
php bin/magento maintenance:statusphp bin/magento ma:sDisplays maintenance mode status
modulephp bin/magento module:disablephp bin/magento mo:dDisables specified modules
php bin/magento module:enablephp bin/magento mo:eEnables specified modules
php bin/magento module:statusphp bin/magento mo:sDisplays status of modules
php bin/magento module:uninstallphp bin/magento m:uUninstalls modules installed by composer
sampledataphp bin/magento sampledata:deployphp bin/magento sa:dDeploy sample data modules
php bin/magento sampledata:removephp bin/magento sa:remRemove all sample data packages from composer.json
php bin/magento sampledata:resetphp bin/magento sa:resReset all sample data modules for re-installation
setupphp bin/magento setup:backupphp bin/magento s:bTakes backup of Magento Application code base, media and database
php bin/magento setup:config:setphp bin/magento s:c:sCreates or modifies the deployment configuration
php bin/magento setup:cron:runphp bin/magento s:c:rRuns cron job scheduled for setup application
php bin/magento setup:db-data:upgradephp bin/magento s:db-d:uInstalls and upgrades data in the DB
php bin/magento setup:db-schema:upgradephp bin/magento s:db-s:uInstalls and upgrades the DB schema
php bin/magento setup:db:statusphp bin/magento s:d:sChecks if DB schema or data requires upgrade
php bin/magento setup:di:compilephp bin/magento s:d:cGenerates DI configuration and all missing classes that can be auto-generated
php bin/magento setup:installphp bin/magento s:iInstalls the Magento application
php bin/magento setup:performance:generate-fixturesphp bin/magento s:p:gGenerates fixtures
php bin/magento setup:rollbackphp bin/magento se:rRolls back Magento Application codebase, media and database
php bin/magento setup:static-content:deployphp bin/magento s:s:dDeploys static view files
php bin/magento setup:store-config:setphp bin/magento s:s:sInstalls the store configuration. Deprecated since 2.2.0. Use config:set instead
php bin/magento setup:uninstallphp bin/magento s:unUninstalls the Magento application
php bin/magento setup:upgradephp bin/magento s:upUpgrades the Magento application, DB data, and schema
storephp bin/magento store:list
Displays the list of stores
php bin/magento store:website:list
Displays the list of websites
themephp bin/magento theme:uninstallphp bin/magento t:uUninstalls theme
varnishphp bin/magento varnish:vcl:ge

For official information, check here.

Examples of Using Magento 2 CLI Commands

Magento 2 SSH/CLI commands help you perform actions right from the command line. Here are some common examples of using CLI commands in Magento 2.

Create/Unlock Admin User

You can use the Magento 2 admin commands to create or unlock the admin users.

  • Command to create an admin: bin/magento admin:user:create or bin/magento a:u:c

You’ll be prompted to enter the admin details, such as username, password, first name, and last name.

  • Command to unlock an admin: bin/magento admin:user:unlock {username} or php bin/magento a:u:u {username}

Increase Admin Session Lifetime 

The admin session lifetime in Magento 2 can be changed from Stores > Config > Admin > Advanced > Security.

You can set the session value in seconds.

Alternatively, this can also be done using the following CLI command:

php bin/magento config:set admin/security/session_lifetime {value in seconds}

Change/Disable Admin Password Expiry

By default, Magento 2 offers a password expiration feature that recommends or forces the admin to change password at regular intervals.

You can also change the password expiration settings using the following Magento 2 CLI commands:

  • Disable password expiration: php bin/magento config:set admin/security/password_lifetime 0
  • Disable forced password change: php bin/magento config:set admin/security/password_is_forced 0

Enable/Disable 2FA in Magento 2 Admin

The two factor authentication in Magento 2 can also be enabled/disabled by switching the module on or off using the CLI commands.

  • To enable 2FA: php bin/magento module:enable Magento_TwoFactorAuth or php bin/magento config:set twofactorauth/general/enable 1
  • To disable 2FA: php bin/magento module:disable Magento_TwoFactorAuth or php bin/magento config:set twofactorauth/general/enable 0

Enable Developer Mode

You can change the deploy mode using the CLI command and switch to developer mode. Here’s how you can do this:

  • Switch to developer mode: php bin/magento deploy:mode:set developer

Enable/Disable Database Query Log

By default, Adobe Commerce logs all the database queries in the /var/debug/db.log file.

You can enable/disable the logging by using the dev:query-log command.

  • To enable database logging: bin/magento dev:query-log:enable
  • To disable database logging: bin/magento dev:query-log:disable

Enable/Disable Template Path & Block Class Hints

Template path class hints help in definition block classes that correspond to other specific areas of the page. You can enable or disable this functionality in Magento 2 by using the dev:template-hints command.

  • To enable template path hints: php bin/magento dev:template-hints:enable
  • To disable template path hints: php bin/magento dev:template-hints:disable

Hopefully, the above compilation makes your task easy each time you require an SSH/CLI command!

I’ll surely update the post if I find any handy Magento 2 CLI command useful to the developer!

Happy Coding

How to Enable Magento 2 Profiler


Gradually, every system tends to slow down by means of performance after it’s loaded with more content and extensions and numerous logs gets generated for it. If you want to keep an eye on what’s slowing down your Magento 2 store’s performance, you need to enable Magento 2 profiler.

Magento 2 has an in-built profiler which is used to identify performance problems on the server side. The profiler allows you to see the execution time of certain files. Identifying which files is slowing down the performance speed can help optimize the store.

There are 3 types of profilers supported: HTML, CSV file, and Firebug.

Analyze the performance tasks, display dependency graphs on a Magento page, reveal unused dependencies to reduce the memory time, etc. Everything with the method given here to enable Magento 2 profiler.

How to Enable Magento 2 Profiler:

1. profiler in Magento 2 by adding SetEnv MAGE_PROFILER “html” to .htaccess.


enable Magento 2 profiler

Here, html’ is for HTML output. You can modify to ‘csvfile for CSV output or firebug’ for Firebug output.

2. Enable the developer mode using the below command:

bin/magento deploy:mode:set developer

3. Finally, compile and refresh the cache.

Following the above method, you can find the reason behind the poor Magento 2 store performance. Hunt down the problem causes by enabling Magento 2 profiler.

Easy, isn’t it?

Magento Shipping Per Product – Meetanshi Extension Explained


According to Statista, 54% of digital shoppers in the United States abandon their cart due to expensive shipping rates.

The shipping rates management can be tricky for admin. It must be set so as to not affect the conversion as well as not incur a loss. The Magento store owners usually use shipping calculators to determine the shipping rate. However, this method is prone to error in case of varied products in terms of weight, shipping locations, value, and carriers. To overcome this limitation, check Meetanshi’s Magento Shipping Per Product extension.

Magento Shipping Per Product helps charge flat rate shipping for each product. Set default shipping rate per product and hide the method if the shipping cost is zero.

The drop shippers are expensive in the case of lighter products and much cheaper in the case of heavy parcels. The easy solution is charge flat rate shipping per product with Magento Shipping Per Product extension!

Why choose Magento Shipping Per Product Extension by Meetanshi?

The Shipping Per Product extension can be configured from admin panel in System > Configuration > Sales > Shipping Methods.

Enable the extension and give the title and name for the shipping method. Enable the default product shipping cost to set default shipping rate when unassigned individually. Add the default shipping rate to charge per product and the handling fee if it is to be applied on orders.

There is also an option to hide the method if the shipping cost is 0. The module allows enabling the shipping per product for selected countries also. Moreover, set the customizable message to be displayed on the frontend in the case of unavailability of the shipping method.

Enter the sort order and enable the option to show that particular method to admin only if required.

The shipping per product extension for Magento can be configured to set flat rate individually for each product.

Once the extension is configured, the shipping rate is applied and can be seen in the cart page.

Also, the checkout page displays the individual shipping rate applied as shown here.

4_Shipping-Per-Product-Applied-on-Checkout-Page
Shipping-Per-Product-in-My-Account-Page

To ease the configuration of the extension, refer the video tutorial

Solved: No Image for Configurable Product in Magento 2 Cart Page


Magento 2 store owners have many options available to optimize the store functionality, improve customer experience, capture payments and ease the administrative tasks with 3rd party extensions. Also, there are 3rd party custom themes available to improve the look and feel of the admin panel and storefront.

The only problem with these 3rd party themes and extensions is that sometimes it disrupts the features of default Magento 2 or conflicts with default configuration.

One such issue is No Image for Configurable Product in Magento 2 Cart Page. The simple product image of a configurable product is not displayed in the cart page due to 3rd party extensions or themes.

Generally, the developers follow below steps for fixing the problem:

Preconditions

  1. Magento 2.2.x
  2. Create a configurable product.

Steps to Reproduce

  1. Create a configurable product.
  2. Add images for all child products
  3. Do not add images for parent products.
  4. Add that product in cart page.

It is expected that images of child product are displayed on cart page. If a child product has no images then images of the parent product are displayed.

Unfortunately, it’s not the case 

Product image not showing issue for configurable product

To overcome this issue, one needs to override the Magento 2 code file. Let’s see how to do it.

Solution: No Image for Configurable Product in Magento 2 Cart Page

Copy [MAGENTO_ROOT]vendormagentomodule-catalogBlockProductImageBuilder.php and paste it to [MAGENTO_ROOT]appcodeMagentoCatalogBlockProductImageBuilder.php 

find the following code:

if ($simpleOption !== null)          {             $optionProduct = $simpleOption->getProduct();             $this->setProduct($optionProduct);         }

And, replace it with the below code:

if ($simpleOption !== null)           {             $optionProduct = $simpleOption->getProduct();             $objectManager = MagentoFrameworkAppObjectManager::getInstance();             $product = $objectManager->create('MagentoConfigurableProductModelResourceModelProductTypeConfigurable')->getParentIdsByChild($optionProduct->getEntityId());             $parentProduct = $objectManager->create('MagentoCatalogModelProduct')->load($product[0]);             $this->setProduct($parentProduct);         }

That’s all you have to do to solve No Image for Configurable Product in Magento 2 Cart Page!

Intent Prototyping: The Allure And Danger Of Pure Vibe Coding In Enterprise UX


examines the problem of over-reliance on static high-fidelity mockups, which often leave the conceptual model and user flows dangerously underdeveloped. He then explores whether AI-powered prototyping is the answer, questioning whether the path forward is the popular “vibe coding” approach or a more structured, intent-driven approach.

There is a spectrum of opinions on how dramatically all creative professions will be changed by the coming wave of agentic AI, from the very skeptical to the wildly optimistic and even apocalyptic. I think that even if you are on the “skeptical” end of the spectrum, it makes sense to explore ways this new technology can help with your everyday work. As for my everyday work, I’ve been doing UX and product design for about 25 years now, and I’m always keen to learn new tricks and share them with colleagues. Right now, I’m interested in AI-assisted prototyping, and I’m here to share my thoughts on how it can change the process of designing digital products.

To set your expectations up front: this exploration focuses on a specific part of the product design lifecycle. Many people know about the Double Diamond framework, which shows the path from problem to solution. However, I think it’s the Triple Diamond model that makes an important point for our needs. It explicitly separates the solution space into two phases: Solution Discovery (ideating and validating the right concept) and Solution Delivery (engineering the validated concept into a final product). This article is focused squarely on that middle diamond: Solution Discovery.

Diagram of the Triple Diamond model: Problem Discovery, Solution Discovery, and Solution Delivery.
The Triple Diamond model and the prototyping sweet spot=

How AI can help with the preceding (Problem Discovery) and the following (Solution Delivery) stages is out of the scope of this article. Problem Discovery is less about prototyping and more about research, and while I believe AI can revolutionize the research process as well, I’ll leave that to people more knowledgeable in the field. As for Solution Delivery, it is more about engineering optimization. There’s no doubt that software engineering in the AI era is undergoing dramatic changes, but I’m not an engineer — I’m a designer, so let me focus on my “sweet spot”.

And my “sweet spot” has a specific flavor: designing enterprise applications. In this world, the main challenge is taming complexity: dealing with complicated data models and guiding users through non-linear workflows. This background has had a big impact on my approach to design, putting a lot of emphasis on the underlying logic and structure. This article explores the potential of AI through this lens.

I’ll start by outlining the typical artifacts designers create during Solution Discovery. Then, I’ll examine the problems with how this part of the process often plays out in practice. Finally, we’ll explore whether AI-powered prototyping can offer a better approach, and if so, whether it aligns with what people call “vibe coding,” or calls for a more deliberate and disciplined way of working.

What We Create During Solution Discovery

The Solution Discovery phase begins with the key output from the preceding research: a well-defined problem and a core hypothesis for a solution. This is our starting point. The artifacts we create from here are all aimed at turning that initial hypothesis into a tangible, testable concept.

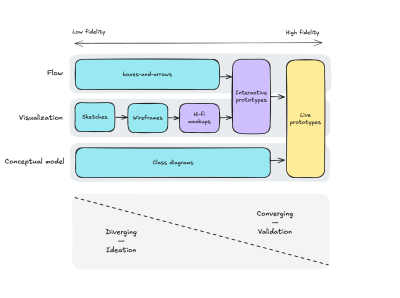
Traditionally, at this stage, designers can produce artifacts of different kinds, progressively increasing fidelity: from napkin sketches, boxes-and-arrows, and conceptual diagrams to hi-fi mockups, then to interactive prototypes, and in some cases even live prototypes. Artifacts of lower fidelity allow fast iteration and enable the exploration of many alternatives, while artifacts of higher fidelity help to understand, explain, and validate the concept in all its details.

It’s important to think holistically, considering different aspects of the solution. I would highlight three dimensions:

  1. Conceptual model: Objects, relations, attributes, actions;
  2. Visualization: Screens, from rough sketches to hi-fi mockups;
  3. Flow: From the very high-level user journeys to more detailed ones.

One can argue that those are layers rather than dimensions, and each of them builds on the previous ones (for example, according to Semantic IxD by Daniel Rosenberg), but I see them more as different facets of the same thing, so the design process through them is not necessarily linear: you may need to switch from one perspective to another many times.

This is how different types of design artifacts map to these dimensions:

Diagram mapping design artifacts to dimensions of Conceptual Model, Visualization, and Flow.
Mapping design artifacts to dimensions of Conceptual Model, Visualization, and Flow. 

As Solution Discovery progresses, designers move from the left part of this map to the right, from low-fidelity to high-fidelity, from ideating to validating, from diverging to converging.

Note that at the beginning of the process, different dimensions are supported by artifacts of different types (boxes-and-arrows, sketches, class diagrams, etc.), and only closer to the end can you build a live prototype that encompasses all three dimensions: conceptual model, visualization, and flow.

This progression shows a classic trade-off, like the difference between a pencil drawing and an oil painting. The drawing lets you explore ideas in the most flexible way, whereas the painting has a lot of detail and overall looks much more realistic, but is hard to adjust. Similarly, as we go towards artifacts that integrate all three dimensions at higher fidelity, our ability to iterate quickly and explore divergent ideas goes down. This inverse relationship has long been an accepted, almost unchallenged, limitation of the design process.

The Problem With The Mockup-Centric Approach #

Faced with this difficult trade-off, often teams opt for the easiest way out. On the one hand, they need to show that they are making progress and create things that appear detailed. On the other hand, they rarely can afford to build interactive or live prototypes. This leads them to over-invest in one type of artifact that seems to offer the best of both worlds. As a result, the neatly organized “bento box” of design artifacts we saw previously gets shrunk down to just one compartment: creating static high-fidelity mockups.


This choice is understandable, as several forces push designers in this direction. Stakeholders are always eager to see nice pictures, while artifacts representing user flows and conceptual models receive much less attention and priority. They are too high-level and hardly usable for validation, and usually, not everyone can understand them.

On the other side of the fidelity spectrum, interactive prototypes require too much effort to create and maintain, and creating live prototypes in code used to require special skills (and again, effort). And even when teams make this investment, they do so at the end of Solution Discovery, during the convergence stage, when it is often too late to experiment with fundamentally different ideas. With so much effort already sunk, there is little appetite to go back to the drawing board.

It’s no surprise, then, that many teams default to the perceived safety of static mockups, seeing them as a middle ground between the roughness of the sketches and the overwhelming complexity and fragility that prototypes can have.

As a result, validation with users doesn’t provide enough confidence that the solution will actually solve the problem, and teams are forced to make a leap of faith to start building. To make matters worse, they do so without a clear understanding of the conceptual model, the user flows, and the interactions, because from the very beginning, designers’ attention has been heavily skewed toward visualization.

The result is often a design artifact that resembles the famous “horse drawing” meme: beautifully rendered in the parts everyone sees first (the mockups), but dangerously underdeveloped in its underlying structure (the conceptual model and flows).


While this is a familiar problem across the industry, its severity depends on the nature of the project. If your core challenge is to optimize a well-understood, linear flow (like many B2C products), a mockup-centric approach can be perfectly adequate. The risks are contained, and the “lopsided horse” problem is unlikely to be fatal.

However, it’s different for the systems I specialize in: complex applications defined by intricate data models and non-linear, interconnected user flows. Here, the biggest risks are not on the surface but in the underlying structure, and a lack of attention to the latter would be a recipe for disaster.

Transforming The Design Process 

This situation makes me wonder:

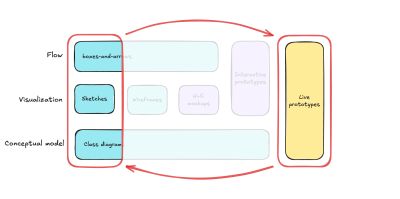
How might we close the gap between our design intent and a live prototype, so that we can iterate on real functionality from day one?

Diagram showing bridging the gap between “Design Intent” and “Live Prototype.”
How might we bridge the gap between design intent and a live prototype? (Large preview)

If we were able to answer this question, we would:

  • Learn faster.
    By going straight from intent to a testable artifact, we cut the feedback loop from weeks to days.
  • Gain more confidence.
    Users interact with real logic, which gives us more proof that the idea works.
  • Enforce conceptual clarity.
    A live prototype cannot hide a flawed or ambiguous conceptual model.
  • Establish a clear and lasting source of truth.
    A live prototype, combined with a clearly documented design intent, provides the engineering team with an unambiguous specification.

Of course, the desire for such a process is not new. This vision of a truly prototype-driven workflow is especially compelling for enterprise applications, where the benefits of faster learning and forced conceptual clarity are the best defense against costly structural flaws. But this ideal was still out of reach because prototyping in code took so much work and specialized talents. Now, the rise of powerful AI coding assistants changes this equation in a big way.

The Seductive Promise Of “Vibe Coding”

And the answer seems to be obvious: vibe coding!

“Vibe coding is an artificial intelligence-assisted software development style popularized by Andrej Karpathy in early 2025. It describes a fast, improvisational, collaborative approach to creating software where the developer and a large language model (LLM) tuned for coding is acting rather like pair programmers in a conversational loop.”

Wikipedia

The original tweet by Andrej Karpathy:

The allure of this approach is undeniable. If you are not a developer, you are bound to feel awe when you describe a solution in plain language, and moments later, you can interact with it. This seems to be the ultimate fulfillment of our goal: a direct, frictionless path from an idea to a live prototype. But is this method reliable enough to build our new design process around it?

The Trap: A Process Without A Blueprint 

Vibe coding mixes up a description of the UI with a description of the system itself, resulting in a prototype based on changing assumptions rather than a clear, solid model.

The pitfall of vibe coding is that it encourages us to express our intent in the most ambiguous way possible: by having a conversation.

This is like hiring a builder and telling them what to do one sentence at a time without ever presenting them a blueprint. They could make a wall that looks great, but you can’t be sure that it can hold weight.

I’ll give you one example illustrating problems you may face if you try to jump over the chasm between your idea and a live prototype relying on pure vibe coding in the spirit of Andrej Karpathy’s tweet. Imagine I want to prototype a solution to keep track of tests to validate product ideas. I open my vibe coding tool of choice (I intentionally don’t disclose its name, as I believe they all are awesome yet prone to similar pitfalls) and start with the following prompt:

I need an app to track tests. For every test, I need to fill out the following data:
- Hypothesis (we believe that...) 
- Experiment (to verify that, we will...)
- When (a single date, or a period) 
- Status (New/Planned/In Progress/Proven/Disproven)

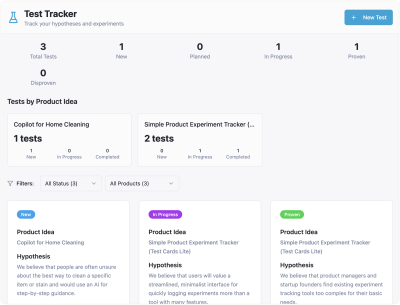
And in a minute or so, I get a working prototype:

Screenshot of a simple Test Tracker app.
The initial prototype. (Large preview)

Inspired by success, I go further:

Please add the ability to specify a product idea for every test. Also, I want to filter tests by product ideas and see how many tests each product idea has in each status.

And the result is still pretty good:

The Test Tracker app screenshot, now with filtering by product ideas.
The prototype updated to include filtering tests by product ideas. (Large preview)

But then I want to extend the functionality related to product ideas:

Okay, one more thing. For every product idea, I want to assess the impact score, the confidence score, and the ease score, and get the overall ICE score. Perhaps I need a separate page focused on the product idea, with all the relevant information and related tests.

And from this point on, the results are getting more and more confusing.

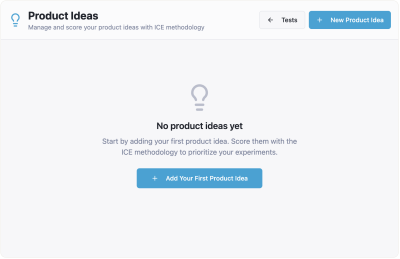
The flow of creating tests hasn’t changed much. I can still create a bunch of tests, and they seem to be organized by product ideas. But when I click “Product Ideas” in the top navigation, I see nothing:

Screenshot of the app’s blank Product Ideas page.
The Product Ideas page is empty. (Large preview)

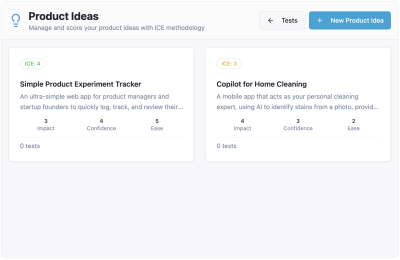
I need to create my ideas from scratch, and they are not connected to the tests I created before:

Screenshot of the Product Ideas page with newly created ideas not connected to tests.
The newly created product ideas are disconnected from existing tests. (Large preview)

Moreover, when I go back to “Tests”, I see that they are all gone. Clearly something went wrong, and my AI assistant confirms that:

No, this is not expected behavior — it’s a bug! The issue is that tests are being stored in two separate places (local state in the Index page and App state), so tests created on the main page don’t sync with the product ideas page.

Sure, eventually it fixed that bug, but note that we encountered this just on the third step, when we asked to slightly extend the functionality of a very simple app. The more layers of complexity we add, the more roadblocks of this sort we are bound to face.

Also note that this specific problem of a not fully thought-out relationship between two entities (product ideas and tests) is not isolated at the technical level, and therefore, it didn’t go away once the technical bug was fixed. The underlying conceptual model is still broken, and it manifests in the UI as well.

For example, you can still create “orphan” tests that are not connected to any item from the “Product Ideas” page. As a result, you may end up with different numbers of ideas and tests on different pages of the app:

Diagram showing conflicting data between the Tests page and the Product Ideas page.
A poorly defined conceptual model leads to data inconsistencies across the app. (Large preview)

Let’s diagnose what really happened here. The AI’s response that this is a “bug” is only half the story. The true root cause is a conceptual model failure. My prompts never explicitly defined the relationship between product ideas and tests. The AI was forced to guess, which led to the broken experience. For a simple demo, this might be a fixable annoyance. But for a data-heavy enterprise application, this kind of structural ambiguity is fatal. It demonstrates the fundamental weakness of building without a blueprint, which is precisely what vibe coding encourages.

Don’t take this as a criticism of vibe coding tools. They are creating real magic. However, the fundamental truth about “garbage in, garbage out” is still valid. If you don’t express your intent clearly enough, chances are the result won’t fulfill your expectations.

Another problem worth mentioning is that even if you wrestle it into a state that works, the artifact is a black box that can hardly serve as reliable specifications for the final product. The initial meaning is lost in the conversation, and all that’s left is the end result. This makes the development team “code archaeologists,” who have to figure out what the designer was thinking by reverse-engineering the AI’s code, which is frequently very complicated. Any speed gained at the start is lost right away because of this friction and uncertainty.

From Fast Magic To A Solid Foundation

Pure vibe coding, for all its allure, encourages building without a blueprint. As we’ve seen, this results in structural ambiguity, which is not acceptable when designing complex applications. We are left with a seemingly quick but fragile process that creates a black box that is difficult to iterate on and even more so to hand off.

This leads us back to our main question: how might we close the gap between our design intent and a live prototype, so that we can iterate on real functionality from day one, without getting caught in the ambiguity trap? The answer lies in a more methodical, disciplined, and therefore trustworthy process.

In Part 2 of this series, “A Practical Guide to Building with Clarity”, I will outline the entire workflow for Intent Prototyping. This method places the explicit intent of the designer at the forefront of the process while embracing the potential of AI-assisted coding.

Thank you for reading, and I look forward to seeing you