Payment of ₹ requested by HONEY VIG. Click the link to pay securely via Razorpay: Make 5000 payment Payment of ₹ requested by HONEY VIG. Click the link to pay securely via Razorpay: Make 5000 payment ⭐ If you would like to buy me a coffee, well thank you very much that is mega kind! : https://www.buymeacoffee.com/honeyvig
Hire a web Developer and Designer to upgrade and boost your online presence with cutting edge Technologies
Showing posts with label windows azure. Show all posts

Tuesday, January 24, 2012

Windows Azure: How to create a SQL Azure Server

In this article, I will show you how to create a new SQL Azure Server in Windows Azure platform from the management portal.
  1. Login to the Windows Azure Management Portal using your Live ID at http://windows.azure.com
  2. Once you’re logged in, click the Database button at the lower left of the page.
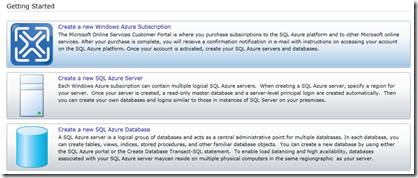
  3. If you have created a SQL Azure server, you can skip this step. Otherwise, click on Create a New SQL Server which is located at the center of the page. azure_mgmtPortal_content_database_getStarted
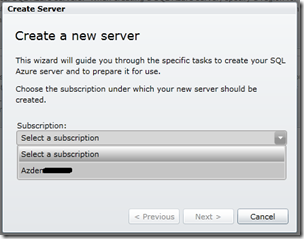
  4. A wizard will pop up. Select your subscription. azure_mgmtPortal_content_database_createServer
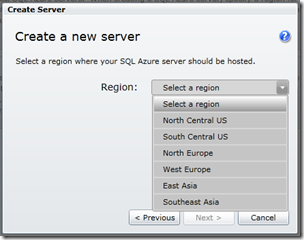
  5. Select the region where your SQL Azure Server will be created. azure_mgmtPortal_content_database_createServer_selectLocation
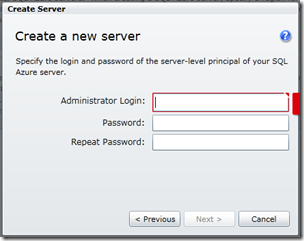
  6. Enter the Administrator username & password. azure_mgmtPortal_content_database_createServer_setAdminAccess
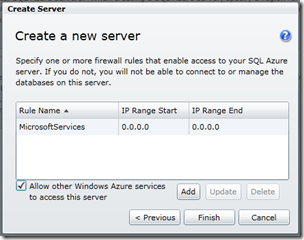
  7. Add any Firewall rules. Check “Allow other Windows Azure services to access this server” to allow your Windows Azure app to access this database. Then click Finish. azure_mgmtPortal_content_database_createServer_setFirewall
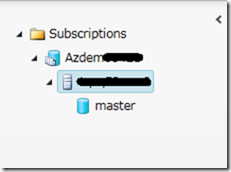
Once you’re done, you can now see your SQL Azure Server at the panel at the left of your page. A default master database will also be created like any other Microsoft SQL Server.
azure_mgmtPortal_nav_database_serverList

Windows Azure: How to Create a SQL Azure Database

In this article, I will show you how to create a new SQL Azure Database. I assume that you already have created a SQL Azure Server.
  1. Login to the Windows Azure Management Portal using your Live ID at http://windows.azure.com/
  2. Once you’re logged in, click the Database button at the lower left of the page.
  3. Click on the Create new SQL Azure Database located in the center of the page.
    Alternatively, if you’re at the Subscription Home, you can click on Create button at the ribbon at the top of the page.
    azure_mgmtPortal_ribbon_database_database
  4. Now in the pop-up wizard, enter your Database name, select the Edition, and the maximum size of the database. Click OK when you’re done. azure_mgmtPortal_nav_database_serverList_withDatabase
Now, you should be able to see your newly created SQL Azure Database under your SQL Azure Server.

Windows Azure: SQL Azure Database connection string

In this article I will show you how to get connection string for your application to connect to your SQL Azure database.
If you have had experience developing ASP.NET application, the connection string below might be familiar to you.
Data Source=<DATABASE SERVER>;Initial Catalog=<DATABASE>;User ID=<USERNAME>;Password=<PASSWORD>
However in Windows Azure Platform, the connection string is a little bit different from the above. Rather of wasting time figuring out what the connection string to your database is, you can actually get the connection string to your specific Windows Azure SQL Database right from the Windows Azure Platform Management Portal.
Assuming that you have already create your SQL Azure Database, follow the steps below to get your connection string from the Windows Azure Management Portal.
  1. Login to Windows Azure Management Portal using your Live ID at http://windows.azure.com/
  2. Once you’re logged in, click on the Database button at the lower left of the page.
  3. Click on the database you wish to view it’s connection string. Then on the Properties panel at the right side of the page, click on the button next to View. azure_mgmtPortal_content_database_connectionString
    Now, you will be able to see 3 different connection string for your database. Copy & Paste the relevant connection string.
    IMPORTANT: Review that you want to use the UserName to connect to the database. Also, you will need to change the Password for the selected user.

Windows Azure: How to create Hosted Service

In this article, I will show you how to create a Hosted Service in Windows Azure. A hosted service is used to host your Windows Azure application. It’s like setting up your hosting server, web server, networking, and domain name all in one place here.
  1. Login to the Windows Azure Management Portal using your Live ID at http://windows.azure.com/
  2. Once you’re logged in, click on the New Hosted Service at the top left of the page.
  3. From the pop-up wizard, choose your subscription account from the dropdown.
  4. In the Service Name, type a name for this service. It will help you identify the service when you have deployed multiple services.
  5. In  Choose a URL for your service, type a subdomain name to create the URL at which your service will be available.
  6. If you have created Affinity groups and you want to assign this service to a particular group, click the radio button next to the Affinity Group dropdown. Otherwise leave the default setting of No Affinity.
  7. Choose a region for your service to be hosted at.
  8. If you’re not deploying a package to the service at this time, choose Do not deploy. Then click OK.
    azure_mgmtPortal_content_services_createHostedService

    Deploying a service

  1. From Step 8 above, choose either Deploy to stage environment or Deploy to production environment instead of choosing Do no deploy
  2. Clear the Start after successful deployment if you doesn’t want to run it after a successful deployment.
  3. Give a name for this deployment.
  4. For package location, Browse locally or Browse storage for the service package (cspkg) file.
  5. For configuration file, Browse locally or Browse storage for the Service configuration (cscfg) file.
  6. Optionally, add a certificate if you already have one. Then click OK.
In this article, I will show you how to synchronize the databases between on-premise SQL server and SQL Azure. FYI, no code involved in this demonstration.

Register for SQL Azure Data Sync Service


  1. Navigate to https://datasync.azure.com/
  2. Read the Terms Of Use.
  3. Check the "I have read and I accept the Terms Of Use" checkbox, if you accept the Terms Of Use.
  4. Click Next.
    Terms of Use
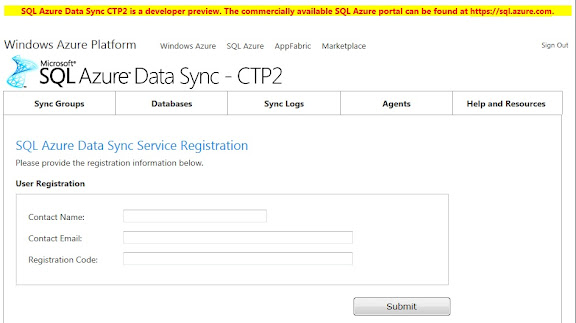
  5. Fill out the "User Registration" form.
    "Registration Code" can be applied from https://datasync.azure.com/
  6. Click Submit.
    User Registration

Create an Agent for your SQL Server Database


  1. Once your SQL Azure Data Sync account is ready, return to the SQL Azure Data Sync UI.
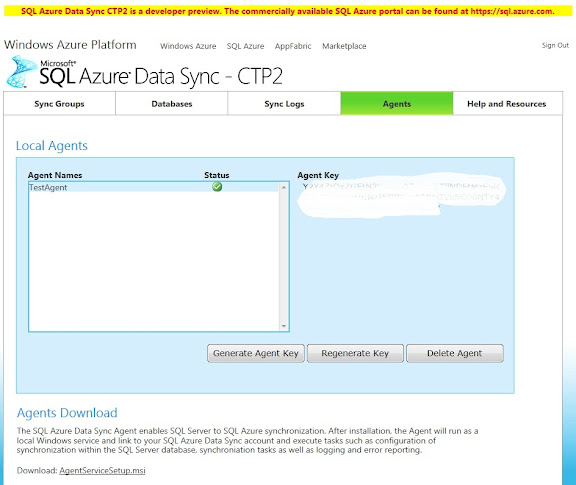
  2. Navigate to Agents tab.
  3. Click Generate Agent Key.
  4. Enter the Agent’s name and click Generate.
  5. Then, highlight the Agent key and copy it to the clipboard.
    Generate Agent Key
  6. Install the AgentServiceSetup.msi by clicking the download link.
  7. Install the service accordingly to the instruction.
  8. Once the installation completed, launch the Agent Configuration Tool from Start | All Programs | Microsoft SQL Azure Data Sync CTP | SQL Azure Data Sync Agent CTP2.

      Configure AgentConfigData.xml

  9. Check the "Encrypt Password" checkbox.
    Ecrypt Password
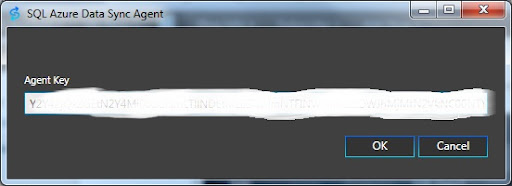
  10. Click "Edit Agent Key" and paste the agent key from your clipboard into the Agent Key space.
    Agent Key
  11. Click "Ping Sync Service" to confirm that the Sync Service is running and your proxies can successfully connect to the service.
  12. "Successfully pinged service" alert will pop up if the connection successfully established.

    Add SQL Server Databases to the Agent

  13. Click "Add Member" from the toolbar.
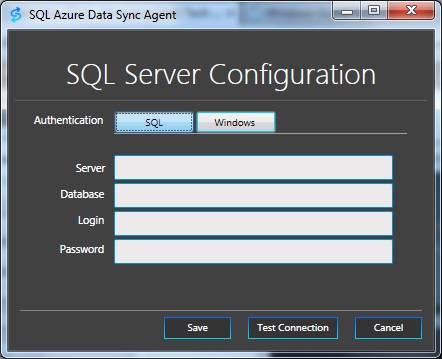
  14. Add the SQL Server details.
  15. Click "Test Connection".
  16. If the connection succeeds, click Save and close the dialog.
    SQL Server Configuration

      Run SQL Azure Data Sync Agent Service

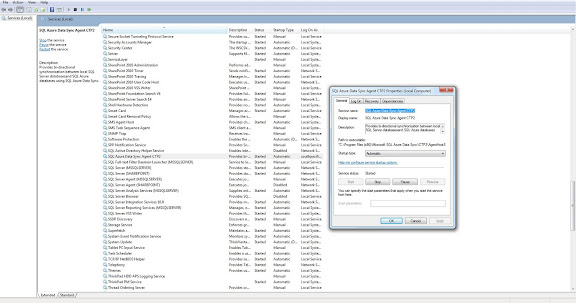
  17. Open run.exe.
  18. Search for services.msc.
  19. Click on the program called "Services".
  20. Look for SQL Azure Data Sync Agent CTP2.
  21. Right click on it and Start the service.
  22. Click Apply then click OK.
  23. Close the Services window and return to the SQL Azure Data Sync web UI.
    Services

    Register the SQL Server Databases

  1. Navigate back to https://datasync.azure.com/
  2. Go to "Databases" tab.
  3. Click "Add".
  4. Register your database accordingly for your on-premise SQL Server and SQL Azure server.
    Add Databases
    * For the first time synchronization, please create a SQL Azure database.

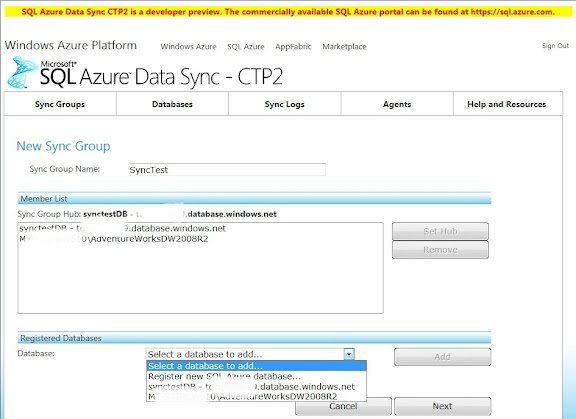
    Create a Sync Group

  1. Navigate to https://datasync.azure.com/
  2. Go to "Sync Groups" tab.
  3. Click "New Sync Group".
  4. Click on the "Registered Databases" dropdown list.
  5. Add both on-premise SQL Server and SQL Azure server databases into the "Member List".
  6. Type your preferable "Sync Group Name" and click Next.
    New Sync Group
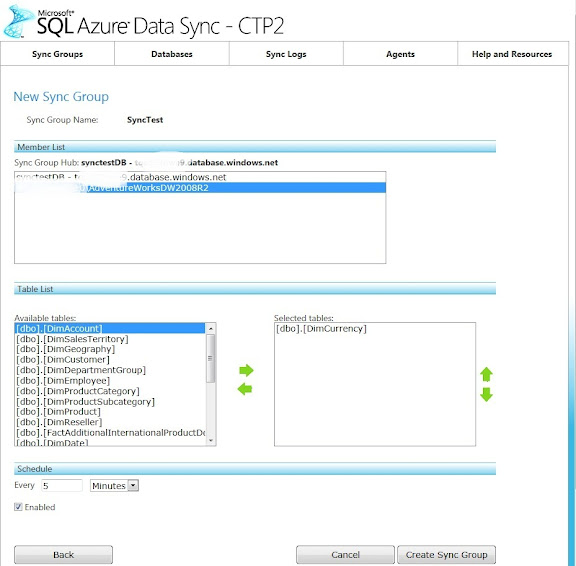
  7. Select the tables from each server that you want to synchronize.
  8. Check the "Enabled" checkbox and set your preferable schedule time for the synchronization.
  9. Click "Create Sync Group".
    Add tables
  10. Well, that all for the demonstration. You may view the Synchronization logs from the "Sync Logs" tab.

How-To Create a .cmd Command File

In this article, I will show you how to create a .cmd file. This post is actually created to support my previous article on Windows Azure: How to Enable Classic ASP Support. It is actually very simple to create a .cmd command file. Here’s how to do it.
  1. Launch Notepad by clicking on Start then type Notepad on the search bar. Click on Notepad to launch the program.
  2. Type in your commands in Notepad. For example: start /w pkgmgr /iu:IIS-ASP
    azure_createCmdFile_enableIISClassicAsp
  3. Save your file with a name of your choice BUT with an extension of .cmd.
    azure_createCmdFile_saveAs
    NOTE:
    Make sure that the Save as type is All Files, and Encoding is ANSI
That’s it!! You have created your own .cmd file.

Windows Azure: How-To Add Instance in Management Portal

In this article, I will show you how you can add/reduce instances for your Windows Azure application. You can also use the steps below to edit other configurations in your application. This is equivalent to editing the .csdef file in your source code solution from Visual Studio.
  1. Login to the Windows Azure Management Portal using your Live ID at http://windows.azure.com/
  2. Once you’re logged in, click on Hosted Services, Storage Accounts & CDN at the lower left of the page.
    azure_mgmtPortal_nav_hostedService
  3. Next, click on your application where its type is Deployment.
  4. At the ribbon on the centre top of your page, click on Configure.
    azure_mgmtPortal_ribbon_hostedService_Deployment
  5. Click on Edit Current Configuration in the pop-up window.
    azure_mgmtPortal_content_services_editConfigDeployment
  6. Now, look for the instance count tag that shows how many instance your application has and edit the number of instance count.
  7. Finally, click OK and wait for the application to be updated.
Note: If you have at least one instance running, there will be no downtime to your application. So  you don’t have to worry that there is downtime while the updating be being executed.

Windows Azure: How-To Create Remote Desktop to Windows Azure

In this article, I will show you how to create a remote desktop connection to your Windows Azure application web role. I will assume that you have already created a Windows Azure project and a Web Application project in Visual Studio. If you have not do, please see my post here on How To Create Classic ASP Solution.
  1. Load your Windows Azure Project in Visual Studio
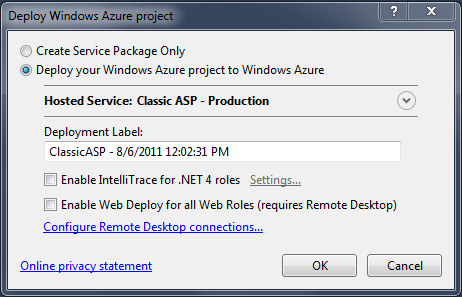
  2. On the Windows Azure project, Right-Click and select Publish
    azure_project_publish
  3. On the pop-up wizard, click on Configure Remote Desktop Connections
    azure_project_publish_configureRemoteDesktop
  4. Select a certificate. Enter username, password, confirm password, and expiration date and click OK. Then click OK again on the Deploy Windows Azure Project wizard.
    azure_project_publish_configureRemoteDesktop_selectCertificate
Note: You should be able to see some changes made to the ServiceConfiguration.cscfg and ServiceDefinition.csdef files.
ServiceConfiguration.cscfg
azure_project_publish_configureRemoteDesktop_cscfg
ServiceDefinition.csdef
azure_project_publish_configureRemoteDesktop_csdef

Windows Azure: How-To Enable FTP

In this article, I will show you how to enable FTP on your Windows Azure instance.
By default, FTP feature will not be enabled when you spin up a new Azure instance. However, this does not mean that you cannot install FTP on the Azure instance. You can still install and enable FTP service manually.
There are 2 ways of installing this feature manually. First, enable Remote Desktop on your Azure instance and install it via Remote Desktop when the Azure instance is ready. The downside of using this method is that whatever changes you made using Remote Desktop will be lost once the Azure instance is being recycled. Therefore, don’t be surprised if you notice your FTP site went missing suddenly.
The second method is to write script to install this feature when the Azure instance is started. This will ensure that your FTP site will remain even when the Azure instance is being recycled. Steps below will guide you how to install FTP feature using script & code.
  1. Install FTP feature in IIS, and enable firewall rules for FTP on startup. Do this by creating a startup command that calls the PowerShell script below. Import-Module ServerManager
    Add-WindowsFeature Web-Ftp-Server
    # open up firewall port for port 21 (the default firewall rules only allow services spawned from svchost.exe to be allowed FTP access!)
    netsh advfirewall firewall delete rule name=FTP
    netsh advfirewall firewall add rule name="FTP" dir=in action=allow service=any profile=public localport=21 protocol=tcp
  2. Enable EndPoint on port 21 for your Azure Instance in the ServiceDefinition.csdef file.
    <Endpoints>
        <InternalEndpoint name="FtpEndpoint" protocol="tcp" port="21" />
    </Endpoints>
  3. Add reference of Microsoft.Web.Administration.dll into your solution.
  4. Add FTP site into IIS.
    ServerManager sm = new ServerManager();
    Site ftpsite = sm.Sites.Add("FtpSite", "ftp", ":21:", "C:\\ftproot\\");
    ftpsite.ServerAutoStart = true;
    ConfigurationElement ssl = ftpsite.GetChildElement("ftpServer").GetChildElement("security").GetChildElement("ssl");
    ssl.SetAttributeValue("controlChannelPolicy", "SslAllow");
    ssl.SetAttributeValue("dataChannelPolicy", "SslAllow");
    ConfigurationElement auth = ftpsite.GetChildElement("ftpServer").GetChildElement("security").GetChildElement("authentication").GetChildElement("basicAuthentication");
    auth.SetAttributeValue("enabled", true);
    sm.CommitChanges();
  5. Add user to FTP site.
    ServerManager sm = new ServerManager();
    Configuration config = sm.GetApplicationHostConfiguration();
    ConfigurationSection authSection = config.GetSection("system.ftpServer/security/authorization", "FtpSite");
    ConfigurationElementCollection authCollection = authSection.GetCollection();
    authCollection.Clear();
    ConfigurationElement addElement = authCollection.CreateElement("add");
    addElement.SetAttributeValue("accessType", "Allow");
    addElement.SetAttributeValue("users", "myftpuser");
    addElement.SetAttributeValue("permissions", "Read, Write");
    authCollection.Add(addElement);
    sm.CommitChanges();
Finally, package and deploy your solution into Windows Azure and you have a FTP enabled site on the cloud.
Note:
  1. The files you send in will not be persisted. Those files may be deleted if the role is being recycled. So, it’s advised to store the files you need in some persisted location.
  2. FTP port may be different depending on which port you choose to use.
  3. If your FTP user is not the same as your Remote Desktop user, you may need to create the user first.
Windows Azure: How-to enable classic ASP support

When you’re planning to migrate your existing application to Windows Azure, one of the first things in your compatibility checklist is the compatibility of your app with Windows Azure. Classic ASP web application is always the concern when planning to host on a server. This is because by default, the current/new web servers does not support classic ASP codes. The administrators have to enable it manually.
If you’re familiar with Microsoft Internet Information Service (IIS) server, you know that you will have to manually enable the classic ASP support in IIS. It’s the same in Windows Azure. You will have to specify or ask Windows Azure to enable classic ASP support in your web role.
The easiest way to do this is to do it in the start up task. You will need to add some codes in the .csdef file.
  1. Load Visual Studio and open your Solution.
  2. Double-click on the .csdef file from the Windows Azure project. azure_solutionProject
  3. In the WebRole tag, add a Startup tag. Then add a Task tag within the Startup tag. azure_startupTask_classicAsp
    Description of the Task tag:
CommandLine : This is the command line including the parameter to execute.
ExecutionContext : You can specify an executionContext that allows it to run in the same security context as the role or with administrative privileges.
TaskType : Here you can specify how this task is scheduled.
  • Simple – the startup process launches the task and does not proceed until the task completes.
  • Background – the startup process launches the task in the background and then continues
  • Foreground – similiar to a background task, but the role cannot shut down until all the foreground task have ended.