Hire a web Developer and Designer to upgrade and boost your online presence with cutting edge Technologies

Sunday, April 30, 2023

Creating REST API with Golang


REST (Representational State Transfer) is the most used interface to populate the dynamic data and perform operations such as add, update and delete in web applications. The REST APIs are used in all kinds applications to make GET, POST, PUT or DELETE HTTP requests to perform CRUD operations on data.

In this tutorial, we are going to explain to create simple REST API with Golang to perform GET, POST, DELETE and PUT on dynamic data. We will mainly focus on the basic concepts of this, so we will perform actions on employee JSON data instead of database. So you can use this by connection with database as per your application requirement. 


1. Create Server to Handle API Requests

We need to create server to handle HTTP requests to the API. So we will create a function apiRequests() in main.go file and called within func main(). The function apiRequests() will handle all requests to the root URL.

package main

import (
    "fmt"
    "log"
    "net/http"
)

func homePage(w http.ResponseWriter, r *http.Request){
    fmt.Fprintf(w, "Welcome to the API Home page!")    
}

func apiRequests() {
    http.HandleFunc("/", homePage)
    log.Fatal(http.ListenAndServe(":3000", nil))
}

func main() {
    apiRequests()
}

When we run the above code, the API will start on post 3000. The URL http://localhost:3000/ will be loaded on browser and see the API home page welcome message and it means we have created the base of our REST API.

2. Create Employee Dummy Data for REST API

In this tutorial we will create simple REST API to perform CRUD operations GET, POST, DELETE and PUT employee data. We will create some dummy employee data in func main(). We will perform

func main() {
	Employees = []Employee{
		Employee{Id: "1", Name: "Jhon Smith", Address: "New Jersy USA", Salary: "20000"},
		Employee{Id: "2", Name: "William", Address: "Wellington Newziland", Salary: "12000"},
		Employee{Id: "3", Name: "Adam", Address: "London England", Salary: "15000"},
	}
}

3. Get All Employee

Now we will start implementing our REST API methods. We will implement function getAllEmployees() to get all employee data.

func getAllEmployees(w http.ResponseWriter, r *http.Request) {    
    json.NewEncoder(w).Encode(Employees)
}

We will also handle routing and call function getAllEmployees() on action employees to get all employee in JSON format. We will use gorilla/mux based HTTP router in place of the standard library and use in this tutorial example.


func apiRequests() {
    route := mux.NewRouter().StrictSlash(true)    
    route.HandleFunc("/employees", getAllEmployees)   
    log.Fatal(route.ListenAndServe(":3000", route))
}

When we load URL http://localhost:3000/employees on method GET then it will display all employee in JSON format.

{"Id":"1","Name":"Jhon Smith","Address":"New Jersy USA","Salary":"20000"},
{"Id":"2","Name":"William","Address":"Wellington Newziland","Salary":"12000"},
{"Id":"3","Name":"Adam","Address":"London England","Salary":"15000"}

We can also get the specific employee record by passing employee id. For this we will create function getEmployee() to get employee data.

func getEmployee(w http.ResponseWriter, r *http.Request) {
    vars := mux.Vars(r)
    key := vars["id"]
    for _, employee := range Employees {
        if employee.Id == key {
            json.NewEncoder(w).Encode(employee)
        }
    }
}

we will call function getEmployee() on route /employee/{id} to get the employee by id.

func apiRequests() {
    route := mux.NewRouter().StrictSlash(true)
    route.HandleFunc("/employee/{id}", getEmployee)
    log.Fatal(http.ListenAndServe(":3000", route))
}

When we load URL http://localhost:3000/employee/3 then it will display employee by that id in JSON format.

{"Id":"3","Name":"Adam","Address":"London England","Salary":"15000"}

4. Create Employee Record

We will implement functionality to create a new employee record. We will create function createEmployee() to add a new employee record.

func createEmployee(w http.ResponseWriter, r *http.Request) {        
    reqBody, _ := ioutil.ReadAll(r.Body)
    var employee Employee 
    json.Unmarshal(reqBody, &employee)    
    Employees = append(Employees, employee)
    json.NewEncoder(w).Encode(employee)
}

We will call function createEmployee() on method POST and route employee to post employee details to add a new record.

func apiRequests() {    
    route.HandleFunc("/employee", createEmployee).Methods("POST")   
    log.Fatal(http.ListenAndServe(":3000", route))
}

When we run our API and POST with following post body then it will create a new employee record.

{
    "Id": "4", 
    "Name": "Peter", 
    "Address": "London, UK", 
    "Salary": "40000" 
}

When we access URL with employee id 4 like http://localhost:3000/employee/4 then it will display employee by that id in JSON format.

{"Id":"4","Name":"Peter","Address":"London, UK","Salary":"40000"}

5. Delete Employee Record

We will implement employee delete functionality by creating function deleteEmployee() to delete employee by id.

func deleteEmployee(w http.ResponseWriter, r *http.Request) {
    vars := mux.Vars(r)
    id := vars["id"]
    for index, employee := range Employees {
        if employee.Id == id {
            Employees = append(Employees[:index], Employees[index+1:]...)
        }
    }
}

We will call function deleteEmployee() on route /employee/{id} to delete employee.

func apiRequests() {
    route := mux.NewRouter().StrictSlash(true)    
    route.HandleFunc("/employee/{id}", deleteEmployee).Methods("DELETE")  
    log.Fatal(http.ListenAndServe(":3000", route))
}

When we will make HTTP request with method DELETE to URL http://localhost:3000/employee/3 with employee id. It will delete that employee.

6. Complete REST API Code

Here is the complete running code for this example.

package main

import (
    "encoding/json"
    "fmt"
    "log"
    "io/ioutil"
    "net/http"

    "github.com/gorilla/mux"
)

type Employee struct {
    Id      string    `json:"Id"`
    Name    string `json:"Name"`
    Address string `json:"Address"`
    Salary  string `json:"Salary"`
}

var Employees []Employee

func homePage(w http.ResponseWriter, r *http.Request) {
    fmt.Fprintf(w, "Welcome to the API Home page!")    
}

func getAllEmployees(w http.ResponseWriter, r *http.Request) {    
    json.NewEncoder(w).Encode(Employees)
}

func getEmployee(w http.ResponseWriter, r *http.Request) {
    vars := mux.Vars(r)
    key := vars["id"]
    for _, employee := range Employees {
        if employee.Id == key {
            json.NewEncoder(w).Encode(employee)
        }
    }
}


func createEmployee(w http.ResponseWriter, r *http.Request) {        
    reqBody, _ := ioutil.ReadAll(r.Body)
    var employee Employee 
    json.Unmarshal(reqBody, &employee)    
    Employees = append(Employees, employee)
    json.NewEncoder(w).Encode(employee)
}

func deleteEmployee(w http.ResponseWriter, r *http.Request) {
    vars := mux.Vars(r)
    id := vars["id"]
    for index, employee := range Employees {
        if employee.Id == id {
            Employees = append(Employees[:index], Employees[index+1:]...)
        }
    }
}

func apiRequests() {
    route := mux.NewRouter().StrictSlash(true)
    route.HandleFunc("/", homePage)
    route.HandleFunc("/employees", getAllEmployees)
    route.HandleFunc("/employee", createEmployee).Methods("POST")
    route.HandleFunc("/employee/{id}", deleteEmployee).Methods("DELETE")
    route.HandleFunc("/employee/{id}", getEmployee)
    log.Fatal(http.ListenAndServe(":3000", route))
}

func main() {
    Employees = []Employee{
        Employee{Id: "1", Name: "Jhon Smith", Address: "New Jersy USA", Salary: "20000"},
        Employee{Id: "2", Name: "William", Address: "Wellington Newziland", Salary: "12000"},
		Employee{Id: "3", Name: "Adam", Address: "London England", Salary: "15000"},
    }
    apiRequests()
}

Conclusion

Here in this tutorial, we have implemented HTTP methods GET, POST and DELETE to read, add and delete employee data. We have not implemented PUT method to update employee data. You can try this at your end and share your suggestion if any regarding this.

Thursday, April 27, 2023

Create Material Design Login and Register Form


Google’s Material Design is getting more popular on each passing day due its awesome design and features. Now more designers started thinking about to design website using Material Design.

The Material Design uses more grid-based layouts, responsive animations and transitions, padding, and depth effects such as lighting and shadows.

So if you’re thinking about designing your user login and register form using Material Design, then you’re here at right place. In this tutorial you will learn how to design user Login and Register Form using Material Design.

We will cover this tutorial in easy steps to design user login and register using Material Design with live demo. 


So let’s start,

Before begin, take a look of files structure used for this tutorial.

  • login.php
  • register.php

Include Material Design CSS and JavaScript Files
First of all we will need to include Material Design CSS and JavaScript files to create HTML using Material Design. It comes with both the minified and unminified CSS and JavaScript CDN files. We just need to include following files to start using Material Design.


<link rel="stylesheet" href="https://cdnjs.cloudflare.com/ajax/libs/materialize/0.97.1/css/materialize.min.css">
<script src="https://cdnjs.cloudflare.com/ajax/libs/materialize/0.97.1/js/materialize.min.js"></script>

Create Material Design Login Form
After including Material Design CSS and JavaScript files, we will start design login form. The Material Design provided great look and feel to Form inputs. We just need to use class .input-field div wrapping input and label. It will enable input border light up and clearly indicating which field the user is currently editing. Material Design also enable us to add an icon prefix to make the Form inputs label more clear. We just need to add class prefix with input related class to display icon prefix. Below complete login Form design using Material Design. In this login Form, we have used email, password and remember me input with relevant icons.

<h4>Material Design Login Form</h4>
<div id="user-login" class="row">
	<div class="col s12 z-depth-6 card-panel">
		<form class="login-form">
			<div class="row margin">
				<div class="input-field col s12">
					<i class="mdi-social-person-outline prefix"></i>
					<input class="validate" id="user_email" type="email">
					<label for="email" data-error="wrong" data-success="right" class="center-align">Email</label>
				</div>
			</div>
			<div class="row margin">
				<div class="input-field col s12">
					<i class="mdi-action-lock-outline prefix"></i>
					<input id="user_pass" type="password">
					<label for="password">Password</label>
				</div>
			</div>
			<div class="row">          
				<div class="input-field col s12 m12 l12  login-text">
					<input type="checkbox" id="remember-me" />
					<label for="remember-me">Remember me</label>
				</div>
			</div>
			<div class="row">
				<div class="input-field col s12">
					<a href="login.html" class="btn waves-effect waves-light col s12">Login</a>
				</div>
			</div>
			<div class="row">
				<div class="input-field col s6 m6 l6">
					<p class="margin medium-small"><a href="register.php">Register Now!</a></p>
				</div>               
			</div>
		</form>
	</div>
</div>

Create Material Design Register Form
Here is complete register Form HTML designed using Material Design. In this Register From, we have used username, email, password inputs with relevant icons.

<h4>Material Design Register Form</h4>	
<div id="register-page" class="row">
	<div class="col s12 z-depth-6 card-panel">
		<form class="register-form">        
			<div class="row margin">
				<div class="input-field col s12">
					<i class="mdi-social-person-outline prefix"></i>
					<input id="user_name" type="text" class="validate">
					<label for="user_name" class="center-align">Username</label>
				</div>
			</div>
			<div class="row margin">
				<div class="input-field col s12">
					<i class="mdi-communication-email prefix"></i>
					<input id="user_email" type="email" class="validate">
					<label for="user_email" class="center-align">Email</label>
				</div>
			</div>
			<div class="row margin">
				<div class="input-field col s12">
					<i class="mdi-action-lock-outline prefix"></i>
					<input id="user_passw" type="password" class="validate">
					<label for="user_passw">Password</label>
				</div>
			</div>
			<div class="row margin">
				<div class="input-field col s12">
					<i class="mdi-action-lock-outline prefix"></i>
					<input id="confirm_pass" type="password">
					<label for="confirm_pass">Re-type password</label>
				</div>
			</div>
			<div class="row">
				<div class="input-field col s12">
					<a href="register.html" class="btn waves-effect waves-light col s12">Register Now</a>
				</div>
				<div class="input-field col s12">
					<p class="margin center medium-small sign-up">Already have an account? <a href="login.php">Login</a></p>
				</div>
			</div>
		</form>
	</div>
</div>

Working with Structs in Golang

 we will explain how to work with Structs in Golang.

Structs in Golang is a ability to create user-defined data type from group of data fields with different data types. The data field in a struct can be declared with built-in or user-defined data types.

The concept of struct can be compared with the object-oriented programming which supports composition but not inheritance. 


Declare Struct

We can represent the properties or fields from any real-world entity into a struct. For example, an employee has properties such as firstName, lastName, age, phone, address and salary. We can group these properties into a Employee struct like below.


type Employee struct {  
    firstName string
    lastName  string
	age       int
    phone     int
	address   string
	salary    int
}

The above will declare a names struct type Employee with fields as it creates a new data type Employee. We can also declare the data fields with same type in a single line as comma separated data fields like below.

type Employee struct {  
    firstName, lastName, address string
    age, phone, salary int    
}

Create Instance of Struct

We can create instance of struct by assinging to a variable.

var emp = Employee 

or

emp := Employee 

We can also create instance by using new keyword.

emp := new(Employee) 

Here is the complete example code to create instance of Employee struct and pass data field values. We will also access data field values with . operator.


package main
 
import "fmt"
 
type Employee struct {  
    firstName, lastName, address string
    age, phone, salary int    
}
 
func main() {	
	emp := Employee{firstName: "Jhon", lastName: "Smith", age: 35, phone: 123456789, salary: 50000, address: "Newyork"} 	
	fmt.Println("Employee name : ", emp.firstName, emp.lastName)
	fmt.Println("Employee age : ", emp.age)
	fmt.Println("Employee salary : ", emp.salary)
	fmt.Println("Employee phone : ", emp.phone)
	fmt.Println("Employee address : ", emp.address)	
}

The above example code will output following:

Employee name :  Jhon Smith
Employee age :  35
Employee salary :  50000
Employee phone :  123456789
Employee address :  Newyork

Struct Instance using Pointer

We can instance of struct using pointer address operator & symbol.

package main
 
import "fmt"
 
type Employee struct {  
    firstName, lastName, address string
    age, phone, salary int    
}
 
func main() {	
	emp1 := &Employee{"Kane", "William", "London", 30, 123456789, 40000} 	
	fmt.Println(emp1)
	
	emp2 := &Employee{firstName: "Jhon", lastName: "Smith", age: 35, phone: 123456789, salary: 50000, address: "Newyork"} 	
	fmt.Println(emp2)
}

The above example code will output following:

&{Kane William London 30 123456789 40000}
&{Jhon Smith Newyork 35 123456789 50000}

Nested structs

We can create nested struct that contain struct in it. In below example, we will use Address struct inside Employee struct for employee city, state and country to create address.

package main
 
import "fmt"
 
type Employee struct {  
    firstName, lastName string
    age, phone, salary int    
	address Address
}

type Address struct {  
    city  string
    state string
	country string
}
 
func main() {	
	emp := Employee{
		firstName: "Jhon", 
		lastName: "Smith", 
		age: 35, 
		phone: 123456789, 
		salary: 50000, 
		address: Address{
			city:  "Chicago",
			state: "Illinois",
			country: "USA",
		},
	} 
	
	fmt.Println("Employee name : ", emp.firstName, emp.lastName)
	fmt.Println("Employee city : ", emp.address.city)	
	fmt.Println("Employee city : ", emp.address.state)
	fmt.Println("Employee city : ", emp.address.country)
}

The above example code will output following:

Employee name :  Jhon Smith
Employee city :  Chicago
Employee city :  Illinois
Employee city :  USA


Wednesday, April 26, 2023

Casting Defects in Dentistry Notes {Distortion, Surface Roughness and Irregularities}


Introduction

  • An unsuccessful casting leads to considerable trouble and time. In most instances, defects in castings are often avoided by strict observance of procedures governed by certain fundamental rules and principles.
  • A casting defect is an irregularity in the metal casting process that is very undesirable. Errors in the casting procedure often leads to casting defects which results in unfitting of casting and may have poor esthetic and mechanical properties. 

Classification of Casting Defects

The casting should be replica of the pattern created in size, texture and form. Because of its causes and effects often overlaps, it is very difficult to classify casting defects.

First Classification of Casting Defects as follows-

i) Metal Excess (Nodules, Fins, Larger Casting)
ii) Metal Deficiency (Smaller casting, Incomplete casting and porosity)
iii) Distortion of casting
iv) Chemical contamination of casting

Second Classification of Casting Defects as follows-

i) Casting Size Mismatch
ii) Distortion
iii) Surface Roughness
iv) Nodules
v) Fins
vi) Porosities
vii) Incomplete Casting
viii) Contaminated Casting

Third Classification of Casting Defects as follows-

Causes of Casting Defects

Casting Size Mismatch

There are always chances of casting size mismatch due to improper technique and failure in management of investment materials. Also shrinkage and expansion of wax pattern and investment materials often leads to casting size mismatch. Thus resulted casting may be-

i) Too Small
ii) Too Large

Distortion

  • Wax distortion is the most common problem in casting defects that can occur during the forming and removal of the pattern from the mouth or die.
  • Distortion can occurs during manipulation due to release of stresses.
  • Some distortion can occur due to hardening of investment material or Expansion and Shrinkage of material.
Wax distortion

How to Avoid Distortion in Dental Casting
  • Don’t overheat wax.
  • Place in increments.
  • Never cool the pattern suddenly.
  • Avoid occluding air during manipulation.
  • Carve with sharp instruments.
  • Permit it to attain equilibrium.
  • Invest immediately.
  • Place it in the center of the casting ring.

2. Surface Roughness

  • These are relatively finely spaced surface imperfections lead to surface roughness.
Causes of Surface Roughness

Causes of Surface Roughness

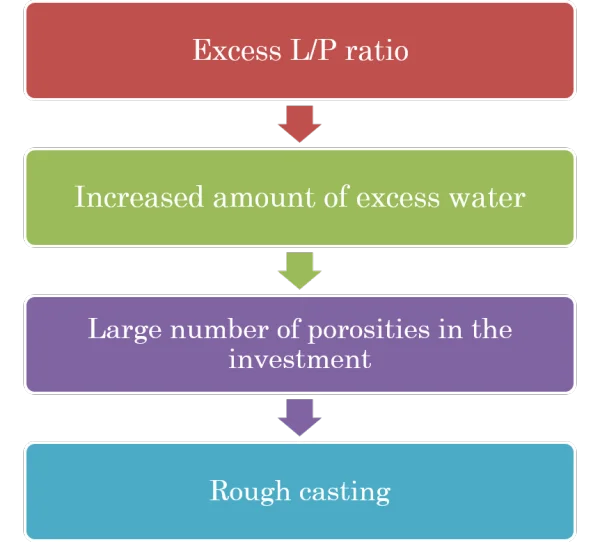
a) High L/P Ratio

a) High L/P Ratio

b) Prolong and Over Heating of Mold

  • Prolonged heating of the mold results in disintegration of gypsum bonded investment. 
  • As a result, the walls of the mold are roughened
Remedy

  • In thermal expansion technique, the mold should be heated to casting temperature and the casting should be made immediately.
c) Type of Investment

Phosphate bonded investment tend to have greater surface roughness than gypsum bonded investment.

d) Composition of Investment

More coarse silica particles produce coarse castings.

e) Too High and Too Low Casting Pressure

Minimized by using 15lbs/sq inch of air pressure.

3. Surface Irregularities

  • These are isolated imperfections which are not characteristic of the entire surface area.

a) Nodules

b) Water Films

c) Fins

a) Nodules 

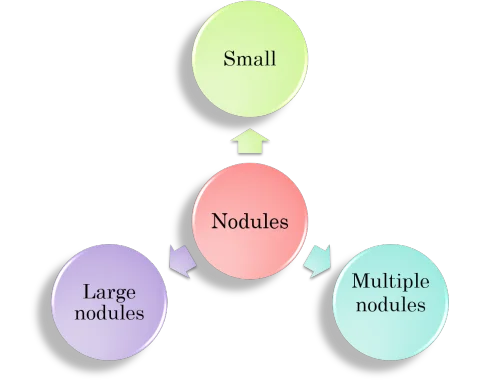
Types of nodules

i) Small Nodules

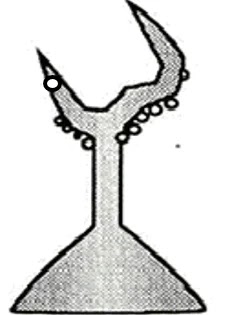
    • Small air bubbles can attached to the pattern during investing. 
    • The bubbles later filled with the casting material (alloy) during casting and is manifested as a nodule (small).
Small Nodule

    • These small nodules might alter the fitting of the casting.
Remedy

The best method to eliminate the incorporation of air within the casting investment is

  • By mixing under vacuum.
  • By using wetting agents.
  • Castings with phosphate bonded investments are more susceptible to such imperfections.
  • They can be removed with round bur. 

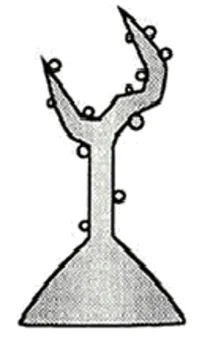
ii) Large Nodules

    • Produced by air trapped during investing procedure 
Large Nodule

iii) Multiple Nodules
Multiple Nodules
    • Inadequate vacuum during investing
    • Improper brush technique.
    • Lack of surfactant

b) Water Films

  • We all know that Wax is repellent to water so when the investment separated from the wax pattern in any case, a water film may form irregularly over the surface.
water film

  • These irregularities seen as minute ridges or veins.
  • This Condition Occurs-
water film casting defects
Remedy
  • Use of Surfactant helps in prevention of water film irregularities.
c) Fins

  • Fins occur when cracks are produced within the investment that radiate out from the surface of the pattern .
Fins Casting Defects

  • During Casting, these cracks are filled with molten metal forming thin fins on the casting.

Significance :

Finning increases the finishing time of the casting and if the defects occur in critical areas (e.g. near the crown shoulder).

Causes of Fins

Causes of Fins


i) Pattern Positioning

  • Positioning of several patterns too close and pattern placed in the same plane in the mold results in formation of fins.
    • Reason: The expansion of the wax is far greater than that of the investment, causing breakdown or cracking of the investment if the spacing between patterns is lesser than 3mm.
  • Patterns placed too near the investment edge causes fins.

    • Reason: If too little investment covers the wax patterns, the alloy is more likely to break through the mold. 
sprue

  • Too much investment over the wax ups may locate the wax patterns too close to the heat center of the mold and impair the escape of gases

Remedy

    • Proper positioning of the wax pattern.
    • The casting ring should permit the patterns to be 3- 6 mm  apart.
    • 6mm from the top of the investment.
    • Minimum 9mm of investment between pattern and the ring liner.

ii) Rapid Heating Rate  
 
    • A characteristic surface roughness occurs due to flaking of the investment when the water/ steam pours into the mold.

Remedy

    • During the heating of the investment filled ring from room temperature to 700º C, Ideally 60 minutes should be elapsed.
    • The greater the amount of the investment, the more slow it should be heated.
iii) Premature Heating
 
    • If setting isn't complete at the time a ring is placed in the oven, the mold may be weak and unable to withstand steam pressure  during burnout.
    • Investment could fracture as a consequence.

Remedy

    • Burnout procedure for recommended setting time.

iv) Liquid Powder Ratio

    • The higher the liquid/powder ratio, the investment becomes weak and develop cracks results in roughness.

    • If low Liquid/Powder ratio is used, the investment becomes thick and cannot be properly applied to the pattern. Because of this air can not be sufficiently removed leading to back pressure porosity.

Remedy

    • Correct proportion of powder to liquid.

v) Casting Pressure

    • Too high pressure during casting  causes fins.

  Remedy

    • Enough force required for liquid alloy to flow onto the heated mold.
    • Adjust the casting machine for each alloy.   
    • 0.10 to 0.14 MPa gauge pressure is sufficient.