Hire a web Developer and Designer to upgrade and boost your online presence with cutting edge Technologies

Wednesday, October 31, 2012

Automatically Add Users to Sites Across a WordPress Multisite Network


When navigating a WordPress multisite network, it’s important to note that users of one site are not automatically made users of other sites across the network. Ordinarily, users have to complete the regular registration process with each site they want to join.
Mika Epstein, otherwise known as Ipstenu, is a prolific multisite plugin developer. She recently released Join My Multisite. This is a brand new plugin that makes it easy for users across a multisite network to join each other’s sites. After network activating the Join My Multisite plugin, each site admin will have three new options for new memberships on their own sites:
  • Auto-add users – any time a logged in user visits a site, they will be automatically added to that site
  • Have a ‘Join This Site’ button in a widget
  • Keep things exactly as they are
Have a look at the settings page:

In addition to the new membership options, site admins can also automatically assign new members a specified user role, using the dropdown menu on the plugin’s settings page.
The membership options determined by this plugin are also available through a widget that each admin can easily drop into any widgetized area of their WordPress theme.

If one of your site admins has registration turned off, this plugin will not affect that. Visitors will not see the ‘register’ button.
As the network admin, you may understand the ins and outs of how WordPress multisite networks work, but visitors more than likely have no idea, especially if the sub-sites are well connected and themed to be similar to one another. They may not understand that they are not automatically members of the other sites. That’s where this plugin is very useful. It lets you eliminate that point of confusion by giving site admins the option to automatically add new visitors as users. Another benefit is that it helps to prevent your networked sites from getting too fragmented and isolated from one another. Download Join My Multisite for free from the WordPress plugin repository.

Magento remove Paypal logo

For magento 1.7. C.E. users [scroll down]
to find how to easily remove the paypal logo from the admin panel with out modifying any of your layout or template or css files ;-)
(For your information, you can just click on the images in this post or any of the posts in this blog to get opened in a new tab or window and you can maximize it / zoom it. All the images used  in this post or any of the posts in this blog are high resolution images so that you can get a clear picture, If there are any discrepancies let me know through your comments )
magento remove paypal logo
1. Login to your Admin Panel of your Store. Go to System -> Configuration and click on  PayPal logofrom the options on the left  side.


2. Then you will get the whole settings of Paypal in your Magento Store. Click on the Tab “Front end Experience settings“.

3. Select “No Logo” from the drop down list of the PayPal Product Logo field.
magento remove paypal logo
4. We are done with this.  Just save your configuration and flush your magento cache from the admin or go to var / cache directory and manually remove all the files. Then refresh your home page. You can find paypal logo is removed from magento home page.
magento remove paypal logo
For magento 1.7 users, Login in to admin panel and go to the following paypal configuration section mentioned below,
System->configuration->payment methods -> Paypal All in one payments solutions->
Paypal Payments Advanced (includes express checkout)-> Basic settings paypal payments advanced->
Frontend Expereince settings -> Paypal Product Logo
To ease your finding click on the image below which will open it in a new tab or window  and click again the opened image to view it with clear and high resolution image.
Remove Paypal logo - in magento 1.7. C.E.
Remove Paypal logo – in magento 1.7. C.E.
Cheers :-)
If you have appreciations, suggestions, difficulties or discrepancies with this kindly let me know through your comments.
Catch you with another useful Magento article

How to Build a Popup Help Center for Your WordPress Site


WordPress Site Popup Help - How to Build a Popup Help Center for Your WordPress Site
Have you been wishing for a way to give users of your WordPress site easy access to all the help and support they need to fully appreciate everything your site has to offer? Well, you can start smiling now, ‘cuz your wish just came true. This tutorial will show you how you can truly enhance their experience with a cool popup help center. Once we finish this project, your users will be able to…
  • pop open your help center by clicking a link or button that you can make as prominent or as discrete as you like
  • select the appropriate help subject from a scrollable, and dynamically updating table of contents
  • view expanded lists of all related sub-topics any time they click on a subject they’re interested in
As admin of your WordPress site, you will be able to add and edit all your help content via the WordPress page editor. That means that you can…
  • include images, videos and links to other sites in any help content
  • include things like a contact form or live chat support
  • use any shortcodes you like or need
  • add content via content buckets
  • manipulate the help content just like you normally do on any page of your WordPress site
Once we’re done, your popup help and support center will look much like the example below.
WordPress Site Popup Help - Screenshot of example popup window
The popup help screen will be divided into 2 scrollable frames: help content on the right; and a dynamically updating table of contents on the left. Your users will be able to scroll either frame independently as seen below. The table of contents will keep itself organized and updated according to the page order you set in the back-end of your WordPress site. Clicking any item heading in the table of contents on the left of the popup will bring up that content in the right-hand pane.
WordPress Site Popup Help - Screenshot of example double-pane popup window

What we’ll need to get this done

As I like to make stuff as easy as possible for novice WordPress users, this tutorial is divided into 5 parts so you can get stuff done at your leisure.
  1. We’ll create a custom page template for our help content
  2. We’ll register a new sidebar to use in our custom template
  3. We’ll use a cool plugin called Hierarchical Pages Widget for the dynamically updating table of contents
  4. We’ll add a bit of javascript magic to create the popup
  5. We’ll write some custom styles to create the layout we want
Before proceeding with any theme customizations, I highly recommend the use of a child-theme. If you’re already using one, great! If not, please create a child-theme of the theme you are using now. If you’re not sure how to create one, see http://codex.wordpress.org/Child_Themes and What are Parent and Child Themes?

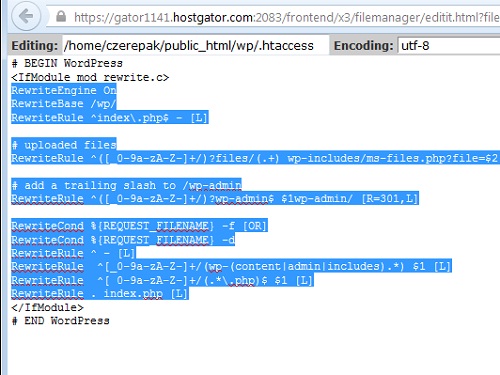
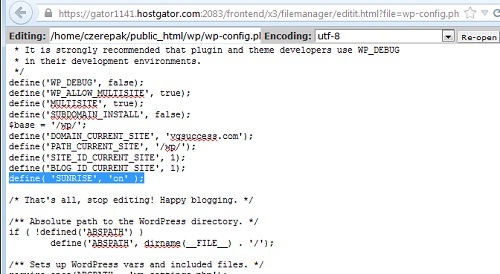
1) First up: a custom page template

The first thing we need for this is a custom page template with no distractions for your users. We want our help content to be displayed in our popup with no banners (that means no header or footer), and navigation designed specifically for it. In our template, we’ll be including calls for the header and footer, because you likely have some essential code in there. But we’ll be hiding them from view later on when we get to the CSS part of this tutorial.
Open a new document in your favorite text editor (mine is by far Notepad++). Copy the code below and paste it to your document. Save your document as template-site-guide.php and upload it to the root of your child-theme folder.
<?php
/*
Template Name: Site Guide
*/
?>

<?php get_header(); ?>

<section id="content" role="main">

 <?php the_post(); ?>

 <article id="<?php the_ID(); ?>" <?php post_class(); ?>>
  <header class="post-header">
   <h1 class="post-<a href="<?php the_permalink(); ?>" title="<?php printf( esc_attr__( 'Permalink to %s', TEMPLATE_DOMAIN ), the_title_attribute( 'echo=0' ) ); ?>" rel="bookmark"><?php the_title(); ?></a></h1>
  </header>
  <div class="post-body">
   <?php the_content( __( 'Continue reading <span class="meta-nav">→</span>', TEMPLATE_DOMAIN ) ); ?>
  </div>

 </article>
  
</section>

<div id="help-sidebar">
 <?php dynamic_sidebar( 'help' ); ?>
</div>

<?php get_footer(); ?>
As you can see, this template is a very basic loop that only calls the post title and post content. We don’t need any more than that for our popup help center. To test that the template is working properly, create a new page for your WordPress site. In the “Page Attributes” section of your page editor, select your new template from the “Template” drop-down menu. When you publish or preview your new page, you should see only the post title and content in the post area, with nothing else (no meta-data, author, date, etc.). The template looks OK? On to the next step then…

2) Register a new custom sidebar

You surely noticed the call to the custom sidebar in the template. In this step, we’ll register a new sidebar to be used only in our help popup. Open your child-theme’s functions.php file, and paste the following code just after the opening <?php tag.
// Register our custom sidebar for the help popup
register_sidebar(
 array(
  'name'          => __( 'Help', TEMPLATE_DOMAIN ),
  'id'            => 'help',
  'description'   => 'Help',
  'before_widget' => '<aside id="%1$s" class="widget %2$s">',    
  'after_widget' => '</aside>',
         'before_title' => '<h3 class="widgettitle">',
         'after_title' => '</h3>'
  )
);
That’s it… were you expecting more? Now, when you go to “Appearance” > “Widgets” in the back-end of your WordPress site, you’ll see a new sidebar called “Help”. That’s where we’re going to drop one of the widgets from the plugin we’ll be using for the table of contents.

3) Our table of contents

To create a table of contents the way we want, we’ll be using a really cool little plugin: Hierarchical Pages Widget. You can either download the plugin and FTP it to your site, or use the automatic install in the Plugins section of your site’s back-end.
Activate the plugin on your site, then go to “Appearance” > “Widgets” and drag the “Hierarchical Pages” widget to your new “Help” sidebar. To set up the widget for our help navigation, simply tick the first 2 check-boxes (Show siblings & Show top-level pages), then enter the ID of the page you created earlier. That will be your top-level help page. All other pages you create for your help popup must be set as children of that page for this to work properly. Save the widget settings.
Now go ahead and view the page you created earlier once again. You should see the page title has been added as a link, probably below the content. Don’t worry about that right now; we’ll fix up the layout in the last step.

Let’s do a quick recap before we continue

  • we’ve created our custom template to display our help content
  • we’ve created our top-level help page (to be edited later)
  • we’ve created a sidebar to use only with the help content
  • and we’ve activated and configured the plugin that builds our table of contents.
Got all that? Now let’s get to the really fun parts: the JavaScript that will create the actual popup, and then it’s on to adding custom styles to our style-sheet to get everything formatted and looking awesome!

Now to work some JavaScript magic

Rather than copying some code from this article and then futzing with it to fit your site, I’ve found a really cool alternative for this purpose. One of my favorite sites for code snippets is DynamicDrive.com. They actually have a code generator to build your own custom popup. How cool is that? Click the link below to create your own code, then come back here.
  • In the field where you’re prompted to enter the “URL of window”, enter the URL of your top-level help page.
  • You’ll also want to set “Scroll bar” to “Yes”.
Generate popup JavaScript
The 1st part of the code you just generated must be pasted to either the header.php file or the footer.php of your child-theme (it’ll work just fine in either one). If you paste it to header.php, be sure it’s just before the closing </head> tag. If you add it to footer.php, be sure you add it before the closing </html> tag.
Save the file you added the JavaScript to, then upload it to your site. The next step is to add the 2nd part of the generated code where you want your “Help” button or link to appear on your site. That is entirely up to you, but for now, simply add it to a text widget in your sidebar, or anywhere on a test page. If you want a button, and want it to look exactly like all the other buttons on your site, simply change <a href to <a class=”button” href in the 2nd bit of code.
Now, wherever you put that link or button, click it and watch your popup appear. If you want to modify the dimensions, or any other setting, simply generate a new pair of code snippets and replace them. Cool huh?

Finally! Let’s make it look snappy!

Below is the basic CSS you’ll need to get a popup help center for your WordPress site just like the examples in the images above. The max-height value in the 1st part should be equal to the height you set for your popup window in the JavaScript you created earlier. The position:fixed and overflow-y:scroll in the 1st part are the all-important bits that create the scrollable left-hand pane (our custom sidebar) that will contain the table of contents.
.page-template-template-site-guide-php #help-sidebar {
  max-width:36%;
  float:left;
  overflow-y:scroll;
  position:fixed;
  max-height:350px;
  margin-right:2%;
  font-size:11px;
 }
.page-template-template-site-guide-php #help-sidebar ul {
  margin-left:0;
}
 .page-template-template-site-guide-php #help-sidebar ul ul {
  margin-left:1em;
 }
 .page-template-template-site-guide-php #help-sidebar ul ul li {
  list-style:disc inside none;
}
 .page-template-template-site-guide-php #help-sidebar ul ul li.current_page_item {
  font-weight:bold;
 }
.page-template-template-site-guide-php #content {
  width:60%;
  float:right;
  margin:2%;
}
Now, depending on the theme you are using, portions of the following code may need to be modified. This bit of CSS applies specifically to my child-theme of SimpleMarket from WPMUdev. The 1st part (branding, top-nav, bottom-footer) hides the site header and footer in the help popup, and the other 3 parts style the main page wrappers. If you are not using SimpleMarket, you will need to adjust or delete stuff to reflect the actual container IDs of your theme. If you need help with this part, please leave a comment below with a link to your site, and I’ll do what I can to help you figure stuff out.
.page-template-template-site-guide-php #branding, .page-template-template-site-guide-php #top-nav, .page-template-template-site-guide-php #bottom-footer {
  display:none;
}
.page-template-template-site-guide-php #site-outer {
  box-shadow:none;
  moz-box-shadow:none;
  -webkit-box-shadow:none;
  margin:0;
}
.page-template-template-site-guide-php #site-wrapper #main {
  border:none;
  padding:0;
}
.page-template-template-site-guide-php #site-wrapper #main-inner {
  padding:0;
  margin:0;
}
Once you’ve added the styles you need to your style-sheet (and have uploaded it to your site, of course), click your “Help” button again and watch the magic unfold.

Final step: create your help pages!

Now that you have a cool container, you get to let your creativity really fly as you build all the help pages you ever wanted on your WordPress site. Be inventive and include example images or screenshots to help your users understand each point in your help content. Experiment with short-codes from other plugins to include a contact form, or even a chat feature. For example, you could try WPMUdev’s own WordPress Chat; you can add it directly to any page without shortcodes.
As always, I hope you enjoyed this tutorial and find use for it!

How to Build a WordPress Multisite Network With Multiple Domains


I remember when I first got the idea to build a WordPress network using multiple domains instead of subdomains. It took me countless hours of Googling, trial and error, code hacking and pounding my fists to figure out something which I can now do in just a few minutes.
Even the WordPress website doesn’t give you very clear instructions on how to set up a WordPress network using multisite, and even then you’re stuck using domains like this for your secondary sites:
www.newsite.example.com
www.example.com/newsite
So thought I’d throw out a lifeline in case you’ve trying to figure this out on your own. At the end of this post, I’ll also show you how you can cut the WordPress brand out of the picture and re-brand WordPress for your company name, your logo and links back to your website or start your very own hosting company using WordPress Multisite.
Let’s start with what you’ll need to set up your WordPress network with multiple domains…

Things You’ll Need to Set Up Your WordPress Network

  1. WordPress installed on the domain you wish to be your primary domain.
(I’m assuming you know how to do this ^ already. If not, I suggest getting a hosting company like Hostgator which literally allows you to set up a WordPress site in 30 seconds by clicking a few buttons and inputting some very basic information)
  1. The WordPress Multi  Domains Plugin from WPMU DEV
  2. The Domain Mapping Plugin from WPMU DEV
  3. FTP access to the hosting account where the WordPress network will be set up.
  4. If you’re doing this in a WordPress site which already has content, please back up your database and deactivate your plugins before continuing to step #1.
Step #1: Prepare WordPress for Multisite
The first thing you’ll need to do is go to the directory where your WordPress site is installed and open up your WordPress config file. It carries the name “wp-config.php” as you’ll see in the screen shot below:

Open that file and find the copy-paste this code…
define(‘WP_ALLOW_MULTISITE’, true);
…just above the “That’s all, stop editing! Happy blogging” comment, as seen in this example below:
Once that’s done, save your “wp-config.php” file but keep it open because we’ll be editing it again in a moment. Next you go to the WordPress admin area and locate the option on your WordPress admin bar for network setup. As in the graphic below, you’ll find this option under “Tools.”
Once you click that option, you should see a screen where you put in your network name and the admin email and click “install.” If you see a message that asks you to deactivate your plugins first, make sure you do that as instructed at the start of this tutorial.
Once you’ve click the “install” button, you’ll see a screen which has two blocks of code. This is the first one:
**********
define(‘MULTISITE’, true);
define(‘SUBDOMAIN_INSTALL’, false);
$base = ‘/wp/’;
define(‘DOMAIN_CURRENT_SITE’, ‘vqsuccess.com’);
define(‘PATH_CURRENT_SITE’, ‘/wp/’);
define(‘SITE_ID_CURRENT_SITE’, 1);
define(‘BLOG_ID_CURRENT_SITE’, 1);
**********
This code ^ goes in your “wp-config.php” file just under the “define(‘WP_ALLOW_MULTISITE’, true);” code which you’ve already pasted in. So after copying that in, your “wp-config.php” file should look like this:
Once again, save the “wp-config.php” file but leave it open because we’ve got one more thing to do in there.
The next piece of code in your WordPress admin dashboard should look like this:
{code type=php}
RewriteEngine On
RewriteBase /wp/
RewriteRule ^index.php$ – [L]
# uploaded files
RewriteRule ^([_0-9a-zA-Z-]+/)?files/(.+) wp-includes/ms-files.php?file=$2 [L]
# add a trailing slash to /wp-admin
RewriteRule ^([_0-9a-zA-Z-]+/)?wp-admin$ $1wp-admin/ [R=301,L]
RewriteCond %{REQUEST_FILENAME} -f [OR]
RewriteCond %{REQUEST_FILENAME} -d
RewriteRule ^ – [L]
RewriteRule  ^[_0-9a-zA-Z-]+/(wp-(content|admin|includes).*) $1 [L]
RewriteRule  ^[_0-9a-zA-Z-]+/(.*.php)$ $1 [L]
RewriteRule . index.php [L]
{/code }
This code ^ goes into your “htaccess” file which you’ll find under the same directory as your “wp-config.php” file, as in the screenshot below:
The code should replace all other WordPress rules, so after you’ve pasted it into your “htaccess” file, it should look like this:
Once that’s pasted in, save and close the “htaccess” file and log out of your WordPress admin. Then log right back in. When you do, you should be able to open up an option to view your network admin area, as in the screen shot below:
Now you’re ready for the next step…

Step #2: Prepare Your Network for Multiple Domain Handling

Once you’ve got WordPress Multisite setup, your next step is to install the WPMU DEV  Multi Domains Plugin and the WPMU DEV Domain Mapping Plugin . These plugins will allow your users to map secondary installations of WordPress to their own domains. All they’ll need to do is point their DNS towards the IP address where your WordPress network is being hosted.  More on that in a moment.
In order to set up and configure the domain mapping you’ll need to access the plugin options from your network admin dashboard. If you try to access them from the dashboard of the main site or a secondary site, you won’t be able to set it up.
So go to the “Network admin” option in your WordPress dashboard and look under “Settings” for the “domain mapping” option. Once you click that, you’ll come to a screen with some instructions that look like this:
Unfortunately, the instructions on this screen are confusing and inaccurate, and you’ll drive yourself crazy trying to follow them to set up your domain mapping plugin. So let’s lay out exactly what you need to do to finish your installation up.
The first step reads like this:
Please copy the sunrise.php to /home/coach/public_html//wp-content/sunrise.php and uncomment the SUNRISE setting in the /home/coach/public_html/wp-config.php file
The “sunrise.php” isn’t actually under your root folder as it says in these ^ instructions. It’s under the folder for the “domain-mapping” plugin which you’ll find under “wp-content” directory which is in the root directory where your WordPress installation. Move this file into the folder named “wp-content.”
The next step in your WordPress admin dashboard should read like this:
Please uncomment the line //define( ‘SUNRISE’, ‘on’ ); in the /home/coach/public_html/wp-config.php file.
Again, this is a potentially confusing line of code because I’ve yet to see the //define( ‘SUNRISE’, ‘on’ );”  in a “wp-config.php” file. So you’ll need to copy and paste the “define( ‘SUNRISE’, ‘on’ );” without the “//” characters in front of it or the quotations around it. Then, paste this just below the multisite rules which you’ve already pasted into your “wp-config.php” file. Once pasted into your “wp-config.php” file, that code should look like this:
Next, you’ll need to obtain your IP address where your website is hosted from your hosting provider and input that into the place where it requests your IP. DO NOT use YOUR IP for this. It needs to be the IP where your website is hosted, not the IP you log on to the internet with.
The fourth setup option asks if you want non-supporters to be able to set up sites on your network, I’ll leave that up to you.
Finally, you can choose which domain the visitors will be mapped to. I use “domain entered by user” for this option, but again that’s up to you.
Now, your users will be able to set up sites on your network and (provided that their DNS is pointed towards the IP address where your WordPress network is hosted), their sites will map to their own domain.
Bonus Features for Making Your WordPress Network Even Cooler
  1. 1.       Install the WPMU DEV “Ultimate Branding” plugin and change ALL instances of WordPress to YOUR brand name, all WordPress logos and favicons to YOUR brand logo and all links to go back to your main website rather than to WordPress.
  2. 2.       Install WPMU DEV “Pro Sites” to accept payments from your users in exchange for the privilege of setting up their websites on your network.
  3. 3.       Install the WPMU DEV “Multi Database” to have the WordPress sites on your network run off of their own database, thus increasing the performance and scalability of your WP network.
PS: If any of the code in this tutorial does not work, check the single quote character and make sure they’re in plain text format rather than the format which some word processor programs or WYSIWYG editors change them into. The plain text single quote looks more like a small straight line than a curved dash. 
Any questions?
Leave them in the comments section below.
Good luck setting up your WordPress network!

Make a WordPress Menu that Stands Out From the Crowd


WordPress Menu Images - A tutorial to add custom images to your WordPress menu

Create a truly unique WordPress menu

This little tutorial will show you how easy it is to create an image-based custom menu for your WordPress site or blog, similar to the screenshot below (taken from the Twenty-Eleven theme with header image hidden for clarity). It only works for a menu with top-level items only though; sorry, no sub-menus. I haven’t yet figured out a way to do this with drop-down sub-menus; when I do though, I’ll definitely do another write-up!
WordPress Menu Images - Screenshot of Twenty-Eleven theme with image menu
Don’t worry, we won’t be doing anything complicated with php, or javascript, or jquery. Everything in this article can be done by simply uploading images to your WordPress media library, and adding a few new style rules to your active theme’s style-sheet.

Find the main nav ID

Regardless of the theme you’re using, you first need to find the ID of the main navigation container. If you don’t know what that ID is, you can easily find it using your browser’s developer tools (see the “Identify the main nav container” section of this post for some tips). Got the ID? Good.

Upload your images

Simply upload your menu item images to your WordPress media library, and copy the file URLs to a blank text file to keep them handy (we’re gonna need them for the CSS).

Create a WordPress menu

It may be a good idea to create a test menu for this exercise. In the example screenshot above, the 5 item names are rather evident, but you can name yours anything you like.

Assign your menu item classes

To be able to assign a specific image to each menu item, we need to assign a specific CSS class to each one of them. If you don’t already see the “CSS classes” option for individual menu items in your WordPress menu editor, click the “Screen Options” tab at the top-right of your screen, then tick the “CSS Classes” checkbox (see screenshot below).
WordPress Menu Images - How to assign CSS classes to WordPress menu items
Give each menu item in your test menu a unique class name, for example: menu-bg1, menu-bg2, menu-bg3, etc. Save your menu, then select it in the “Theme locations” box at the top-left of your menu editor screen. Now refresh any page on your site to make sure your menu shows up. See your new menu? Good, let’s get the images in there.

The CSS you’ll need

Below is the basic CSS you’ll need to add to your WordPress theme’s style-sheet (I do hope you’re using a child-theme!). If you’ve used the images from the example zip file, or made your own the same size (122x40px), you don’t need to adjust the padding or width in the 1st style rule (if your own images are a different size, adjust accordingly). You do need to edit each occurrence of 2 things specific to your theme though:
  • #access = the ID of your theme’s main nav container
  • .menu-bg* = the CSS classes you assigned to your menu items
If you want a purely image-based WordPress menu, simply set the color in the first style rule to transparent. This will effectively hide the link text from view.
#access .menu-bg1 a, #access .menu-bg1 a:hover, #access .menu-bg1 a:focus, 
#access .menu-bg2 a, #access .menu-bg2 a:hover, #access .menu-bg2 a:focus, 
#access .menu-bg3 a, #access .menu-bg3 a:hover, #access .menu-bg3 a:focus, 
#access .menu-bg4 a, #access .menu-bg4 a:hover, #access .menu-bg4 a:focus, 
#access .menu-bg5 a, #access .menu-bg5 a:hover, #access .menu-bg5 a:focus {
background-repeat:no-repeat;
background-position:0.5em 0.5em;
color:#555;
padding:10px 0 0 60px;
width:70px;
}
#access .menu-bg1 a, #access .menu-bg1 a:hover, #access .menu-bg1 a:focus {
background-image:url('FULL-URL-TO-YOUR-UPLOADED-IMAGE-#1-GOES-HERE');
}
#access .menu-bg2 a, #access .menu-bg2 a:hover, #access .menu-bg2 a:focus {
background-image:url('FULL-URL-TO-YOUR-UPLOADED-IMAGE-#2-GOES-HERE');
}
#access .menu-bg3 a, #access .menu-bg3 a:hover, #access .menu-bg3 a:focus {
background-image:url('FULL-URL-TO-YOUR-UPLOADED-IMAGE-#3-GOES-HERE');
}
#access .menu-bg4 a, #access .menu-bg4 a:hover, #access .menu-bg4 a:focus {
background-image:url('FULL-URL-TO-YOUR-UPLOADED-IMAGE-#4-GOES-HERE');
}
#access .menu-bg5 a, #access .menu-bg5 a:hover, #access .menu-bg5 a:focus {
background-image:url('FULL-URL-TO-YOUR-UPLOADED-IMAGE-#5-GOES-HERE');
}
Save/upload your style-sheet, the refresh any page on your site. You should see your new images for each item in your WordPress menu. Note that you may need to adjust the background-position, padding and/or width in the first style rule above to get things looking just right for your site.

A simple hover effect

Finally, let’s add a little hover effect to each item in your new WordPress menu. This effect will simply give a bit of transparency to each image when you hover your mouse pointer over it, allowing the background color of your main nav container to show through. Go ahead and adjust the opacity and transition time to suit your own tastes.
#access .menu-bg1 a:hover, #access .menu-bg1 a:focus, 
#access .menu-bg2 a:hover, #access .menu-bg2 a:focus, 
#access .menu-bg3 a:hover, #access .menu-bg3 a:focus, 
#access .menu-bg4 a:hover, #access .menu-bg4 a:focus, 
#access .menu-bg5 a:hover, #access .menu-bg5 a:focus {
color:#fff;
opacity:0.7;
filter:alpha(opacity=70);
-moz-transition: all 0.5s;
-ms-transition: all 0.5s;
-webkit-transition: all 0.5s;
-o-transition: all 0.5s;
}

That’s it, we’re done!

I hope you enjoyed this little WordPress menu tut and find use for it. If you need a hand with anything, or want to show off what you make with, please leave a comment below with a link to your site. Thanks for reading!

The Lovely Blockquote

I’ve been meaning to write this column for a while, which is to say I just thought of it and it interested me a lot more than the one I had planned. Sometimes that’s the same thing, or at least I can claim it is since this is my bloody column (insert still a column link and so on) and not even The Farmer can stop me from hitting that Publish button. I guess he could unpublish stuff though, but let’s cross that bridge when we get to it, shall we?
Blockquote. Why on Earth would I want to talk about blockquotes? Because quoting people is a lost art? Because most people don’t know how to properly quote someone, nor conduct an interview, and definitely not how to actually structure such an article?
Nah, all those things are interesting and all, but what’s interesting me more is how quotes are used on blogs in general and tech blogs in particular.

We’ve gotten a sort of niche, if you will, of sites that employ what I call the quote and comment principle. This is basically sites that pick something, anything they deem interesting really, from an article, another blog post, a quote from some douche on TV or whatever, and quote it and comment it. Sort of like this, a quote and comment post within a blockquote, just to make it a little bit meta:
Batman Light Up For Debate
Police commissioner Gordon had this to say about the Batman signal:
We don’t know who he is or why he does what he does, but Batman is a great asset to this city. As long as madmen like the Joker are roaming our streets, someone in the department is bound to light that Batman light on our rooftop, and I sure ain’t gonna be the one to stop it!
The big question obviously is: How was the Batman light funded and why aren’t City Hall releasing the electrical bill for it? Tax payers should know these things.
The formula for a quote and comment post is simple:
  1. Write a title. Posts should have titles.
  2. Set up the quote with a snazzy introduction.
  3. Publish a fairly short and effective quote.
  4. Add your comment on the quote.
  5. Link to the quote somewhere in the post.
Pretty cheap content, that. All you need to do is read the feeds in your areas of interest, and pick the stuff that catches your eye. Then you comment on it.
The quote and comment principle has been made popular by such sites as Daring Fireball, which in turn has made it a really popular format among tech bloggers who wish their names were John Gruber.
Cheapo content, or a great way to offer opinion? I’ll let you be the judge of that, but I sure love the blockquote. After all, how many HTML tags have sparked a full on niche of blogging?
This Week’s Piece of WordPress Advice
Do you want to roll a link blog? Since you’re into cheap content I’m guessing you’re to cheap to support poor ol’ me. That’s why I’ll suggest you explore the possibilities of Post Formats, which has a Link post format that comes very much in handy for these sort of things. In fact, do familiarize yourself with Post Formats overall, because they are a pretty handy way of getting additional control over without having to fiddle with multiple categories or tags, nor have they the clunkiness of custom fields.

How to Set Up Limited Duration Memberships in WordPress

The WPMU DEV Membership plugin is a great tool for selling premium content of your WordPress site. However, there are times where limited duration memberships may be needed. So, what is a limited duration membership, and how can you set it up in WPMU DEV Membership?
A Limited Duration Membership is a membership option that allows for a customized payment plan. For example, a three-month subscription that bills once per month is a limited duration membership; a renewable one-year subscription is not a limited duration membership.
Membership has a lot of options, but in order to set up a limited duration membership, you will first need to work a little WordPress magic. To start with, you need to understand the types of Membership opens that come with the plugin. let’s have a look…
(These settings are found by going to “Subscription Plans” and selecting “edit” for the subscription plan which you want to make into a limited duration membership)

Mode can be switched between Finite, Indefinite, and Serial.
While Serial subscriptions allow you to set a reoccurring subscription, it doesn’t allow administrators to set a limited duration to expire. In other words, Membership either uses a finite non-repetitive payment scheme, a reoccurring subscription, or an indefinite scheme that involves one payment that allows permanent access.
A Limited Duration Membership falls outside of the scope of these three default options.
Here is a guide on how to set up your limited duration membership.

Step 1: Configure Membership

Because you will be creating a unique payment handling for limited duration memberships, you will need to reconfigure membership. As the installing user of the plugin, click Membership -> Options and go to the Advanced tab at the top. You will need to check the box that says ‘Show Membership Wizard.’

Step 2: Configure Dripped Content Site

Click Membership in the left hand menu to return to the front page.  There will be an option to set your site as a Dripped Content Site. Select this option. Now, in order to continue the installation process, you will need to click on Next Step.

Step 3: Configure your Subscription Options

This is where the process gets a little complicated. In order to set limited duration memberships, you must migrate each user through a series of different memberships. Create a dripped content style subscription feed. You do this by dragging and dropping the appropriate subscription types in the order you want the user to migrate through them.
This is the heart and soul of setting up a limited duration membership. The final subscription option in the scheme should be a finite closing subscription. The below image shows an example of how you work with your subscription plans in order to set up your dripped content styled subscription feed.

You will need to adjust each Membership level in order to set up the appropriate subscription plan.

When to Use Limited Duration Memberships

Now that you have a better idea of how to implement limited duration memberships, it is important to discuss why you would set up such an elaborate method of billing a subscription.

While standard subscription types offer a reasonable amount of flexibility, having the ability to run special offers outside of the standard subscription scheme can open many business opportunities. Here is a quick list of ways you might be able to take advantage of the content drip subscription method:
  • Setting up Limited-Time Offers
  • 3 month limited subscriptions with free month trial offers
  • 6 month limited subscriptions with free time trial offers
  • Free trials with automatic subscription renewals
There are many other ways that you can take advantage of the Membership plugin to enhance how your billing works.
There are other ways that Membership can aid your business. For example, if you require monthly billing transactions for tax purposes, a limited duration membership can help you keep a proper receipt tracking of your subscriptions.
While it does take a few extra steps to implement limited duration subscriptions, I like that Membership does have the functionality to do so, which opens a lot of doors for sites seeking new business opportunities and options.
Enjoy!

Tuesday, October 30, 2012

SuperCharging Your Image Galleries


WordPress SuperCharge Your NextGEN GalleryAt one time or another, we need to put a photo gallery on our WordPress website. There are numerous plugins that can accomplish this and I’ve tried a lot of them. However, very recently, I revisited one that I’ve tried before but never used because when I tried it years ago, we didn’t get along very well. I reacquainted myself with the NextGEN Gallery Plugin because of a new plugin that coordinates very well with it and now I’m a huge NextGEN Gallery proponent.
If you are unfamiliar with NextGEN Gallery, it is a plugin that allows you to place a gallery of images on a page or post fairly simply. You simply create a “gallery”, upload your selected images to it, and then use a shortcode in your page or post to display all the images nicely laid out and evenly spaced.
Whether you use NextGEN Gallery or another gallery plugin, or just simply manually place a group of images on your page or post, you probably want to provide your reader with the ability to view the photos larger on the screen. One method is to use a lightbox plugin to make the images fill the screen and the page/post dim in the background.

Not Another Lightbox Plugin!

Nope, this is not “just another lightbox plugin” – it’s unlike any of the others that I’ve seen. Even the team at NextGEN think so as they’ve written a post on their blog regarding it.

O.K. Enough Mystery. What Is It?

If you didn’t visit the NextGEN link above, then you’re still wondering what this is that I’m prattling on about. Well, it’s FooBox.
Funny name isn’t it? Well, the name may be funny, but this is a serious contender in the WordPress Lightbox plugin arena. To the best of my knowledge, FooBox is the only lightbox plugin that will resize the lightbox depending upon the device you are viewing the lightbox on. As you will see in the image below, whether it’s an iPhone, an iPad, a computer screen, an Android tablet, or whatever, the lightbox is resized to fit perfectly in the viewing area. With other lightbox plugins, the images are usually off center and chopped off.
Foobox Lightbox WordPress Plugin
On the FooBox website, you can view a demo of the responsive nature of the lightbox.

O.K But Why Would I Want Another Lightbox Plugin

Honestly, you probably don’t. But, once you use this, and realize the full potential of it, you will probably come to the same conclusion that I have. This will NOT be “another lightbox plugin” in my toolbox – it will be the ONLY lightbox plugin in my toolbox. Why? Two very important features make it my lightbox of choice now.

Responsive Image Resizing

FooBox WordPress Responsive Image Resizing
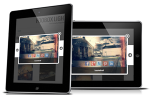
To date, I’ve not seen a single lightbox that can resize images depending upon the device you are using to view them. It allows all or selected images to respond to the device and orientation that your visitor uses to view your website. This was a huge benefit for one of my clients and I know it will be in more demand going forward.

Responsive Social Sharing Built In

WordPress FooBox Responsive Social Sharing Icons Built InIn today’s highly social internet environment, most websites depend upon sharing of images and video to bring additional traffic to their websites. In the spirit of, “you can never make it too easy for a customer to do business with you” FooBox makes it extremely easy for people to share your images with their friends and followers on the most popular platforms. The images appear on each photo and the visitor simply clicks the image to share it on that social network. What could be easier?

What Features Does FooBox Have?

FooBox boasts the following features:

WordPress Gallery Support

FooBox WordPress Gallery SupportBy simply clicking a checkbox, you can add FooBox to all galleries on your website.

Image Caption Support

FooBox WordPress Image Caption Lightbox SupportCheck a box and FooBox will pull the image caption information you’ve entered and display it very nicely in your slideshow.

NextGEN Gallery Integration

This allows you to use FooBox with both single images as well as galleries.
WordPress Custom CSS Class Support

Custom CSS Class Support

Got lots of heavy customization in your theme? No problem. With FooBox, you have lots of custom CSS class support to style this to match your theme.

OpenGraph Meta Data Integration

O.K. What exactly does that mean? You know those images that display on Facebook, LinkedIn, and other OpenGraph websites? Well, it means that those websites will now pull the proper images when things are shared on those websites.

Popular SEO Plugin Integration

FooBox WordPress SEO IntegrationBecause so many people use WordPress SEO by Yoast and All In One SEO Pack, support for these two plugins is built right in.

Auto Slideshow With Progress Bar

Got a lot of images in your gallery? Just enable the slideshow function and your visitors can sit back and relax while the images advance automatically.

Keyboard Navigation Support

Personally, I hate having to move my hand to my mouse unless I absolutely have to. So, anytime I can navigate with my keyboard I have a much better user experience. FooBox supports the ability to navigate through a slideshow using your keyboard.

All Images Option

This is the Ronco method…just “set it and forget it” and all images on your website will use FooBox when clicked.

Arrow Navigation Icon Selection

WordPress FooBox Plugin Arrow Icon Options
Choose from several navigation arrows in you FooBox. Plus, the arrows are responsive as well, so they resize according to the viewing device.

Color Scheme Selection

WordPress FooBox Plugin Lightbox Color Scheme Options
You can choose a color scheme for the border around your FooBox that works with your theme.

Fit To Screen Option

Sometimes, your images just aren’t big enough to match other images on your website or in your galleries. By choosing this option, you can force all your images to fill your screen for a more consistent sizing of images.

Show Or Hide Scrollbars

Clean up your viewing area by choosing to hide the scrollbars of long pages/posts when the FooBox is activated.

Show Or Hide Navigation Buttons

Don’t want to clutter up your FooBox with navigation buttons? Sure, just choose to hide them and your viewer will simply click the image or use the keyboard to navigate.

Custom Error Message Or Image

WordPress Custom Missing Image ErrorIf for some reason an image goes missing, you can choose a custom message or image to show in it’s place. Much better than that silly empty placeholder that we so often see.

Show Or Hide FooBox Affiliate Link

Want to make some money with FooBox? Just check the box to show the affiliate link and anyone that buys through that link will generate an affiliate commission for you. Don’t care about that? Just uncheck it.
WordPress FooBox Image Counter

Show Or Hide Image Counter

If you don’t want your visitor to know how many images are in your slideshow, simply choose to hide the image counter. If you want them to know, then you can choose to show the image counter.

Custom Counter Message

No more boring counter messages. If your slideshow is a series of funny political cartoons, you could make the image counter show something like “Political funny 7 of 14″ as an example. You can make the message anything that you feel is appropriate for your website.
WordPress Social Networks

Enable Or Disable All Social Icons

The social icons feature is one of the things that really first attracted me to FooBox, and it’s extremely useful. But, there may be occasions where you don’t want them to show up. If so, simply choose to turn them off and they’re gone.

Social Icons Positioning Options

You’re not locked into a single position for these social icons. You can choose from Top or Bottom as well as Left, Right, or Center.

Select Specific Social Networks

Don’t care about people posting your images on Pinterest? Fine, simply deselect Pinterest and that is no longer an option in the Social Sharing icons. You get to choose which social networks you want to make it easy to share your images on.

Advanced Settings Tab

When you become an experienced FooBox user (I’m not there yet), you can fully control and manipulate the Lightbox functionality with your own custom scripts. I don’t know of any custom scripts.

Do I Have To Use This With A Gallery Plugin?

Not at all. FooBox works independently as a lightbox plugin OR in conjunction with a gallery plugin. Put a gallery of photos – or a single photo – on your website and FooBox will take care of the rest. But, if you use NextGEN Gallery or some other gallery, then this just takes that plugin to a whole new level.

O.K. I Want It. How Do I Get It?

While this is a premium plugin, I think you will find the $17 starting price for a single WordPress website to be very affordable. If you’d like unlimited WordPress websites, then the $47 pricetag is even more affordable. I recently used this on a cabinet shop’s website and built over 40 different galleries using NextGEN Gallery and FooBox. From the start of the client’s website, they kept telling me that they were different from other cabinet shops so their website should be different. FooBox helped me achieve the “different” that they were looking for.
If you are using FooBox, I’d love to hear how you are using it. If you’ve not seen it yet, be sure to check it out and then leave your comments here with what you think of it.

Download Links

NextGEN Gallery
FooBox

Photo Credit

FooBox images courtesy of FooBox
Eadey via photopin cc
geirarne via photopin cc
greyweed via photopin cc
See-ming Lee 李思明 SML via photopin cc

Sunday, October 28, 2012

Learn How to Troubleshoot White Screen Errors in WordPress

White screen errors, or the phenomenon where WordPress ceases to function and outputs only a white screen, can result in some folks doing do-or-die measures to fix it.

What Causes the White Screen Error?

The most frustrating element of the White Screen Error is that there is no error messages at all, just a blank screen. Imagine for a moment going from this…

To this…

Not a pretty picture, right?

So, how does one diagnose a white, blank page?

Here is a brief list of possible causes. I’ll go into the solutions after.
  • Memory Limit in PHP reached
  • Bugged Theme*
  • Plugin Memory Exceeded
  • Cache Exceeded
*Bugged Themes may trigger PHP errors or show as the classic White Screen of Death.

Solution – Memory Limit in PHP Reached

With a little server know-how, this is easily fixed. By upping the memory limit to 256 or 512 MB, any memory limit errors should be resolved. If they aren’t, the problem is likely Plugin Memory Exceeded.

Solution—Bugged Theme

Delete the theme’s folder after saving a back-up copy. WordPress should revert to a default theme when it encounters a 404 error, thus resolving the White Screen of Death.

Solution—Plugin Memory Exceeded

This means that a plugin has a serious bug. Make a backup folder of all plugins and delete the plugin files. See if WordPress fixes. If so, add back each plugin one at a time until the problematic plugin has been identified.

Solution—Cache Exceeded

If you are getting White Screens of Death on long posts only, clear your WordPress cache. This will often correct the error.