The Silverlight TextBox does have a Watermark property, but Microsoft says “Do not use in a Silverlight 4 application” HERE. So I looked into making one myself and it didn’t take much to do it.
I just wanted the text box below to show the text “Search” in a grayed out way.
To do this it is just setting the forground color.
I also wanted to reset the text to the normal color and to clear the text box when the user gave it focus. Simple enough. If you notice above, the GotFocus event is wired up to the following method:
In one of our ASP.Net application we wanted to change where the AppSettings were stored from a config file to a database table. Since this is a very large application (over 670 .cs files), the first requirement was that the majority of the changes needed to be done with a search and replace. In the end the change looked like this: System.Configuration.ConfigurationSettings.AppSettings["AppVersion"]
Would be replaced by: cApp.AppSettings["AppVersion"];
BACKGROUND
We had app settings in web.config and the environment specific settings were in an WebEnvironment.config file that was referenced by the web.config file. So our appSettings section in our web.config looked like:
<appSettings file="WebEnvironment.config">
<add key="AppVersion" value="13.9"/>
…
</appSettings>
The problem with this is that we have to do a release to change one of the settings. Whenever we were changing a setting in the WebEnvironment.config we had to give the deployment team a different file for each environment and have them rename the correct file depending on where they were deploying to. So they had a WebEnvironment.configTEST, WebEnvironment.configQA, WebEnvironment.configPROD and WebEnvironment.configDR, this is a little awkward and prone to errors.
We also liked the fact that if the app settings lived in a table then we could give ourselves a maintenance page where we could change the values without doing a deployment.
TABLE
First I needed the table to hold the app setting. This was simple enough:
create table dbo.Config
(Environment varchar(4),
[Key] varchar(255),
Value varchar(8000),
Comment varchar(255),
LastUpdated datetime default getdate())
go
STORED PROC
Second a stored proc to retrieve the values depending on the environment. So this is:
create proc dbo.GetConfig(@Environment varchar(4))
as
begin
select [key], value
from AppConfig with(nolock)
where environment = @Environment
union all
select [key], value
from AppConfig with(nolock)
where environment = 'All'
and [key] not in
(select env.[key]
from AppConfig env with(nolock)
where env.environment = @Environment
)
order by [key]
end
go
SAMPLE DATA
Now insert some sample data:
insert into Config
(Environment, [Key], Value, Comment)
values ('Dev','AppVersion','13.9', 'Version of the application')
CONFIG CLASS
Now I need my new class that will hold the data, this will only load once.
using System.Data;
using System.Collections.Generic;
public class cConfig
{
public Dictionary<string, string> AppSettings = new Dictionary<string,string>();
public cConfig(string environment)
{
// the cApp.DAL is our data access layer and this just calls the stored proc and returns a table.
foreach (DataRow dr in cApp.DAL.CommonData.GetConfig(environment).Rows)
{
AppSettings.Add(dr["Key"].ToString(), dr["Value"].ToString());
}
}
}
CLASS VARIABLE
Now we make the data available globally within the application and define it in such a way that it only insantiates the cConfig object once in a tread safe way.
using System;
using System.Collections.Generic;
using System.Configuration;
public sealed class cApp
{
// This is the only time System.Configuration.ConfigurationManager.AppSettings is called.
// The appSetting ApplicationEnv is in machine.config and will be one of the values “Dev”, “Test”, “QA”, “Prod” or “DR”
static readonly cConfig _config = new cConfig(System.Configuration.ConfigurationManager.AppSettings["ApplicationEnv"]));
public static Dictionary<string, string> AppSettings
{
get {
return _config.AppSettings;
}
}
....
Now I can use this anywhere in my code by using the following:
cApp.AppSettings["MySetting"];
Ok, this is not new. The thing is that removing whitespace is a very tricky discipline that is different from site to site. At least that was what I thought until very recently.
For some unexplained reason I started working on a little simple method to remove whitespace in a way so it works on all websites without breaking any HTML. Maybe not unexplained since I’ve written about it so many times that it would seem I got a secret obsession.
Obsession or not, here is the code I ended up with after a few hours of hacking. Just copy the code onto your base page or master page and watch the magic.
privatestaticreadonly Regex REGEX_BETWEEN_TAGS = new Regex(@">\s+<", RegexOptions.Compiled);
privatestaticreadonly Regex REGEX_LINE_BREAKS = new Regex(@"\n\s+", RegexOptions.Compiled);
/// <summary> /// Initializes the <see cref="T:System.Web.UI.HtmlTextWriter"></see> object and calls on the child /// controls of the <see cref="T:System.Web.UI.Page"></see> to render. /// </summary> /// <param name="writer">The <see cref="T:System.Web.UI.HtmlTextWriter"></see> that receives the page content.</param> protectedoverridevoid Render(HtmlTextWriter writer)
{
using (HtmlTextWriter htmlwriter = new HtmlTextWriter(new System.IO.StringWriter()))
{
base.Render(htmlwriter);
string html = htmlwriter.InnerWriter.ToString();
html = REGEX_BETWEEN_TAGS.Replace(html, "> <");
html = REGEX_LINE_BREAKS.Replace(html, string.Empty);
writer.Write(html.Trim());
}
}
Remember that whitespace removal speeds up rendering in especially IE and reduces the overall weight of your page.
body = Regex.Replace(body, @"[\n\r]+\s*", string.Empty);
body = Regex.Replace(body, @"\s+", " ");
body = Regex.Replace(body, @"\s?([:,;{}])\s?", "$1");
body = body.Replace(";}", "}");
body = Regex.Replace(body, @"([\s:]0)(px|pt|%|em)", "$1");
// Remove comments from CSS
body = Regex.Replace(body, @"/\*[\d\D]*?\*/", string.Empty);
return body;
}
The method takes a string of CSS and returns a minified version of it. The method have been modified for demo purposes, so you might want to optimize the code yourself.
By taking advantage of these few tricks we can increase the performance of any new or existing website without changing anything but the web.config file.
The following XML snippets must be placed in the section of the web.config.
HTTP compression
You’ve always been able to perform HTTP compression in ASP.NET by using third-party libraries or own custom built ones. With IIS 7 you can now throw that away and utilize the build-in compression available from the web.config. Add the following line to enable HTTP compression:
By default, only text based content types are compressed.
doDynamicCompression
Setting this attribute to true enables compression of dynamically generated content such as pages, views, handlers. There really aren’t any reasons not to enable this.
doStaticCompression
This attribute allows you to decide whether or not you want static files such as stylesheets and script files to be compressed. Images and other non-text content types will not be compressed by default. This is also something you want to enable.
dynamicCompressionBeforeCache
If you do output caching from within your ASP.NET website, you can tell IIS 7 to compress the output before putting it into cache. Only if you do some custom output caching you might run into issues with setting this to true. Try it and test it. If your website works with this enabled, then you definitely want to keep it enabled.
Tip
By default, only text based content types are compressed. That means if you send application/x-javascript as content type, you should change it to text/javascript. If you use some custom modules in your website, then you might experience conflicts with the IIS 7 compression feature.
To speed up the load time for the visitors, it is crucial that everything that can be cached by the browser IS cached by the browser. That includes static files such as images, stylesheets and script files. By letting the browser cache all these files means it doesn’t need to request them again for the duration of the cache period. That saves you and your visitors a lot of bandwidth and makes the page load faster. A well primed browser cache also triggers the load and DOMContentLoaded event sooner.
By adding this snippet to your web.config, all static files are cached in the browser for 1 year:
This setting sets the expiration date of the file one year in the future. It does that by setting an HTTP header that instruct the browser to add the file to its internal cache. If you hit F5 or ctrl-F5, the browser will request the files no matter what the expiration is set to.
A major problem with client-side caching is if your static files change before the cache expires. Then the visitor with the old version in the cache won’t see the new file until she clears the browser cache or hit F5. Therefore, this setting must be used with caution and probably with a shorter expiration time. In part 2 of this series I’ll address this problem and provide a simple solution to it.
Tip
Make sure that user sensitive information isn't cached on the browser. It will then be available by anyone else using the same browser.
==============================================================
In this part we will focus on handling browser caching issues and optimize the number of JavaScript and CSS files loaded from an ASP.NET website. NB! All the code (a single .cs file of 125 lines) is included in the zip file at the bottom of this post.
Browser caching
In part 1, we looked at how it was possible to set an expiration header to any static file such as JavaScript and CSS files, so the browser would cache them for a long time and thereby optimize both for bandwidth and the number of requested files going from server to browser.
The problem with setting a browser cache expiration date of i.e. a JavaScript file to a year in the future becomes clear when you change the file before it expires in your visitor’s browsers. They simply won’t see the changes until they either clear their cache or hits F5 manually.
Adding the version number
The only viable way to maintain a far-in-the-future expiration date is to change the URL of the file when the file changes. So instead of including script files like so:
…we really want to get a version number included in the src attribute, like so:
The problem with this is that ASP.NET doesn’t have any feature that will inject a version number, so we have to create that our selves. It is very simple to do so by looking at when the file was last changed and then retrieve the ticks from that date. In the zip file below you’ll find a method that does exactly that and it can be used like so:
The BundleHelper.InsertFile method is one you want to use for Stylesheets as well, like so:
" type="text/css" />
Ok, now all our JavaScript and stylesheet references have the version number in the path. Next thing to look at is getting it working with the updated non-existing path.
The HTTP handler
To be able to serve the correct file even with the version number in the path, we need to register an HTTP handler in the web.config’s section like so:
The handler we just registered is called FileBundleHandler and knows how to filter out the version number to find the right file. It supports both .css and .js files. The handler also makes sure to both output cache and browser cache correctly. Just add the FileBundleHandler.cs file from the zip file to your website and you are up and running.
Now the browser cache issue has been resolved by adding a version number to the path of the included file and by adding an HTTP handler that knows how to remove it again when serving the file.
Bundle multiple files
Another common website performance issue is that there are many JavaScript and CSS files included on a page. This scenario results in the browser have to download a lot of extra files and that all slows down the performance of a website. The solution to this is also very simple when you’ve first completed the above steps to register the HTTP handler in web.config and called the BundleHelper.InsertFile method when inserting JavaScript and CSS files.
The folder structure convention
There are many ways of bundling files into a single request, like Justin Etheredge’s Squisher. For this example I have chosen a convention based approach because that doesn’t require any code to implement.
Any given ASP.NET website might have a folder structure similar to this:
The folder convention supported in the FileBundleHandler lets you reference a folder instead of just a file. Both the HTTP handler and the BundleHelper.InsertFile understand when a folder is referenced and automatically bundles all the .js or .css files to a single response. So in order to bundle all the files in a given folder, simply reference the folder name and add the extension of the types of files you want bundled. Having the folder structure above, you can add a bundle like so:
Notice that the file /scripts/common.js doesn’t exist, but the folder /scripts/common does. By adding .js at the end, we tell the HTTP handler to look for all files with the same file extension – in this case .js files. It bundles all the files in alphabetical order and serve the as a single response. For security reasons, the HTTP handler will only serve .css and .js extensions.
Minification
Since we are now running all JavaScript and stylesheet files in bundles and through the HTTP handler, it makes sense to also look at the content of the files to optimize even further.
For this example I’m using the Microsoft Ajax Minifier (MAM), which is a single .dll file capable of minifying both JavaScript and stylesheets. The MAM is my favorite JavaScript minifier since it not only removes whitespace, it also rewrites variable and function names and a lot of other things as well. For me it has proven a better choice than the YUI Compressor and Google Closure Compiler. The stylesheet minifier feature of MAM also looks very nice, but I have honestly never used it before except for this example.
Basically what MAM does is that it optimizes and removes unwanted whitespace from both JavaScript and stylesheets. The HTTP handler makes use of MAM for both single files and bundled ones, so you get full benefit no matter your scenario.
Summary
No matter if you use the website model, the web application model or ASP.NET MVC you are now able to utilize the browser cache to the fullest. Furthermore, by bundling your files using the folder convention you can minimize the number of requests sent by the browser. Both JavaScript and stylesheet files are also minified and optimized for even smaller file sizes sent over the wire.
It's worth noticing that the output caching respects file changes and therefore refreshes evertime changes are made to the JavaScript and CSS files tunnelled through this code.
Following the techniques in part 1 combined with this example will improve any website’s server-to-browser performance substantially.
Implementation
Download the zip file below and place the AjaxMin.dll in your bin folder.
Then place the FileBundleHandler.cs in your App_Code folder if you use the website model – otherwise place it where ever it makes sense in your structure.
Now register the HTTP handler in your web.config under the section like so:
The last thing you need is to start using the BundleHelper.InsertFile method on your pages for both JavaScript and stylesheets like so:
The http-equiv attribute is used by servers to gather information about a page using the HTTP header. The meta tag’s http-equiv attribute set is similar to a http header. The attribute lets you to send additional information to the browser in the http header. I rarely use any http-equiv meta elements other than content-type, and had never really thought about them for any purpose other than caching, So, as I looked deeper into the possible values, I thought I would “share”. There isn’t as much depth to this post as my usual endeavors, but hopefully this will make a good resource to bookmark.
Structure of Meta Element
The structure of the meta element is: http-equiv="value" content="value" />
Do not include the name attribute in the meta when the http-equiv attribute is included. Do include the content attribute. Below are the various values for the http-equiv attribute:
Values for http-equiv
content-type” content=”type; charset=charset” />
http-equiv=”content-type” indicates the type of data sent to the browser, enabling the browsers to know what to do with data received. The element, in all its forms, are optional. Content-type is the one you really don’t want to omit. For English sites use . There are many other possible values for content, such as for Japanese sites.
expires” content=”date” />
The date indicates the date and time that the document is set to expire. When the date is reached, the document will be reloaded even if the document is stored in the cache. This element is used to disable caching of the document: simply put a date that has passed in the date, and this will cause the browser to fetch new files. Put a date far into the future if you want the page to be cached. Note that IE6 will fetch the content of a users home page when a new browser window is opened, even if you set it to cache.
The name is the name of the cookie.The value is the value to be set for that named cookie. The date is the date and time when the cookie will be deleted from the the computer. The date is optional. If you don’t include an expiration date and time, the cookie will be deleted when you exit the browser. You can include more than one http-equiv=”set-cookie” if you need to set more than one cookie name/value pair.
content-encoding” content=”data encoding” />
Indicates the encoding of the returned data; usually the compression type. For g-zipped documents, use content-encoding” content=”gzip” />
allow” content=”methods” />
Supposedly you include methods supported by server, but I’ve never seen this in action.
date” content=”date” />
Include the date and time that the page was created.
last-modified” content=”date” />
The content is the date and time the page was last modified.
location” content=”n; url” />
refresh” content=”n;url=url” />
ex.
ex. n is the interval at which time the page should be refreshed: in our example, the page will refresh every 12 seconds. If included, url is the location the page will redirect to. Our second example would cause the page to redirect to Community MX after 3 seconds. Please do NOT use this method to redirect to a new URL. It is not accessible.
window-target” content=”location” />
The http-equiv=”window-target” specifies the “named window” of the current page. The main use is to prevent a page from appearing inside another framed page: . Usually this means that the Web browser will force the page to go the top frameset.
www-authenticate” content=”" />
http-equiv=”www-authenticate” is one method of providing basic access authentication, but providing such authentication in such a visible manner is not recommended for security reasons.
pics-label” content=’labellist‘ />
The Platform for Internet Content Selection (PICS) is a standard for labeling online content: basically online content rating. To generate the labelist, visit safesurf or another labellist generator. Note that the content attribute uses single quotes, because the PICS label syntax uses double quotes.
pragma” content=”option” />
cache-control” content=”option” />
You can use the http-equiv=”expires” with a past date to ensure that the browser retrieves fresh files from the server (rather than caching). Since not all client browsers and caching devices (e.g. proxy servers) are known to successfully implement all no-caching options, include multiple no-caching options, including:
content-language” content=”language-Country” />
Enables language specification, enabling search engines to accurately categorize the document into language and country. The language is the main language code, and the country is the country where the dialect of the language is more specific, such as en-US versus en-GB, US English versus English spoken in Great Britain. content-language” content=”de-AU” /> would be German as is spoken in Austria.
content-script-type” content=”language“>
The default script language for the script element is javascript. If you aren’t using JavaScript as your default, declare informs the browser which type of scripting language you are using by default: is this case, Visual Basic.
Page-enter and page-exit are Microsoft proprietary transitions that only work in Internet Explorer. The seconds is how long the transition should take, and num is an integer between 0 and 23, correlated with a specific type of transition (23 is random).. There are 23 transitions, from 0 – 22. A transition with value of 23 is allows Internet Explorer to randomly select from the 23 available transitions. page-enter” content=”blendTrans(duration=sec)” /> is another value.
imagetoolbar” content=”no”>
Another IE specific (which means you shouldn’t use it) http-equiv value is “imagetoolbar”. In some versions of Internet Explorer, when an image is hovered, an image toolbar appears. enables the disabling of the image toolbar.
Notes:
The following characters appearing within the content must be escaped using SGML entities:
Magento is a bit complex. Sometime it takes so much time to find the
existing model on Magento to retrieve data with complex query. So you
will think about how to run SQL anywhere you want. Please check the
below code to find the solution
$result= $db->query("SELECT `entity_id` FROM `{$table_prefix}catalog_product_entity`");
if(!$result) {
returnfalse;
}
while($row= $result->fetch(PDO::FETCH_ASSOC)) {
print_r($row); // process the row data here
}
Reference: at class Zend_Db
Controls how the next row will be returned
to the caller. This value must be one of the PDO::FETCH_* constants,
defaulting to value of PDO::ATTR_DEFAULT_FETCH_MODE (which defaults to
PDO::FETCH_BOTH).
PDO::FETCH_ASSOC: returns an array indexed by column name as returned in your result set
PDO::FETCH_BOTH (default): returns an array indexed by both column
name and 0-indexed column number as returned in your result set
PDO::FETCH_BOUND: returns TRUE and assigns the values of the columns
in your result set to the PHP variables to which they were bound with
the PDOStatement::bindColumn() method
PDO::FETCH_CLASS: returns a new instance of the requested class,
mapping the columns of the result set to named properties in the class.
If fetch_style includes PDO::FETCH_CLASSTYPE (e.g. PDO::FETCH_CLASS |
PDO::FETCH_CLASSTYPE) then the name of the class is determined from a
value of the first column.
PDO::FETCH_INTO: updates an existing instance of the requested
class, mapping the columns of the result set to named properties in the
class
PDO::FETCH_LAZY: combines PDO::FETCH_BOTH and PDO::FETCH_OBJ, creating the object variable names as they are accessed
PDO::FETCH_NUM: returns an array indexed by column number as returned in your result set, starting at column 0
PDO::FETCH_OBJ: returns an anonymous object with property names that correspond to the column names returned in your result set
After
analyzing CSS and its weaknesses, and management giving a green light
to the refactoring project, it’s time to get to work. A team needs to
agree on the internal code standards and best practices, plan out the
refactoring strategy, and outline individual tasks. We need to set up a
visual regression testing suite, and a maintenance plan to enforce the
new standards and best practices in the future.
Maintaining, extending,
and working with the low-quality codebase is difficult and often
requires additional time and resources. Before bringing up the
refactoring proposal to the management and stakeholders, it can be
useful to back up the suggestion with some hard data about the codebase health — not only to convince the management department, but also have a measurable goal for the refactoring process.
Let’s assume that management has approved the CSS refactoring
project. The development team has analyzed and pinpointed the weaknesses
in the CSS codebase and has set target goals for the refactor (file
size, specificity, color definitions, and so on). In this article, we’ll
take a deep dive into the refactoring process itself, and cover
incremental refactoring strategy, visual regression testing, and
maintaining the refactored codebase.'
Preparation And Planning
Before starting the refactoring process, the team needs to go over the codebase issues and CSS health audit data
(CSS file size, selector complexity, duplicated properties, and
declarations, etc.) and discuss individual issues about how to approach
them and what challenges to expect. These issues and challenges are
specific to the codebase and can make the refactoring process or testing
difficult. As concluded it’s important to establish internal rules and codebase standards and
keep them documented to make sure that the team is on the same page and
has a more unified and standardized approach to refactoring.
The team also needs to outline the individual refactoring tasks and
set the deadlines for completing the refactoring project, taking into
account current tasks and making sure that refactoring project doesn’t
prevent the team from addressing urgent tasks or working on planned
features. Before estimating the time duration and workload of the
refactoring project, the team needs to consult with the management about
the short-term plans and adjust their estimates and workload based on
the planned features and regular maintenance procedures.
Unlike regular features and bug fixes, the refactoring process yields
little to no visible and measurable changes on the front end, and
management cannot keep track of the progress on their own. It’s
important to establish transparent communication to
keep the management and other project stakeholders updated on the
refactoring progress and results. Online collaborative workspace tools
like Miro or MURAL
can also be used for effective communication and collaboration between
the team members and management, as well as a quick and simple task
management tool.
Christoph Reinartz pointed out the importance of transparency and clear communication while the team at trivago was working on the CSS refactoring project.
“Communication and clearly making the progress and any
upcoming issues visible to the whole company were our only weapon. We
decided to build up a very simple Kanban board, established a project
stand-up and a project Slack channel, and kept management and the
company up-to-date via our internal social cast network.”
The most crucial element of planning the refactoring process is to
keep the CSS refactoring task scope as small as possible. This makes the
tasks more manageable, and easier to test and integrate.
Harry Roberts refers to these tasks as “refactoring tunnels”.
For example, refactoring the entire codebase to follow the BEM
methodology all at once can yield a massive improvement to the codebase
and the development process. This might seem like a simple
search-and-replace task at first. However, this task affects all
elements on every page (high scope) and the team cannot “see the light
at the end of the tunnel” right away; a lot of things can break in the
process and unexpected issues can slow down the progress and no one can tell when the task is going to be finished.
The team can spend days or weeks working on it and risk hitting a wall,
accumulate additional technical debt, or making the codebase even less
healthy. The team ends up either giving up on the task of starting over,
wasting time and resources in the process.
By contrast, improving just the navigation component CSS is a smaller
scope task and is much more manageable and doable. It is also easier to
test and verify. This task can be done in a few days. Even with
potential issues and challenges that slow down the task, there is a high
chance of success. The team can always “see the end of the tunnel”
while they’re working on the task because they know the task will be
completed once the component has been refactored and all issues related
to the component have been fixed.
Finally, the team needs to agree on the refactoring strategy and
regression testing method. This is where the refactoring process gets
challenging — refactoring should be as streamlined as possible and
shouldn’t introduce any regressions or bugs.
Let’s dive into one of the most effective CSS refactoring strategies and see how we can use it to improve the codebase quickly and effectively.
Refactoring is a challenging process that is much more complex than
simply deleting the legacy code and replacing it with the refactored
code. There is also the matter of integrating the refactored codebase
with the legacy codebase and avoiding regressions, accidental code
deletions, preventing stylesheet conflicts, etc. To avoid these issues, I
would recommend using an incremental (or granular) refactoring
strategy.
In my opinion, this is one of the safest, most logical, and most
recommended CSS refactoring strategies I’ve come across so far. Harry
Roberts has outlined this strategy in 2017. and it has been my personal go-to CSS refactoring strategy since I first heard about it.
Let’s go over this strategy step by step.
Step 1: Pick A Component And Develop It In Isolation #
This strategy relies on individual tasks having low scope, meaning
that we should refactor the project component by component. It’s
recommended to start with low-scope tasks (individual components) and
then move onto higher-scoped tasks (global styles).
Depending on the project structure and CSS selectors, individual
component styles consist of a combination of component (class) styles
and global (wide-ranging element) styles. Both component styles and
global styles can be the source of the codebase issues and might need to
be refactored.
Let’s take a look at the more common CSS codebase issues
which can affect a single component. Component (class) selectors might
be too complex, difficult to reuse, or can have high specificity and
enforce the specific markup or structure. Global (element) selectors
might be greedy and leak unwanted styles into multiple components which
need to be undone with high-specificity component selectors.
Starting state of the CSS and HTML codebase that we want to
refactor. Card component markup consists of multiple HTML elements. Card
component styles consist of a combination of class selector styles and
global element selector styles. (Large preview)
After choosing a component to refactor (a lower-scoped task), we need
to develop it in an isolated environment away from the legacy code, its
weaknesses, and conflicting selectors. This is also a good opportunity
to improve the HTML markup, remove unnecessary nestings, use better CSS
class names, use ARIA attributes, etc.
You don’t have to go out of your way to set up a whole build system for this, you can even use CodePen
to rebuild the individual components. To avoid conflicts with the
legacy class names and to separate the refactored code from the legacy
code more clearly, we’ll use an rf- prefix on CSS class name selectors.
Building refactored Card component CSS and Markup in isolation. (Large preview)
Step 2: Merge With The Legacy Codebase And Fix Bugs #
Once we’ve finished rebuilding the component in an isolated
environment, we need to replace the legacy HTML markup with refactored
markup (new HTML structure, class names, attributes, etc.) and add the
refactored component CSS alongside the legacy CSS.
We don’t want to act too hastily and remove legacy styles right away.
By making too many changes simultaneously, we’ll lose track of the
issues that might happen due to the conflicting codebases and multiple
changes. For now, let’s replace the markup and add refactored CSS to the
existing codebase and see what happens. Keep in mind that refactored
CSS should have the .rf- prefix in their class names to prevent conflicts with the legacy codebase.
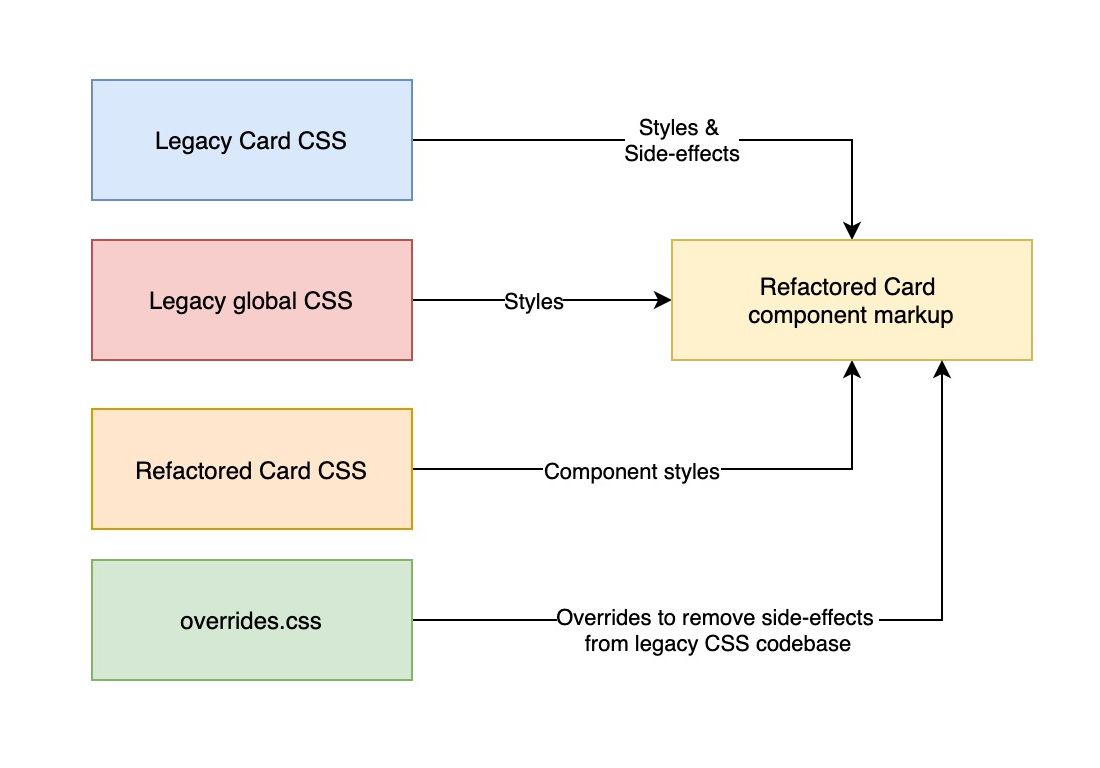
Replacing the legacy Card markup with refactored markup and adding
refactored Card CSS alongside legacy styles. Legacy component and
global styles apply unwanted side-effects due to the wide-reaching
global or element selectors. (Large preview)
Legacy component CSS and global styles can cause unexpected
side-effects and leak unwanted styles into the refactored component.
Refactored codebase might be missing the faulty CSS which was required
to undo these side-effects. Due to those styles having a wider reach and
possibly affecting other components, we cannot simply edit the
problematic code directly. We need to use a different approach to tackle
these conflicts.
We need to create a separate CSS file, which we can name overrides.css or defend.css which will contain hacky, high-specificity code that combats the unwanted leaked styles from the legacy codebase.
overrides.css which will contain high-specificity
selectors which make sure that the refactored codebase works with the
legacy codebase. This is only a temporary file and it will be removed
once the legacy code is deleted. For now, add the high-specificity style
overrides to unset the styles applied by legacy styles and test if
everything is working as expected.
We are adding overrides.css to combat the unwanted side-effects. This file contains high-specificity code that overrides the legacy styles. (Large preview)
If you notice any issues, check if the refactored component is
missing any styles by going back to the isolated environment or if any
other styles are leaking into the component and need to be overridden.
If the component looks and works as expected after adding these
overrides, remove the legacy code for the refactored component and check
if any issues happen. Remove related hacky code from overrides.css and test again.
Legacy Card component styles can now be safely removed, alongside with (some) styles from overrrides.css
which helped combat the side-effects from those selectors. However,
global CSS selectors may still apply unwanted side-effects so we cannot
completely remove this file until we’ve refactored global styles also. (Large preview)
Depending on the case, you probably won’t be able to remove every
override right away. For example, if the issue lies within a global
element selector which leaks styles into other components that also need
to be refactored. For those cases, we won’t risk expanding the scope of
the task and the pull request but rather wait until all components have been refactored and tackle the high-scope tasks after we’ve removed the same style dependency from all other components.
In a way, you can treat the overrides.css file as your
makeshift TODO list for refactoring greedy and wide-reaching element
selectors. You should also consider updating the task board to include
the newly uncovered issues. Make sure to add useful comments in the overrides.css
file so other team members are on the same page and instantly know why
the override has been applied and in response to which selector.
/* overrides.css *//* Resets dimensions enforced by ".sidebar > div" in "sidebar.css" */.sidebar > .card{min-width: 0;}/* Resets font size enforced by ".hero-container" in "hero.css"*/.card{font-size: 18px;}
Once the refactored component has been successfully integrated with
the legacy codebase, create a Pull Request and run an automated visual
regression test to catch any issues that might have gone unnoticed and
fix them before merging them into one of the main git branches. Visual
regression testing can be treated as the last line of defense before
merging the individual pull requests. We’ll cover visual regression
testing in more detail in one of the upcoming sections of this article.
Now rinse and repeat these three steps until the codebase has been refactored and overrides.css is empty and can be safely removed.
Let’s assume that we have refactored all individual low-scoped components and all that is left in the overrides.css
file are related to global wide-reaching element selectors. This is a
very realistic case, speaking from the experience, as many CSS issues
are caused by wide-reaching element selectors leaking styles into
multiple components.
By tackling the individual components first and shielding them from the global CSS side-effects using overrides.css
file, we’ve made these higher-scoped tasks much more manageable and
less risky to do. We can move onto refactoring global CSS styles more
safely than before and remove duplicated styles from the individual
components and replacing them with general element styles and utilities —
buttons, links, images, containers, inputs, grids, and so on. By doing
so, we’re going to incrementally remove the code from our makeshift TODO
overrides.css file and duplicated code repeated in multiple components.
Let’s apply the same three steps of the incremental refactoring
strategy, starting by developing and testing the styles in isolation.
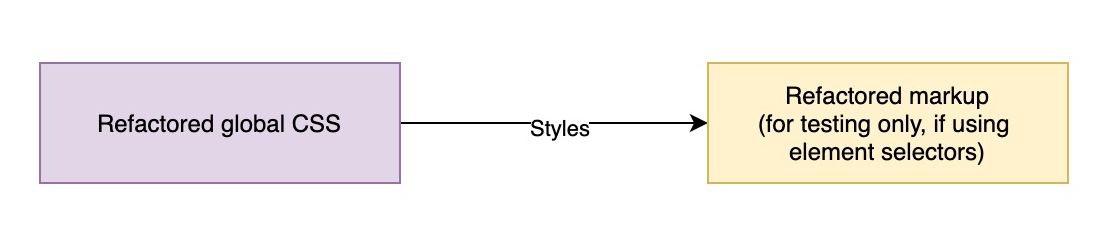
Refactoring global styles in isolation. If these global styles are
using element selectors without any special markup or class name
applied, then markup won’t change and only the refactored CSS needs to
be moved to the codebase. (Large preview)
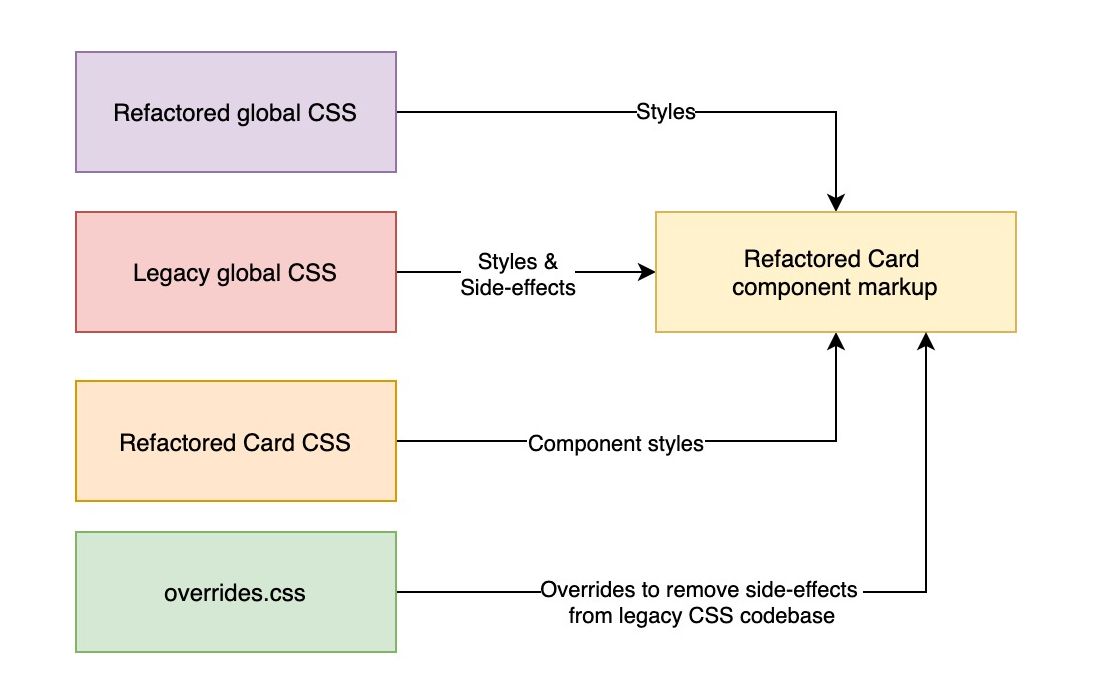
Next, we need to add the refactored global styles to the codebase. We
might encounter the same issues when merging the two codebases and we
can add the necessary overrides in the overrides.css.
However, this time, we can expect that as we are gradually removing
legacy styles, we will also be able to gradually remove overrides that
we’ve introduced to combat those unwanted side-effects.
The downside of developing components in isolation
can be found in element styles that are shared between multiple
components — style guide elements like buttons, inputs, headings, and so
on. When developing these in isolation from the legacy codebase, we
don’t have access to the legacy style guide. Additionally, we don’t want
to create those dependencies between the legacy codebase and refactored
codebase.
That is why it’s easier to remove the duplicated code blocks and move
these styles into separate, more general style guide components and
selectors later on. It allows us to address these changes right at the
end and with the lower risk as we are working with a much healthier and
consistent codebase, instead of the messy, inconsistent, and buggy
legacy codebase. Of course, any unintended side-effects and bugs can
still happen and these should be caught with the visual regression
testing tools which we’ll cover in one of the following sections of the
article.
Merging the refactored global CSS with the codebase and updating overrides.css to remove unwanted side-effects of the legacy codebase. (Large preview)
When the codebase has been completely refactored and we’ve removed all makeshift TODO items from the overrides.css file, we can safely remove it and we are left with the refactored and improved CSS codebase.
Removing legacy global styles and overrides.css once the codebase has been completely refactored. (Large preview)
Let’s use the incremental refactoring strategy to refactor a simple
page that consists of a title element and two card components in a grid
component. Each card element consists of an image, title, subtitle,
description, and a button and is placed in a 2-column grid with
horizontal and vertical spacing.
The .card
component also uses high specificity selectors which enforces a
specific HTML structure and allows styles to leak into other elements
inside the card components.
/* Element needs to follow this specific HTML structure to have these styles applied */.card h2 > small{/* ... */}/* These styles will leak into all div elements in a card component */.card div{padding: 2em 1.5em 1em;}/* These styles will leak into all p elements in a card component */.card p{font-size: 0.9em;margin-top: 0;}
We’ll
start with the lowest scoped and topmost children components, so let’s
refactor the card component which is the topmost child of the page, i.e.
the card component is a child of the grid component. We’ll develop the
card component in isolation and use the agreed standards and best
practices.
We’ll use BEM to replace the greedy wide-reaching selectors with
simple class selectors and use CSS custom properties to replace the
inconsistent, hard-coded inline color values. We’ll also add some CSS to
help us develop the component, which we won’t copy to the existing
codebase.
We are using the rf- prefix for the new CSS classes so
we can avoid class name conflicts and differentiate the refactored
styles from legacy styles for better code organization and simpler
debugging. This will also allow us to keep track of the refactoring
progress.
We
are going to replace the legacy markup with the refactored markup, and
add the refactored styles to the CSS codebase. We are not going to
remove the legacy styles just yet. We need to check if any styles from
other legacy selectors have leaked into the refactored component.
Due to the issues with global wide-ranging selectors, we have some
unwanted style overrides leaking into the refactored component — title
font properties have been reset and font size inside the card component
has changed.
We need to add style overrides to overrides.css to remove the
unwanted side-effects from other selectors. We’re also going to comment
on each override so we know which selector has caused the issue.
We now know that we are going to have to refactor the .grid
component and global h1, h2 selector at some point. This is why we can
treat it as a TODO list - these leaked styles can cause issues in other
components, they are objectively faulty, and are applying styles that
are being reset in the majority of use-cases.
Let’s remove the legacy .card styles from the project and see if everything looks alright. We can check if we can remove any styles from overrides.css,
however, we know right away that none of the overrides are related to
legacy card component styles, but other components and element
selectors.
Now that the card component has been refactored, let’s check our
makeshift TODO list and see what to tackle next. We have a choice
between:
Refactor the grid component — lower scope (short tunnel),
Refactor global styles — higher scope (longer tunnel).
We’ll go with the lowest scope component, the grid component in this
case, and apply the same approach. We’ll start by developing the grid
component in isolation. We can use the card component markup for
testing, card component styles won’t affect the grid and won’t help us
develop the component, so we can leave them out of the isolated
component for a simpler CSS markup.
Let’s replace the grid HTML markup with the refactored markup and add
the refactored styles to the CSS codebase and check if we need to add
any styles to overrides.css to mitigate any stylesheet conflicts or leaked styles.
We can see that no new issues appeared, so we can proceed with removing the legacy .grid styles. Let’s also check if overrides.css contains any styles that are applied for the legacy .grid selector.
This
is why it’s useful to document the override rules. We can safely remove
this selector and move it onto the last item in our makeshift TODO list
— heading element selectors. We’re going to go through the same steps
again — we’ll create a refactored markup in isolation, replace the HTML
markup and add the refactored styles to the stylesheet.
.rf-title{font-family: Georgia,"Times New Roman", Times, serif;}.rf-title--size-regular{line-height: 1.3;font-size: 2.5em;}.rf-title--spacing-regular{margin-top: 0;margin-bottom: 0.75em;}
We’ll
check if there are any issues and confirm that no new issues were
introduced by the updated markup and stylesheet and we’ll remove the
legacy h1, h2 selector from the stylesheet. Finally, we’re going to check overrides.css and remove the styles related to the legacy element selector.
The overrides.css is now empty and we’ve refactored the
card, grid, and title components in our project. Our codebase is much
more healthier and consistent compared to the starting point — we can
add elements to the grid component and new title variations without
having to undo the leaked styles.
However, there are a few tweaks we can do to improve our codebase.
As we’ve developed the components in isolation, we’ve probably re-built
the same style guide components multiple times and created some
duplicated code. For example, a button is a style guide component and
we’ve scoped these styles to a card component.
/* Refactored button styles scoped to a component */.rf-card__link{color:var(--color-text-negative);background-color:var(--color-cta);padding: 1em;display: flex;justify-content: center;text-decoration: none;text-transform: uppercase;letter-spacing: 0.05em;font-weight: 600;}
If
any other component is using the same button styles, it means that
we’re going to write the same styles each time we develop them in
isolation. We can refactor these duplicates into a separate .button component and replace the duplicated scoped styles with general style guide styles. However, we already have a legacy .button selector which needs to be refactored, so we’re also able to remove the legacy button selector.
Even though we’re moving onto refactoring higher scoped elements, the
codebase is much healthier and consistent compared to the starting
point, so the risk is lower and the task is much more doable. We also
don’t have to worry that the changes in the topmost child components
will override any changes to the general selector.
We
can use the same incremental approach to the We’re going to rebuild the
button component in isolation, update the markup, and add the
refactored styles to the stylesheet. We’re going to do a quick check for
stylesheet conflicts and bugs, notice that nothing has changed, and
remove the legacy button markup and the component-scope button styles.
/* Before - button styles scoped to a card component */
<a class="rf-card__link" href="#">View gallery</a>

/* After - General styles from a button component */
<a class="rf-button rf-button--regular rf-button--cta" href="#">View gallery</a>
Once the refactoring project has been completed, we can use search-and-replace to clean up the rf-
prefixes in the codebase and treat the existing codebase as the new
standard. That way, extending the codebase won’t introduce naming
inconsistencies or force the rf- prefix naming that could cause issues for any future refactors.
Regardless of the refactor tasks’ scope size and how well the team
follows the incremental refactoring strategy steps, bugs and regressions
can happen. Ideally, We want to avoid introducing issues and
regressions in the codebase — conflicting styles, missing styles,
incorrect markup, leaked styles from other elements, etc.
Using automated visual regression testing tools like Percy or Chromatic on a Pull Request level can speed up testing, allow developers to address regressions quickly and early, and make sure that the bugs don’t end up on the live site.
These tools can take screenshots of individual pages and components and
compare changes in style and layout and notify developers of any visual
changes that can happen due to changes in the markup or CSS.
Since the CSS refactor process shouldn’t result in any visual changes
in usual cases and depending on the task and issues in the legacy
codebase, the visual regression testing process can potentially be
simple as checking if any visual changes happened at all and checking if
these changes were intentional or unintentional.
Visual regression test example in Chromatic.
Dimensions for this specific button variation have been unintentionally
changed when the button component has been refactored. This issue has
been caught when Pull Request has been created, so developers were able
to address this issue early.
Depending on the project, testing tools don’t need to be complex or sophisticated to be effective. While working on refactoring the Sundance Institute’s CSS codebase, the development team used a simple static style guide page generated by Jekyll to test the refactored components.
“One unintended consequence of executing the refactor in
abstraction on a Jekyll instance was that we could now publish it to
Github pages as a living style guide. This has become an invaluable resource for our dev team and for external vendors to reference.”
Once the CSS refactor tasks have been completed and the refactored
code is ready for production, the team can also consider doing an A/B test to check the effect of the refactored codebase on users.
For example, if the goal of the refactoring process was to reduce the
overall CSS file size, the A/B test can potentially yield significant
improvements for mobile users, and these results can also be beneficial
to project stakeholders and management. That’s exactly how the team at Trivago approached the deployment of their large-scale refactoring project.
“(…) we were able to release the technical migration as an
A/B Test. We tested the migration for one week, with positive results on
mobile devices where mobile-first paid out and accepted the migration
after only four weeks.”
Keeping Track Of Refactoring Progress
Kanban board, GitHub issues, GitHub project board, and standard
project management tools can do a great job of keeping track of the
refactoring progress. However, depending on the tools and how the
project is organized, it may be difficult to estimate the progress on a
per-page basis or do a quick check on which components need to be
refactored.
This is where our .rf-prefixed CSS classes come in. Harry Roberts has talked about the benefits of using the prefix in detail. The bottom line is — not only do these classes allow developers to clearly separate the refactored CSS codebase from the legacy codebase, but also to quickly show the progress to the project managers and other project stakeholders on a per-page basis.
For example, management may decide to test the effects of the
refactored codebase early by deploying only the refactored homepage code
and they would want to know when the homepage components will be
refactored and ready for A/B testing.
Instead of wasting some time comparing the homepage components with
the available tasks on the Kanban board, developers can just temporarily
add the following styles to highlight the refactored components which
have the rf- prefix in their class names, and the
components that need to be refactored. That way, they can reorganize the
tasks and prioritize refactoring homepage components.
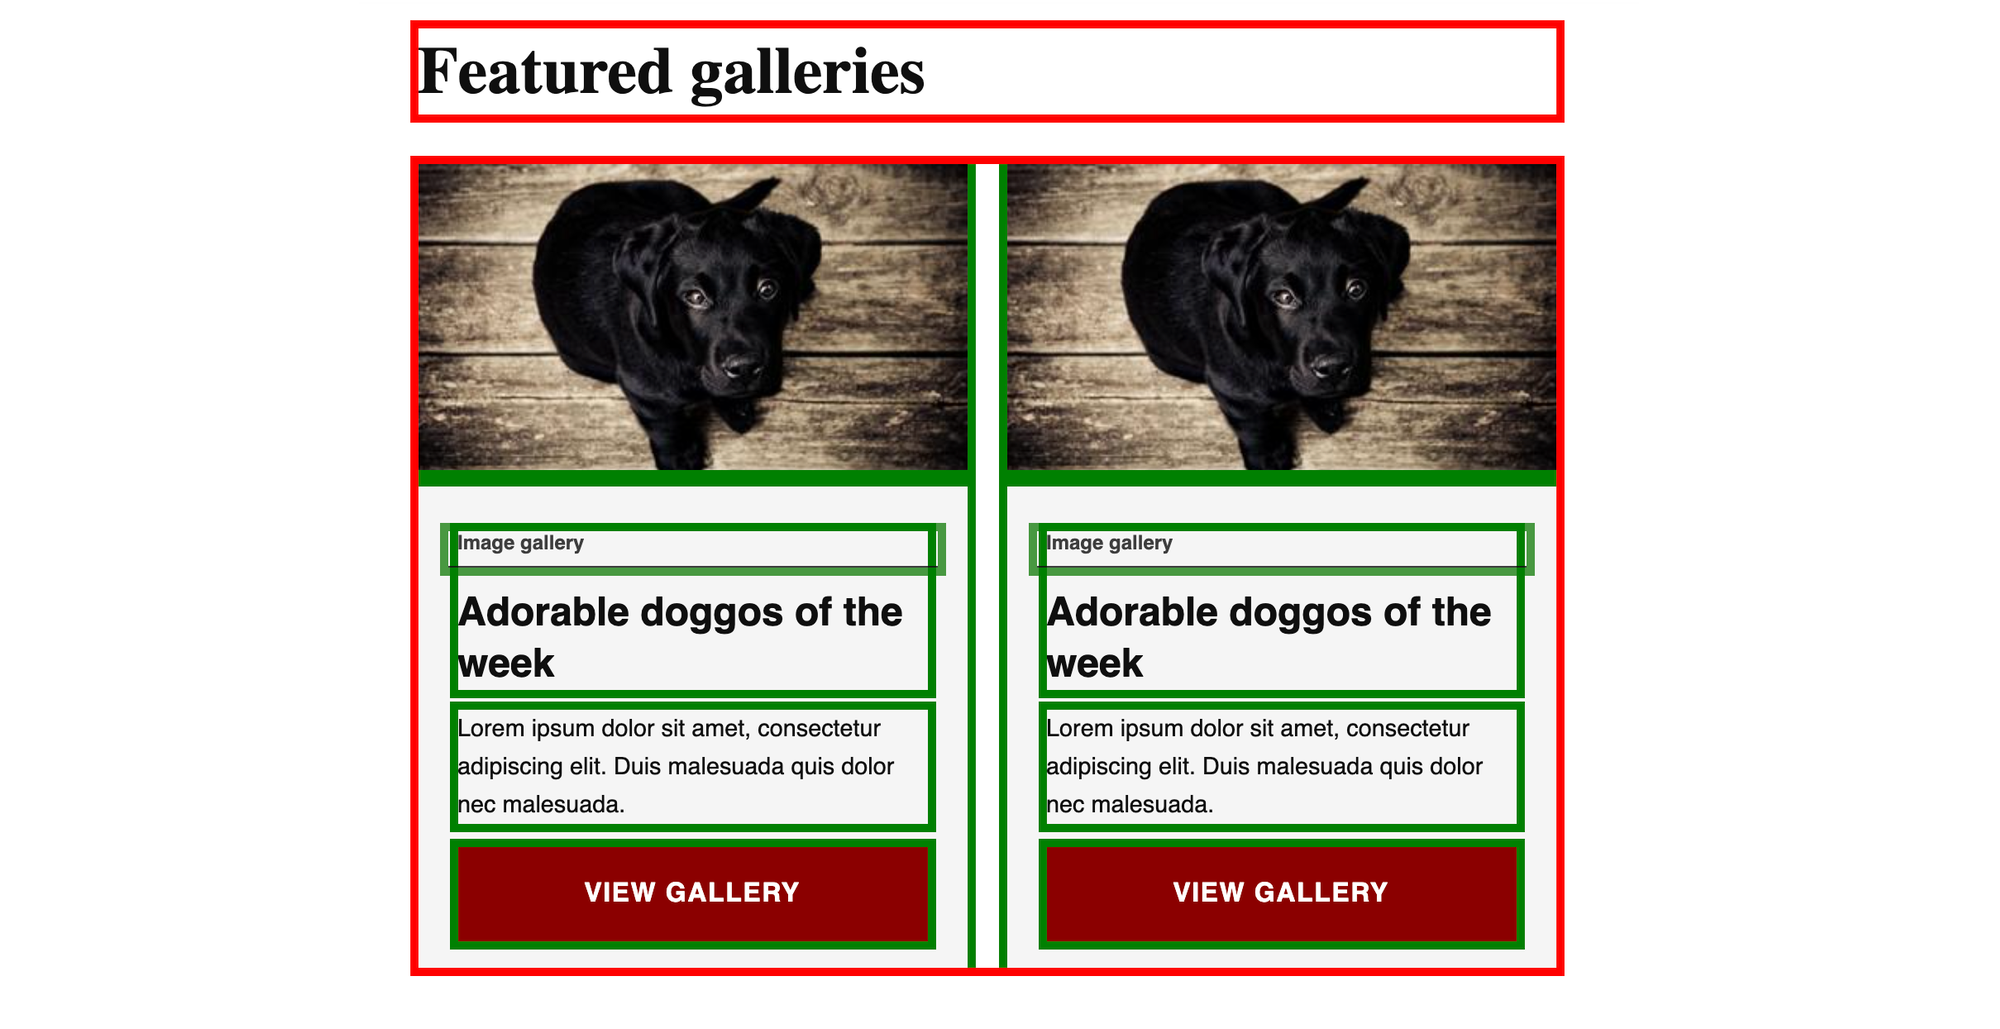
/* Highlights all refactored components */[class*="rf-"]{outline: 5px solid green;}/* Highlights all components that havent been refactored */body *:not([class]){outline: 5px solid red;}
Previous example of refactored card component with temporary
highlight code added. Components that have been refactored are
highlighted with the green outline, while components that may need to be
refactored are highlighted with the red outline.
Maintaining The Refactored Codebase
After the refactoring project has been completed, the team needs to
make sure to maintain the codebase health for the foreseeable future —
new features will be developed, some new features might even be rushed
and produce technical debt, various bugfixes will also be developed,
etc. All in all, the development team needs to make sure that the
codebase health remains stable as long as they’re in charge of the
codebase.
Technical debt which can result in potentially faulty CSS code should be isolated, documented, and implemented in a separate CSS file which is often named as shame.css.
It’s important to document the rules and best practices
that were established and applied during the refactoring projects.
Having those rules in writing allows for standardized code reviews,
faster project onboarding for new team members, easier project handoff,
etc.
Some of the rules and best practices can also be enforced and documented with automated code-checking tools like stylelint.
Andrey Sitnik, the author of widely-used CSS development tools like
PostCSS and Autoprefixer, has noted how automatic linting tools can make
code reviews and onboarding easier and less stressful.
“However, automatic linting is not the only reason to adopt
Stylelint in your project. It can be extremely helpful for onboarding
new developers on the team: a lot of time (and nerves!) are wasted on
code reviews until junior developers are fully aware of accepted code
standards and best practices. Stylelint can make this process much less
stressful for everyone.”
Additionally, the team can create a Pull Request template
and include the checklist of standards and best practices and a link to
the project code rules document so that the developers making the Pull
Request can check the code themselves and make sure that it follows the
agreed standards and best practices.
Conclusion
Incremental refactoring strategy is one of the safest and most
recommended approaches when it comes to refactoring CSS. The development
team needs to refactor the codebase component by component to ensure
that the tasks have a low scope and are manageable. Individual
components need to be then developed in isolation — away from the faulty
code — and then merged with the existing codebase. The issues that may
come up from the conflicting codebases can be solved by adding a
temporary CSS file that contains all the necessary overrides to remove the conflicts in CSS styles.
After that, legacy code for the target component can be removed and the
process continues until all components have been refactored and until
the temporary CSS file which contains the overrides is empty.
Visual regression testing tools like Percy and Chromatic can be used
for testing and to detect any regressions and unwanted changes on the
Pull Request level, so developers can fix these issues before the
refactored code is deployed to the live site.
Developers can use A/B testing and use monitoring tools to make sure
that the refactoring doesn’t negatively affect performance and user
experience before finally launching the refactored project on a live
site. Developers will also need to ensure that the agreed standards and
best practices are used on the project continues to maintain the
codebase health and quality in the future.