Payment of ₹ requested by HONEY VIG. Click the link to pay securely via Razorpay: Make 5000 payment Payment of ₹ requested by HONEY VIG. Click the link to pay securely via Razorpay: Make 5000 payment ⭐ If you would like to buy me a coffee, well thank you very much that is mega kind! : https://www.buymeacoffee.com/honeyvig
Hire a web Developer and Designer to upgrade and boost your online presence with cutting edge Technologies
Showing posts with label CSS. Show all posts

Thursday, November 5, 2026

Modern CSS Might Make Your Front-End More Complex


Replacing JavaScript with a modern CSS feature can simplify a piece of code while making the wider application harder to reason about. Gabriel Shoyombo explores what happens when logic is split between CSS and JavaScript, sharing practical guidance to help you keep complexity in check during migration.

Have you ever replaced fifty lines of JavaScript with a few lines of CSS, merged the PR, and felt like you just did the codebase a favor? You replace ResizeObserver with a container query, the diff is mostly red, and everyone approves it before lunch.

This was what it looked like before you made the change:

See the Pen demo (before PR) [forked] by Shoyombo Gabriel Ayomide.

Then, a week later, a card on the dashboard has vanished. A heading has grown on tablets for no reason anyone can explain. The spacing inside a comment is off.

See the Pen demo (after PR) [forked] by Shoyombo Gabriel Ayomide.

None of these bugs are in the few lines you wrote. All of them arrived with those few lines of CSS.

In my last article on how CSS is growing smarter, I left a few questions hanging at the end, including: What happens when logic is split between CSS and JavaScript, and how do we debug conditional styles without a clear view of what triggered them? This article is my attempt to answer these two questions.

I think it’s worth saying clearly that I am not saying modern CSS is bad. What I am saying is that:

A CSS feature can simplify a piece of code while making the wider application harder to reason about if you don’t understand how it relates to existing code, be it CSS or JavaScript.

“

Local Simplicity Vs. System Complexity 

Think of a new CSS feature as a new tenant moving into a shared apartment. The tenant may be quiet and tidy, but they still share a kitchen with everyone who already lives there. In that case, CSS is now roommates with JavaScript, the component’s layout, the CSS Cascade, and the browser’s rendering engine. The apartment’s stability depends less on the tenant and more on how they get along with one another.

That gives us two different things to measure, and a diff only shows the first one:

  • Local simplicity: How little code a single file needs.
  • System complexity: The number of interactions you must understand before you can safely change the application.

I am not the only one thinking about this. In April 2026, Igor Roztropiński published an essay titled “Modern Frontend Complexity: essential or accidental?” asking:

“Can we start from scratch and figure out a much simpler approach, given how browsers have evolved in recent years?”

— Igor Roztropiński

The essay landed on r/programming, where the thread has drawn 80-plus comments and the replies pull in two directions. One of the most upvoted comments, from a user named Kwantuum, pushes back on the whole genre:

“All these articles are like ‘We can do it with less!’ but then they don’t do it with less. They just do less.”

— Kwantuum

Another commenter, kayinfire, takes the other side, arguing that “there are tons of scenarios where a front-end framework introduces more accidental complexity than it’s worth.” They say this a few replies later:

“I don’t even need to go into how massively CSS has improved interactivity over the recent years, but hey nobody cares about anything apart from JS anymore, which I find to be quite a shame.”

— Keyser Söze

I think both commenters are on to something, and this article lives in the gap between the two. Yes, CSS has improved in the last several years. And yes, “less” CSS on paper is not automatically “less” complexity in practice. That said, my claim is narrower. A native feature only reduces complexity when it actually replaces what was there before and doesn’t disrupt the calm state of everything else it interacts with.

Let’s meet the housemates in our metaphorical apartment, one scenario at a time.

Scenario 1: The Behavior With Two Owners 

The first housemate is JavaScript, and the trouble starts when the old tenant never quite moves out. Here is a card that switches to a two-column layout when it has enough room. The original version uses a ResizeObserver to toggle a class:

const card = document.querySelector('.card');

new ResizeObserver(([entry]) => {
  card.classList.toggle('card--wide', entry.contentRect.width > 480);
}).observe(card);
.card--wide .card__body {
  display: grid;
  grid-template-columns: 160px 1fr;
}

.card--wide .card__title {
  font-size: 1.5rem;
}

With CSS Container Queries, we need no script at all and can simplify our selectors at the same time:


.card {
  container-type: inline-size;
}

@container (width > 480px) {
  .card__body {
    display: grid;
    grid-template-columns: 160px 1fr;
  }
}

Lovely. Now, here’s the thing: migrations rarely happen in one clean sweep. The pull request adds the @container rule and removes the .card--wide .card__body rule. The observer survives because it is registered in another file. The .card--wide .card__title rule survives because nobody searched for the class. Nothing looks broken, because both implementations agree on 480px. Then a designer asks to move the breakpoint to 600px, and a developer updates the only place they know about: the @container rule.

See the Pen Scenario 1: The Behaviour With Two Owners [forked] by Shoyombo Gabriel Ayomide.

Between 480px and 600px, the card now has a single-column body and a wide-layout title. Nobody wrote that state. To find it, you need to know that the layout has two owners and read both of them.

The same trap comes in other shapes:

  • JavaScript toggles an .is-active class while :has() derives the very same state from the DOM.
  • A JavaScript animation and a CSS transition both respond to one interaction.
  • Old media-query rules stay beside the new container-query rules, so the component answers to the viewport in one place and to its container in another.

CSS and JavaScript can happily share a component. What they cannot share is the component’s behavior. So, instead of having a silent fight over a component’s behavior, check first. Know all the contending parties, then split the work.

  • CSS owns presentation that follows from size or DOM structure.
    The layout at a given width. The appearance of a form containing an invalid field.
  • JavaScript owns application state and asynchronous work.
    Whether a request is pending. What the server returned. Anything that code outside the stylesheet needs to read.

And when you’re done migrating, you have to finish the job: delete the observer, the class, and every selector that mentions the class. Otherwise, you may wind up with a tenant who simply refuses to move out.

Scenario 2: The Roommate Rearranges The Room 

Back in 2023, I wrote about how block formatting contexts solve float issues. Back then, creating a block formatting context was something we did on purpose. Today, you can create one without meaning to. When we declare container-type: inline-size, we think we are saying, “let my children query my width.” The browser hears quite a bit more. This is the second housemate, the layout around the component, and our new tenant who just asked for one shelf has ended up rearranging the living room.

According to MDN’s container-type reference, the value “applies style and inline-size containment to the element.” And MDN’s guide to block formatting contexts lists “query containers (elements where container-type isn’t normal)” among the CSS styles that create one. An element that establishes a new block formatting context will, in MDN’s words:

  • Contain internal floats,
  • Exclude external floats, and
  • Suppress margin collapsing.

That means one declaration can change three layout behaviors that have nothing to do with queries, plus a fourth that comes from inline-size containment. I built a demo where each “before” and “after” pair differs by only that one declaration.

See the Pen Scenario 2: The Card That Vanished [forked] by Shoyombo Gabriel Ayomide.

Margins Stop Collapsing 

A paragraph with margin-bottom: 16px sits above the card, and the card’s heading has margin-top: 24px. Before the change, the heading’s margin collapsed through the top of the card and merged with the paragraph’s margin, leaving a 24px gap. Afterward, the margin remained trapped inside the card. The two margins now add up to 40px, and the card grows from 30px to 54px tall.

Floats Push The Card Aside 

The card follows a floated image. Before the change, the card’s box ran behind the float and its text wrapped around the image. Afterward, the whole card sits beside the float; it starts 120px further in (the width of the image) and is 120px narrower.

Content-Sized Cards Collapse #

This is the one that makes cards vanish. Inline-size containment stops an element from taking its width from its contents. MDN has a nice, succinct explanation:

“If a contextual or explicit size is not available, elements with size containment will collapse.”

— MDN

In the last demo, three tag-sized cards sit in a flex row and measure roughly 74px, 96px, and 114px, respectively. If we add container-type: inline-size, then all three measure 0px. I got the same 0px result when the card was displayed inline-block, floated, set to a width: fit-content box, was an align-items: flex-start child of a column flex container, and when it was an item in an auto grid track. A plain block-level card retains its full width because its width is determined by its parent rather than its contents.

In isolation, the card is a block that fills its parent. In reality, it is a flex item, follows a float, or sits under a paragraph whose margin it used to absorb.

Before you add container-type to an element, ask yourself the following three questions:

  1. Where does its width come from?
    If the answer is “its contents,” give it a width from context (e.g., flex: 1 and width: 100%), or move container-type to a wrapper that already has one.
  2. Do its first or last children have margins?
    Those margins may be collapsing through the element.
  3. Where is it actually used?
    Test the component inside every real layout that hosts it, not just in isolation.

Answering these will help prevent a housemate from completely changing the furniture layout right from under you.

Scenario 3: The Loud Housemate 

The third housemate is the CSS Cascade. Every shared apartment has house rules about who gets the last word, and a new tenant can arrive with more say than anyone expected.

The :has() selector and native nesting let us write short selectors in CSS. But short selectors can match more and weigh more than they appear.

Say we want to remove paragraph margins from card components that have a hero image. This might look like it does the job:

<article class="card">
  <p>Body text of the card.</p>
  <p>A second paragraph.</p>
  <div class="comment">
    <img src="avatar.png" alt="">
    <p>Nice post.</p>
  </div>
</article>
.card:has(img) p {
  margin: 0;
}

/* Elsewhere, the comment component's own rule */
.comment p {
  margin-block: 8px;
}
See the Pen Scenario 3: The Selector That Reached Too Far [forked] by Shoyombo Gabriel Ayomide.

This card has no hero image. Yet every paragraph in it loses its margin.

If you inspect the comment’s paragraph in DevTools and look at the “Styles” pane, you will find two culprits:
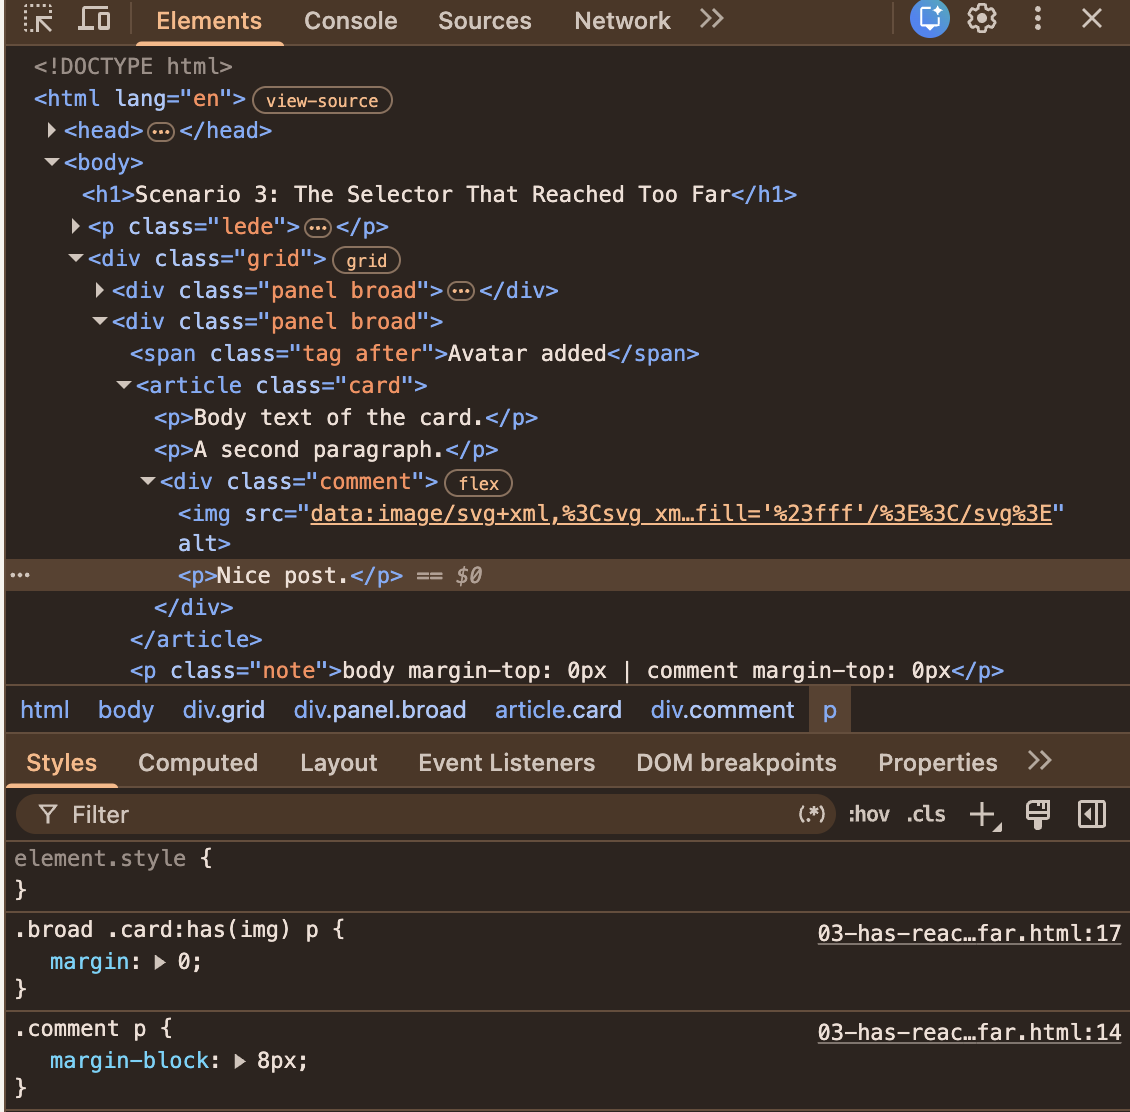
DevTools “Styles” pane
The selected <p> also showed the :has(img) style attached. (Large preview)
  1. The selector matches more than we meant.
    The :has(img) rule matches any descendant image, so the comment’s avatar counted as a hero image. And the p element selector matches any descendant paragraph. As a result, the comment’s text was caught in the selection.
  2. The selector outweighed the comment’s own rule.
    MDN’s specificity guide explains that :has() adds no weight by itself, but its argument does. That gives .card:has(img) p a specificity score of 0-1-2, while .comment p comes in at just 0-1-1 and loses the battle.

It could get even more complex and difficult to catch because the state changes at runtime. Let’s say a user posts a comment that includes an avatar. The body text of the card above it loses its spacing. Good luck reproducing that from a bug report that says “spacing looks off sometimes.”

The fix is to constrain the selector with child combinators:

.card:has(> img) > p {
  margin: 0;
}

This helps the selector get more specific about what it is yelling about.

Nesting Also Borrows Weight 

Native nesting has the same habit. MDN’s guide to nesting and specificity says the & selector takes “the largest specificity in the associated selector list,” exactly like :is(). Look at this adaptation of MDN’s example:

/* Specificity 1-0-0 */
.card, #featured {
  /* Specificity: 1-0-1 */
  & a {
    color: blue;
  }
}

/* Specificity: 0-1-0 */
.button {
  color: red;
}

A .button link inside a .card is blue, even though the #featured ID is nowhere near it. The usual reaction is a more specific .button rule, then an exception to that rule. Before you know it, you are in a war of specificity you never knew you had declared.

The way out is to keep the selector list and drop its weight by wrapping it in :where():

/* :where() always weighs 0-0-0 */
:where(.card, #featured) {
  /* Specificity: 0-0-1 */
  & a {
    color: blue;
  }
}

/* Specificity: 0-1-0 */
.button {
  color: red;
}

Plain links inside a card are still blue, and the .button link is red again. Again, another way to quiet the loud housemate.

Layers Don’t Rescue You By Default #

Don’t be fooled into thinking specificity is the whole story. MDN’s introduction to the cascade puts origin, importance, and cascade layers ahead of specificity, and notes that “normal layered styles have less precedence than normal unlayered styles.” In my test, a layered rule with a specificity of 0-4-0 lost to an unlayered .title (0-1-0). So if your new component styles go into @layer components while the legacy stylesheet stays unlayered, the legacy rule wins every conflict, however carefully you wrote the new one. The exception is when the !important keyword is used, because it actually reverses the cascade order.

Miriam Suzanne’s original proposal for cascade layers describes exactly the pain layers were meant to remove: having to “be very careful with matching specificity to layer.” Layers do remove it, but only when the rules on both sides of the conflict are layered. A half-layered codebase just gives you one more ordering to keep in your head.

An Old Fight With A New Tool #

None of these battles started with :has() or nesting. In an r/webdev thread titled “CSS-in-JS: What’s the biggest performance drop you actually felt?”, one of the most upvoted answers isn’t about performance at all. It is about the cascade:

“Here’s a fun one: refactoring your JS can cause your CSS to break, because your CSS builds are determined by JS import orders.”

— mq2thez

This is about the “order of appearance,” which is the last step in the cascade that ends up deciding a conflict nobody knew existed. Another commenter in the subreddit adds that the injected styles can land in a different order in development and production builds: “Who doesn’t love debugging something that works locally but not in prod.”

Not everyone in the thread agrees on who is to blame. TheThirdRace replies, “It’s a coding issue, not a technology issue.”

I think both are right, and that is exactly the point. CSS-in-JS is a different technology from the native features we are looking at, so take this as a neighboring example, not as proof. But the shape of the problem is the same: the tool did what it promised, and the trouble arose from how it complied with the existing rules.

Before you add the rule:

  1. Constrain it. Use > so the selector stops at the component’s own children.
  2. Drop the borrowed weight. Wrap heavy selectors in :where(), which always has a specificity of 0-0-0.
  3. Check the layers. Which layer does your rule land in, and where do its competitors live?

Scenario 4: The Housemate That’s Slow To Pay Rent 

“We moved it to CSS, so it’s faster now.” You have probably heard this in a code review, and maybe said it yourself. In my last article, I warned that it isn’t always the case. Let’s test it.

Moving a behavior from JavaScript to CSS changes who does the work. It doesn’t tell you how much work there is. The last housemate, the browser’s rendering engine, is the one who gets the bill. Everyone in the apartment shares it, and nobody looks at it after the move.

Take :has() as an example. Browser vendors were worried about its cost from the start. In a CSS Working Group issue about :has() restrictions, Emilio Cobos Álvarez noted that implementations wanted to ship it with limitations “in order to prevent performance footguns and complexity.” Today, MDN’s :has() page has a whole section on performance with two pieces of advice:

  • Don’t anchor :has() to an element with a large subtree, “like body, :root, or *.”
  • Constrain the inner selector with > or +, because otherwise “the browser might need to traverse the entire subtree of the anchor element on every DOM mutation.”

I wanted numbers, so I built a list with 5,000 rows. The test toggles an .is-selected class on the same row 300 times, so the row’s selected state changes on every toggle, and forces a style and layout update each time. I ran it in Chrome 153 on a Mac in October 2026, and recorded a trace in DevTools to count how many elements each toggle restyles.

See the Pen Scenario 4: The Rewrite Nobody Measured [forked] by Shoyombo Gabriel Ayomide.
RuleWhat is in the stylesheetMedian time per toggleElements restyled
1JavaScript toggles a class on the toolbarUnder 0.1ms1
2body:has(.row.is-selected) .toolbarAbout 1.4ms1
3.list:has(.cell > b) .row, with the toolbar handled by JavaScriptUnder 0.1ms1
4Rules 2 and 3 togetherAbout 7ms5,001
5For scale: JavaScript restyles all 5,000 rows on every toggleAbout 6ms5,001

There are two lessons in that table.

First, the “bad” selector was fine. Rule 2 is exactly the shape MDN warns against: a :has() anchored to body. It cost about a millisecond and a half more than the script, and it restyled a single element, the toolbar. A frame at 60Hz lasts 16.7ms, so I would take that trade for deleting an event handler any day.

Second, two harmless rules were not harmless together. Rule 3 styles the rows, and its :has() condition remains unchanged throughout the test. On its own, it costs nothing measurable. Put it in the same stylesheet as the second rule instead, and every toggle restyles all 5,000 rows plus the toolbar. That is about what it costs a script to restyle every row on purpose.

Let’s keep this in proportion. Since 7ms still fits inside a frame, nobody would notice it on this page. However, the browser is now restyling 5,001 elements to change just one, and neither rule says so. Also, the cost grows with the list. When I set the demo to 20,000 rows, the two rules together restyled 20,001 elements and took about 31ms per toggle, which is nearly two frames.

I can tell you what Chrome does here, but not why. Changing .is-selected on one row restyles every element that the other :has() rule targets, even though that rule never mentions .is-selected and its result never changes. I have filed this with the Chromium team as an issue, with a reduced test case, and I only tested Chrome. Whatever the cause, neither rule looks suspicious in a code review, and the cost applies only when both are met.

That is system complexity in a single table. And please take the pattern from it, not the numbers: this is one page, one browser, and one machine.

The same goes for animation. The animation guide on web.dev recommends restricting animations to opacity and transform where possible, and warns that “an animation that moves an element using something other than transform is likely to be slow.” MDN’s CSS performance guide lists the properties that trigger layout when animated, such as width, height, margin, top, and left. A CSS transition on left runs layout on every frame, while a JavaScript animation of transform skips it. The property determines the cost, regardless of which language you write it in.

To be fair, CSS often wins. A script that reads layout, writes styles, and reads layout again forces the browser to do layout several times in one frame, and a container query hands that whole job to the browser. But that win is something you can measure, so measure it:

  1. Record the interaction in the “Performance” panel of Chrome DevTools, before and after the change.
  2. Compare the time spent in “Recalculate Style,” “Layout,” and “Paint.”
  3. Enable CSS selector stats in the panel’s settings to see which selectors cost the most.
  4. Use production-sized data. A 20-row fixture hides what a 5,000-row list reveals.

When All Four Show Up In One Pull Request 

Each of these scenarios is small on its own. The trouble is that a real migration could hit all four scenarios at once. You have already seen three of them. They are the three bugs in the “after” demo at the top of this article. Add a long list, and you get the fourth. One move-in, four housemates disturbed.

A team replaces a card’s JavaScript-driven responsive layout with a container query and :has(). The pull request adds twelve lines of CSS, deletes one script, and misses another. Within a month, three bug reports land, and there’s a chance a performance trace turns up as the fourth problem:

  1. The card title is too big on tablets. The observer still sets .card--wide, and one rule still reads it. The developer goes digging through the JavaScript.
  2. The cards on the dashboard have disappeared. On the dashboard, the card is a flex item, and inline-size containment collapsed it to 0px. The developer reads the parent’s layout.
  3. The text is squashed in some cards. Those cards have comments with avatars, so .card:has(img) p matches. The developer traces the winning declaration in DevTools.
  4. Selecting a row might become laggy for our biggest customer. At 5,000 rows, the two :has() rules cost about 7ms per selection. That fits within a frame, even though each selection restyles 5,001 elements, whereas it used to restyle one. As the number of rows increases, the elements restyled increase, and the cost of the two :has() rules per selection will also increase, but who renders a table with a large number of rows without pagination?

None of these reports means that container queries or :has() were the wrong choice. Each bug lives in the meeting point between the new CSS and the system it moved into. Still, one small pull request has sent a developer through the JavaScript, the page layout, the cascade, and the profiler.

And the way out is not a return to JavaScript. Here is the same page once more, fixed.

See the Pen demo (fixed PR) [forked] by Shoyombo Gabriel Ayomide.

It still uses a container query and :has(), with three changes:

  1. The observer and the leftover .card--wide rule are removed, so the layout has a single owner.
  2. The query container is a wrapper that inherits its width from the surrounding layout, so the card can no longer collapse.
  3. The selector is constrained to the card’s own image and its own paragraphs, so the comment keeps its spacing.

This gap between a clean start and a real codebase shows up in the same r/webdev thread. The person who started it, JRM_Insights, opens with an observation that could describe any of our four scenarios:

“I often find that the initial tooling simplicity gives way to harder-to-debug runtime styling issues.”

— JRM_Insights

Further down, mq2thez describes moving an old CSS-in-JS codebase to a newer pattern: “In isolation or greenfield maybe it wouldn’t be a huge issue,” but in practice, it meant rewriting “whole component trees.” TheThirdRace, who had been defending the technology, answers that they had only ever evaluated it “from a greenfield project perspective,” and that it was “very enlightening to see this through the lens of a spaghetti CSS migration.”

That is the honest version of this whole article.

Most of what we read about a new feature is written from the greenfield perspective. Most of what we ship is a migration.

“

Your Migration Checklist 

Before you replace JavaScript with a modern CSS feature, or adopt one in an existing codebase, answer these six questions. Think of them as the conversation to have with the housemates before the new tenant gets a key. I suggest putting the answers right in the pull request description.

  1. Ownership: Is exactly one of CSS or JavaScript the owner of this behavior?
  2. Scope: What changes for the element’s formatting context: its width, its parent, its children, and its neighbors?
  3. Cascade: Which existing rules could override this one, and which rules could it override?
  4. Migration: Have you deleted the old implementation, including every class and selector it relied on, and tested every state?
  5. Performance: Have you measured the real workload before and after, rather than assuming the rewrite is faster?
  6. Maintainability: Can the next developer tell why this rule exists and where its effects stop?

Conclusion 

Modern CSS is great and a huge improvement to styling as a whole. In particular, container queries and :has() let us express things that used to need a script, a dependency, or a hack. But a new capability does not hand us a simpler system by default. In every scenario we looked at, the new tenant did something that didn’t sit well with others, and that was because nobody introduced them to the housemates’ ways of doing things. We get a simpler system when the new rule has one clear owner, a scope we have checked, a place in the cascade we chose on purpose, and numbers showing it helped.

So, the next time a pull request deletes more than it adds, enjoy the red lines. Then ask where the complexity went, and run the six questions. If you can’t answer one of them, the migration isn’t finished yet.

References 


Tuesday, November 3, 2026

DoubleClick jacking: Why Your Clickjacking Headers Never See It Coming


The attack never puts your page in a frame, so the headers on NGINX, Cloudflare and CloudFront have nothing to block. Here is how it works, what actually stops it, and an Angular component with tests you can copy.

It's Friday, 4:40 p.m., and your security review just came back clean. The report has one line you're proud of: "Clickjacking: protected." You set X-Frame-Options and frame-ancestors on NGINX months ago, the scanner agrees, and your session cookie is SameSite=Lax.

Then a teammate drops a link in chat. "Try this. Just double-click the box."

A fake verification window pops up. You double-click. Nothing seems to happen. Ten seconds later you open your account settings, and a stranger's app is sitting in the list of connected apps with permissions you never agreed to.

You never saw a consent screen. You never even saw your own site. So how does DoubleClickjacking get past a setup that every checklist calls correct?

Here's what you'll get from this article: how the attack really works, the families it comes in, what NGINX, Apache, Cloudflare and CloudFront can and can't do about it, and a small client-side gate that closes the hole. You'll build that gate as an Angular component and test it.

One question to carry with you: if this attack never puts your page in a frame, what exactly are those headers protecting? I'll answer it near the end.

If you like security write-ups told as stories, with code you can paste into a project today, follow me here on Medium so the next one finds you.

Before we get into the examples, a quick note: The code snippets provided here are meant purely for understanding the concept. Some syntax shown may reflect patterns from earlier Angular/React versions. Always refer to the official documentation for the most current API and syntax.

What happens when you double-click a fake CAPTCHA?

Quick version. Classic clickjacking hides your site inside an invisible frame and tricks you into clicking through it. Browsers fought back with headers that say "don't let other sites frame me." DoubleClickjacking skips the frame completely. The attacker's page opens a second window on top and asks you to double-click. While you're busy doing that, the window underneath quietly navigates to your real page, say an OAuth approval screen. Your first click closes the top window. Your second click lands on whatever is now underneath. That's your Approve button.

Real-world version. Security researcher Paulos Yibelo published the technique in December 2024, and the coverage that followed reported that it sidesteps X-Frame-Options, CSP and SameSite cookies. The reason is boring and important: your page is opened as a normal top-level page, in a normal window, with the victim's normal session. From the browser's point of view nothing is being framed, and nothing about the request is cross-site.

The usual targets are screens where one click does something serious: approving an OAuth app, confirming a payment, flipping a security setting. If you want more angles on the same exploit, these are worth your time: the ICOIN 2026 paper on clickjacking and double-clickjacking prevention, my earlier piece on this exploit, the Indusface explainer and the YesWeHack write-up.

Under the hood. A double-click is two presses with a gap between them. The browser delivers each press to whichever window is under the cursor at that moment. So the attacker only has to change what's under the cursor inside that gap. Here's the timeline in plain text:

time ------------------------------------------------------------>

1. attacker page opens a small window on top: "double-click to verify"
2. that window navigates the window underneath to YOUR consent page
3. first press and release  -> handled by the top window, which closes itself
4. second press and release -> lands on the page that is now underneath
                               (your Approve button) 

Notice what's missing. There's no iframe anywhere in that story. The user sees one fake box and does the one thing it asked for.

That's the original trick. The headline hides how many shapes it comes in, so let's count them.

How many ways can DoubleClickjacking happen?

It depends on how you count, and I don't trust anyone who gives you a single number. These are the four families I'd keep in your head.

The window swap. The original. A top window asks for a double-click while the window underneath is sent to the target page. Everything above describes this one.

The held-key variant. Researcher Jorian Woltjer pushed the idea further in a write-up on making the attack smoother with popups and keyboard input. In his research, a victim who is holding a key can hand the attacker a steady supply of user activations, which is what lets popups open and swap without a fresh click each time. Takeaway for you: a keypress isn't automatic proof of intent.

The extension and wallet variant. Reports on the original research name browser extensions as targets, including crypto wallets, Web3 transaction prompts and VPN toggles that can be switched off.

The touch variant. The same reports say phones are affected too, through double-taps instead of double-clicks.

I can't promise that list is complete, and new variants keep showing up. That's why I'd defend the behavior (a button that fires on a click nobody meant) and not any single variant.

So here's a question for you. Which screens in your app do something expensive on a single click? Write that list down, because you'll need it in a minute.

First, though, let's do what everyone does and reach for headers.

Why don't X-Frame-Options and frame-ancestors stop it?

Quick version. Those headers answer exactly one question: "may another page frame me?" In this attack nobody frames you, so there's no question for the header to answer.

Here's the screen from your Friday story. This is the wrong version, the one that still runs.

src/app/consent.component.ts

import { Component, input, output } from '@angular/core';

@Component({
  selector: 'app-consent',
  template: `
    <h2>{{ appName() }} wants access to your account</h2>
    <p>Scopes: {{ scopes().join(', ') }}</p>
    <button type="button" data-testid="approve" (click)="approved.emit()">Approve</button>
  `,
})
export class ConsentComponent {
  readonly appName = input.required<string>();
  readonly scopes = input<string[]>([]);
  readonly approved = output<void>();
} 

It renders an Approve button that works on the very first click. That's the weakness, and no server setting touches it.

Now the first attempt, the one every checklist suggests: set the framing headers. They're still worth having, since classic clickjacking hasn't gone anywhere, so do this and keep reading.

NGINX. Put the headers in the server block and add always so error pages get them too.

/etc/nginx/conf.d/app.conf

server {
    listen 443 ssl;
    server_name app.example.com;

    add_header X-Frame-Options "DENY" always;
    add_header Content-Security-Policy "frame-ancestors 'none'" always;

    location / {
        proxy_pass <http://127.0.0.1:4200>;
    }
} 

Pitfall: NGINX only inherits add_header lines from the level above when the current level has none of its own. The moment a location block adds a header, your server-level ones vanish for that location. The NGINX headers module docs spell this out.

Apache. Same idea, with mod_headers.

/etc/apache2/conf-available/framing.conf

Header always set X-Frame-Options "DENY"
Header always set Content-Security-Policy "frame-ancestors 'none'" 

Run a2enmod headers and a2enconf framing, then reload Apache.

Cloudflare. If you can't touch the origin, add a response header Transform Rule in the dashboard. If you prefer code, a Worker does the same job.

src/worker.ts

export default {
  async fetch(request: Request): Promise<Response> {
    const upstream = await fetch(request);
    const headers = new Headers(upstream.headers);
    headers.set('X-Frame-Options', 'DENY');
    headers.set('Content-Security-Policy', "frame-ancestors 'none'");
    return new Response(upstream.body, {
      status: upstream.status,
      statusText: upstream.statusText,
      headers,
    });
  },
}; 

Pitfall: headers.set replaces any Content-Security-Policy your origin already sends. If you have one, merge frame-ancestors 'none' into it instead of overwriting it.

CloudFront. Create a response headers policy and attach it to your cache behavior.

policy.json

{
  "Name": "framing-protection",
  "Comment": "Block framing of every response",
  "SecurityHeadersConfig": {
    "FrameOptions": {
      "FrameOption": "DENY",
      "Override": true
    },
    "ContentSecurityPolicy": {
      "ContentSecurityPolicy": "frame-ancestors 'none'",
      "Override": true
    }
  }
} 
aws cloudfront create-response-headers-policy --response-headers-policy-config file://policy.json 

The command returns JSON that includes the new policy's Id. Copy it into the ResponseHeadersPolicyId field of the cache behavior that serves your app, or the policy exists and does nothing.

Whichever server you use, verify it from the outside:

curl -sI <https://app.example.com/oauth/authorize> | grep -i -E "x-frame-options|content-security-policy" 

Expected output:

x-frame-options: DENY
content-security-policy: frame-ancestors 'none' 

Real-world version. Both headers work as designed. A browser consults them when a document is about to load inside a frame. In this attack your consent page loads into a top-level window, so there's no frame and no ancestor to check. SameSite=Lax doesn't help either: it exists to stop cross-site requests, and a top-level navigation is the exact case Lax allows.

Under the hood. This is why the report I mentioned earlier says the old defenses are blind to it. The defenses answer questions about where your page is embedded. The attack changes which window your user's next click goes to.

Every green tick above is real, and none of them touches this attack.

Have you ever added a security header, watched the scanner turn green, and later found out it was guarding a different door? Tell me which header and which door in the comments.

So if headers can't see the attack, what can? Something small, and slightly rude to your own users.

What if the button refuses to work until a human proves they're there?

Back to your Friday. Your first instinct is to open the config files again and add one more header. There's nothing left to add. Those headers describe where your page may live, and this attack doesn't care where it lives. The flaw is smaller and closer to home: your Approve button trusts every click it receives.

Quick version. Load sensitive buttons disabled. Enable them only after the page sees something a person looking at this window would do, like moving the mouse a little or pressing Tab. In the attack, the cursor is parked over the fake box when your page slides in underneath. The pointer never moves inside your page, so the button stays dead and the second click goes nowhere. This is the client-side fix Yibelo recommends in his write-up: keep critical buttons disabled until a gesture shows up.

Real-world version. The naive version, "enable on any mousemove", has holes, and I found a few by thinking about real devices. Touch screens never fire mousemove, so a pure pointer gate would lock out every phone user. A held key repeats keydown events, and we saw earlier that an attacker can get a victim to hold a key, so repeats must not count. If the window loses focus, whatever trust you earned should be thrown away. The gate below handles all of that. On touch screens it falls back to a short delay after the window gains focus, set longer than the gap between two quick taps. That delay is my pick, so tune it against your own users.

src/app/gesture-gate.ts

export interface GestureGateOptions {
  /** Pixels the pointer must travel before we trust it. */
  minTravel?: number;
  /** Delay before arming on touch screens, after the window gains focus. */
  touchDelayMs?: number;
  /** Where to listen. Defaults to the global document. */
  root?: Document;
  /** Override for tests. Defaults to a (pointer: coarse) media query. */
  isCoarsePointer?: () => boolean;
}

export interface GestureGate {
  destroy(): void;
}

export function createGestureGate(
  onChange: (armed: boolean) => void,
  options: GestureGateOptions = {},
): GestureGate {
  const root = options.root ?? document;
  const win = root.defaultView ?? window;
  const minTravel = options.minTravel ?? 8;
  const touchDelayMs = options.touchDelayMs ?? 800;
  const isCoarsePointer =
    options.isCoarsePointer ??
    (() => win.matchMedia?.('(pointer: coarse)').matches ?? false);

  let armed = false;
  let last: { x: number; y: number } | null = null;
  let travelled = 0;
  let timer: ReturnType<typeof setTimeout> | undefined;

  const set = (value: boolean): void => {
    if (armed !== value) {
      armed = value;
      onChange(value);
    }
  };

  const clearTimer = (): void => {
    if (timer !== undefined) {
      clearTimeout(timer);
      timer = undefined;
    }
  };

  const startTimer = (): void => {
    clearTimer();
    timer = setTimeout(() => set(true), touchDelayMs);
  };

  const reset = (): void => {
    last = null;
    travelled = 0;
    clearTimer();
    set(false);
  };

  const onMove = (e: MouseEvent): void => {
    if (last) {
      travelled += Math.hypot(e.clientX - last.x, e.clientY - last.y);
    }
    last = { x: e.clientX, y: e.clientY };
    if (travelled >= minTravel) {
      set(true);
    }
  };

  const onKey = (e: KeyboardEvent): void => {
    // A held key repeats. An attacker can make the victim hold a key.
    if (e.repeat) return;
    if (e.key === 'Tab') set(true);
  };

  const onBlur = (): void => reset();

  const onFocus = (): void => {
    if (isCoarsePointer()) startTimer();
  };

  const onVisibility = (): void => {
    if (root.visibilityState === 'hidden') reset();
  };

  root.addEventListener('mousemove', onMove);
  root.addEventListener('keydown', onKey);
  root.addEventListener('visibilitychange', onVisibility);
  win.addEventListener('blur', onBlur);
  win.addEventListener('focus', onFocus);

  if (isCoarsePointer() && root.hasFocus()) startTimer();

  return {
    destroy(): void {
      clearTimer();
      root.removeEventListener('mousemove', onMove);
      root.removeEventListener('keydown', onKey);
      root.removeEventListener('visibilitychange', onVisibility);
      win.removeEventListener('blur', onBlur);
      win.removeEventListener('focus', onFocus);
    },
  };
} 

The gate takes a callback and returns a handle you can destroy, so it isn't tied to Angular. The component is where the signal lives. This is the fixed version of the screen from earlier.

src/app/consent.component.ts

import { Component, DestroyRef, inject, input, output, signal } from '@angular/core';
import { createGestureGate } from './gesture-gate';

@Component({
  selector: 'app-consent',
  template: `
    <h2>{{ appName() }} wants access to your account</h2>
    <p>Scopes: {{ scopes().join(', ') }}</p>
    <button
      type="button"
      data-testid="approve"
      [disabled]="!armed()"
      (click)="approved.emit()"
    >
      Approve
    </button>
    @if (!armed()) {
      <small data-testid="hint">Move your mouse or press Tab to enable this button.</small>
    }
  `,
})
export class ConsentComponent {
  readonly appName = input.required<string>();
  readonly scopes = input<string[]>([]);
  readonly approved = output<void>();

  protected readonly armed = signal(false);

  constructor() {
    const gate = createGestureGate((value) => this.armed.set(value));
    inject(DestroyRef).onDestroy(() => gate.destroy());
  }
} 

What you should see in the browser:

page loads            -> Approve is disabled, the hint is visible
mouse moves 8px+      -> Approve is enabled, the hint disappears
window loses focus    -> Approve is disabled again 

Under the hood. The gate asks for evidence that only a person at your window can produce. Another origin can't dispatch pointer events into your page, and a parked cursor produces none. That evidence has limits. Yibelo floated a browser-level header called Double-Click-Protection as an idea, and I found no sign of any browser honoring a header like that, so don't add one and expect protection. I also couldn't verify a browser-level fix when I researched this, so read current browser release notes and test the browsers you support.

Assistive technology deserves its own check. If a screen reader doesn't produce the key events the gate listens for, add the ones it does produce, or your keyboard-only users will meet a button that never wakes up. And if an attacker already has script running on your page, no gate helps, because that's a different problem.

A gate like this is only worth something if it keeps working after the next refactor, so let's pin it down with tests.

How do you test a gate you can't click through?

Quick version. You don't click. You dispatch the same events a browser would and check the button after each one. In a new Angular project, ng test runs Vitest by default since Angular 21 (see the Angular testing guide). Older projects use Karma and Jasmine, so swap vi.fn() for jasmine.createSpy() and vi.useFakeTimers() for jasmine.clock().install().

src/app/consent.component.spec.ts

import { ComponentFixture, TestBed } from '@angular/core/testing';
import { ConsentComponent } from './consent.component';

describe('ConsentComponent', () => {
  let fixture: ComponentFixture<ConsentComponent>;

  const approve = (): HTMLButtonElement =>
    fixture.nativeElement.querySelector('[data-testid="approve"]');

  const move = (x: number, y: number): void => {
    document.dispatchEvent(new MouseEvent('mousemove', { clientX: x, clientY: y }));
    fixture.detectChanges();
  };

  const press = (init: KeyboardEventInit): void => {
    document.dispatchEvent(new KeyboardEvent('keydown', init));
    fixture.detectChanges();
  };

  beforeEach(async () => {
    await TestBed.configureTestingModule({ imports: [ConsentComponent] }).compileComponents();
    fixture = TestBed.createComponent(ConsentComponent);
    fixture.componentRef.setInput('appName', 'Photo Printer');
    fixture.componentRef.setInput('scopes', ['read:photos']);
    fixture.detectChanges();
  });

  it('starts disabled', () => {
    expect(approve().disabled).toBe(true);
  });

  it('ignores a click when no gesture happened', () => {
    const spy = vi.fn();
    fixture.componentInstance.approved.subscribe(spy);
    approve().click();
    expect(spy).not.toHaveBeenCalled();
  });

  it('enables after real pointer travel and then emits', () => {
    const spy = vi.fn();
    fixture.componentInstance.approved.subscribe(spy);
    move(0, 0);
    move(20, 20);
    expect(approve().disabled).toBe(false);
    approve().click();
    expect(spy).toHaveBeenCalledTimes(1);
  });

  it('arms on Tab but not on a repeating key', () => {
    press({ key: 'Tab', repeat: true });
    expect(approve().disabled).toBe(true);
    press({ key: 'Tab' });
    expect(approve().disabled).toBe(false);
  });

  it('disarms when the window loses focus', () => {
    move(0, 0);
    move(30, 30);
    expect(approve().disabled).toBe(false);
    window.dispatchEvent(new Event('blur'));
    fixture.detectChanges();
    expect(approve().disabled).toBe(true);
  });
}); 

src/app/gesture-gate.spec.ts

import { createGestureGate } from './gesture-gate';

describe('createGestureGate on touch screens', () => {
  afterEach(() => vi.useRealTimers());

  it('arms only after the delay that follows a focus event', () => {
    vi.useFakeTimers();
    const states: boolean[] = [];
    const gate = createGestureGate((armed) => states.push(armed), {
      isCoarsePointer: () => true,
      touchDelayMs: 800,
    });

    window.dispatchEvent(new Event('focus'));
    vi.advanceTimersByTime(799);
    expect(states).toEqual([]);

    vi.advanceTimersByTime(1);
    expect(states).toEqual([true]);
    gate.destroy();
  });
}); 

Run them once without watch mode:

ng test --no-watch 

Expected output (the CLI prints a check mark in front of each file, and a project made with ng new also lists its default app spec, which we replace near the end):

 src/app/consent.component.spec.ts (5 tests)
 src/app/gesture-gate.spec.ts (1 test)

 Test Files  2 passed (2)
      Tests  6 passed (6) 

Real-world version. Unit tests prove your logic, not the browser's event order. Add one manual check for every browser you support: park the cursor where the Approve button will appear, load the page with a keyboard shortcut, then click without moving the mouse. Nothing should happen. If some browser enables the button on its own after layout, you've learned something valuable before an attacker did.

Under the hood. jsdom has no matchMedia, so the gate treats the test environment as a mouse-and-keyboard device, and the touch path is covered by injecting isCoarsePointer. Fake timers let the 800 ms delay run in zero real milliseconds, and the afterEach puts real timers back so the next test isn't affected.

So far the fix lives inside an Angular app. What about the pages you don't own the code for?

Can NGINX, Cloudflare or CloudFront deliver the gate for you?

Quick version. They can't block the attack with headers, but they can deliver the script that does. For server-rendered or legacy pages, bundle the same gate as a tiny standalone script, mark the dangerous buttons with data-sensitive, and let the edge add one script tag.

src/guard.ts

import { createGestureGate } from './app/gesture-gate';

const targets = Array.from(
  document.querySelectorAll<HTMLButtonElement | HTMLInputElement>('[data-sensitive]'),
);

const setDisabled = (disabled: boolean): void => {
  for (const el of targets) {
    el.disabled = disabled;
  }
};

setDisabled(true);
createGestureGate((armed) => setDisabled(!armed)); 

Bundle it into one file. A typical Angular project already has esbuild installed through its build tooling; if yours doesn't, install it first.

npx esbuild src/guard.ts --bundle --minify --format=iife --outfile=public/dcj-guard.js 

Expected output, with timings that will differ on your machine:

 public/dcj-guard.js  1.0kb

Done in 7ms 

Mark the buttons in the server-rendered page:

consent.html

<button type="submit" data-sensitive>Approve</button> 

NGINX. Add these two locations inside the same server block as before. Neither one declares its own add_header, so the framing headers keep being inherited.

/etc/nginx/conf.d/app.conf

location = /static/dcj-guard.js {
    root /var/www/app;
}

location /oauth/authorize {
    proxy_pass <http://127.0.0.1:4200>;
    proxy_set_header Accept-Encoding "";
    sub_filter '</head>' '<script src="/static/dcj-guard.js" defer></script></head>';
} 

Copy the bundle to /var/www/app/static/dcj-guard.js. Two details trip people up here. sub_filter needs the ngx_http_sub_module, which not every NGINX build includes. And the empty Accept-Encoding header makes the upstream send plain HTML, because NGINX can't rewrite a compressed body.

Check that the tag arrives:

curl -s <https://app.example.com/oauth/authorize> | grep -o '<script src="/static/dcj-guard.js" defer></script>' 

Expected output:

<script src="/static/dcj-guard.js" defer></script> 

Cloudflare. A Worker can add the same tag with HTMLRewriter, only on the pages that need it. Types for the Workers runtime come from the @cloudflare/workers-types package.

src/inject-guard.ts

export default {
  async fetch(request: Request): Promise<Response> {
    const upstream = await fetch(request);
    const { pathname } = new URL(request.url);

    if (!pathname.startsWith('/oauth/authorize')) {
      return upstream;
    }

    return new HTMLRewriter()
      .on('head', {
        element(head) {
          head.append('<script src="/static/dcj-guard.js" defer></script>', { html: true });
        },
      })
      .transform(upstream);
  },
}; 

CloudFront. A response headers policy only changes headers, so it can't add a script tag. I'd put the tag in the page template or the build output at your origin and let CloudFront cache it. If you want to rewrite bodies at the edge, check the current CloudFront documentation for what it supports today.

Real-world version. If you run a strict Content-Security-Policy, make sure script-src allows the guard script's origin. Also remember the script is deferred, so there's a short moment before it runs when the button is still live. If that bothers you, ship the button with the disabled attribute already in the markup and let the script enable it. The trade-off is that people with JavaScript turned off can never approve anything, which may be exactly what you want on a consent screen.

Under the hood. Injecting at the edge keeps your app code untouched, but it ties your security to a string replace. The day someone removes the closing head tag from that template, the guard quietly disappears. A test that fetches the page and looks for the script tag is cheap insurance.

Disabling a button handles the timing trick. But what if you want a second lock that doesn't depend on timing at all?

What should the server ask for when a click can't be trusted?

Quick version. Ask for something an attacker can't produce by hijacking a click. A click can be stolen. Typing into your own field can't. Here's a small component that makes the user type the app's name before the final button wakes up.

src/app/typed-confirm.component.ts

import { Component, input, output, signal } from '@angular/core';

@Component({
  selector: 'app-typed-confirm',
  template: `
    <label>
      Type {{ expected() }} to continue
      <input #box data-testid="typed" [value]="typed()" (input)="typed.set(box.value)" />
    </label>
    <button
      type="button"
      data-testid="confirm"
      [disabled]="typed() !== expected()"
      (click)="confirmed.emit()"
    >
      Confirm
    </button>
  `,
})
export class TypedConfirmComponent {
  readonly expected = input.required<string>();
  readonly confirmed = output<void>();

  protected readonly typed = signal('');
} 

src/app/typed-confirm.component.spec.ts

import { ComponentFixture, TestBed } from '@angular/core/testing';
import { TypedConfirmComponent } from './typed-confirm.component';

describe('TypedConfirmComponent', () => {
  let fixture: ComponentFixture<TypedConfirmComponent>;

  const confirm = (): HTMLButtonElement =>
    fixture.nativeElement.querySelector('[data-testid="confirm"]');

  const type = (value: string): void => {
    const input: HTMLInputElement = fixture.nativeElement.querySelector('[data-testid="typed"]');
    input.value = value;
    input.dispatchEvent(new Event('input'));
    fixture.detectChanges();
  };

  beforeEach(async () => {
    await TestBed.configureTestingModule({ imports: [TypedConfirmComponent] }).compileComponents();
    fixture = TestBed.createComponent(TypedConfirmComponent);
    fixture.componentRef.setInput('expected', 'Photo Printer');
    fixture.detectChanges();
  });

  it('stays disabled until the exact name is typed', () => {
    expect(confirm().disabled).toBe(true);
    type('Photo');
    expect(confirm().disabled).toBe(true);
    type('Photo Printer');
    expect(confirm().disabled).toBe(false);
  });

  it('emits once when confirmed', () => {
    const spy = vi.fn();
    fixture.componentInstance.confirmed.subscribe(spy);
    type('Photo Printer');
    confirm().click();
    expect(spy).toHaveBeenCalledTimes(1);
  });
}); 

Real-world version. My rule: an app asking to read private data, or a change to a security setting, gets step-up verification. Make the user re-enter their password or a one-time code first. Email them when a new app is connected, and make revoking it one tap away. If a future variant slips past your gate, the attacker still can't type your user's password.

Under the hood. The attacker controls the timing of clicks and which window receives them. They don't control keystrokes going into a field on your page. Typing the app's name has a side benefit, too: it forces a glance at the name, which a reflexive click never does. Use it on rare, high-impact steps only. If every screen asks for typing, people learn to type without reading.

Time to see all of it running together.

Does the whole thing work together?

Here's the full running example. The root component walks the user through the gated consent screen, then the typed confirmation, then a final message.

src/app/app.ts

import { Component, signal } from '@angular/core';
import { ConsentComponent } from './consent.component';
import { TypedConfirmComponent } from './typed-confirm.component';

@Component({
  selector: 'app-root',
  imports: [ConsentComponent, TypedConfirmComponent],
  template: `
    @switch (step()) {
      @case ('consent') {
        <app-consent
          appName="Photo Printer"
          [scopes]="['read:photos']"
          (approved)="step.set('confirm')"
        />
      }
      @case ('confirm') {
        <app-typed-confirm expected="Photo Printer" (confirmed)="step.set('done')" />
      }
      @case ('done') {
        <p data-testid="done">Access granted to Photo Printer.</p>
      }
    }
  `,
})
export class App {
  protected readonly step = signal<'consent' | 'confirm' | 'done'>('consent');
} 

The CLI generates an app.html and app.css next to this file. Delete both, since the template now lives inline. Then replace the default app.spec.ts with a test that plays the whole flow, including a click that should do nothing.

src/app/app.spec.ts

import { TestBed } from '@angular/core/testing';
import { App } from './app';

describe('App', () => {
  it('walks consent, typed confirmation and done in order', async () => {
    await TestBed.configureTestingModule({ imports: [App] }).compileComponents();
    const fixture = TestBed.createComponent(App);
    fixture.detectChanges();

    const el: HTMLElement = fixture.nativeElement;
    const q = <T extends HTMLElement = HTMLElement>(id: string): T | null =>
      el.querySelector<T>(`[data-testid="${id}"]`);

    // a click without a gesture does nothing
    q('approve')!.click();
    fixture.detectChanges();
    expect(q('typed')).toBeNull();

    // real pointer movement arms the gate
    document.dispatchEvent(new MouseEvent('mousemove', { clientX: 0, clientY: 0 }));
    document.dispatchEvent(new MouseEvent('mousemove', { clientX: 40, clientY: 40 }));
    fixture.detectChanges();
    q('approve')!.click();
    fixture.detectChanges();
    expect(q('typed')).not.toBeNull();

    const typed = q<HTMLInputElement>('typed')!;
    typed.value = 'Photo Printer';
    typed.dispatchEvent(new Event('input'));
    fixture.detectChanges();
    q('confirm')!.click();
    fixture.detectChanges();
    expect(q('done')?.textContent).toContain('Access granted');
  });
}); 

Run everything:

ng test --no-watch 

Expected output (again, the CLI puts a check mark before each file):

 src/app/app.spec.ts (1 test)
 src/app/consent.component.spec.ts (5 tests)
 src/app/typed-confirm.component.spec.ts (2 tests)
 src/app/gesture-gate.spec.ts (1 test)

 Test Files  4 passed (4)
      Tests  9 passed (9) 

If you'd rather watch it by hand, run ng serve and open the page. You'll see a disabled Approve button and the hint. Move the mouse and the button wakes up. Click it, type the app's name, press Confirm, and the final message appears.

So what were those headers protecting all along?

Remember the question I planted at the start? Here's the answer. X-Frame-Options and frame-ancestors protect your page from being framed by someone else's page, which is the classic clickjacking attack. They do that job well, and you should keep them. They're the right answer to a different question.

What changed is that your defenses now come in layers, each answering a different question. The framing headers cover your page living inside someone else's frame. The gesture gate covers a click arriving that the user never aimed at your page. The typed confirmation covers whatever slips past both. You can paste all three from this article.

It's Friday, 4:40 p.m. again, and the scanner is green again. This time you know what it can't see. You pull up the list of one-click screens you wrote down earlier, and the report line changes from "Clickjacking: protected" to something more honest. Then you close the laptop.

If you know someone who ships consent screens or payment confirmations, send them this article. It might save them a very strange Monday.

Bonus tips

Beginner. Take the list of screens that act on a single click and add data-sensitive to every dangerous button. Even if you do nothing else this week, that list is worth more than another header.

Intermediate. Record how long passes between the window gaining focus and the Approve click, and send it with the request. I'd use it as a risk signal, not as a lock, and alert on a burst of instant approvals.

Advanced. Browsers change. Script the parked-cursor check from the testing section in an end-to-end run for each engine you support, so a browser update that changes the behavior fails a test instead of surprising you in production.

Recap

DoubleClickjacking swaps the page under a user's cursor between the two halves of a double-click, so the second click lands on your most sensitive button. Because your page is never framed, X-Frame-Options, frame-ancestors and SameSite cookies have nothing to catch, whether they're set in NGINX, Apache, Cloudflare or CloudFront. The fix that holds up is on the client: keep sensitive buttons disabled until you see real interaction, guard against held keys and focus changes, and handle touch with a delay. Back it with a typed confirmation or step-up verification for the actions that matter most, and keep your framing headers for the classic attack.


What did you think? Did this approach match how you are solving it, or do you have a different take? Drop a comment. I genuinely read every single one.

Found this helpful? If this saved you even a few minutes of debugging or confusion, hit that clap button so others can find it too. It really does make a difference.

Want more tips like this? I share one practical dev insight every week. Follow me here on Medium or subscribe to my newsletter so you never miss one.

Let us connect. Find me on LinkedIn or GitHub and let us keep the conversation going.


Follow Me for More Angular & Frontend Goodness:

I regularly share hands-on tutorials, clean code tips, scalable frontend architecture, and real-world problem-solving guides.