Payment of ₹ requested by HONEY VIG. Click the link to pay securely via Razorpay: Make 5000 payment Payment of ₹ requested by HONEY VIG. Click the link to pay securely via Razorpay: Make 5000 payment ⭐ If you would like to buy me a coffee, well thank you very much that is mega kind! : https://www.buymeacoffee.com/honeyvig
Hire a web Developer and Designer to upgrade and boost your online presence with cutting edge Technologies
Showing posts with label Active Directory. Show all posts

Thursday, December 8, 2022

Multiple-user student webserver


For today’s (well, the last week or so) post, I’ll outline the steps needed to build a webserver that can be used by multiple users, authenticated from an active directory environment, to host content stored in individual personal directories. Last month, our existing student webserver (StudentNet) died as it was being hosted  on a disk array that was long overdue for being replaced. After 4 hard disk failures on a RAID 6 enclosure (accounting for the two hot spares that had been setup), it then died taking 10 servers down with it. Hopefully we will be able to purchase a new storage array soon – but in the meantime we need to get StudentNet back up and running for the start of term in October.

What is (or was) StudentNet?

StudentNet was a Ubuntu 12 server that was originally advertised as having the following software installed:

  • Apache
  • PHP
  • MySQL
  • Perl
  • Python
  • Firefox
  • X11
  • Oracle Java 7 (JRE and JDK)

It could be accessed internally on-campus through SSH and CIFS and finally, users could access their own directory via a web-browser by appending the url with their student ID, even externally. For now, I am only focusing on the items in bold.

Setup a basic LAMP server

First things first is to install a new VM on our ESX cluster. I recently updated the local ISOs available to the host machines to include Ubuntu 14 but I suspect that this will likely make no difference than had I stuck with using Ubuntu 12. As I have absolutely no idea of what sort of CPU load to expect, I decided to set the VM as having a single 4-core virtual CPU with 16GB of memory; it can be expanded later in the virtual machine settings. For making a new disk, I selected FFD3 – the new drive array, built from 6 (5 + 1 hot swap) 15K RPM SAS drives, collected up from no-longer (and never particularly often) used servers lying around. Like the existing SAS drives that failed they are old disks still, but most probably saw barely any use in their life (all were pillaged from other Dell servers we had around). Now, FFD3 is going to be exclusively used for studentnet – so I can allocate the entire disk group with thick provisioning to be used by the VM – if the I/O activity shreds these disks to oblivion, nothing else shares them and we can just rebuild the whole server again.

During a standard installation of Ubuntu, you can select a LAMP server as an option, but after selecting only to install OpenSSH and running a package update, I then went ahead to configure it as a LAMP server by manually installing the following:

  • apache2
  • apache2-utils
  • mysql-server
  • php-pear
  • php5
  • php5-mysql
  • php5-gd
  • php5-mcrypt
  • php5-curl
  • libapache2-mod-auth-mysql

The first thing I went ahead and did was to configure MySQL by running mysql_install_db followed by mysql_secure_installation, selecting the options to remove remote login through root and removing the test database.

I then modified /etc/apache2/mods-enabled/dir.conf to push index.php to be the preferred file (So that it now reads as “DirectoryIndex index.php index.html index.cgi index.pl index.xhtml index.htm_”) and did a service apache2 restart.

Finally, to test it all I created a new .php file for testing success under /var/www/html/ that just verifies mysql and php. It works!

LDAP support

I downloaded PowerBroker Identity Services from http://download.beyondtrust.com/PBISO/7.5.1.1517/linux.deb.x64/pbis-open-7.5.1.1517.linux.x86_64.deb.sh and installed it bash. I think it can probably
also be installed by running apt-get install pbis-open but I had installed 7.5 by downloading the package manually already. PBIS replaces Likewise, which used to be in the Ubuntu repository (but apparently now isn’t), and enables users to logon with active directory credentials. This means that students can now, hopefully, log in with their student IDs.

However, to do this, first we need to join the server to Active Directory by using the /opt/pbis/bin/domainjoin-cli command with the format of

“OU=<folder>,DC=<Our university>,DC=ac,DC=uk” ouruni.ac.uk serviceaccountforad

(you don’t need to add the domain to the account name). PBIS prompts you for the password and, after this, the errors started (albeit usually with no descriptions).

Now to change the PBIS configuration defaults for users logging on (so, which directory is created for them etc)

 sudo /opt/pbis/bin/lwsm refresh lsass
 sudo /opt/pbis/bin/config AssumeDefaultDomain true
 sudo /opt/pbis/bin/config HomeDirUmask 072
 sudo /opt/pbis/bin/config Local_LoginShellTemplate /bin/bash
 sudo /opt/pbis/bin/config Local_HomeDirTemplate %H/%D/%U
 sudo /opt/pbis/bin/config LoginShellTemplate /bin/bash
 sudo /opt/pbis/bin/config HomeDirTemplate %H/%D/%U
  [which represent Homedirectory/Domainname/Username]
 sudo /opt/pbis/bin/config UserDomainPrefix UOB 
 [Prefixes users and groups with UOB]
 [This restricts who can use the system, but wont use it for now. In future we might.]
 sudo /opt/pbis/bin/config RequireMembershipOf "UOB\\allStudents" "UOB\\CSTLinuxServerAdmins" "UOB\\allStaff"

I then added the Linux Server Admins group to the list of super users by running VISUDO and appending it with this like at the bottom

%CSTLinuxServerAdmins ALL=(ALL) ALL

Now, any user in that group can make system changes. Only a few people should be allowed to do this though! For a bit more security, I edited /etc/login.defs to change UMASK to 072 from 022. This means that now, nobody except people outside the group can read data and nobody except the owner can modify it.

After restarting the server, it is still joined to the domain and I can successfully log in as either a staff member or student!


Enabling user directories

So it seems that to get what we want, user-specific web folders, we have to use “userdir”. If I type “a2enmod userdir” to enable the module, and restart the apache2 service, I now should be able to login with WinSCP, right?

Right! I have my own directory specified as /home/UOB/(my username)/, however I can also browse other directories outside of /home/, which needs to be secured sometime. After making the changes below to /etc/apache2/mods-enabled/userdir.conf, users can put all of their files into a folder in their home directory named /public_html/ and access them through a browser at http://<server>.ac.uk/~<username/. Without the following changes, users who try to view the page will get a message that they are forbidden from being able to do so.

<Directory /home/UOB/*/public_html>
   AllowOverride All
   Options MultiViews Indexes SymLinksIfOwnerMatch IncludesNoExec
   <Limit GET POST OPTIONS>
      #Pre-Apache 2.4
      #Order allow,deny
      #Allow from all
      Require all granted
   </Limit>
   <LimitExcept GET POST OPTIONS>
      #Pre-Apache 2.4
      #Order deny,allow
      #Deny from all
      Require all denied
   </LimitExcept>
 </Directory>

And with that (on default Ubuntu 14 installations, it is just really two changes as highlighted), we now have a working student webserver!

Next time, I will probably try and get user directories working with Samba in Windows, so that users can drive map to their area on studentnet – but this will likely make them re-use it again as a storage area where they will inevitably run files from again, creating the huge I/O activity we saw before. But we will see how students need and use it over the coming months.

Troubleshooting

  • To test if the server is in AD, I just run “pbis status”. I have found servers that have somehow “lost” their AD binding, you can just then use “/opt/pbis/bin/domainjoin-cli join” to rejoin the domain and restore AD connectivity. You can also check the config file by doing “/opt/pbis/bin/config –dump” and seeing if the settings match up as above. This might also be /opt/likewise/bin/lwconfig instead, for older installations that used Likewise before PB took over.
  • Sometimes the server may not join if the computer has been moved from its original OU to another one. To remedy this, I went into the Active Directory tree structure and deleted the computer account on the domain controller. I then attempted to rejoin the server with a success.

Bootnote: I had originally used “pbis join” as the command to join the domain. However there seems to be actually nowhere on the internet at the time of writing that specifies “pbis join” as being a command to use! It might be possible to use this instead of domainjoin-cli, but there must be something that domainjoin-cli does that pbis join doesn’t.

I suspect this is to do with /etc/pam.d/common-session which pbis join doesn’t alter, but domainjoin-cli does (it adds session sufficient pam_lsass.so and session optional pam_systemd.so to the end of the file). Additionally, the syntax is a little different than if you were to use domainjoin-cli as above (error descriptions are not always forthcoming so from the small amount on the “pbis join” command, I can only assume that this isn’t fully supported by Powerbroker – yet?):

  • First of all, I had Error 40022; I forgot my AD service account password, so I had to reset it.
  • Then I had Error 40320 – LW_ERROR_LDAP_INVALID_DN_SYNTAX – I had the syntax wrong; you don’t need to have the entire OU/DC structure, just the OU as follows: “LowestFolder/NextFolder/Computers/TopOfTree”.
  • This gave me Error 40318 – LW_ERROR_LDAP_NO_SUCH_OBJECT – I had the syntax now the wrong way around; The error indicates that the OU object doesn’t exist as it was written, so it is now  “TopOfTree/Computers/NextFolder/LowestFolder”.

After correct this one last time, it now finally works using pbis join –ou “TopOfTree/Computers/NextFolder/LowestFolder” ouruni.ac.uk serviceaccountforad.

However, this actually didn’t allow me to login, even after rebooting, as any domain user. I could find them wiith “pbis find-user-by-name” and a username of someone I know and it returns a user, telling me that it can locate users. But I can’t log in as one, bizarrely. It was then that I reverted to using domainjoin-cli

Thanks, in part, to http://andys.org.uk/bits/2010/01/28/likewise-open-and-linux/

Wednesday, December 7, 2022

Multiple-user student webserver

 we have had a second catastrophic outage of our storage array which, once again, has taken Studentnet with it. However, going from my previous blog post has allowed me to get this up and running fairly quickly. In the process, I found some addendums that I would make to the original – but rather than edit it in, I thought it would be better to make a new post to explain the differences. Plus, I found a much quicker way to get it up and running..


Change 1: Install Linux as a LAMP server

This is really simple. Lots of things will get installed by default here; the pear, php and mysql modules all get installed with this. Selecting this and OpenSSH is all I did this time around. Straight afterward this, all that needs to be done is the original step of altering /etc/apache2/mods-enabled/dir.conf to push index.php to the start as well as an apt-get update and upgrade

Change 2: Powerbroker/Likewise installation

This time around, I used pbis 8.2, rather than 7.5. apt-get install pbis-open doesn’t work – so we need to get it from Beyondtrust’s download site manually. Over at http://download1.beyondtrust.com/Technical-Support/Downloads/PowerBroker-Identity-Services-Open-Edition/?Pass=True can be found the latest version for a given distribution; for Ubuntu, currently, this is currently located at  http://download.beyondtrust.com/PBISO/8.2.1/linux.deb.x64/pbis-open-8.2.1.2979.linux.x86_64.deb.sh which uses the Debian release.

The following commands are how I got this working:

cd /tmp
//Make a temporary directory

wget http://download.beyondtrust.com/PBISO/8.2.1/linux.deb.x64/pbis-open-8.2.1.2979.linux.x86_64.deb.sh
//Download to this directory

sudo chmod +x pbis-open-8.2.1.2979.linux.x86_64.deb.sh
//Give execution permission for this file

sudo ./pbis-open-8.2.1.2979.linux.x86_64.deb.sh
//Run the installer. Dont select legacy links, dont need it, and select yes to install now

sudo domainjoin-cli join --ou "OU=ComputerFolder,DC=company,DC=co,DC=uk" company.co.uk myaccount
//The account "myaccount" has to be able to join the domain. You'll be prompted to enter a password.

After this, the server can now accept domain logins. The only other thing to do now is to add in some AD configuration, for things like the prefix for the domain (so users don’t have to type their username@domain.. they only need to type username) as well as where their home directory is located. The following lines add entries to the PBIS configuration:

sudo /opt/pbis/bin/config UserDomainPrefix MYDOMAIN
sudo /opt/pbis/bin/config AssumeDefaultDomain true
sudo /opt/pbis/bin/config LoginShellTemplate /bin/bash 
sudo /opt/pbis/bin/config HomeDirTemplate %H/%D/%U 
sudo /opt/pbis/bin/config RequireMembershipOf "MYDOMAIN\\students" "MYDOMAIN\\staff" "UOB\\TechStaff"
sudo /opt/pbis/bin/config HomeDirUmask 072


Change 3: Quick permissions changes

The only next thing to do now is to ensure that “TechStaff” are able to act as admins. We can do this by adding the following, somewhere in the sudoers file (nano /etc/sudoers):

%TechStaff ALL=(ALL:ALL) ALL

TechStaff users can now do everything. Now, for the web server part, we set home directories to be only changed by their owners (and read by anyone in the group and executed by anyone else) already, but we need to change one small thing in the apache2 user directory config after making sure we have run a2enmod userdir – Inside /etc/apache2/mods-enabled/userdir.conf , the line /home/*/public_html needs to be changed to /home/domain/*/public_html – which is specified in the HomeDirTemplate above (home/domain/user – %H/%D/%D). The next line, AllowOverride, should just say All after it, too.

After restarting apache2, everything should work alright, as before. PBIS was a lot easier to install and join the domain with this time around and with the LAMP installation automated, everything was just a lot quicker to get running.

Creating a Windows shared drive in Ubuntu 14.04 with Samba


Since writing this post, these subsequent posts may help with some issues:

Introduction

One of the many servers we didn’t lose was the team’s storage server, called Warehouse. In fact, it was the only remaining survivor of what we can in future call the Great Server Loss of 2014 (or 2015. We’ve had two now). However, it had been set up by someone else who worked here and I was keen to see how hard it was to set up for myself, since we’ll be setting something similar up later for students to have their own storage space. With the server’s footprint at over 2TB (deleted files don’t free up any usage, since its a VM), I decided it would just be quicker and more useful to rebuild it from scratch, rather than copy everything over to a new partition in a lengthy disk “downsize” process.

This – and following – articles should help with making a file server in Ubuntu (the same steps should more or less apply to any other flavour of Linux) that you can then access, and map a drive to, from Windows. We need Samba because Linux’s own file system, NFS, can’t be accessed natively by Windows – so we will configure a system that can. Samba is, basically, the Unix way to to use Server Message Blocks (SMB), which is mostly used by Microsoft networks for file-sharing and communication between hosts. If you’ve seen the term CIFS anywhere, it is basically a Microsoft-only implementation of an older (but once newer) version of Samba (see here for a more in-depth explanation of how it all fits together). So Samba is the thing we will configure and use for Windows machines to be able to access the file system on our Linux server – from Windows, it should essentially appear to be just the same as a Windows server share.

For where I work, there are two purposes for our storage server:

  • Share files between staff members in Windows, which should be only accessible by certain authenticated users
  • Make certain files (desktop backgrounds, some installers, some documents and assets) publicly accessible for other users and computers

There are a few steps involved and, although not particularly lengthy, I wanted to go into a bit more detail about how to get each step working and explain some of the problems you might also face in a similar environment.

Initial Installation

When installing a standard Ubuntu 14.04 server installation, select Samba and OpenSSH. Out of the box you can connect to the server via SFTP, using something like WinSCP. But this isn’t really practical for accessing files – additionally, you have to be authenticated to login and, with only one account, you’d have to make more users manually if you wanted to give access to different people. So, after updates and upgrades, we need to configure Samba to make it work at all and end with the aim of joining an Active Directory domain.

Configuring Samba

There are two things that are implied a lot throughout the next few step;s the first is that you are editing the samba configuration file which in this case – unless otherwise specified – is at /etc/samba/smb.conf

The second thing is that you will be doing a lot of service restarts. Any time you make a change in the Samba configuration file, you have to restart both the nmbd and smbd services, which you can do using service samba.

Finally, you’ll likely have to use sudo for everything.

sudo vim /etc/samba/smb.conf

sudo service samba restart
Stopping Samba daemons: nmbd smbd.
Starting Samba daemons: nmbd smbd.


Starting to make Samba work

Now, by default if you connect to a Ubuntu server through the Windows explorer address bar, for example \\10.1.63.246\, you’ll get a message that Windows can’t access the address. However, with Samba installed, you’ll be able to browse it straight away, since ports 139 and 445 are open, which are used by Samba. Although, until we enable the home directories, we won’t see anything.

The first thing to do is edit the samba configuration file, smb.conf, which contains different categories and settings. There will be a commented out section called [homes], so uncomment it to read as follows:

[homes]
comment = Home Directories
browseable = yes

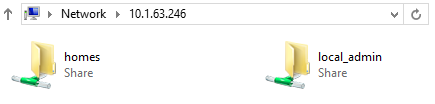
If you save and exit the configuration and restart the samba service, you can now navigate back to your IP address and should see new folders show up:

bar2

This will show whether or not it works! However, you don’t need be authenticated for this and, by default, all user directories are shown here and, although not editable, they are readable and copyable. In the configuration file, you can change “browseable = yes” and make it “no” instead; this way, you can’t see all the home directories by default and any other shares you make, you can make browseable. However, the user directories are still accessible. This probably still isn’t going to be quite right; we want to create our own shares and control which are public and which require a user to be authenticated to be able to view them.

Active Directory with PBIS

One way to accomplish this is to make different user accounts and groups on the server itself, but with an Active Directory domain already in existence, we can just join our server to the domain, as previously described here, under “Change 2”, and use these accounts and groups instead.

With the server on the domain, you can now login as other users if you wanted to. I modified the configuration file to remove all of the comments and, essentially, rewrite it as follows;

[global]
workgroup = Troliver
realm = troliver.com
server string = Warehouse Server (%h)
dns proxy = no
security = ADS
encrypt passwords = true
log file = /var/log/samba/log.%m
max log size = 1000
syslog = 0#
panic action = /usr/share/samba/panic-action %d
passdb backend = tdbsam
obey pam restrictions = no
unix password sync = yes
passwd program = /usr/bin/passwd %u
passwd chat = *Enter\snew\s*\spassword:* %n\n *Retype\snew\s*\spassword:* %n$
pam password change = yes

The important things here are the domain name in realm and that security = ads is set. After this comes the different shares – mappings to Unix directories; to make a share, you have to specify the path to a directory. 

Creating shares

For this guide, I’ve made two shares – test1 and test2. You can do this by simply add the following lines to the configuration file created above:

[test1]
comment = Read only, everyone
path = /home/share/test1

[test2]
comment = Read only, CST Tech Staff group
path = /home/share/test2

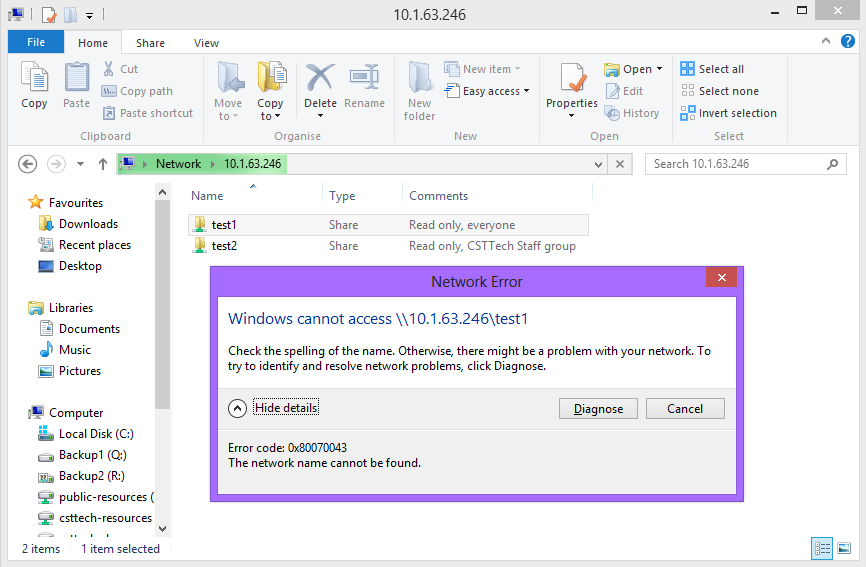
The shares will be visible but you can’t initially access them, with a message that the network name cannot be found.

share1

This is because the path we have specified in Samba doesn’t actually exist on the server. Samba will show Windows that this path exists but that doesn’t necessarily mean it does; samba acts a front end to Windows and the configuration tells samba, essentially, how to present your server to the rest of the network.

To resolve this, we just create a new folder with mkdir and it should now work:

mkdir /home/share/test1
mkdir /home/share/test2

Restricting shares to specific users or groups – Samba permissions

The next thing we can do is to restrict who can actually access the share. We can specify that “test2” can’t be accessed by anyone who isn’t called “testuser1”

[test2]
comment = Read only, access only Staff group
path = /home/share/test2
valid users = testuser1

Alternatively, we can specify a group name by prefixing it with an @, as below:

[test2]
comment = Read only, access only Staff group
path = /home/share/test2
valid users = @domain^admins

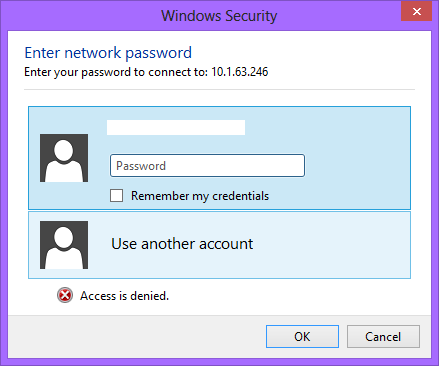
Now we are giving a whole group – domain^admins – access to the share instead. You’ll notice that, if you aren’t logged in, you cant access it; but you can still see it if you browse to the address of the samba server. By default, without valid users specified, everyone is able to access the share.

The last thing to put in, which we will need later, is to make any new files created by a user to be given a specific group association with force group.

[test2]
comment = Read only, access only Staff group
path = /home/share/test2
valid users = @domain^admins
force group = domain^admins

Normally, in our domain, it seems that any files created from within Windows by an authenticated user will be created with “domain^users” as the group; but the problem is that this would include anyone who isn’t in the group of domain^admins if they were a member of both. The above change in the configuration forces all files to take on their group membership of domain^admins and, if necessary, “force user” can be added, too, to force ownership of the file by another user.

Edit: There is an important thing to note here. If you want a share to only be accessible by a specific group – say domain^admins – you may have to prefix it with a plus sign (+domain^admins) if you don’t also specify “valid users”:

In Samba 2.0.5 and above this parameter has extended functionality in the following way. If the group name listed here has a ‘+’ character prepended to it then the current user accessing the share only has the primary group default assigned to this group if they are already assigned as a member of that group. This allows an administrator to decide that only users who are already in a particular group will create files with group ownership set to that group. This gives a finer granularity of ownership assignment. For example, the setting force group = +sys means that only users who are already in group sys will have their default primary group assigned to sys when accessing this Samba share. All other users will retain their ordinary primary group.


Restricting shares to specific users or groups – Unix permissions

(For a quick explanation of Unix permissions, see my previous article on Unix permissions.)

As I mentioned earlier, Samba relies on the underlying Linux system to have directory availability and permissions to match that which it advertises; in other words, the Linux file system is what really counts here. You can create a share to anywhere, but if that folder doesn’t exist on the system, then it won’t ever be accessible. Similarly, even if you restrict access to a share through Samba’s permissions, there is no guarantee that somebody might not gain access via SSH and access folders that way.

Since you have to ensure that the underlying shares that Samba can access have the right permissions anyway, you might as well restrict who can access a folder this way too.

First of all, we need to change the group that owns the folder, which isn’t a Samba-specific thing. You can check the owner and the group of a file or folder with ls -l.

share4

Then use the following command to change the group  to domain^admins:

chgrp domain^admins /home/share/test2

Check the ownership again:

share6

The test2 share should now be accessible by the domain^admins group, however nothing will have necessarily changed, since the default permissions for that directory is 755; which means only the owner can modify files, but everybody else can only read and execute them; including the group assigned to it.

However, this isn’t necessarily too problematic at the moment because newly created files still are only modifiable by their owner, as per the underlying Unix file permissions. But non-authenticated users can view the newly made files and only the owner can modify them, which isn’t necessary what we want; we want the owner and the group to be able to read and write and everyone else to have no access at all.

So to do that, we want this changed with chmod to 770 or 775 – which means that the group associated with a directory, or file, has the same permissions as the owner, whilst still restricting the access of other users. This is an important step to follow, otherwise your restrictions won’t apply how you want them to.

chmod 771 /home/share/test1
chmod 770 /home/share/test2


This needs to be done for the main directories that you want to act as shares. I would recommend setting them to 775 for public folders and 770 for restricted folders, with the group set to being that of one that you wish to act as administrators for the folders. But there is another issue; even if we have the share folders’ permissions set and the users and groups of new files set to those that should have appropriate access, we don’t have the default permissions set to match them.

Back to Samba again

However, from within Samba, we can force a set of permissions for files and directories with two sets of commands;

  • create mask and directory mask
  • force create mode and force directory mode

These can be used to specify what permissions are granted to new files when they’re created. There are some default behaviours, by default:

  • Samba’s default create mask is 744 and directory mask is 755
  • Samba’s default force create mode is 000
  • Samba ignores the system umask (which is 0022), which is used to give permissions to files normally


Logically, the way in which permissions are changed by these two sets of commands are (with this site backing it up),

  • force create mode will do a logical OR on permissions, so modification should increase permissions
  • create mask will do a logical AND on permissions, so modification should restrict permissions

Therefore, I would likely need a combination of both; force create mode to increase permissions for the group and create mask to remove permissions for other users. Because the create mask already has a default, we should just be able to change that to remove the restriction that is inherent with its use. However, even after setting create mask to 777, which should get rid of any restrictions, this actually only sets the permissions to 766 for new files instead – and it doesn’t seem that there is any logic for this to be happening at all. If the system umask and fmask did actually affect these files, then my setting it to 0000 would have had some affect, which it didn’t. It looks like there is something else restricting the permissions, somewhere else; however this isn’t a big deal, since we don’t necessarily want everyone to execute files on the server. So we can stick with the following additions to the file to make files only read/write by the group assigned to that file or directory with:

create mask = 0660
directory mask = 0770


Amend for public readable files and folders with:

create mask = 0660
directory mask = 0770


So no matter what we do with create mask, we are restricted to not being able to execute for group members or other users. But here’s the thing; you can force Samba to give you all the permission you want if we then decide to user force create mode – you can get the last two bits you need with setting it to 011 (or 777, for that matter), although I don’t see what is preventing you from doing this same thing by removing the create mask by setting all permission bits. Feel free to contact me if you have any idea why!!

So with that finally done, here is the resulting smb.conf file that should give you access to a shared directory that has had its permissions set to 770 and its group assigned to domain^admins. Note that, if you only need one group to be able to access the share, you don’t need to include the valid users line, since this is just a Samba restriction – if the underlying file system already has that restriction, its redundant. Uncomment or keep commented as necessary.


[test2]
comment = Read only, access only Staff group
path = /home/share/test2
#browseable = no
#valid users = @domain^admins
force group = domain^admins
create mask = 0740
directory mask 0750


What next?

  • These three options shouldn’t need to be configured, but you might want to if you have a larger group given access that might include other groups, or you want to restrict access without using ACLs:
    • guest ok
    • write list
    • valid users
  • For more information on getting started and configuring Samba for Ubuntu, take a look at a few of the guides on the Ubuntu page for Samba as well as some of the following links, which helped me too:

If you have any comments or questions, feel free to post them below. I may well have overlooked something!

Trouble in Sambadise; Issues with PBIS Active Directory and Samba


Continuing from the last post, with the original default configuration you could browse shares on the server, but with the updated configuration you can’t.

share5

We have joined the server to Active Directory and there are likely no issues reported with running pbis status, so what could be wrong?

I had a look through some logs in /var/log/samba/, where there are logs for each machine that has tried to access a samba share. Open one of them and you’ll possibly see four errors occur (with the timestamp lines removed)

  get_schannel_session_key: could not fetch trust account password for domain 'Troliver'

  cli_rpc_pipe_open_schannel: failed to get schannel session key from server domaincontroller.troliver.com for domain Troliver.

  connect_to_domain_password_server: unable to open the domain client session to machine domaincontroller.troliver.com. Error was : NT_STATUS_CANT_ACCESS_DOMAIN_INFO.

  domain_client_validate: Domain password server not available.

This is crazy; it seems like there is something wrong with joining the domain – but we are already on the domain and can change users! Ah ha, but I haven’t yet run the Samba-Interop installer, which allows you to integrate PBIS authentication with Samba.

Following this guide, for version 8.x, I ran /opt/pbis/bin/samba-interop-install  – but this failed!

Found smbd version 4.1.6-Ubuntu
Unsupported smbd version 4.1.6-Ubuntu
Error: ERROR_PRODUCT_VERSION

If anyone asks what the difference is when using Ubuntu over CentOS, one answer you might commonly find on Google is to do with how “up-to-date” Ubtuntu is, with new and updated packages all the time, compared to CentOS which may be lagging behind with older, more stable, releases. So at the time of writing, Ubuntu’s implementation of Samba – as installed by default – is at version 4.16 and PBIS is at 8.2.1.something. Both are the latest; yet they don’t work together when using the samba-interop-install to link PBIS with Samba, which only supports versions up to 3.5 it seems.

In fact, this seems to be a problem that has been around for a while. Its for PowerBroker to figure out and fix; but actually, they even only discuss version 3 in their installation guide. So we probably can’t use Samba 4 at all and there is no indication that that will change. In the meantime, you have to use an older version of Samba. But how?

[The hard way that I didn’t end up using] – Make Samba yourself

  • For this, you’ll need to have installed gcc and make. You then have to remove Samba, which should also prompt you to remove libnss-winbind, libpam-winbind, samba and winbind. Use apt-get purge to get rid of the local repository files too.
  • Next, you can find an appropriate version of Samba 3 to compile here (probably version 3.5 or below).
  • Download it with wget (package address), use tar -xvzf to extract it, go to the source3 folder and run ./configure. This can take a while..
  • Run make, more time again.
  • Finally do make install
  • If it all completes successfully, you can delete all of these files that you downloaded and extracted
  • The installation process should have put Samba into /usr/local/ – which is where any newly compiled stuff goes by default
  • After this, you need to do a few more things, but I found a much easier way to do it instead; see below.

[The easier way that I ended up using] – Install Samba from another repository

It looks like there is a way to get this working with an older version of Samba, build for Ubuntu 12. Thankfully, it worked fine – so referring to this link, the following had to be done:

  • Edit /etc/apt/sources.list to include the line “deb http://ftp.sernet.de/pub/samba/3.5/debian squeeze main”. This will add the sernet server as a package repository.
  • Attempt to perform  apt-get update, which will initially fail since you need to have a key to authenticate with the sernet server
  • As root (and you have to be, for this), write these two lines:
    • gpg –export –armor F4428B1A | apt-key add –
    • gpg –keyserver wwwkeys.pgp.net –recv-keys F4428B1A; 
  • You should now be able to perform an update successfully and install samba from this new repository with apt-get install sernet-samba.
  • After this, all other commands should work the same as it would with the original distribution of Ubuntu; you don’t have to use sernet-samba for every samba command you write

Running the samba-interop-install should now work fine and, at least in my case, everything fell into place. Hopefully everything will work better now for other people too – but if anyone has any issues, comments or suggestions, please feel free to discuss them or to get in touch.

Trouble in Sambadise; How to remove .DS_Store and other system-created files in Samba


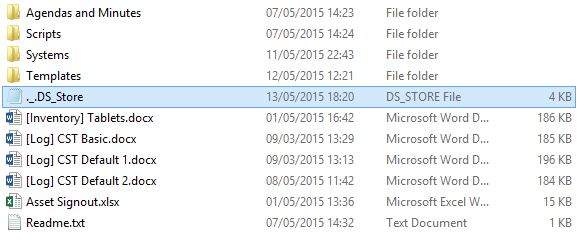
Our file share seems to be running well now, except for one bothersome thing; The generation of hidden system files. I noticed this after one of our team members accessed our Samba share from a system running Mac OS, where I could see where he’d looked around by the trail of hidden ._.DS_Store files he had left behind.

sambaveto1

Users who access the Samba shares from a Mac will inadvertently generate ._.DS_Store and .DS_Store files that are just plain annoying. Although you can view them if you have the option to view hidden files turned on, by default they’re hidden and make an apparently empty directory NOT empty, amongst other annoyances. This is even true from within Linux, where listing a directory with one of these rogue files shows nothing:

veto1


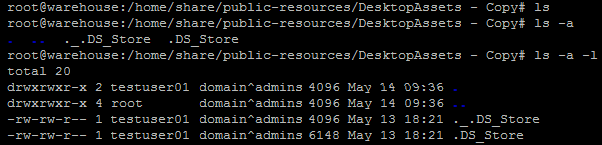
But you’ll be able to see hidden files, with the -a switch.veto2


And finally you can see more about the files with both -l and -a.veto3

So how do you stop this from happening?

Samba allows you to “veto files” by specifying which files in the current folder you want to remove – but this doesn’t actually get rid of them on its own. Since Samba builds on top underlying permissions in the Unix system, all that this does is to hide these files from the view of Windows share users.

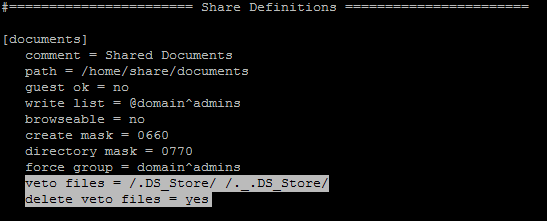
This is quite annoying – because if you try and delete a folder, it just won’t let you (and, at least on my Windows 8 system, no error shows up). You have to also specify “delete veto files = yes” to allow users to delete these files too (even if you can’t see them). Open up the Samba configuration (etc/samba/smb.conf) and, under your share name, add the following two lines:

veto file command

However, this doesn’t get rid of files that already exist; it just hides them. I think many people think that this is enough – but I’d really like to avoid the creation of residual files and hidden behaviours like this in the first place, so I wanted to find a more robust solution.

The most popular articles exist suggest that the above two lines should be enough. Actually, it has been suggested to add all ._* files to this list on some of these articles – but this can affect some unix files too, which isn’t necessarily what we want to have happen.

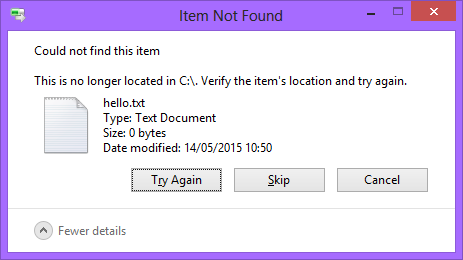
But it turns out that these two lines are probably the best approach – and what wasn’t initially clear, too, is that this does actually stop files from being created in the first place. You can test this out by doing something like copying over just a plain text file called “hello.txt”, which should be blacklisted in the veto files list:

veto4

Now, the message you get is that it can’t find it in the source folder, but all that is happening is that it just isn’t copying it over. Don’t worry, it isn’t deleting the original file!

This should be all you need to do – but one other thing that should be pointed out is the format that Samba expects you to have files listed in, if you’re trying to veto multiple files. Each file should be separated by a forward slash with no spaces, like so:

/test1.txt/test.txt/test3.txt


Well, actually.. you can have spaces.. but in that case, it has to look like this:

/test1.txt/ /test2.txt/ /test3.txt/


If you do the following, then only test3.txt is removed, since the space is included in the name of the file:

/test1.txt /test.txt /test3.txt


This is important – since if a file has a space in the name, you would NOT use quotes as you might expect you’d have to; you simply write the name as it appears:

/test 1.txt/test 2.txt/test 3.txt


The last thing to do now is to cleanup the files that already exist. Since there could be any number of folders and subfolders that have been accessed by a Mac user, you need to do a recursive search for the files and then delete them.

find . -name "*DS_Store" -delete

(You can replace the *DS_Store part with anything you want to find and delete, for example .DS_Store, ._.DS_Store, desktop.ini or thumbs.db)


As a final thought is that, there is a possibility that this has an effect the server’s performance when writing files since it has to check the list of veto’d files every time a file is written. This is not a critical issue for shared drives where read time is often more important than write time, but its a consideration for the future if performance was ever to be of critical importance.

Tuesday, December 6, 2022

Mapping Samba shares in Windows (and how to assign drives through a Group Policy)


(Looking for how to set up a Samba share in Linux? See one of my previous posts for setting up Samba shares with Ubuntu) 

Before I start, this article assumes that you already have a Samba share you want to access and that you are running Windows (XP, 7, 8 its all kind of similar). It’s quite a straightforward guide and I’ll go into how you can apply a Group Policy to map a drive automatically at login.

Map the share – GUI

  • First of all, you should be able to connect directly to the share by navigating to \\x.x.x.x\share-name\, although you might not be authenticated to view it if there are permissions applied to it.


  • To map the drive in your list of drives in Windows, right click My Computer and select Map network drive
  • Next, give it a drive letter and put the share’s address in. Note that this is whatever you named the share heading in /etc/samba/smb.conf and not necessarily its absolute path on the server.
  • If you want the drive to be persistent, IE appear when you next log in, keep “Reconnect at sign-in” checked.
  • If the drive requires authentication from specific users, click “Connect using different credentials”. If this is on a different domain, make sure the username is in the format of domain\username and that you check the box to remember your details, otherwise you’ll have to keep typing in your password every time you want it to connect.
  • Your drive should now be mounted and reconnect when you logon!

 Map the share – command line

  • You can use net use to map a share in the same way by typing:
    • net use z: \\10.1.1.1\test1
  • For shares requiring authentication as a different account other than the one currently logged in, you can connect using specific credentials as above, for user Troliver (and, if you want, on a domain called myDomain) with:
    • net use z: \\10.1.1.1\test1 /user troliver password1
    • net use z: \\10.1.1.1\test1 /user myDomain\troliver password1
  • You can then keep the drives in your list every time you log in with the /p[ersistent] switch:
    • net use z: \\10.1.1.1\test1 /p:yes
    • net use z: \\10.1.1.1\test1 /persistent:yes
  • Now, if you want to the share to be persistent and use the same credentials (and store them), you have to use a different syntax, which will then ask you to input your details;
    • net use z: \\10.1.1.1\test1 /persistent:yes /savecred 
  • And if you want to delete a share, or all shares, you can use the following:
    • net use * /delete
    • net use z: /delete

Map the share – Group policy

Going on from the command line mapping, you can also map drives this way through using Active Directory Group Policies. For this, you need to have permission to create Group Policies on your domain controller.

  • Firstly, open up Group Policy Management
  • Next, right click on the OU with the computers in that you want to apply to Group Policy to and select the option to make a new GP and to link it here.


  • Edit the policy to the level of User Configuration > Policies > Windows Settings > Scripts (Logon/Logoff).
  • We can add scripts here that we want to execute at user logon. Right click “Logon”, select properties, click “Add” and create a new file named mountingscript.bat file in the folder for your GP.
  • You can get this script here to do anything you want, but this one will just be used for mapping shared drives:
net use x: /d 
net use x: \\storageserver.troliver.com\documents /persistent:no 
net use w: /d 
net use w: \\storageserver.troliver.com\resources /persistent:no 
net use p: /d 
net use p: \\storageserver.troliver.com\shared /persistent:no
  • This will map three shares to three different drive letters. persistent:no is also added so that the drive isn’t saved between logons. This is optional, but a good idea to include because the drives might end up being changed remotely, later. Additionally, you might want to delete the drives in case somebody else has mapped them already, with net use [drive] /d(elete) before each drive.


  • The changes should be saved immediately when you click apply, although they make take some time to propagate through to the different domain controllers. You can verify the settings in the Settings tab.


  • One final thing you can do is to restrict which groups this policy applies to. Up until now, there hasn’t really been a reason to use the default Lab Policy that already exists for the same OUs. But we can target specific users – such as a technical team – by making a new policy which has its Security Filtering only apply the GP to specific users and groups. For this, you will want to remove “Authenticated Users” and replace it with a group (or groups) of your choice. Its important to remove “Authenticated Users”, otherwise you’ll not have restricted it at all!


  • If you’ve configured it correctly, you should now get a drive (or drives) show up at logon for any domain user who’s logged onto the OU that the Group Policy applies to.

I hope this manages to help people to mount their Samba shares seamlessly with the rest of their Windows Network. There’s very little to really talk about with the Linux side as, once it is set up, it should appear to the user no different from a Windows Server share.

If you have any questions or comments, please do get in touch or leave a comment below and I’ll try to help!