
When it comes to building a website, it helps to have a process to follow, especially if you are just getting started as a web designer. Good guidelines can help you work better by keeping forgetfulness to a minimum.
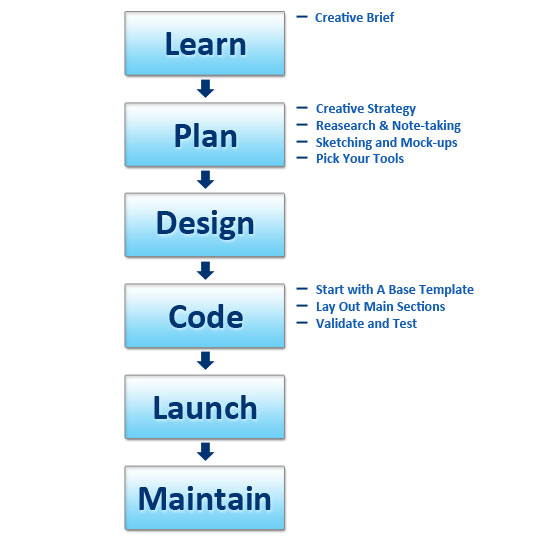
Every designer or company will develop unique components to their web design process over time, but the basics remain the same: learn, plan, design, code, launch and maintain.
In this article, I will share my process for designing a website.
Before we get into it, let me first share two parallel processes that should be taking place throughout your design process.
The first thing you should be doing continuously is seeking feedback. You’ll save yourself a lot of wasted time and effort by getting feedback at regular intervals.
The second thing you should do continuously is testing. Test the heck out of everything as you go to avoid mega-headaches down the road.
With that said, let’s get started!
1. Learn
What do you think is the most important step of the web design process? Planning? Designing? Coding?Guess again.
It shouldn’t surprise you that learning — discovering and understanding what you need to build in the first place — is the most important part of the entire website design process.
Why? It’s simple, really. The more you know about what you need to accomplish, the better your chances will be of creating a successful website.
Think of it like this: If you are an archer, don’t you need to know where to aim your arrow? That’s what the target is for. The little red dot in the middle is the bullseye. Since it’s smaller, it’s harder to hit, but even if you aim for it and miss, you’re sure to get closer than if you aimed your arrow up into the air and hoped for a random direct hit.

So how can you score a bullseye as a web designer? Before you go any further, you need to define what hitting the bullseye in your project means.
As a web designer, hitting the bullseye is giving your clients what they want — it’s what they are paying you for.
What clients want varies widely on a case-by-case basis. Since you aren’t a mind reader (no, you’re not), you need to proactively find out what they want.
In some cases, they may not even know what they want, and in other cases, they may have a hard time verbalizing what they have envisioned because they don’t know industry terms and concepts like CSS, Ajax, or relational databases.
The Creative Brief
Fortunately, there’s a tool web designers can use to easily gather this information. It’s called a creative brief. A creative brief is basically a series of questions that you ask your clients so that you can understand the scope and goals of a project.You can ask these questions during a face-to-face meeting or a phone call — or you can simply make a web form available on your website that handles the answers of your clients.
You should obtain this information in the way you and your clients are most comfortable with — but whatever you do, don’t skip the creative brief because it will become the lifeblood of your project.
What kind of questions should you ask in your creative brief? At the minimum, find out:
- The client’s target audience
- Their primary and secondary goals for the website
- Current branding characteristics
- Budget
- Deadlines they need to meet
You might also want to find out if they need an online store, if they already have a logo (if not, you can make one for them), who will be responsible for maintaining the site once it goes live, and so forth.
You might have unique questions that you will want to include; use them and don’t be afraid to tailor your questions on a per-project basis.
2. Plan
Once you’ve learned what you need to build, it’s time to start planning how you are going to make it happen. Before you can start designing a website, you need to know exactly what, and how, to design it in the first place — and it all starts with creating a design strategy.Your design strategy for each website you make should be handcrafted to fit the client’s vision (if you are designing a site for yourself, then you would qualify as the client).
So what factors will shape your design strategy? The creative brief will act as the foundation of your plan by providing you with some basic information, such as what your timeframes are and who the target audience of the website is.
It’s especially important to know your audience because it will affect where and how the site gets viewed. For example, will you also need to create a mobile version or an iPad-specific version that works with touch?
Research and Note-Taking
Whatever gaps are left in the overall strategic picture will need to be filled by doing some research of your own. Now is the time to visit competing websites and see what types of designs are already out there in the target market so you will know how to differentiate your own design.See who comes up first in a Google search and try to find out why. Within 10 minutes, you should be able to start piecing together the beginnings of your design plan.
While you are researching, you’ll also start brainstorming about what colors to use, where to place the call(s)-to-action, what kind of fonts you should use and other similar details.
At this point, you should also be taking notes, snapping screenshots and starting a mood board.
Sketching and Mock-Up
Next, it’s time to create a mock-up and start letting your ideas take on more of a tangible state. I like to start by sketching out my ideas on a regular old piece of paper, as do many other web designers.Other people prefer to use a wireframing tool like OmniGraffle. During this phase, not only will you want to start thinking seriously about the layout of the site, but also the structure of your site and how the navigation will shape up.
This is your chance to see what works best and a good place to experiment with different ideas before actually hitting Photoshop or Illustrator to create something more concrete.
Pick Your Tools
This part of the process is also the perfect opportunity to assess which tools you will need to use. You absolutely should not fall into a pattern of using a predetermined set of tools for each site you create. It’s a potentially hazardous practice for everyone involved, including the site’s end users and the client (not to mention how monotonous your portfolio would look).Put some real thought into what content management system would work the best considering the site’s goals, whether or not including Flash at all is a good idea, and so on.
3. Design
Now I know there are many web designers out there who like to skip directly to the design stage without giving a second thought to learning or planning, but design is more than just the act of creating. You want to actually create something good and useful and you just can’t do that without first doing some preliminary work before starting to design.If you’ve already done the legwork of learning and planning, it makes the actual designing much easier. When you don’t have to worry about the little details, it really opens up a whole new level of effectiveness and productivity because you can focus on more important things.
Once you are ready to start designing, keep in mind that you need to design more than just a home page. You’ll need a design for the sub-pages of your site as well. It can sometimes be easy to design a home page concept, slice it up and start coding only to get to sub-pages and have no direction. You may also need to design a mobile or iPad version of your site as well.
The design phase itself is straightforward. Just open up Photoshop (or your graphics creation tool of choice) and start bringing your mock-up to life. Sweat the details. Make it pixel perfect. Even if you feel like the project you are working on is more boring that staring at a wall for 24 hours straight, put your all into it. Your client will notice and you’ll be proud of the work you did.
You’ll have to decide at this point whether you want to use real content in your design or some dummy text (e.g. Lorem Ipsum). There are plenty of fans in either camp, but I personally prefer to use real copy and photos if they are available to make it as close to reality as possible.
During the design phase, it is incredibly important to seek feedback often to make sure all specified requirements have been met. If the client wants to make changes, now is the time to do it before the design is sliced and coded, making it ten times more difficult to make what would be a simple change if you were to do it during the design phase.
4. Code
Once you have a killer design, you’ll need to turn it into a real, live website. A safe bet, no matter what content management system you are going to be working with, is to start with a generic HTML and CSS template.Start with a Base Template
If you’re like me, you’ve already got a set of starter HTML and CSS files ready to go that are already linked to each other and already contain some basic starter code (such as a CSS reset).If you’re not like me and don’t have these generic files at the ready, go ahead and create some that you can reuse at this stage in the future.
Before you go any further, it’s a good idea to go ahead and add in your title, descriptions and meta tags, or at least make a note of what they should be if you are going to be using a content management system later on.
Lay Out the Main Sections and Content
Begin carving up your HTML/CSS by inserting the major sections (your mains) for your header, footer and content area.
Next, begin adding your text and image content. The goal is to keep your markup as semantic as possible so that each element is meaningful.
Avoid divitis — the act of utilizing too many divs. For example, you don’t need a div just to contain the logo. Try using an
or a
You’ll also need to do some browser testing to make sure the site looks and acts as intended and provides a uniform brand experience no matter how a user accesses it. You can use a tool like Browsershots if you have limited access to different types of computers.
Use Firebug and YSlow to debug your site and make sure your work is running at an optimal speed.
One last thing: don’t forget to implement Google Analytics or your favorite analytics alternative so you won’t miss out on tracking the stats during the big launch.
For instance, if you are redesigning a site that uses a content management system or publishing platform, your launch may be as simple as applying a new theme.
If you are designing a brand new site in a sandbox or local development environment, then "going live" means FTP’ing your files to the production server.
During the hand-off/closeout of the project, it might also help to provide some guidelines and basic training to your client to make sure they understand how to properly maintain the site.
Next, begin adding your text and image content. The goal is to keep your markup as semantic as possible so that each element is meaningful.
Avoid divitis — the act of utilizing too many divs. For example, you don’t need a div just to contain the logo. Try using an
or a display CSS property).
Validate and Test
Don’t forget to make sure your code validates by using the validation tool provided by the W3C (but also understand that validation tools have shortcomings).You’ll also need to do some browser testing to make sure the site looks and acts as intended and provides a uniform brand experience no matter how a user accesses it. You can use a tool like Browsershots if you have limited access to different types of computers.
Use Firebug and YSlow to debug your site and make sure your work is running at an optimal speed.
One last thing: don’t forget to implement Google Analytics or your favorite analytics alternative so you won’t miss out on tracking the stats during the big launch.
5. Launch
When you’ve finally perfected the site, it’s time to release it to the public. Launching can mean different things to different people, mostly because there are various content management systems and development circumstances out there.For instance, if you are redesigning a site that uses a content management system or publishing platform, your launch may be as simple as applying a new theme.
If you are designing a brand new site in a sandbox or local development environment, then "going live" means FTP’ing your files to the production server.
6. Maintain
During your planning phase, you should have determined who will be in charge of site maintenance. If a client is unable to maintain the site, you may want to suggest that they hire you on a regular or as-needed basis to manage and perform maintenance tasks.During the hand-off/closeout of the project, it might also help to provide some guidelines and basic training to your client to make sure they understand how to properly maintain the site.


